Now let's begin with Cucumber. As we are concentrating on Framework in this complete series, we expect you to be familiar with Cucumber. In case this is new, I suggest you to go through the Cucumber Tutorials before starting this.
Convert Selenium Test into Cucumber BDD Style test
In this chapter, we will use Cucumber BDD Framework to execute test. But to achieve that we need to Convert Selenium Test into Cucumber BDD Style test and Cucumber understands Gherkin language, read Feature files and execute code written in Step Definition files with the help of Cucumber Options specified in TestRunner.
To obtain this, we need to perform below-mentioned tasks:
- Add Cucumber Dependencies to the Project
- Write a test in a Feature File
- Create a Test Runner
- Write test code to Step file
- Execute test as JUnit test & Maven Command Line
Step 1 : Add Cucumber Dependencies to the Project
To execute test in Cucumber we need the following jars:
- cucumber-java
- cucumber-jvm-deps
- cucumber-junit
As we have a Maven Project, it is very easy for us to include the above dependencies into the project. Just open the POM.xml from project and start adding all the dependencies.
Cucumber JVM Java - cucumber-java : The dependency information for cucumber-java can be collected from online Maven Repositoory.
<dependency>
    <groupId>info.cukes</groupId>
    <artifactId>cucumber-java</artifactId>
    <version>1.2.5</version>
</dependency>
Cucumber JVM Repackaged Dependencies - cucumber-jvm-deps : The dependency information for cucumber-java can be collected from online Maven Repositoory.
<dependency>
    <groupId>info.cukes</groupId>
    <artifactId>cucumber-jvm-deps</artifactId>
    <version>1.0.5</version>
    <scope>provided</scope>
</dependency>
Cucumber JVM JUnit - cucumber-junit : The dependency information for cucumber-java can be collected from online Maven Repositoory.
<dependency>
    <groupId>info.cukes</groupId>
    <artifactId>cucumber-junit</artifactId>
    <version>1.2.5</version>
    <scope>test</scope>
</dependency>
Complete pom.xml will look like this:
<project xmlns="https://maven.apache.org/POM/4.0.0" xmlns:xsi="https://www.w3.org/2001/XMLSchema-instance"
  xsi:schemaLocation="https://maven.apache.org/POM/4.0.0 http://maven.apache.org/xsd/maven-4.0.0.xsd">
  <modelVersion>4.0.0</modelVersion>

  <groupId>ToolsQA</groupId>
  <artifactId>CucumberFramework</artifactId>
  <version>0.0.1-SNAPSHOT</version>
  <packaging>jar</packaging>

  <name>CucumberFramework</name>
  <url>http://maven.apache.org</url>

  <properties>
    <project.build.sourceEncoding>UTF-8</project.build.sourceEncoding>
  </properties>

  <dependencies>
	 <dependency>
	    <groupId>junit</groupId>
	    <artifactId>junit</artifactId>
	    <version>4.12</version>
	    <scope>test</scope>
	 </dependency>
     <dependency>
	    <groupId>org.seleniumhq.selenium</groupId>
	    <artifactId>selenium-java</artifactId>
	    <version>3.7.0</version>
	</dependency>
	<dependency>
	    <groupId>info.cukes</groupId>
	    <artifactId>cucumber-java</artifactId>
	    <version>1.2.5</version>
	</dependency>
	<dependency>
	    <groupId>info.cukes</groupId>
	    <artifactId>cucumber-jvm-deps</artifactId>
	    <version>1.0.5</version>
	    <scope>provided</scope>
	</dependency>
	<dependency>
	    <groupId>info.cukes</groupId>
	    <artifactId>cucumber-junit</artifactId>
	    <version>1.2.5</version>
	    <scope>test</scope>
	</dependency>
  </dependencies>

    <build>
	    <plugins>
		      <plugin>
		        <groupId>org.apache.maven.plugins</groupId>
		        <artifactId>maven-compiler-plugin</artifactId>
		        <version>3.7.0</version>
		        <configuration>
		          <source>1.8</source>
		          <target>1.8</target>
		           <encoding>UTF-8</encoding>
		        </configuration>
		      </plugin>
      	</plugins>
  	</build>

</project>
Note: Make sure to update the POM by right click on the project root and select Maven >> Update Project.
Step 2: Write a test in a Feature File
These tutorials are framework-specific, so we are ignoring the details of Cucumber components. To go through the detail of Cucumber Feature File, we suggest you to go through our tutorial Feature File.
In the previous chapter, we discussed the test scenario, which was given to us by the BA's. Let's try to break the same scenario in terms of BDD Gherkin Steps.
Test to Automate
Ritika visits ToolsQA Demo Website for the first time and SEARCH for Dress. She selects the first product and goes to product page. She successfully adds it to the bag. She continues to Cart Page from mini cart icon at the top right corner. Then she moves forward to Checkout page. She choose to be an ANONYMOUS USER (Not Registering) completes email and address details. She selects FREE delivery, and places the order using CHECK payment method with Billing & Delivery address as same.
Cucumber BDD Style Test
- Given user is on Home Page
- When he search for "dress"
- And choose to buy the first item
- And moves to checkout from mini cart
- And enter personal details on checkout page
- And select same delivery address
- And select payment method as "check" payment
- And place the order
Create Feature File
-
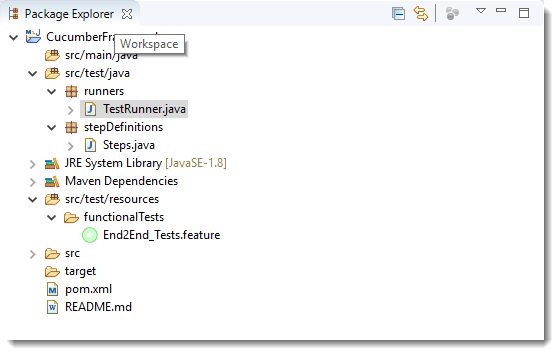
Create a New Package and name it as functionalTests, by right click on the src/test/resources and select New >> Package. Note: It is always recommended to put all the feature files in the resources folder.
-
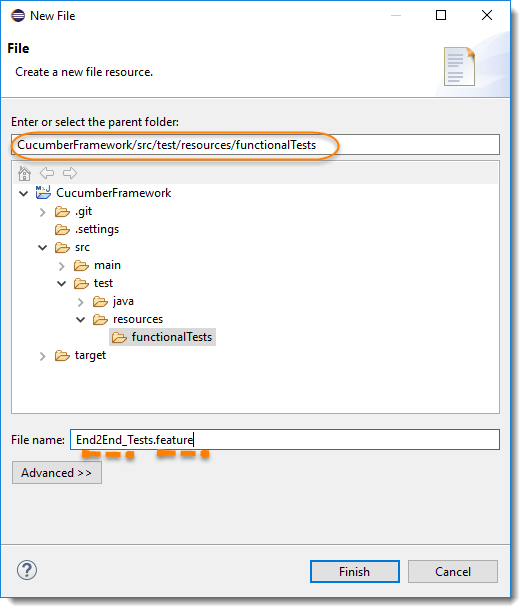
Create a Feature file and name it as End2End_Test.feature by right click on the above-created package and select New >> File.

Make sure to add .feature extension to the file.
- Add the test steps to the feature file.
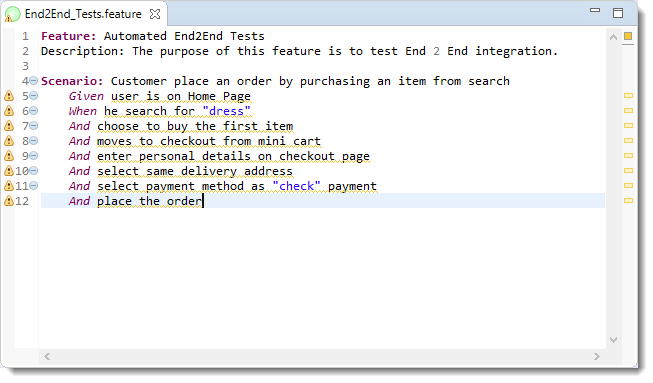
Note: Notices that all the keywords used in the test steps are in different colors. These are Gherkin keywords. By default Eclipse does not understand these but if you install the cucumber Eclipse plugin-in, this will be recognized. Please follow our tutorial to Install Cucumber Eclipse Plugin.
Step 3: Create a JUnit Test Runner
As mentioned above these tutorials are framework specific, so we are ignoring the details of Cucumber components. To go though the detail of Cucumber Test Runner, we suggest you to go through our tutorial JUnit Test Runner .
-
Create a New Package and name it as runners by right click on the src/test/java and select New >> Package.
-
Create a New Java Class file and name it as TestRunner by right click on the above created package and select New >> Class.
package runners;
import org.junit.runner.RunWith;
import cucumber.api.CucumberOptions;
import cucumber.api.junit.Cucumber;

@RunWith(Cucumber.class)
@CucumberOptions(
		features = "src/test/resources/functionalTests"
		)
public class TestRunner {
}
Note: Make sure not to click on the public static void main.
Step 4: Write test code to Step file
Again, I suggest you to go through our tutorial on Cucumber Step Definitions. first before moving ahead with this.
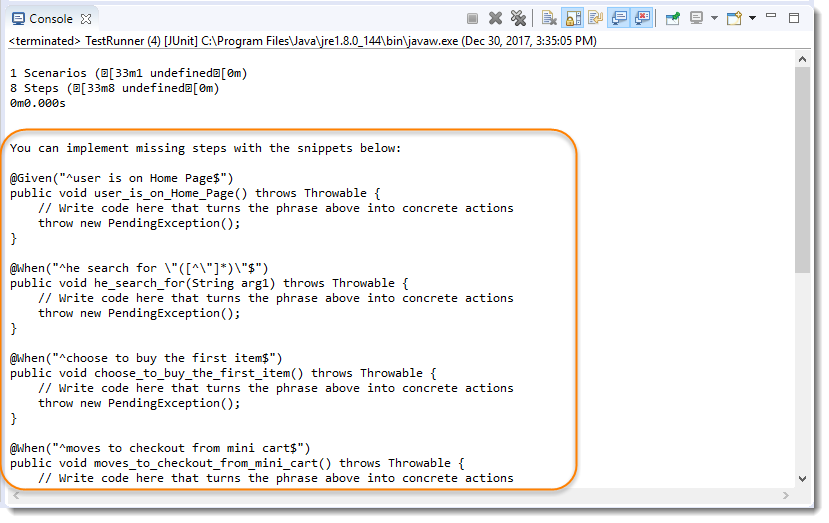
- To get the steps automatically generated, we need to execute TestRunner class. Right-click on the TestRunner file and select Run As >> JUnit Test. You would get the below result in the Eclipse Console.
-
Create a New Package and name it as stepDefinitions by right click on the src/test/java and select New >> Package.
-
Create a New Java Class and name it is as Steps by right click on the above created package and select New >> Class.
-
Now copy all the steps created by Eclipse to this Steps file and start filling up these steps with Selenium Code. Take all the code from our Selenium Test file created in the End2End_Test. Steps test file will look like this:
package stepDefinitions;

import java.util.List;
import java.util.concurrent.TimeUnit;
import org.openqa.selenium.By;
import org.openqa.selenium.WebDriver;
import org.openqa.selenium.WebElement;
import org.openqa.selenium.chrome.ChromeDriver;
import cucumber.api.java.en.Given;
import cucumber.api.java.en.When;

public class Steps {
	WebDriver driver;

	@Given("^user is on Home Page$")
	public void user_is_on_Home_Page(){
		System.setProperty("webdriver.chrome.driver","C:\\ToolsQA\\Libs\\Drivers\\chromedriver.exe");
		driver = new ChromeDriver();
		driver.manage().window().maximize();
		driver.manage().timeouts().implicitlyWait(10, TimeUnit.SECONDS);
		driver.get("https://www.shop.demoqa.com");
	}

	@When("^he search for \"([^\"]*)\"$")
	public void he_search_for(String arg1)  {
		driver.navigate().to("https://shop.demoqa.com/?s=" + arg1 + "&post_type=product");
	}

	@When("^choose to buy the first item$")
	public void choose_to_buy_the_first_item() {
		List<WebElement> items = driver.findElements(By.cssSelector(".noo-product-inner"));
		items.get(0).click();

		WebElement addToCart = driver.findElement(By.cssSelector("button.single_add_to_cart_button"));
		addToCart.click();
	}

	@When("^moves to checkout from mini cart$")
	public void moves_to_checkout_from_mini_cart(){
		WebElement cart = driver.findElement(By.cssSelector(".cart-button"));
		cart.click();

		WebElement continueToCheckout = driver.findElement(By.cssSelector(".checkout-button.alt"));
		continueToCheckout.click();
	}

	@When("^enter personal details on checkout page$")
	public void enter_personal_details_on_checkout_page() throws InterruptedException {
		Thread.sleep(5000);
		WebElement firstName = driver.findElement(By.cssSelector("#billing_first_name"));
		firstName.sendKeys("Lakshay");

		WebElement lastName = driver.findElement(By.cssSelector("#billing_last_name"));
		lastName.sendKeys("Sharma");

		WebElement emailAddress = driver.findElement(By.cssSelector("#billing_email"));
		emailAddress.sendKeys("[email protected]");

		WebElement phone = driver.findElement(By.cssSelector("#billing_phone"));
		phone.sendKeys("07438862327");

		WebElement countryDropDown = driver.findElement(By.cssSelector("#billing_country_field .select2-arrow"));
		countryDropDown.click();
		Thread.sleep(2000);

		List<WebElement> countryList = driver.findElements(By.cssSelector("#select2-drop ul li"));
		for(WebElement country : countryList){
			if(country.getText().equals("India")) {
				country.click();
				Thread.sleep(3000);
				break;
			}
		}

		WebElement city = driver.findElement(By.cssSelector("#billing_city"));
		city.sendKeys("Delhi");

		WebElement address = driver.findElement(By.cssSelector("#billing_address_1"));
		address.sendKeys("Shalimar Bagh");

		WebElement postcode = driver.findElement(By.cssSelector("#billing_postcode"));
		postcode.sendKeys("110088");

		WebElement countyDropDown = driver.findElement(By.cssSelector("#billing_state_field .select2-arrow"));
		countyDropDown.click();
		Thread.sleep(2000);

		List<WebElement> countyList = driver.findElements(By.cssSelector("#select2-drop ul li"));
		for(WebElement county : countyList){
			if(county.getText().equals("Delhi")) {
				county.click();
				Thread.sleep(3000);
				break;
			}
		}
	}

	@When("^select same delivery address$")
	public void select_same_delivery_address() throws InterruptedException{
		WebElement shipToDifferetAddress = driver.findElement(By.cssSelector("#ship-to-different-address-checkbox"));
		shipToDifferetAddress.click();
		Thread.sleep(3000);
	}

	@When("^select payment method as \"([^\"]*)\" payment$")
	public void select_payment_method_as_payment(String arg1){
		List<WebElement> paymentMethod = driver.findElements(By.cssSelector("ul.wc_payment_methods li"));
		paymentMethod.get(0).click();
	}

	@When("^place the order$")
	public void place_the_order() {
		WebElement acceptTC = driver.findElement(By.cssSelector("#terms.input-checkbox"));
		acceptTC.click();

		WebElement placeOrder = driver.findElement(By.cssSelector("#place_order"));
		placeOrder.submit();
	}

}
- We also need to make sure that the TestRunner file would also able to find the steps files. To achieve that we need to mention the path of the package, where we have kept all of our step definitions in CucumberOptions. To know more parameters of @CucumberOptions, please visit out tutorial Cucumber Options.
package runners;

import org.junit.runner.RunWith;

import cucumber.api.CucumberOptions;
import cucumber.api.junit.Cucumber;

@RunWith(Cucumber.class)
@CucumberOptions(
		features = "src/test/resources/functionalTests",
		glue= {"stepDefinitions"}
		)

public class TestRunner {

}
Note: By default Junit/Cucumber finds the test code in the src/test/java folder, this is why we just need to specify the package name for the cucumber glue.
Step 5 : Run the Cucumber Test
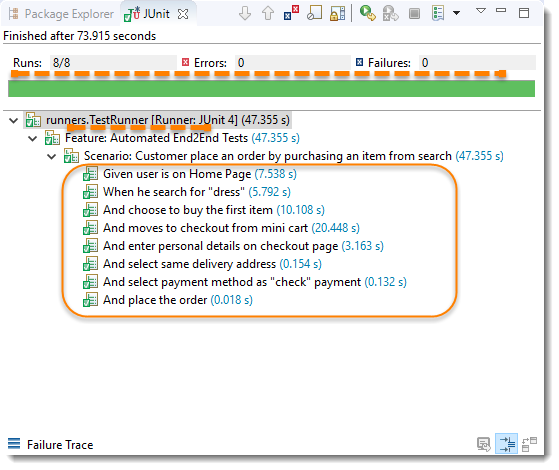
Run as JUnit
Now we are all set to run the first Cucumber test. Right Click on TestRunner class and Click Run As >> JUnit Test. Cucumber will run the script the same way it runs in Selenium WebDriver and the result will be shown in the left-hand side project explorer window in JUnit tab.
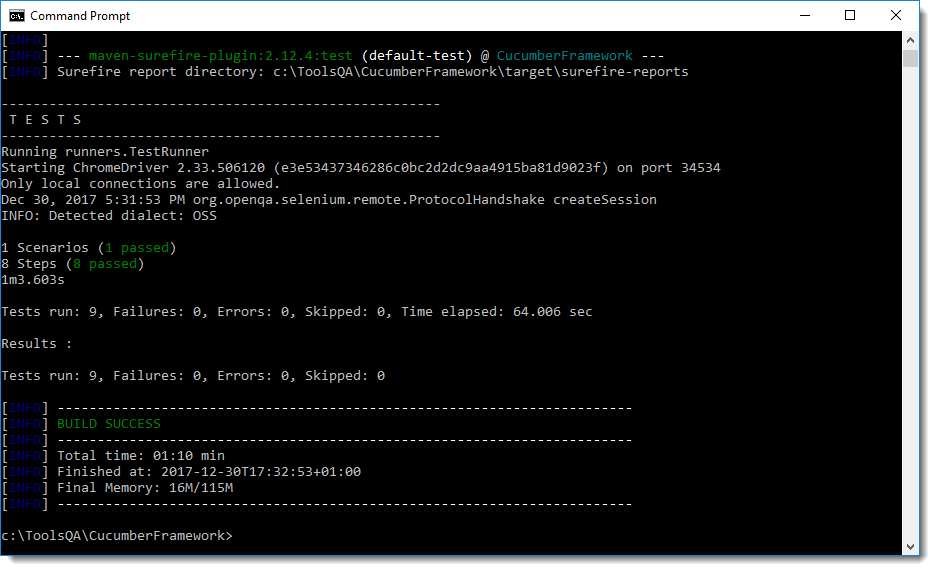
Run Cucumber Test from Command Prompt
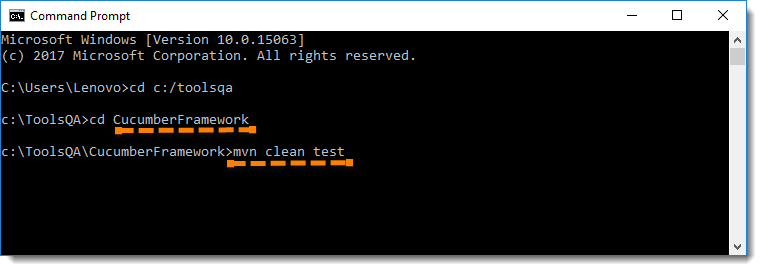
Since we are following Maven Type project, we have a liberty to run test from command prompt. A simple command to run tests is mvn clean test. But to use the same you have to be in the Cucumber project.
In the below screenshot first I went to my project location, which is in my case C:/ToolsQA/CucumberFramework and then I used the above-mentioned maven command to run test.
Maven Output
I hope you like the tutorial and able to run test. Now when we do not our earlier written Selenium Test, it is better to delete the same from the project. Right click on the seleniumTests package and select Delete. With that we also delete the E2E_Test.java as well. Still you can keep it in the project for your reference, but it is up to you.