In the last chapter of Cucumber Reports we got to know about the Plugins which are provided by Cucumber itself to generate various kind of reports like HTML, JSON, XML etc. Although those reports are enough to give you the overall execution results with detailed time logs and other things. But there are many third-party plugins also available in the market, which helps you to produce awesome reports which has much more capability to produce test logs and better visual graphics.
Extend Report
One of such plugin is Extent Report by our dearest friend Anshoo Arora. This is one of the best reporting plugin I have ever came across. I used in my past projects and always felt proud to demonstrate it to my team. This report fits fine with any test framework you use. With Cucumber as well it works fine but it requires to have some hecks to produce reports which even provide you details around the test steps as well. It would have been easy if, Cucumber would also have annotations like @beforeScenario & @beforeFeature. These annotations are available in SpecFLow which is Cucumber in C#.
But there is another alternative called Cucumber Extent Reporter.
Cucumber Extent Report
This is again an awesome plugin that is built on Extent Report specially for Cucumber by Vimal Selvam. This one is actually made to ease the implementation of Extent Report in Cucumber Framework. Let's start by implementing the same in our Selenium Cucumber Framework.
Step 1: Add Cucumber Extent Reporter library to Maven Project
This is really simple, as we have been using Maven Project, all we need to do is to add the dependencies in to the project POM file. Dependencies information can be taken from Maven Repository – Cucumber Extent Reporter.
<dependency>
	<groupId>com.vimalselvam</groupId>
	<artifactId>cucumber-extentsreport</artifactId>
	<version>3.0.2</version>
</dependency>
Note: If you are using Java 8+, in that case, it is required to add the dependency of ExtentReport v3.0.6+ as well.
Add Extent Report library
Dependencies information can be taken from Maven Repository – Extent Report.
<dependency>
	<groupId>com.aventstack</groupId>
	<artifactId>extentreports</artifactId>
	<version>3.1.2</version>
</dependency>
Note: Make sure to add these dependencies under <dependencies>
Add here</dependencies> tag. Also after adding dependencies, always do Maven >> Update Project by Right Click on Project.
Step 2 - Add Extent Config to the Project
Extent Config is required by the Cucumber Extent Report plugin to read the report configuration. As it gives the capability to set many useful settings to the report from the XML configuration file.
- Create a New File and name it as extent-config.xml by right click on the configs folder in the project. In this config file you can set many elements like :
- Report Theme :
<theme>: standard or dark - Document Encoding :
<encoding>: UFT-8 - Title of the Report :
<documentTitle>: This will display on the Browser Tab - Name of the Report:
<reportName>: This will display at the top of the Report - Global Date Format :
<dateFormat>: Like this yyyy-MM-dd - Global Time Format :
<timeFormat>: Like this HH:mm:ss
extent-config.xml
<?xml version="1.0" encoding="UTF-8"?>
<extentreports>
  <configuration>
    <!-- report theme --> <!-- standard, dark -->
    <theme>standard</theme>

    <!-- document encoding -->  <!-- defaults to UTF-8 -->
    <encoding>UTF-8</encoding>

    <!-- protocol for script and stylesheets -->   <!-- defaults to https -->
    <protocol>https</protocol>

    <!-- title of the document -->
    <documentTitle>ToolsQA - Cucumber Framework</documentTitle>

    <!-- report name - displayed at top-nav -->
    <reportName>ToolsQA - Cucumber Report</reportName>

    <!-- global date format override -->  <!-- defaults to yyyy-MM-dd -->
    <dateFormat>yyyy-MM-dd</dateFormat>

    <!-- global time format override -->   <!-- defaults to HH:mm:ss -->
    <timeFormat>HH:mm:ss</timeFormat>

    <!-- custom javascript -->
    <scripts>
      <![CDATA[
        $(document).ready(function() {

        });
      ]]>
    </scripts>

    <!-- custom styles -->
    <styles>
      <![CDATA[

      ]]>
    </styles>
  </configuration>
</extentreports>
Step 3: Read the extent-config.xml path
- Make an entry for the Path of the config in the Configuration.properties file.
reportConfigPath=C:/ToolsQA/CucumberFramework/configs/extent-config.xml
Note: Make sure to edit the path as per your machine path.
- Write a method getReportConfigPath() in the ConfigFileReader class to return the extent report config file path.
public String getReportConfigPath(){
	String reportConfigPath = properties.getProperty("reportConfigPath");
	if(reportConfigPath!= null) return reportConfigPath;
	else throw new RuntimeException("Report Config Path not specified in the Configuration.properties file for the Key:reportConfigPath");
}
Step 4: Modify TestRunner to Implement Cucumber Extent Reporter
- Modify the runner class and add the com.cucumber.listener.ExtentCucumberFormatter:output/report.html as a plugin followed by the report file as input. This should be done within the @CucumberOptions annotation.
@CucumberOptions( plugin = { "com.cucumber.listener.ExtentCucumberFormatter:target/cucumber-reports/report.html"})
The above setup will generate the report in the output directory with the name of the report.html.
- Write Extent Reports
Add a method writeExtentReport() in the TestRunner class to write the report.
@AfterClass
	public static void writeExtentReport() {
		Reporter.loadXMLConfig(new File(FileReaderManager.getInstance().getConfigReader().getReportConfigPath()));
	}
This will load the extent configurations from extent-config XML and write the report in the desired path.
TestRunner,java
package runners;

import java.io.*;
import org.junit.AfterClass;
import org.junit.runner.RunWith;
import com.cucumber.listener.Reporter;
import cucumber.api.CucumberOptions;
import cucumber.api.junit.Cucumber;
import managers.FileReaderManager;

@RunWith(Cucumber.class)
@CucumberOptions(
	features = "src/test/resources/functionalTests",
	glue= {"stepDefinitions"},
	plugin = { "com.cucumber.listener.ExtentCucumberFormatter:target/cucumber-reports/report.html"},
	monochrome = true
	)


public class TestRunner {
	@AfterClass
	public static void writeExtentReport() {
		Reporter.loadXMLConfig(new File(FileReaderManager.getInstance().getConfigReader().getReportConfigPath()));
	}
}
Run as JUnit
Now we are all set to run the Cucumber test. Right Click on TestRunner class and Click Run As >> JUnit Test. Cucumber will run the script the same way it runs in Selenium WebDriver and the result will be shown in the left hand side project explorer window in JUnit tab.
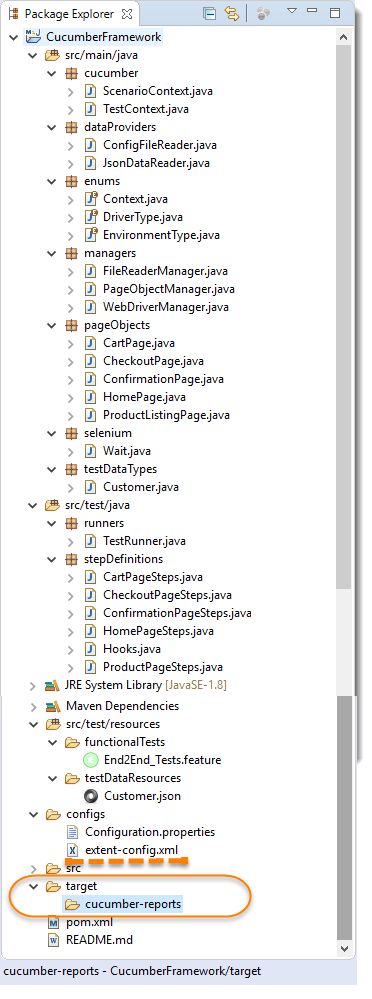
You may find the report at C:\ToolsQA\CucumberFramework\target\cucumber-reports folder

Cucumber Extent Reporter Features
As I mentioned above, this report provides nice features to make report impressive. Let's go one by one.
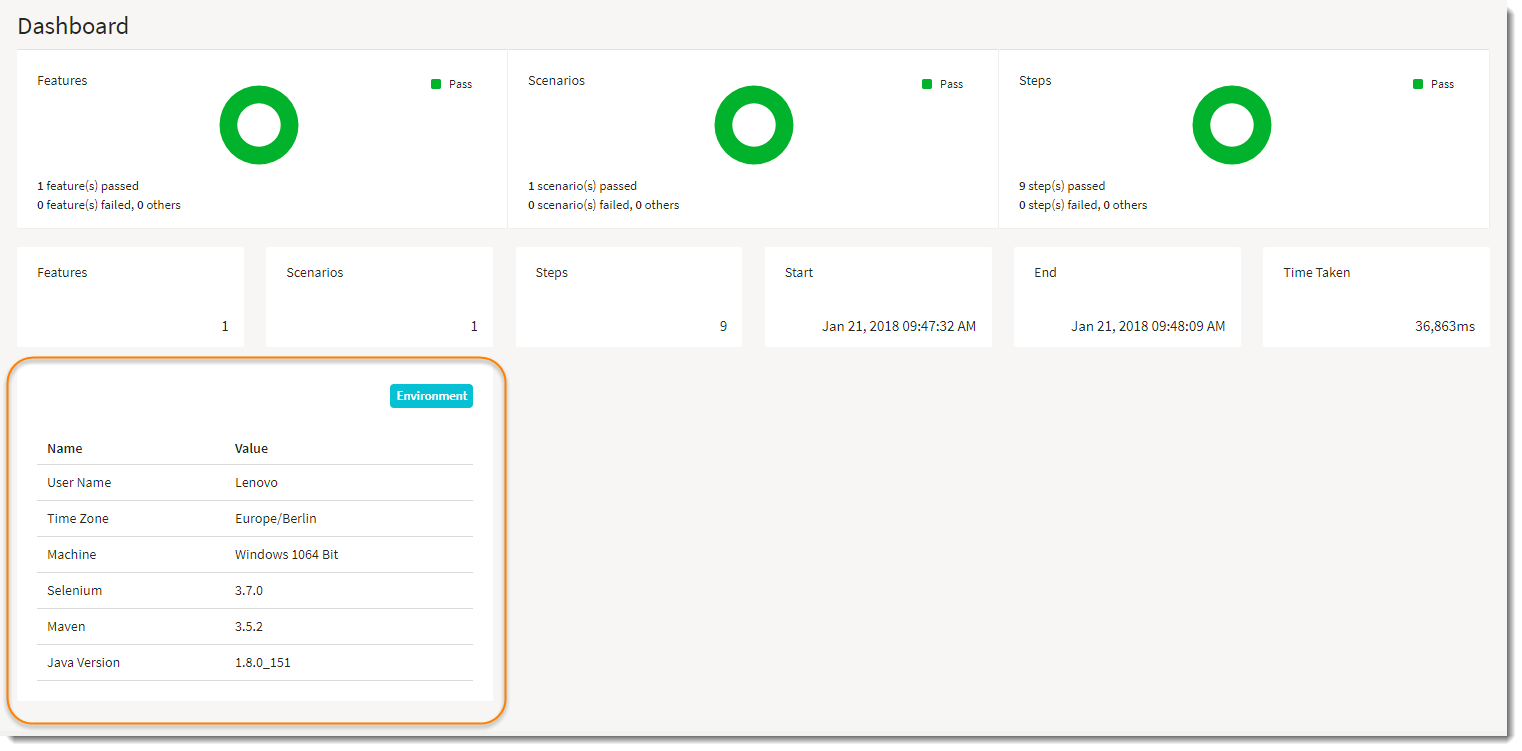
Set System Information in Report
This gives you nice feature to set multiple System properties to the report, so that you know under which system configurations your test suite was executed and when. To set this just make use of Reporter class and access its static method setSystemInfo() and pass it your information like below.
	@AfterClass
	public static void writeExtentReport() {
		Reporter.loadXMLConfig(new File(FileReaderManager.getInstance().getConfigReader().getReportConfigPath()));
	    Reporter.setSystemInfo("User Name", System.getProperty("user.name"));
	    Reporter.setSystemInfo("Time Zone", System.getProperty("user.timezone"));
	    Reporter.setSystemInfo("Machine", 	"Windows 10" + "64 Bit");
	    Reporter.setSystemInfo("Selenium", "3.7.0");
	    Reporter.setSystemInfo("Maven", "3.5.2");
	    Reporter.setSystemInfo("Java Version", "1.8.0_151");
	}
Output
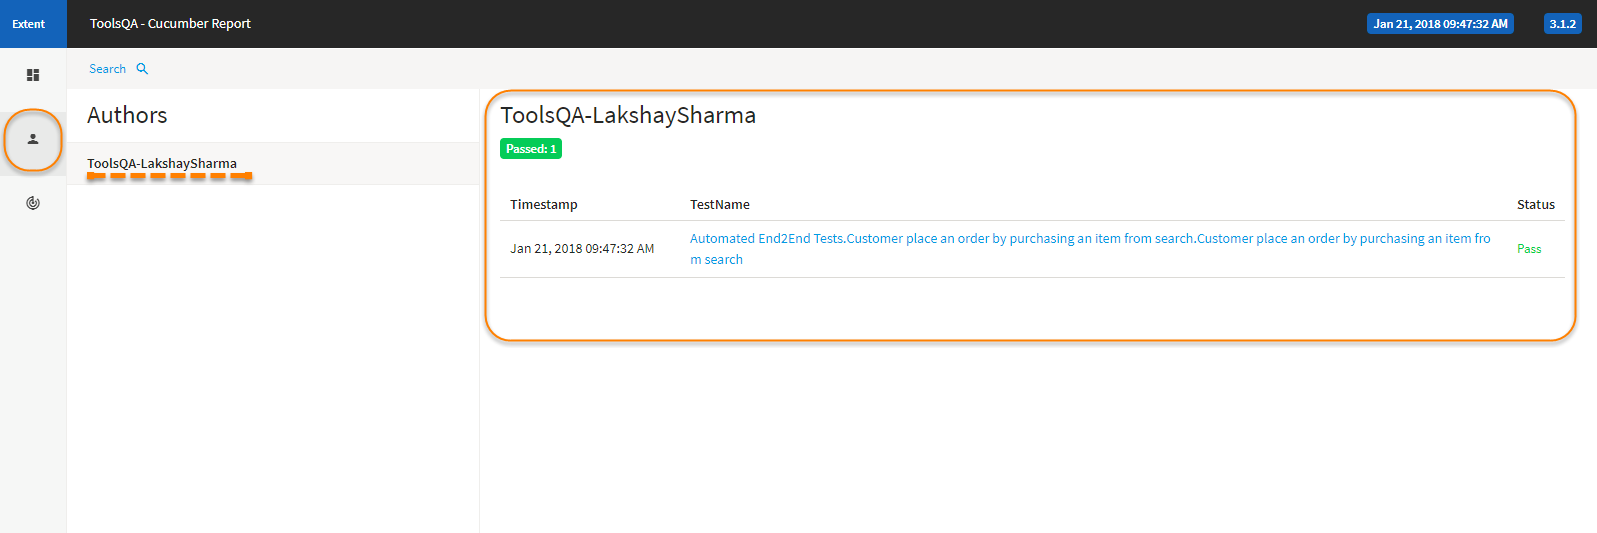
Assign the Author to Test Scenarios
This gives you capability to assign Author of the tests. If the tests are written by different people, you can tag these tests accordingly. To set this just make use of Reporter class and access its static method assignAuthor() and pass it your information like below.
Reporter.assignAuthor("ToolsQA - Lakshay Sharma");
But as it has to be done before the Scenario actually starts executing, Add a new method in Hooks class using cucumber.api.java.Before like below:
@Before
public void beforeScenario(Scenario scenario) {
	Reporter.assignAuthor("ToolsQA - Lakshay Sharma");
}
Or if you know what all scenarios are written by whom, you can create a logic around like this:
@Before
public void beforeScenario(Scenario scenario) {
	if (scenario.getName().equals("Some scenario name")) {
		Reporter.assignAuthor("ToolsQA - Lakshay Sharma");
}
Or specify multiple Authors at once.
Reporter.assignAuthor("author1", "author2", ...);
Complete Hook class will look like below now:
Hooks.java
package stepDefinitions;
import com.cucumber.listener.Reporter;
import cucumber.TestContext;
import cucumber.api.Scenario;
import cucumber.api.java.After;
import cucumber.api.java.Before;
public class Hooks {
	TestContext testContext;
	public Hooks(TestContext context) {
		testContext = context;
	}

	@Before
	public void beforeScenario(Scenario scenario) {
	    Reporter.assignAuthor("ToolsQA - Lakshay Sharma");
	}

	@After
	public void AfterSteps() {
		testContext.getWebDriverManager().quitDriver();
	}
}
Output
Add Logging to your Reports
User can add logs at any step and those logs will be captured and attached to the corresponding step. The log should be added as follows:
Reporter.addStepLog("Step Log message goes here");
In case any log to be added at the scenario level, the following can be done:
Reporter.addScenarioLog("Scenario Log message goes here");
It's a static class, so feel free to use this Reporter class to anywhere in the project.
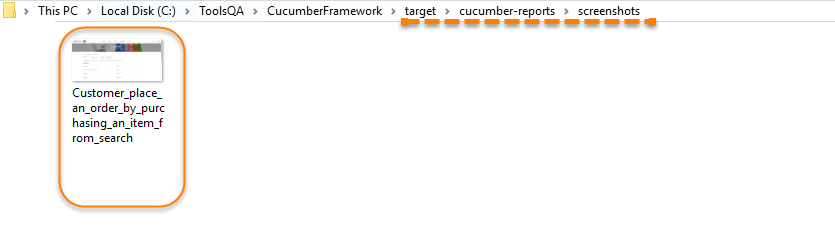
Add Screenshot for Failed Scenario
This feature is my favorite as it gives you the capability to embedded the screenshot in the report itself using Reporter class: Reporter.addScreenCaptureFromPath(screenshotPath)
Below you will find the complete code to capture a screenshot and attach the same to the report, only if the scenario is Fail. In case of Pass, no screenshot would be taken.
Hooks.java
package stepDefinitions;

import java.io.File;
import java.io.IOException;
import org.openqa.selenium.OutputType;
import org.openqa.selenium.TakesScreenshot;
import com.cucumber.listener.Reporter;
import com.google.common.io.Files;
import cucumber.TestContext;
import cucumber.api.Scenario;
import cucumber.api.java.After;
import cucumber.api.java.Before;

public class Hooks {

	TestContext testContext;

	public Hooks(TestContext context) {
		testContext = context;
	}

	@Before
	public void beforeScenario(Scenario scenario) {
	    Reporter.assignAuthor("ToolsQA - Lakshay Sharma");
	}

	@After(order = 1)
	public void afterScenario(Scenario scenario) {
		if (scenario.isFailed()) {
			String screenshotName = scenario.getName().replaceAll(" ", "_");
			try {
				//This takes a screenshot from the driver at save it to the specified location
				File sourcePath = ((TakesScreenshot) testContext.getWebDriverManager().getDriver()).getScreenshotAs(OutputType.FILE);

				//Building up the destination path for the screenshot to save
				//Also make sure to create a folder 'screenshots' with in the cucumber-report folder
				File destinationPath = new File(System.getProperty("user.dir") + "/target/cucumber-reports/screenshots/" + screenshotName + ".png");

				//Copy taken screenshot from source location to destination location
				Files.copy(sourcePath, destinationPath);

				//This attach the specified screenshot to the test
				Reporter.addScreenCaptureFromPath(destinationPath.toString());
			} catch (IOException e) {
			}
		}
	}


	@After(order = 0)
	public void AfterSteps() {
		testContext.getWebDriverManager().quitDriver();
	}

}
Note: @After(Order = 1) will run before the @After(Order = 0), as screenshot needs the driver object. So driver should be closed after taking screenshot. For better understanding on Hooks, please visit Cucumber Tags, Cucumber Hooks, Tagged Hooks, Execution Order of Hooks & Background Keyword.
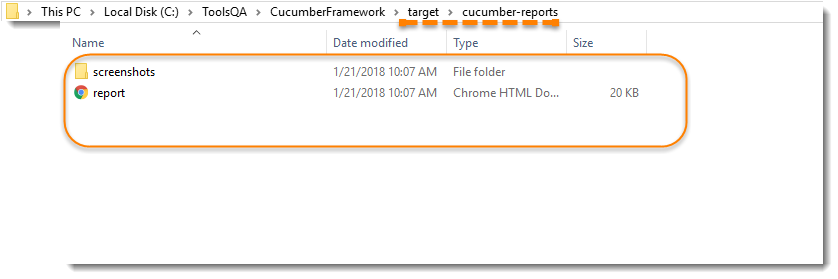
Note: Also make sure to create a folder 'screenshots' with in the cucumber-report folder before running the test.
Now to explicitly fail your scenario, just make a small change to the Assert statement in the method verify_the_order_details() of class ConfirmationPageSteps{}
Assert.assertTrue(confirmationPage.getProductNames().stream().filter(x -> x.contains(productName)).findFirst().get().length()== 0);
or you can also add message to Asserts, that will display in case of failure only:
Assert.assertTrue(productName + " : is not found on " + confirmationPage.getProductNames().toString(), confirmationPage.getProductNames().stream().filter(x -> x.contains(productName)).findFirst().get().length()==0);
Run the Test
This will save the screenshot at below location:
Report will be saved at the below location:
Output
Output
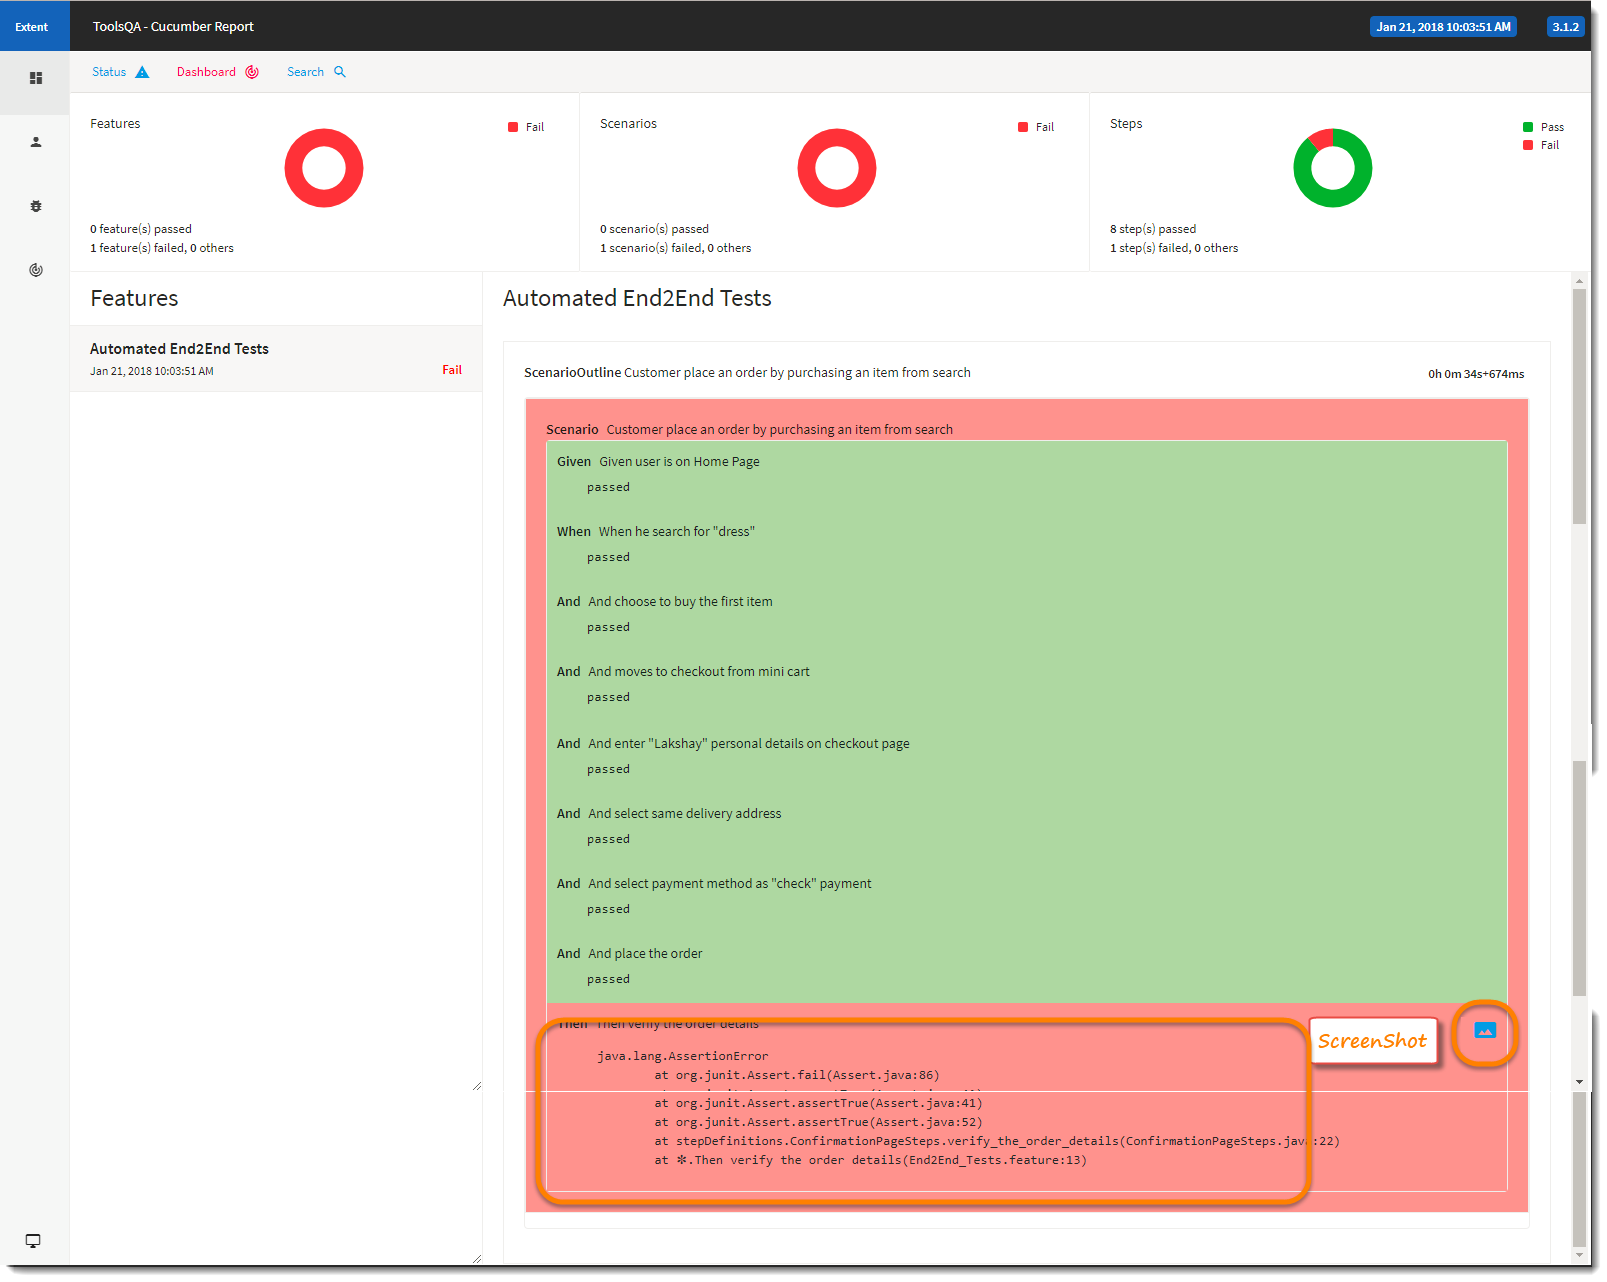
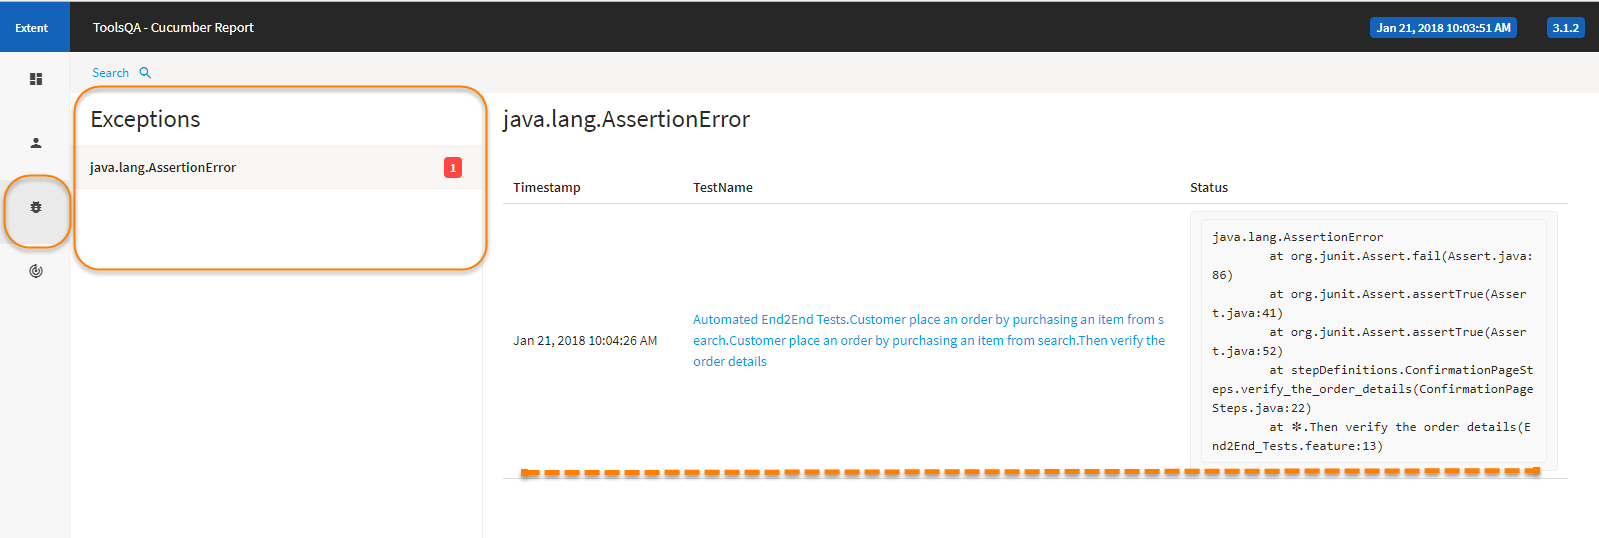
Note: You can see an small icon at the bottom the scenario, this is for Screenshot. Just click on it and it will open the screenshot with in the report itself.
Project Explorer
The current state of the Project Explorer.