I hope you have reached directly to this chapter of Data-Driven Testing using Json with Cucumber in the series of Selenium Cucumber Framework. I would suggest you to go through the whole series first, as we have done a lot of code already in the previous chapters. You would be able to use the code of this chapter only when you have the code ready for previous chapters as well.
What is Data-Driven Testing?
The simplest explanation of data-driven testing is this: data that is external to your functional tests is loaded and used to extend your automated test cases. One of the best examples is that of a customer order form. To use data-driven testing in this scenario, you might record a single automated test, entering values into the various fields. After you have recorded the automated test, it only contains values that you entered during the recording. Most likely, data you have specified does not cause errors in the application, but other data may cause them. To be sure that the application works as expected you can alter the test to accept variables, entering those variables into the data fields. Thus, data-driven testing allows you to run this test each time you want to add an order record, passing in a new set of data each time.
How Data-Driven Testing can be done with Cucumber?
In the past few tutorials of Cucumber Series we have gone through different ways of doing Data-Driven Testing with Cucumber:
- Parameterization in Cucumber
- Data-Driven Testing Using Examples Keyword
- Data Tables in Cucumber
- Maps in Data Tables
Out of the above, we will use the Data-Driven Technique using Example Keywords in our below example. And we will be using JSON to provide Data to our test.
What is JSON?
JSON is short for JavaScript Object Notation, and is a way to store information in an organized, easy-to-access manner. In a nutshell, it gives us a human-readable collection of data that we can access in a really logical manner.
As a simple example, information about a person might be written in JSON as follows:
 {
	"age" : "24",
	"hometown" : "Missoula, MT",
	"gender" : "male"
};
Why JSON over Excel?
In most of our tutorials on Data-Driven Testing, we have used Excel - Apache POI. But there is other medium as well to store data into files such as csv, xml, json, text file, etc. Excel is good to manage data and to use but it comes with its own limitations. Like MS Office needs to be installed on the system where the tests are being executed. This is a big limitation on its own, as the test servers has never bound to have had such dependencies. If test is meant to run on Mac, then again there is a different problem.
Data Driven Testing using JSON with Cucumber
We have to do lot of amendments in our project in this chapter to implement Data Driven Technique using JSON files:
- Decide what data needs to pass through JSON files
- Create JSON Data set
- Write a Java POJO class to represent JSON data
- Pass JSON data file location to Properties file and Write a method to read the same
- Create a JSON Data Reader class
- Modify FileReaderManager to accommodate JSON Data Reader
- Modify Checkout Steps file to pass Test Data to Checkout Page Objects
- Modify Checkout Page object to use Test Data object
Step 1 : Selecting Test Data for JSON files
Our Feature file for now looks like this:
Scenario: Customer place an order by purchasing an item from search
	Given user is on Home Page
	When he search for "dress"
	And choose to buy the first item
	And moves to checkout from mini cart
	And enter personal details on checkout page
	And select same delivery address
	And select payment method as "check" payment
	And place the order
As we mentioned above, we will be using Cucumber Examples to pass test data in to the test. Although we can make this test completely data driven by passing the below things as test data :
- On 2nd step : Different Product type
- 3rd step : Item position
- 4th step : Move to Checkout from Product page
- 5th step : Customer Data
- 6th step : Place order with different Address
- 7th step : Make payment with Cash option
But for the sake of the simplicity, I choose to pass the Customer Details only to this test. Once you done that, you can extend the test data on every step of your test for more practice and cover more functionality.
If we pass Customer Details to feature file using Scenario Outline & Example, the below step would change
And enter personal details on checkout page
To
And enter "<customer>" personal details on checkout page
Examples:
|customer|
|Lakshay|
The new feature file would look like this now after passing test data
Feature: Automated End2End Tests
Description: The purpose of this feature is to test End 2 End integration.

Scenario Outline: Customer place an order by purchasing an item from search
	Given user is on Home Page
	When he search for "dress"
	And choose to buy the first item
	And moves to checkout from mini cart
	And enter "<customer>" personal details on checkout page
	And select same delivery address
	And select payment method as "check" payment
	And place the order
Examples:
	|customer|
	|Lakshay|
Note: Make sure to change Scenario to Scenario Outline to use test data from Examples.
Step 2 : Create JSON data set for Customer data
So far we just passed Customer name from feature file, but we need a complete customer details to pass to checkout page to complete the order. These details we will get from JSON file. We ask JSON file to give us the details of any particular Customer out of the all Customers Data. As we need multiple customer data we need to create JSON Data in Arrays.
Storing JSON Data in Arrays
A slightly more complicated example involves storing multiple people in one JSON. To do this, we enclose multiple objects in square brackets like [ ], which signifies an array. For instance, if I needed to include information about two people:
[{
    "name" : "Jason",
    "age" : "24",
    "gender" : "male"
},
{
    "name" : "Kyle",
    "age" : "21",
    "gender" : "male"
}];
Lets start creating customer data for us.
-
Create a New Package and name it as testDataResources, by right click on the src/test/resources and select New >> Package. As we know that we need to keep all out test resources in the src/test/resources folder, it is better to create a package with in that to have all the JSON file in it.
-
Create a New File and name it is as Customer.json by right click on the above created package and select New >> File.
Customer.json
[
	{
		"firstName": "Lakshay",
		"lastName": "Sharma",
		"age": 35,
		"emailAddress": "[email protected]",
		"address": {
			"streetAddress": "Shalimar Bagh",
			"city": "Delhi",
			"postCode": "110088",
			"state": "Delhi",
			"country": "India",
			"county": "Delhi"
		},
		"phoneNumber": {
			"home": "012345678",
			"mob": "0987654321"
		}
	},
	{
		"firstName": "Virender",
		"lastName": "Singh",
		"age": 35,
		"emailAddress": "[email protected]",
		"address": {
			"streetAddress": "Palam Vihar",
			"city": "Gurgaon",
			"postCode": "122345",
			"state": "Haryana",
			"country": "India",
			"county": "Delhi"
		},
		"phoneNumber": {
			"home": "012345678",
			"mob": "0987654321"
		}
	}
]
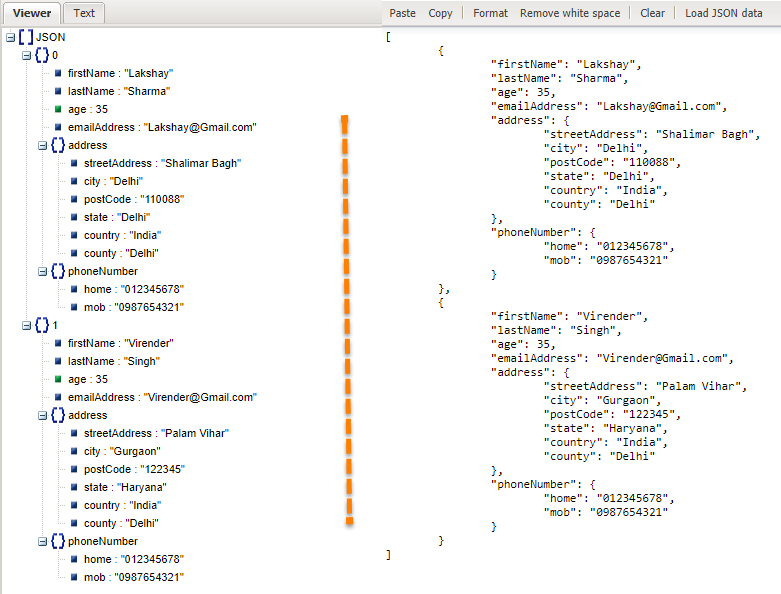
Note: If you are not families with JSON structure, I suggest you to please find any easy tutorial on the web and get used to of it. But above we just created information for the two customer as of now in JSON. Above JSON also has some nested elements such as Address and Phone Numbers for customer which has further entries.
Step 3 : Write a Java POJO class to represent JSON data
To use this JSON data in the test we need to first deserializes the JSON into an object of the specified class. And to have the JSON deserialized, a java class object must be created that has the same fields names with the fields in the JSON string.
There are few websites that provides a service for viewing the content of a JSON string in a tree like manner. http://jsonviewer.stack.hu.
And there are websites which actually helps you to create POJO java classes out of JSON like http://www.jsonschema2pojo.org/ .
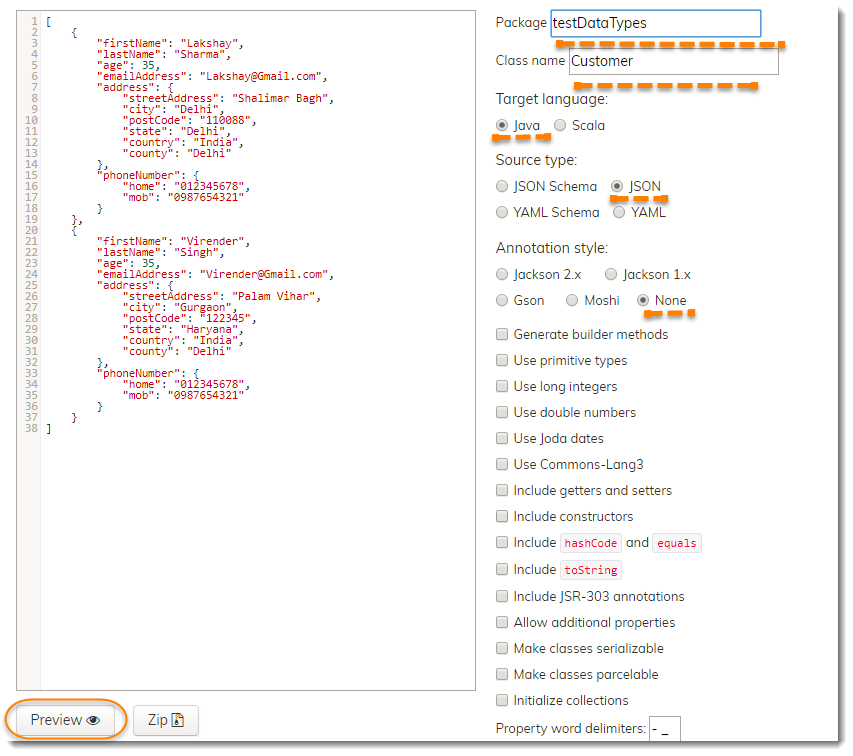
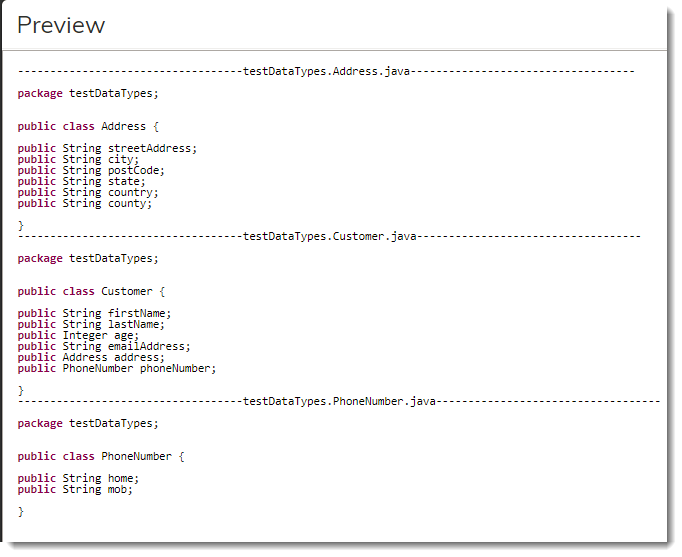
Make a good use of these websites to create JSON data or to create POJO's. Now lets just put the Customer class code in to the project.
-
Create a New Package and name it as testDataTypes, by right click on the src/test/java and select New >> Package. We will be keeping all the data types classes with in this package only.
-
Create a New Class and name it is as Customer by right click on the above created package and select New >> Class.
Customer.java
package testDataTypes;

public class Customer {
	  public String firstName;
	  public String lastName;
	  public int age;
	  public String emailAddress;
	  public Address address;
	  public PhoneNumber phoneNumber;

	  public class Address {
		  public String streetAddress;
		  public String city;
		  public String postCode;
		  public String state;
		  public String country;
		  public String county;
	  }

	  public class PhoneNumber {
		  public String home;
		  public String mob;
	  }
}
Note: We could have created three different classes for Customer, Address and Phone, as it was created by the website above, but there is no harm in putting these in the same class file as well.
Step 4: Prepare ConfigFileReader to read Json path location from Properties
- First just make an extra entry on the Configuration.properties file for the JSON file path
testDataResourcePath=src/test/resources/testDataResources/
with above complete Configuration file will become like this:
Configuration.properties
environment=local
browser=chrome
windowMaximize=true
driverPath=C:\\ToolsQA\\Libs\\Drivers\\chromedriver.exe
implicitlyWait=20
url=http://www.shop.demoqa.com
testDataResourcePath=src/test/resources/testDataResources/
- Now create a read method for the same in the Config File Reader class:
public String getTestDataResourcePath(){
	String testDataResourcePath = properties.getProperty("testDataResourcePath");
	if(testDataResourcePath!= null) return testDataResourcePath;
	else throw new RuntimeException("Test Data Resource Path not specified in the Configuration.properties file for the Key:testDataResourcePath");
}
Explanation: In the above code, we just get the value saved in the config file for key testDataResourcePath. We throw the exception in case of null value returned from getProperty() method or return the value if it is found not null.
Including above method, the complete Config Reader file will become like this:
ConfigFileReader.java
package dataProviders;

import java.io.BufferedReader;
import java.io.FileNotFoundException;
import java.io.FileReader;
import java.io.IOException;
import java.util.Properties;

import enums.DriverType;
import enums.EnvironmentType;

public class ConfigFileReader {
	private Properties properties;
	private final String propertyFilePath= "configs//Configuration.properties";

	public ConfigFileReader(){
		BufferedReader reader = null;
		try {
			reader = new BufferedReader(new FileReader(propertyFilePath));
			properties = new Properties();
			try { properties.load(reader); }
			catch (IOException e) { e.printStackTrace(); }
		} catch (FileNotFoundException e) {
			throw new RuntimeException("Properties file not found at path : " + propertyFilePath);
		}finally {
			try { if(reader != null) reader.close(); }
			catch (IOException ignore) {}
		}
	}

	public String getDriverPath(){
		String driverPath = properties.getProperty("driverPath");
		if(driverPath!= null) return driverPath;
		else throw new RuntimeException("Driver Path not specified in the Configuration.properties file for the Key:driverPath");
	}

	public long getImplicitlyWait() {
		String implicitlyWait = properties.getProperty("implicitlyWait");
		if(implicitlyWait != null) {
			try{
				return Long.parseLong(implicitlyWait);
			}catch(NumberFormatException e) {
				throw new RuntimeException("Not able to parse value : " + implicitlyWait + " in to Long");
			}
		}
		return 30;
	}

	public String getApplicationUrl() {
		String url = properties.getProperty("url");
		if(url != null) return url;
		else throw new RuntimeException("Application Url not specified in the Configuration.properties file for the Key:url");
	}

	public DriverType getBrowser() {
		String browserName = properties.getProperty("browser");
		if(browserName == null || browserName.equals("chrome")) return DriverType.CHROME;
		else if(browserName.equalsIgnoreCase("firefox")) return DriverType.FIREFOX;
		else if(browserName.equals("iexplorer")) return DriverType.INTERNETEXPLORER;
		else throw new RuntimeException("Browser Name Key value in Configuration.properties is not matched : " + browserName);
	}

	public EnvironmentType getEnvironment() {
		String environmentName = properties.getProperty("environment");
		if(environmentName == null || environmentName.equalsIgnoreCase("local")) return EnvironmentType.LOCAL;
		else if(environmentName.equals("remote")) return EnvironmentType.REMOTE;
		else throw new RuntimeException("Environment Type Key value in Configuration.properties is not matched : " + environmentName);
	}

	public Boolean getBrowserWindowSize() {
		String windowSize = properties.getProperty("windowMaximize");
		if(windowSize != null) return Boolean.valueOf(windowSize);
		return true;
	}

	public String getTestDataResourcePath(){
		String testDataResourcePath = properties.getProperty("testDataResourcePath");
		if(testDataResourcePath!= null) return testDataResourcePath;
		else throw new RuntimeException("Test Data Resource Path not specified in the Configuration.properties file for the Key:testDataResourcePath");
	}

}
Step 5 : Create a JSON Data Reader class
There are two important things, we should be careful about.
- As of now there is just one JSON data file for Customer, but later there can be many other files like Product, Payment etc.
- This class may have a method which can return a whole list of Customer data like getAllCustomers() and later you filter the data as per your requirement. Or you can make it bit restrict and expose different methods to access data like getCustomerByName or getCustomerFromIndia(). Decide what suits you best.
How to read JSON and what is GSON?
GSON is an open source code and it’s used a lot in working with JSON and Java. GSON uses Java Reflection to provide simple methods to convert JSON to java and vice versa. You can download GSON jar file from google code website or if you are using maven then all you need is to add it’s dependency.
But as of now you are not required to add it, as GSON is also used internally by Selenium. So we add it or not but we can access it's API's as we have selenium in our project. GSON API also supports out of the box JSON to Java Object conversion if the object field names are same as in JSON.
GSON is the main class that exposes the methods fromJson() and toJson() for conversion. For default implementation, we can create this object directly or we can use GsonBuilder class that provide useful options for conversion.
JsonDataReader.java
package dataProviders;
	import java.io.BufferedReader;
	import java.io.FileNotFoundException;
	import java.io.FileReader;
	import java.io.IOException;
	import java.util.Arrays;
	import java.util.List;
	import com.google.gson.Gson;
	import managers.FileReaderManager;
	import testDataTypes.Customer;

public class JsonDataReader {
	private final String customerFilePath = FileReaderManager.getInstance().getConfigReader().getTestDataResourcePath() + "Customer.json";
	private List<Customer> customerList;

	public JsonDataReader(){
		customerList = getCustomerData();
	}

	private List<Customer> getCustomerData() {
		Gson gson = new Gson();
		BufferedReader bufferReader = null;
		try {
			bufferReader = new BufferedReader(new FileReader(customerFilePath));
			Customer[] customers = gson.fromJson(bufferReader, Customer[].class);
			return Arrays.asList(customers);
		}catch(FileNotFoundException e) {
			throw new RuntimeException("Json file not found at path : " + customerFilePath);
		}finally {
			try { if(bufferReader != null) bufferReader.close();}
			catch (IOException ignore) {}
		}
	}

	public final Customer getCustomerByName(String customerName){
			 return customerList.stream().filter(x -> x.firstName.equalsIgnoreCase(customerName)).findAny().get();
	}


}
Explanation:
- getCustomerData() : This is a private method, which has the logic implemented to read the Customer Json and save it to the class instance variable. You should be creating more methods like this if you have more test data files like getPaymentOptions(), getProducts() etc.
- JsonDataReader(): Here the responsibility of the constructor is to call getCustomerData() method only.
- getCustomerByName() : This just filter the information and return the specific customer to the test. Same method can also be written as :
	public final Customer getCustomerByName(String customerName){
		for(Customer customer : customerList) {
			if(customer.firstName.equalsIgnoreCase(customerName)) return customer;
		}
		return null;
	}
Step 6 : Modify FileReaderManager to return JSsonDataReader object
As you know we have a FileReaderManager singleton class over all the readers, so we need to make an entry of JsonDataReader in that as well.
FileReaderManager.java
package managers;

import dataProviders.ConfigFileReader;
import dataProviders.JsonDataReader;

public class FileReaderManager {

	private static FileReaderManager fileReaderManager = new FileReaderManager();
	private static ConfigFileReader configFileReader;
	private static JsonDataReader jsonDataReader;

	private FileReaderManager() {
	}

	 public static FileReaderManager getInstance( ) {
	      return fileReaderManager;
	 }

	 public ConfigFileReader getConfigReader() {
		 return (configFileReader == null) ? new ConfigFileReader() : configFileReader;
	 }

	 public JsonDataReader getJsonReader(){
		 return (jsonDataReader == null) ? new JsonDataReader() : jsonDataReader;
	}
}
Step 7 : Modify CheckoutPage Steps file to pass Test Data to Checkout Page Objects
All the setup work is done, it is the time to move closer to the test. As we already have modified our feature file in the first step, now we need to make necessary changes to the step file as well.
@When("^enter \\\"(.*)\\\" personal details on checkout page$")
public void enter_personal_details_on_checkout_page(String customerName){
	Customer customer = FileReaderManager.getInstance().getJsonReader().getCustomerByName(customerName);
	checkoutPage.fill_PersonalDetails(customer);
}
Explanation : Fetching the Customer data from json reader using getCustomerByName() by passing the Customer Name. Supplying the same data to the Checkout page objects fill_PersonalDetails() method. The complete class would look like this:
CheckoutPageSteps.java
package stepDefinitions;

import cucumber.TestContext;
import cucumber.api.java.en.When;
import managers.FileReaderManager;
import pageObjects.CheckoutPage;
import testDataTypes.Customer;

public class CheckoutPageSteps {
	TestContext testContext;
	CheckoutPage checkoutPage;

	public CheckoutPageSteps(TestContext context) {
		testContext = context;
		checkoutPage = testContext.getPageObjectManager().getCheckoutPage();
	}

	@When("^enter \\\"(.*)\\\" personal details on checkout page$")
	public void enter_personal_details_on_checkout_page(String customerName){
		Customer customer = FileReaderManager.getInstance().getJsonReader().getCustomerByName(customerName);
		checkoutPage.fill_PersonalDetails(customer);
	}

	@When("^select same delivery address$")
	public void select_same_delivery_address(){
		checkoutPage.check_ShipToDifferentAddress(false);
	}

	@When("^select payment method as \"([^\"]*)\" payment$")
	public void select_payment_method_as_payment(String arg1){
		checkoutPage.select_PaymentMethod("CheckPayment");
	}

	@When("^place the order$")
	public void place_the_order() {
		checkoutPage.check_TermsAndCondition(true);
		checkoutPage.clickOn_PlaceOrder();
	}

}
Step 8 : Use Customer test data to fill information
Finally we come closer to the end, just use customer object to fill all the information and test prep work is complete.
public void fill_PersonalDetails(Customer customer) {
	enter_Name(customer.firstName);
	enter_LastName(customer.lastName);
	enter_Phone(customer.phoneNumber.mob);
	enter_Email(customer.emailAddress);
	enter_City(customer.address.city);
	enter_Address(customer.address.streetAddress);
	enter_PostCode(customer.address.postCode);
	select_Country(customer.address.country);
	select_County(customer.address.county);
}
Full file would be like this:
CheckoutPage.java
package pageObjects;


import java.util.List;
import org.openqa.selenium.WebDriver;
import org.openqa.selenium.WebElement;
import org.openqa.selenium.support.FindAll;
import org.openqa.selenium.support.FindBy;
import org.openqa.selenium.support.How;
import org.openqa.selenium.support.PageFactory;

import testDataTypes.Customer;

public class CheckoutPage {
	WebDriver driver;

	public CheckoutPage(WebDriver driver) {
		this.driver = driver;
	    PageFactory.initElements(driver, this);
	}

	@FindBy(how = How.CSS, using = "#billing_first_name")
	private WebElement txtbx_FirstName;

	@FindBy(how = How.CSS, using = "#billing_last_name")
	private WebElement txtbx_LastName;

	@FindBy(how = How.CSS, using = "#billing_email")
	private WebElement txtbx_Email;

	@FindBy(how = How.CSS, using = "#billing_phone")
	private WebElement txtbx_Phone;

	@FindBy(how = How.CSS, using = "#billing_country_field .select2-arrow")
	private WebElement drpdwn_CountryDropDownArrow;

	@FindBy(how = How.CSS, using = "#billing_state_field .select2-arrow")
	private WebElement drpdwn_CountyDropDownArrow;

	@FindAll(@FindBy(how = How.CSS, using = "#select2-drop ul li"))
	private List<WebElement> country_List;

	@FindBy(how = How.CSS, using = "#billing_city")
	private WebElement txtbx_City;

	@FindBy(how = How.CSS, using = "#billing_address_1")
	private WebElement txtbx_Address;

	@FindBy(how = How.CSS, using = "#billing_postcode")
	private WebElement txtbx_PostCode;

	@FindBy(how = How.CSS, using = "#ship-to-different-address-checkbox")
	private WebElement chkbx_ShipToDifferetAddress;

	@FindAll(@FindBy(how = How.CSS, using = "ul.wc_payment_methods li"))
	private List<WebElement> paymentMethod_List;

	@FindBy(how = How.CSS, using = "#terms.input-checkbox")
	private WebElement chkbx_AcceptTermsAndCondition;

	@FindBy(how = How.CSS, using = "#place_order")
	private WebElement btn_PlaceOrder;


	public void enter_Name(String name) {
		txtbx_FirstName.sendKeys(name);
	}

	public void enter_LastName(String lastName) {
		txtbx_LastName.sendKeys(lastName);
	}

	public void enter_Email(String email) {
		txtbx_Email.sendKeys(email);
	}

	public void enter_Phone(String phone) {
		txtbx_Phone.sendKeys(phone);
	}

	public void enter_City(String city) {
		txtbx_City.sendKeys(city);
	}

	public void enter_Address(String address) {
		txtbx_Address.sendKeys(address);
	}

	public void enter_PostCode(String postCode) {
		txtbx_PostCode.sendKeys(postCode);
	}

	public void check_ShipToDifferentAddress(boolean value) {
		if(!value) chkbx_ShipToDifferetAddress.click();
		try { Thread.sleep(5000);}
		catch (InterruptedException e) {}
	}

	public void select_Country(String countryName) {
		drpdwn_CountryDropDownArrow.click();
		try { Thread.sleep(2000);}
		catch (InterruptedException e) {}

		for(WebElement country : country_List){
			if(country.getText().equals(countryName)) {
				country.click();
				try { Thread.sleep(3000);}
				catch (InterruptedException e) {}
				break;
			}
		}
	}

	public void select_County(String countyName) {
		drpdwn_CountyDropDownArrow.click();
		try { Thread.sleep(2000);}
		catch (InterruptedException e) {}

		for(WebElement county : country_List){
			if(county.getText().equals(countyName)) {
				county.click();
				try { Thread.sleep(3000);}
				catch (InterruptedException e) {}
				break;
			}
		}
	}

	public void select_PaymentMethod(String paymentMethod) {
		if(paymentMethod.equals("CheckPayment")) {
			paymentMethod_List.get(0).click();
		}else if(paymentMethod.equals("Cash")) {
			paymentMethod_List.get(1).click();
		}else {
			new Exception("Payment Method not recognised : " + paymentMethod);
		}
		try { Thread.sleep(3000);}
		catch (InterruptedException e) {}

	}

	public void check_TermsAndCondition(boolean value) {
		if(value) chkbx_AcceptTermsAndCondition.click();
	}

	public void clickOn_PlaceOrder() {
		btn_PlaceOrder.submit();
	}


	public void fill_PersonalDetails(Customer customer) {
		enter_Name(customer.firstName);
		enter_LastName(customer.lastName);
		enter_Phone(customer.phoneNumber.mob);
		enter_Email(customer.emailAddress);
		enter_City(customer.address.city);
		enter_Address(customer.address.streetAddress);
		enter_PostCode(customer.address.postCode);
		select_Country(customer.address.country);
		select_County(customer.address.county);
	}

}
Run the Cucumber Test
Run as JUnit
Now we are all set to run the Cucumber test. Right Click on TestRunner class and Click Run As >> JUnit Test. Cucumber will run the script the same way it runs in Selenium WebDriver and the result will be shown in the left hand side project explorer window in JUnit tab.
You will notice that after executing all the steps, the execution will come in the hooks and it will execute quitDriver().
Project Explorer