Till now we have understood what SpecFlow is and what development model it follows. Now let's try to create first SpecFlow Selenium C# test. I assume that you have some basic understanding of Selenium WebDriver and its basic commands.
I hope you have been following the complete tutorial and I expect that by now you have completed the following steps, which are the prerequisite for writing SpecFlow Selenium test:
- Download and Install Visual Studio
- Set Up Selenium WebDriver with Visual Studio in C#
- Set Up SpecFlow
Let's first take a look at a simple Selenium Test script for LogIn functionality and then convert the same script into SpecFlow script to understand it better.
Selenium Test Script
Selenium Script for logging in to www.store.demoqa.com application.
- Launch the Browser
- Navigate to Home Page
- Click on the LogIn link
- Enter UserName and Password
- Click on Submit button
- LogOut from the application
- Close the Browser
using OpenQA.Selenium;
using OpenQA.Selenium.Firefox;

namespace ToolsQA
{
    class FirstTestCase
    {
        static void Main(string[] args)
        {
            IWebDriver driver = new FirefoxDriver();

            //Launch the Online Store Website
            driver.Url = "https://www.store.demoqa.com";

            // Find the element that's ID attribute is 'account'(My Account)
            driver.FindElement(By.XPath(".//*[@id='account']/a")).Click();

            // Find the element that's ID attribute is 'log' (Username)
            // Enter Username on the element found by above desc.
            driver.FindElement(By.Id("log")).SendKeys("testuser_1");

            // Find the element that's ID attribute is 'pwd' (Password)
            // Enter Password on the element found by the above desc.
            driver.FindElement(By.Id("pwd")).SendKeys("Test@123");

            // Now submit the form.
            driver.FindElement(By.Id("login")).Click();

            // Find the element that's ID attribute is 'account_logout' (Log Out)
            driver.FindElement(By.XPath(".//*[@id='account_logout']/a")).Click();

            // Close the driver
            driver.Quit();

        }
    }
}
Note : As I said before, a prerequisite for SpecFlow with Selenium is to have the Basic Understanding of Selenium in C#. If you are not familiar with the above script, please go through the small tutorial on Selenium with C#.
To convert the above Selenium Test into SpecFlow Test, it is required to create a Feature file and write automation test statements in it. Now the question comes in mind is What is Feature File?
What is SpecFlow Feature File?
A feature file is an entry point to the SpecFlow test. This is a file where you will describe your tests in Descriptive language (Like English). It is an essential part of SpecFlow, as it serves as an automation test script as well as live documents. A feature file can contain a scenario or can contain many scenarios in a single feature file but it usually contains a list of scenarios. Let's create one such file.
Before moving the head for writing the first script, let's create a nice folder structure of the project.
Create a Feature File Folder
It is always good to have a nice and clean folder structure in the project and each folder represents the content in it. So, first, create a folder for the feature file.
- Create a new Folder by right click on the 'Project' and navigating to Add -> New Folder.
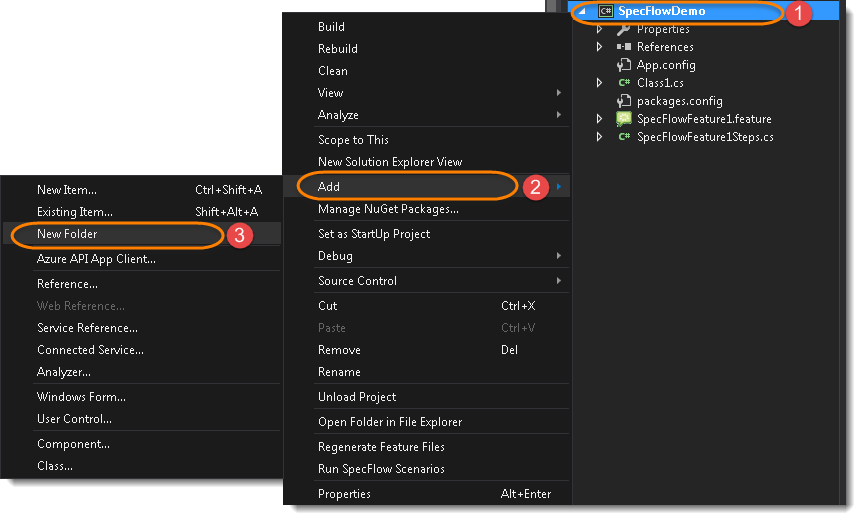
- Name the folder as ‘Features’ and hit enter.
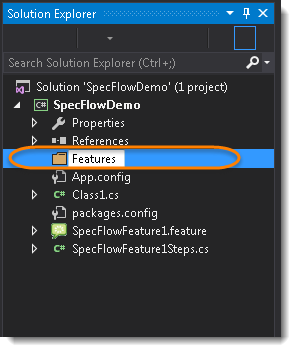
Once the folder for feature file is created, we are good to go to create a feature file.
Create a Feature File
-
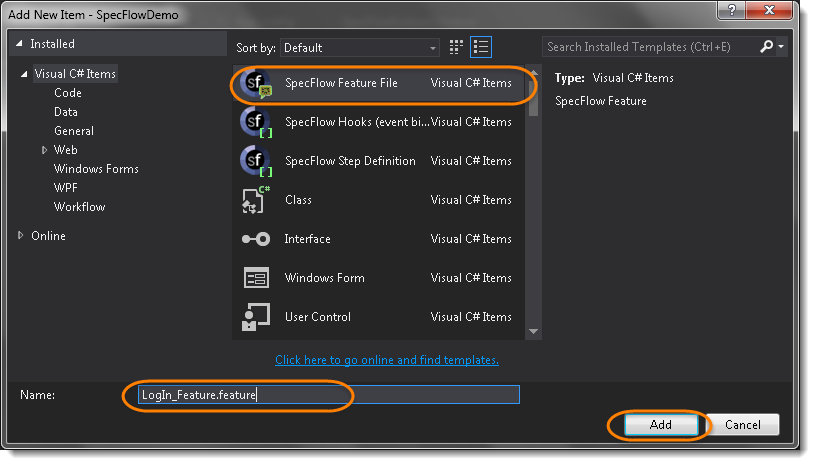
On the Feature folder Right-click and navigate to Add -> New Item...
-
Select SpecFlow Feature File in the middle and give it a logical name, for the sake of this tutorial, please use the same name 'LogIn_Feature' referred in the below screenshot.
Note: In order for SpecFlow to automatically detect the stories (or features, as they’re known in SpecFlow), you need to make sure that they carry the '.feature' file extension. For example, in this case, I’ve named my user story 'LogIn_Feature.feature'. Every '.feature' file conventionally consists of a single feature.
- Write first feature file for LogIn Scenario.
Feature File
Feature: LogIn_Feature
	In order to access my account
    As a user of the website
    I want to log into the website

@mytag
Scenario: Successful Login with Valid Credentials
	Given User is at the Home Page
	And Navigate to LogIn Page
	When User enter UserName and Password
	And Click on the LogIn button
	Then Successful LogIN message should display

Scenario: Successful LogOut
	When User LogOut from the Application
	Then Successful LogOut message should display
Note: Don’t worry about the syntax if it looks strange to you.. Ideally you should be able to understand the intent of the test just by reading a test in feature file. We will discuss this in more details in next chapter on Gherkin Keywords but still go through the small intro on Gherkin & Keywords below.
Gherkin
A language above is called Gherkin and it implements the principles of Business readable domain specific language(BRDSL). Domain specific language gives you the ability to describe your application behavior without getting into details of implementation. What does that mean? If we go back to our tutorial in TDD we saw that we wrote test code before writing any application code. In a way we described what is the expected behavior of our application in terms of tests. On TDD those tests were pure Java tests, in your case those might be a C++ or C# tests. But the basic idea is that those are core technical tests.
If we now come back to BDD/BRDSL we will see that we are able to describe tests in a more readable format. In the above test it's quite clear and evident, just by reading, what test would do. At the same time of being a test it also documents the behavior of application. This is the true power of BDD/BRDSL and it will become the power of cucumber eventually because cucumber works on the same principles.
Keywords
Now moving forward we have just defined a test. You will notice colored part of the tests (Feature, Scenario, Given, When, And and Then). These are keywords defined by Gherkin. Gherkin has more keywords and we will discuss those in the following tutorials. But to start off we can quickly explain some of the keywords in one line. Note this is not a complete listing of Keywords:
Feature: Defines what feature you will be testing in the tests below
Given: Tells the pre-condition of the test
And: Defines additional conditions of the test
When: Defines the action of the test
Then: States the post condition. You can say that it is expected result of the test
In this chapter, we are done with Feature file but still, we are not near to running the test using the feature file. I hope you understand that so far we have not provided any implementation to the steps in the feature file. Steps in the feature file are just the body of the Car, engine is yet to be created. In the next chapter of Gherkin Keywords, we will go through all the keywords available in SpecFlow to use in the feature file and then in the following chapter we will create a Step Definition file, which will hold the implementation of the features.
With this understanding let's move on the next topic where we will talk about Gherkin and the syntax it provided to write application tests/behavior.