Test-Driven Development
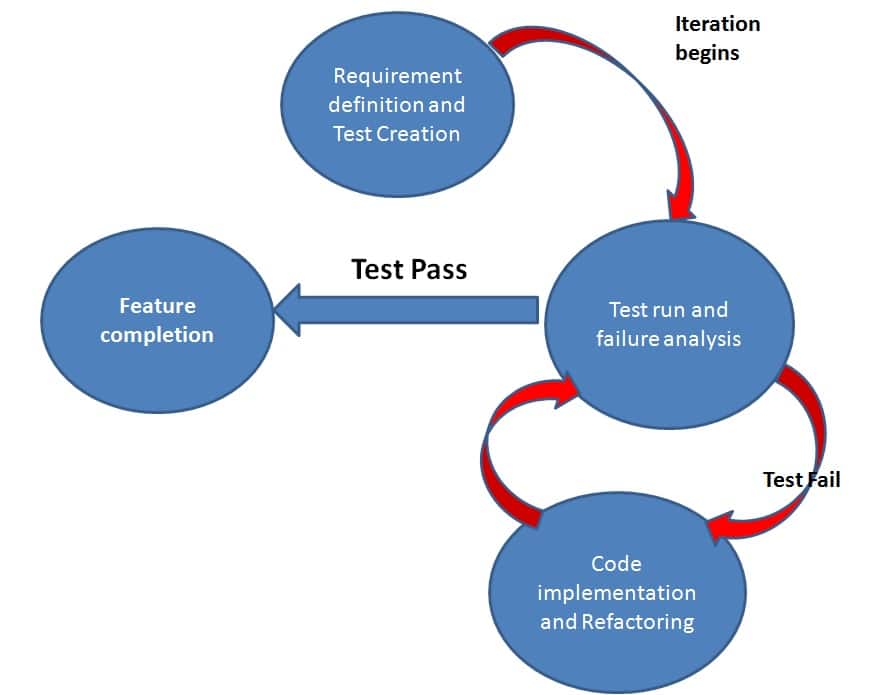
TDD is an iterative development process. Each iteration starts with a set of tests written for a new piece of functionality. These tests are supposed to fail during the start of iteration as there will be no application code corresponding to the tests. In the next phase of the iteration, Application code is written with an intention to pass all the tests written earlier in the iteration. Once the application code is ready tests are run.
Any failures in the test run are marked and more Application code is written/re-factored to make these tests pass. Once application code is added/re-factored the tests are run again. This cycle keeps on happening until all the tests pass. Once all the tests pass we can be sure that all the features for which tests were written have been developed.
Benefits of TDD
- Unit test proves that the code actually works
- Can drive the design of the program
- Refactoring allows improving the design of the code
- Low-Level regression test suite
- Test first reduce the cost of the bugs
Drawbacks of TDD
- Developer can consider it as a waste of time
- The test can be targeted on verification of classes and methods and not on what the code really should do
- Test become part of the maintenance overhead of a project
- Rewrite the test when requirements change
If we were to summarize this as phases in the development process we can write as
Phase 1 (Requirement Definition)
We will take a simple example of a calculator application and we will define the requirements based on the basic features of a calculator. For further simplicity, we will condense the calculator application to a simple java class named
public class Calculator{
}
In phase 1 application requirements are gathered and defined. Taking the example of a simple calculator we can say that in iteration 1 we would like to implement
1. The ability to add two numbers
2. The ability to subtract two numbers
3. The ability to multiply two numbers
At this time we will open Eclipse or any Java IDE of your choice and create a Java project called Calculator. In the project, we will create two folders (Src & Tests). Src will contain all the application code which is the code of calculator application and the Tests folder will contain all the tests. We will be using Junit tests here. If you are not familiar with Junit already. Take a look at our Junit tutorial.
So as said earlier TDD starts with defining requirements in terms of tests. Let's refine our first requirement in terms of tests
Requirement 1: Calculator should have the ability to add two numbers.
Test 1: Given two numbers of positive numbers (10 and 20) calculator should be able to add the two numbers and give us the correct result (30)
Test 2: Given two negative numbers (-10 and -20) calculator should be able to add the two numbers and give us the correct result (-30)
This list of tests will go on and also for each requirement. In phase 1 all we have to do is to write tests for all the requirements. At this point in time, in the Calculator application, we will just have a class called Calculator.
package source;

public class Calculator {

}
We will write all our tests against this class. Here is how our Test 1 will look like. We will put all our Adding tests in a class called AddingNumbersTests
package AppTests;

import org.junit.Assert;
import org.junit.Test;

import source.Calculator;

public class AddingNumbersTests {

	private Calculator myCalculator = new Calculator();

	@Test
	public void addTwoPositiveNumbers()
	{
		int expectedResult = 30;
		int ActuaResult = myCalculator.Add(10, 20);
		Assert.assertEquals("The the sum of two positive numbers is correct" , expectedResult, ActuaResult);
	}

	@Test
	public void addTwoNegativeNumbers()
	{
		int expectedResult = -30;
		int ActuaResult = myCalculator.Add(-10, -20);
		Assert.assertEquals("The the sum of two negative numbers is correct" , expectedResult, ActuaResult);
	}
}
Now the very first thing that will come to our mind is that the Calculator class doesn't have any methods and in our tests, we have used a method named Add() on calculator class. This will give us a compilation error. Well, that's the whole point of writing the tests first. This will force us to add only the code that's necessary. Ignoring the compilation error, let's just move on to the next step.
Phase 2: Executing Tests
In this phase, we will simply run our tests. Let's do it one by one
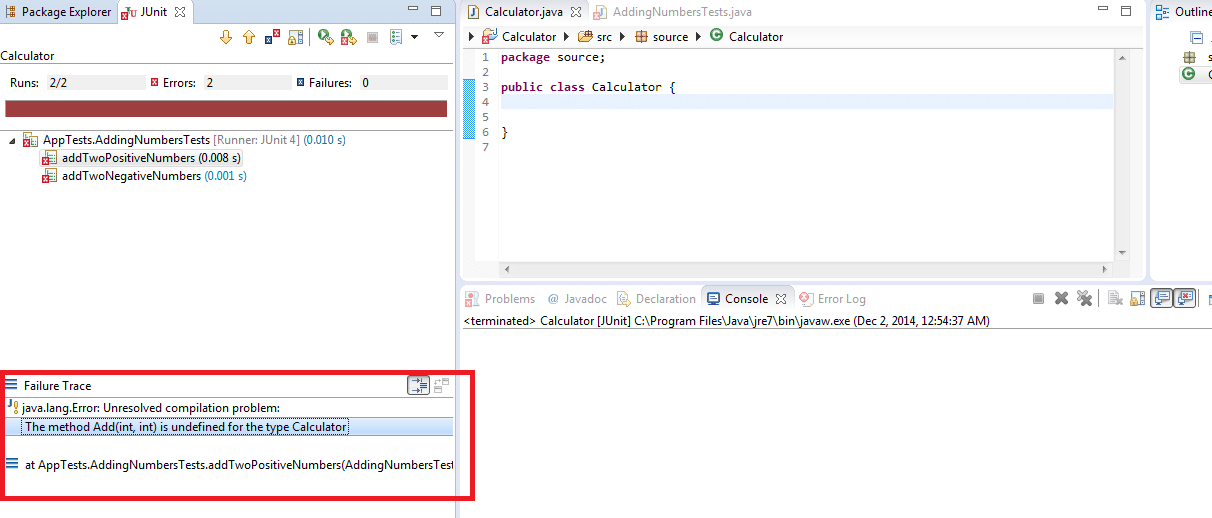
Attempt 1: When we run our tests for the first time we will get this error message
java.lang.Error: Unresolved compilation problem: The method Add(int, int) is undefined for the type Calculator
This error clearly states that Add method is not present in the Calculator class. In details, you can see in this screenshot
Phase 3: Adding/Refactoring code
After the test failure in the previous step, we will take a logical action and we will simply add a method called Add in our Calculator class and make it return 0 for the time being. Now our Calculator class will look something like this
package source;

public class Calculator {
	public int Add(int number1, int number2)
	{
		return 0;
	}
}
With this change, we will move to the next step that is rerun our tests. Which is nothing but Phase 2 mentioned earlier. Let's see what is the test result that we get this time.
Results from the two tests is
java.lang.AssertionError: The the sum of two positive numbers is incorrect expected:<30> but was:<0> at org.eclipse.jdt.internal.junit.runner.RemoteTestRunner.main(RemoteTestRunner.java:192)
And
java.lang.AssertionError: The the sum of two negative numbers is incorrect expected:<-30> but was:<0> at org.junit.Assert.fail(Assert.java:88)
Now with this test failure, we conclude that addition of two positive and negative numbers is not happening properly. Based on the test failure we will add just enough code that these two tests pass. As we do this we move to the next phase which is Phase 3. This phase is already describer earlier. I will just show you how the code of our Calculator will look like after this phase
package source;

public class Calculator {
	public int Add(int number1, int number2)
	{
		return (number1 + number2);
	}
}
Now we will run our tests Phase 2. The test results after this change will make all our tests pass. Once all the tests will pass we will conclude that our Iteration has been completed. Tests results:
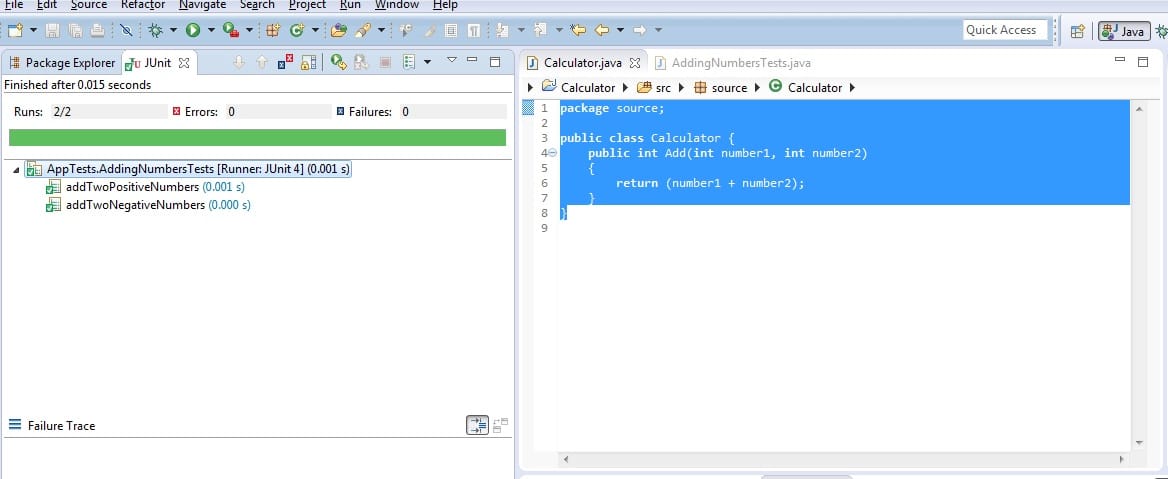
Once all the tests pass it signals the end of iteration. If there are more features that need to be implemented in your product, product will go through the same phases again but this time with new feature set and more tests.
Summarizing it in a figure can be done like this
Conclusion
Test-Driven Development flips the usual order of work: you describe the behaviour you want as a failing test first, then write only enough code to make it pass. Through the Calculator example we walked the full cycle — defining the requirement, writing AddingNumbersTests against an empty Calculator class, watching it fail to compile, adding a stub Add() method that returned 0, seeing the assertion failures, and finally returning number1 + number2 to turn everything green.
That loop of phases — define, execute, add or refactor, execute again — is the whole of TDD. Each failure told us exactly what to write next, and nothing more. The benefits we listed follow naturally from it: proof that the code works, a design shaped by real usage, a low-level regression suite, and bugs caught when they are cheapest. The drawbacks are worth respecting too, particularly the maintenance effort and the need to rewrite tests when requirements shift.
TDD, however, tests code at the level of classes and methods, not at the level of business behaviour. That gap is precisely what BDD sets out to close. In the next chapter, Behavior Driven Development, we build on this foundation before moving on to Gherkin and Cucumber.
With this understanding of TDD, we will move to BDD. This will form the basis of understanding Gherkin and eventually Cucumber.
Join me in the next tutorial to learn more.