Now we have a complete understanding of What is TDD, What is BDD and Why & When these are used. We are heading towards the SpecFlow tutorial. In the last chapter we followed the Steps to Install Visual Studio and in this chapter we will learn How to Configure or SetUp SpecFlow.
Steps to Configure or Set Up SpecFlow
SpecFlow tests are defined as “features” that have multiple scenarios. There is a small amount of project setup that needs to be done, but it’s not too bad and you can be up and running in just a few minutes.
- Create a New Project
- Install SpecFlow Visual Studio integration
- Add SpecFlow to the Project Reference
- Add NUnit Test Adapter to the Project Reference
- Add NUnit Framework to the Project Reference
Step 1 : Create a New Project
You might expect a SpecFlow template to appear somewhere in the project list. Sorry, that’s not what you get. You could create one yourself if you really wanted. To create a SpecFlow project, all you really need to do is to create a Class Library project.
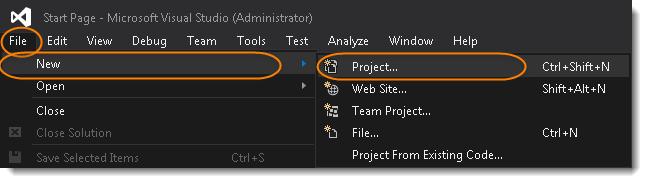
1) Assuming that Visual studio is opened on the machine, Go to File -> New -> Project to create a new Demo Project for the practice.
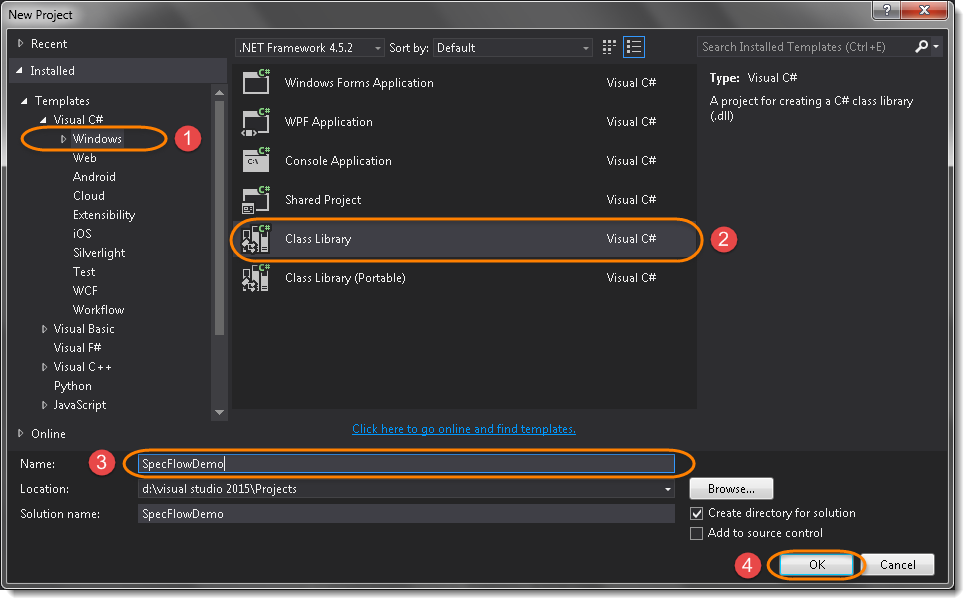
- Select Windows from the left tab, it will display all the windows application project types. Choose Class Library in the center window and name the project accordingly. To keep it simple, please follow the same name give below 'SpecFlowDemo'. Once done, click on the OK button.
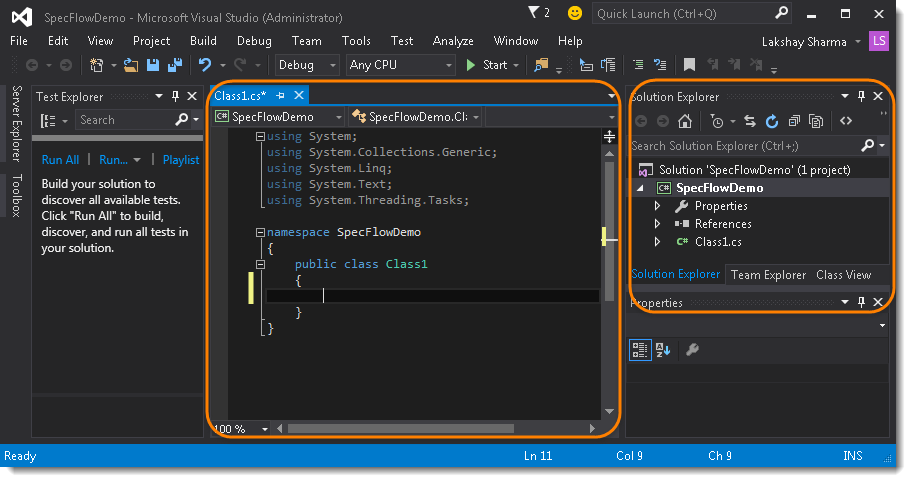
- A new project will be created with a dummy class 'Class1.cs'. The project will look like the below image. All the project files such as Property Files, References and Class Files & Folders display under the Solution Explorer at the right side.
Step 2 : Install SpecFlow Visual Studio Integration, NUnit Adapter & NUnit Framework
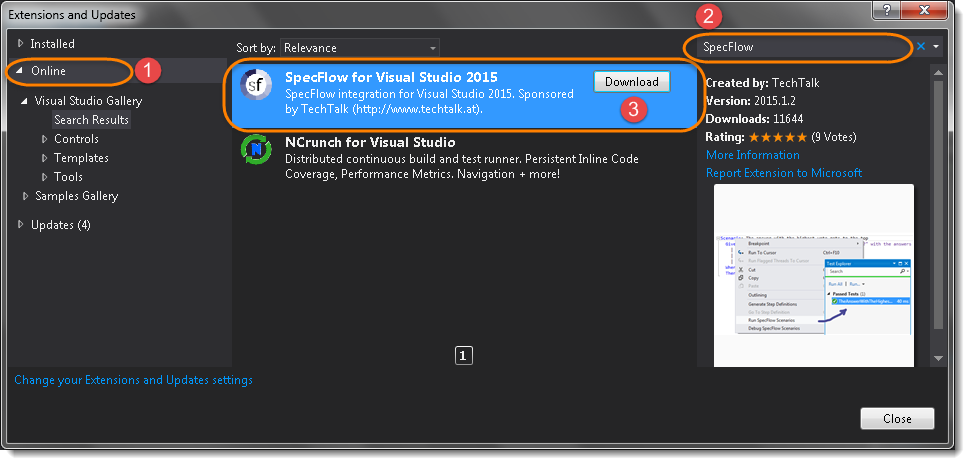
1) The first thing should be done is to install the SpecFlow Visual Studio integration. Do this by navigating to Tools –> Extension and Updates..
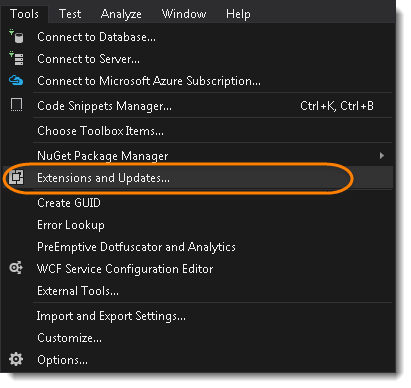
- Make sure you are in the Online branch on the left and type SpecFlow into the search area in the upper right corner of the dialog. Search will display the SpecFlow Tool at the center, select it and click on Download.
Step 3 : Add SpecFlow to the Project Reference
And now, this is where I always get tripped up for a minute. You can create a new feature file, but there is a menu item you should see that will allow you to add feature steps to a class file and you won’t see that until you add a reference to SpecFlow.
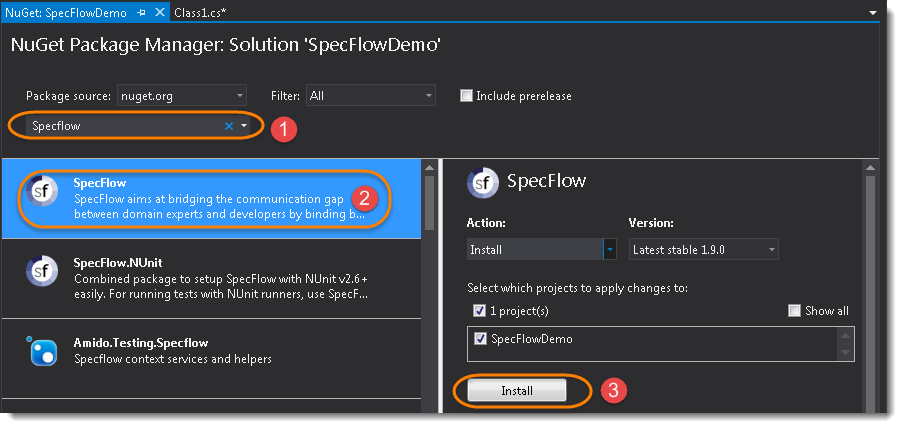
- Now include the SpecFlow tool in the project reference. Navigate to Tools -> NuGet Package Manager -> Manager Nuget Packages for Solutions...

2) Once again a dialog will display. In the search box, type SpecFlow and hit enter. This will display the SpecFlow tool, select the tool and click on Install button at the right side.
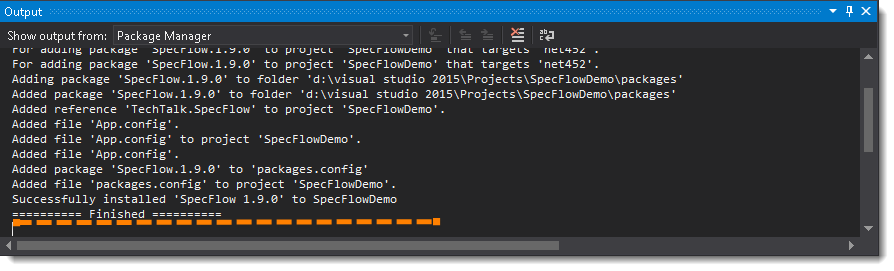
A Successfull Message will display in the Console window at the successfull Installation.
- The way install NUnit Adapter and NUnit Framework. Still in case face any issue, please refer the chapter
How to write C# Test using NUnit Framework. In this chapter, installation for both tools is given, but still the installation is preety straight forward.
Steps to Configure a SpecFlow Test
Step 1 : Create a Feature File
1) Now that you have the environment setup, you can actually use SpecFlow. To create your first feature file, you can right click on the project and select Add –> New Item... from the context menu.
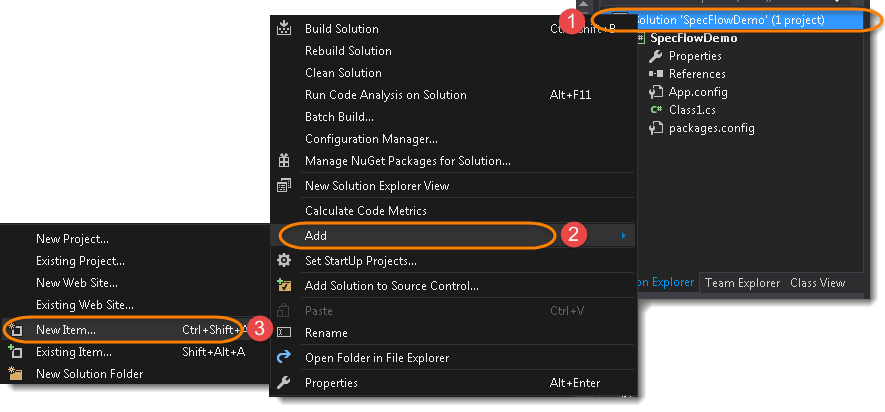
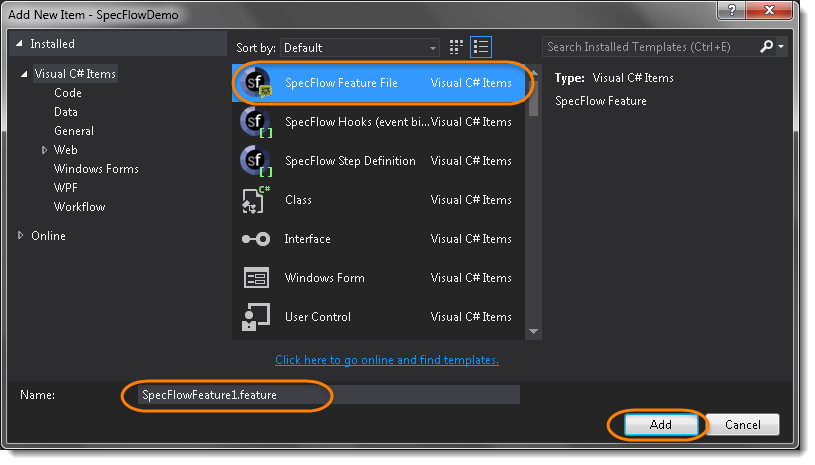
- Select SpecFlow Feature File, give it a logical name and click on Add button. When I name my SpecFlow feature files, I try to name them similar to the feature it will be testing.
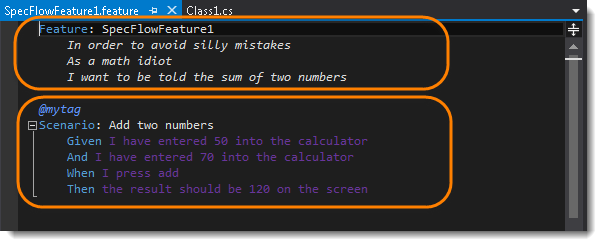
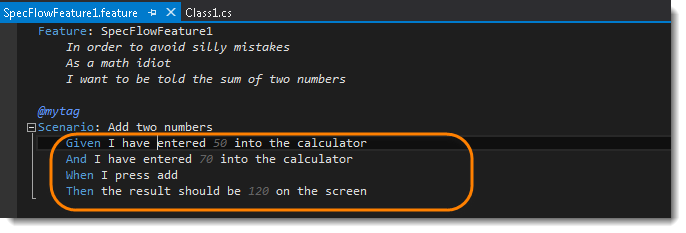
3) The feature file will have a sample of how feature will be setup. This is just a sample and the purpose it to display the pattern of the feature file. So, you will be changing these file a lot when you move forward in this tutorial.
Step 2: Generate Step Definition File
In order to test our scenario, the next thing to do is to create a Step Definition file. This is a regular C# file with a Binding attribute added. The file that SpecFlow will generate will match the template they provided in the feature file. Yes, it can automatically generate a skeleton for the automation code that you can then extend as necessary:
- Right-click on your feature file in the code editor and select Generate Step Definitions from the popup menu.
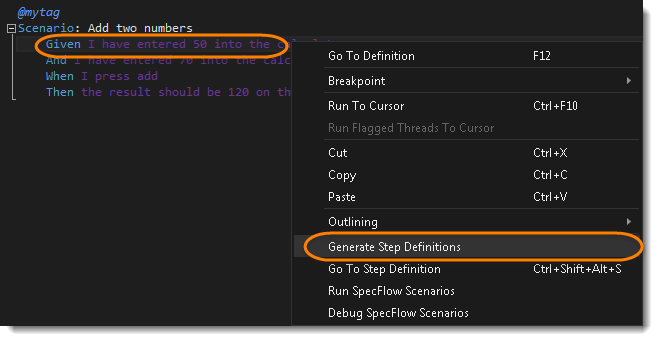
- This displays a Pop Up window, which will ask to select the statements for which Step Definition file is to be created. Select all and click on Generate button.
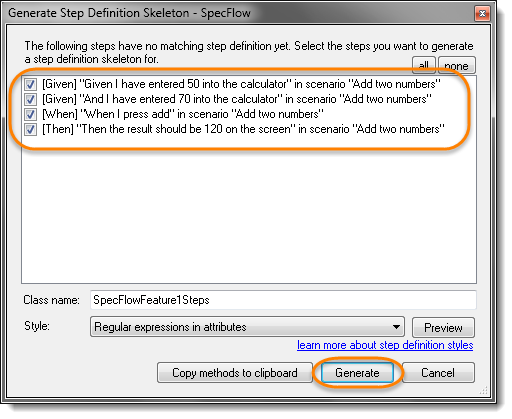
Note: Always choose a sensible name for the files, this is just an example file, I am not bothering about the name, from the next chapter we will follow the rules.
- It will ask to specify the folder path to save the Step Definition file, let it be a default project folder and hit the Save button.

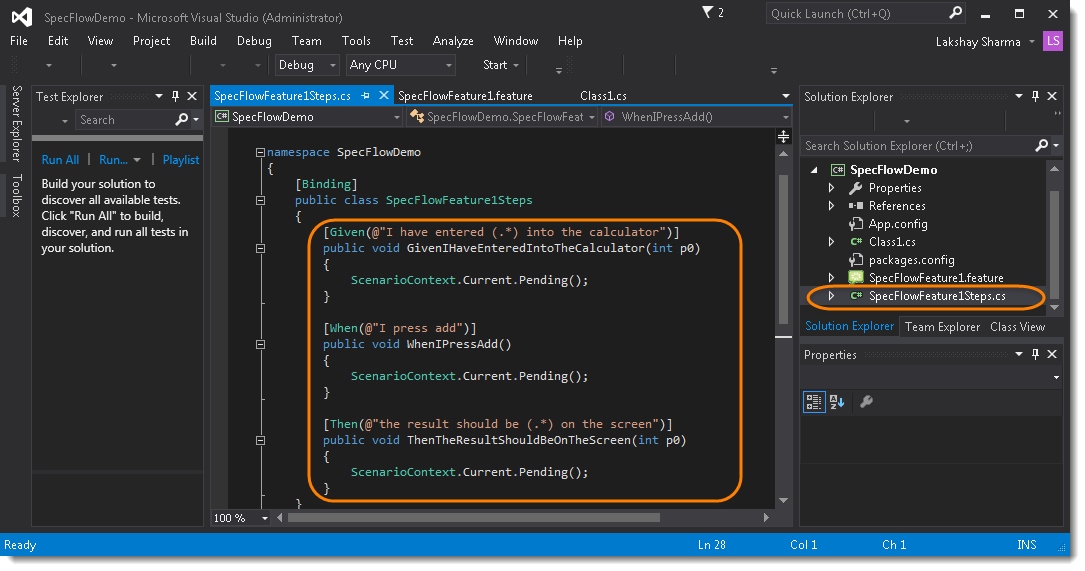
- All the statements will change the color now, it means these Feature statements are linked with Step Definitions.
- To have a look at the attached definitions, click on any statement and press F12 button. This will open up the linked definition file and the cursor will be pointing to the linked definition.
Executing a SpecFlow Test
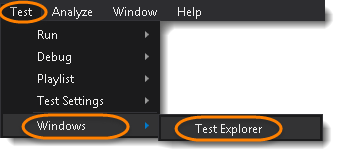
- To identify all the tests in the Feature File, go to Test -> Windows -> Test Explorer.
- Notice, at the left side a new window is appeared called Test Explorer. One test is also displayed in the Test Explorer window.
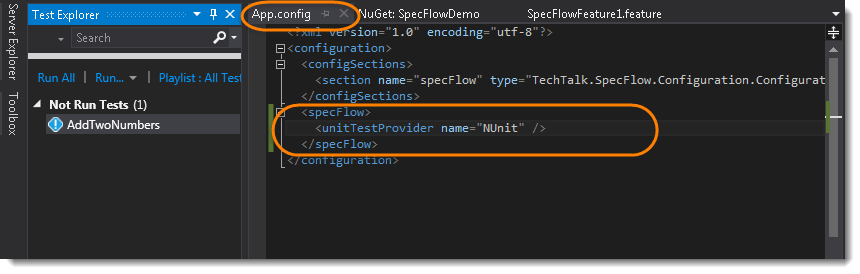
Note: There can be strong chances that the Test Explorer window will not show the default test. Kindly do a build by Build -> Build Solution. if not succeeded, open App.config file from the Solution Explorer window and make sure that unitTestProvider name should contain only one entry, either NUnit or SpecFlow. take help from the above screenshot.
- Now to run a Feature Test, Right-click on the test in the Test Explorer window and select Run Selected Tests. This will run the selected test and display the output in the console window.
Note: Feature File can also be run by Right-clicking in the feature and choosing Run SpecFlow Scenarios. But sometimes it creates an issue.