What is XPath?
First of all, let’s define What is XPath. It is one of HTML selectors which are used in test automation. Basically, it is a path from the top tag (body) of HTML page (absolute XPath) or a path derived from some web element (relative XPath). Except for XPath, you can use also other selector types such as CSS selector.
Sample page
I created a very simple web page for this tutorial’s purposes. I will refer to this code in the whole tutorial. This is a source code:
<html>
<head>
<title>My First Page</title>
</head>
<body>
	<div id="header" class="hdr-main">
		<div id="logo">
			<img src="/images/whatever.png" alt="My logo">
		</div>

	<div id="main" class="body-main">
		<h1>Main header</h1>
		<div id="text">
			<p>Sample text.</p>
			<div id="main-button">
				<button type="button" onclick="alert('Button was clicked!')">Click me</button>
			</div>
		</div>
		<div id="mainSelectBox">
			<select>
				<option value="opt1" selected>Option 1</option>
				<option value="opt2">Option 2</option>
				<option value="opt3">Option 3</option>
			</select>
		</div>
		<div id="mainInput">
			<input id="myInputId" type="text" placeholder="Sample input">
		</div>
	</div>

	<div id="footer" class="footer-main">
		<small>All rights reserved.</small>
	</div>
</body>
</html>
XPath basics
XPath syntax:
| nodename | Selects all nodes with the name "nodename" |
| / | Selects from the root node |
| // | Selects nodes in the document from the current node that match the selection no matter where they are |
| . | Selects the current node |
| .. | Selects the parent of the current node |
| @ | Selects attributes |
| [] | Node predicates |
XPath operators:
| \ | Computes two node-sets | //book \ //cd |
| + | Addition | 6 + 4 |
| - | Subtraction | 6 - 4 |
| * | Multiplication | 6*4 |
| div | Division | 8 div 48 |
| = | Equal | price=9.80 |
| != | Not equal | price!=9.80 |
| < | Less than | price <9.80 |
| <= | Less than or equal to | price<=9.80 |
| > | Greater than | price>9.80 |
| >= | Greater than or equal to | Price>=9.80 |
| or | Or | price=9.80 or price=9.70 |
| and | And | price>9.00 and price<9.90 |
| mod | Modulus (division remainder) | 5 mod 2 |
(Source: w3schools.com)
XPath Best practices
- The very best and ultimate practice is to avoid using absolute Xpaths. Use this only and only when there is no other choice. It works, but it is really hard to maintain – even the smallest change in page’s source code can make Xpath invalid.
Sample absolute Xpath in our sample code: /body/div/div/div/button This example does not look so bad, BUT - in feature-rich websites, you may have 15-20 elements between the root element and your object.
- If possible, keep your XPaths easy and short. Prefer using direct XPath (when unique identifier is present)
Example: //input[@id=”myInputId”] Attribute id is (should be) unique within a page, so you may be sure that you are about to use correct element.
- If unique identifier is not present, find nearest ancestor/descendant with unique identifier. Then, use relative Xpath to locate your element.
Example: //div[@id=”text”]/p Element p does not have any unique ID, but its nearest ancestor (parent element) has. So relative Xpath approach can be easily applied.
- Use XPath operator and to get element by multiple attribute
//img[@src="/images/whatever.png" and @alt="My logo"] This may be useful when a single attribute may not be sufficient to identify an element, i.e. when the same image is used on multiple places, but alt attribute is different.
- text() and contains() functions
XPath offers several functions, but probably most used for test automation are text() and contains(haystack, needle) methods. Text() returns a text of current node, contains() returns true/false based on parameters. Example: //small[text()=”All rights reserved.”] //small[contains(text(), “rights”)] You may see that in the first option, you have to specify exact text, whereas, in the second option, it is enough to provide only a substring. In our case, for contains method, you provide a result of text() method as a haystack and substring as a needle.
- Get N-th element when there are multiple (and same) siblings. This approach may be useful mostly for searching in tables when you don’t have unique identifier for table data elements, but it can be applied to any other element.
Example: //div[@id=”mainSelectBox”]/select/option[2]
This expression returns second <option> element in the select box.
How to get and verify XPaths on Browser Console?
Browser console allows you to verify your XPath directly. Type $x(“//yourxpath”) into a browser’s developer console and if the element exists, it is returned in a console. When multiple elements match the expression, an array of these elements is returned. For those who are not familiar with developer tools, you can open it by pressing F12 (most of the browsers) or Command-Option-C for Safari on MacOS. As you may see on the following screenshot, developer tools sidebar is active.
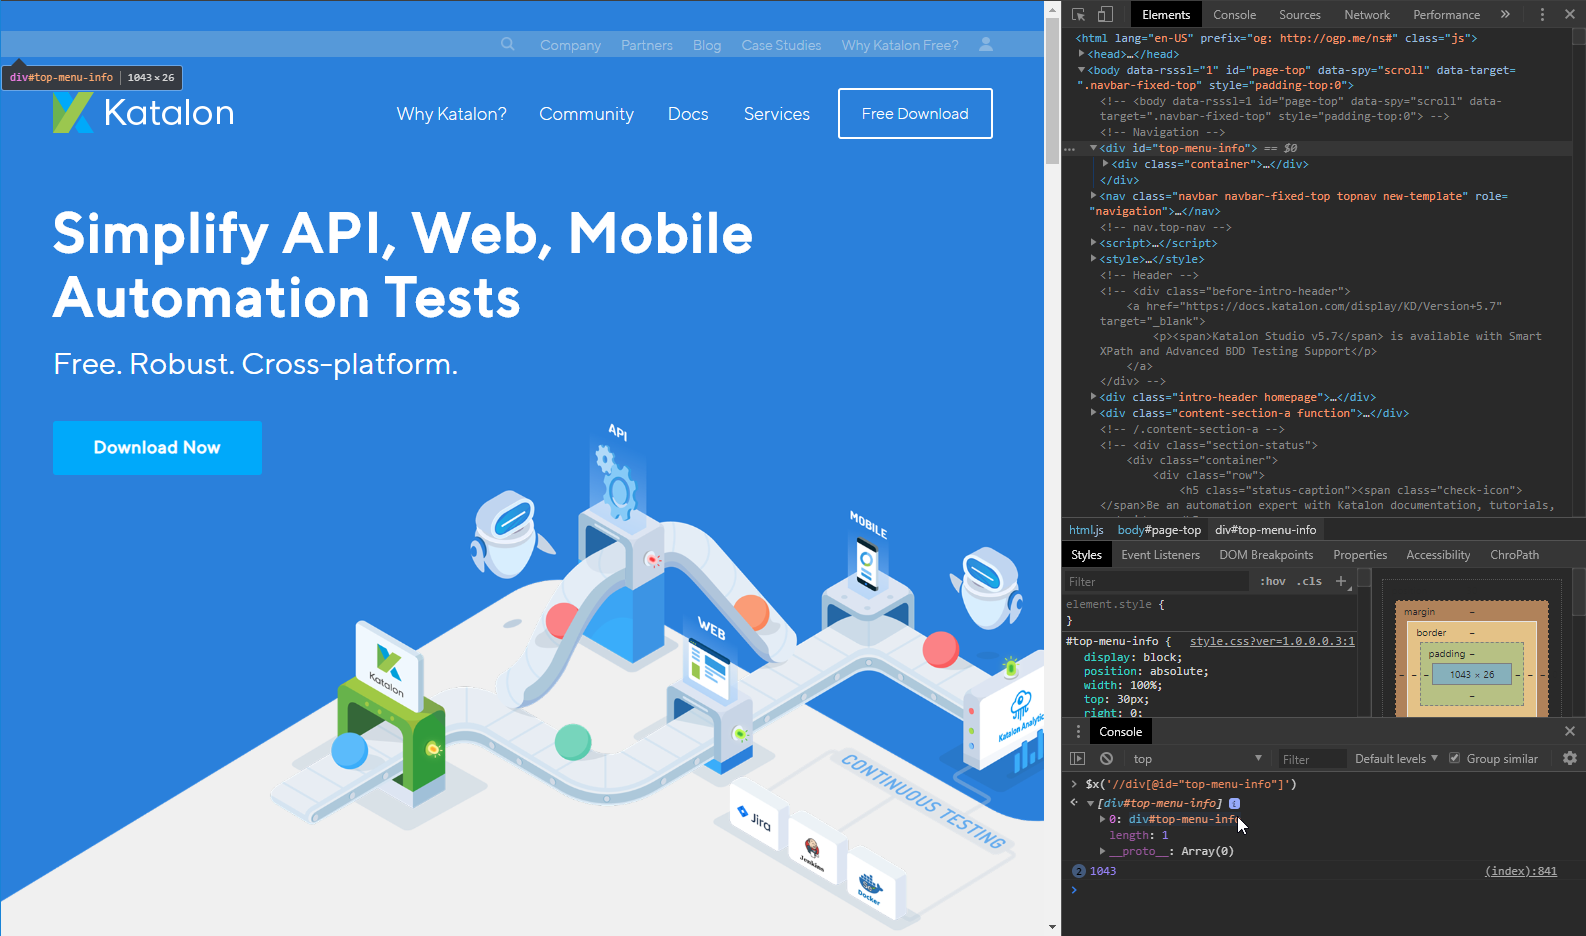
You can see a console at the bottom of the developer panel. If it is not shown, find “Console” option in developer sidebar menu. You may see that there is already one XPath evaluated and element is found. When you hover over the element in a console (as I did), the found element is highlighted on the page. There are also multiple browser extensions which may help you with getting and evaluating XPaths. You can find them in the add-ons store in your favorite browser, I use addon ChroPath (available for Chrome and Firefox), but there are also many others. You can try more of them and choose the one which is the best for you.
ChroPath sidebar looks pretty much the same, but it is more user-friendly as you can find element’s XPath by clicking on it.
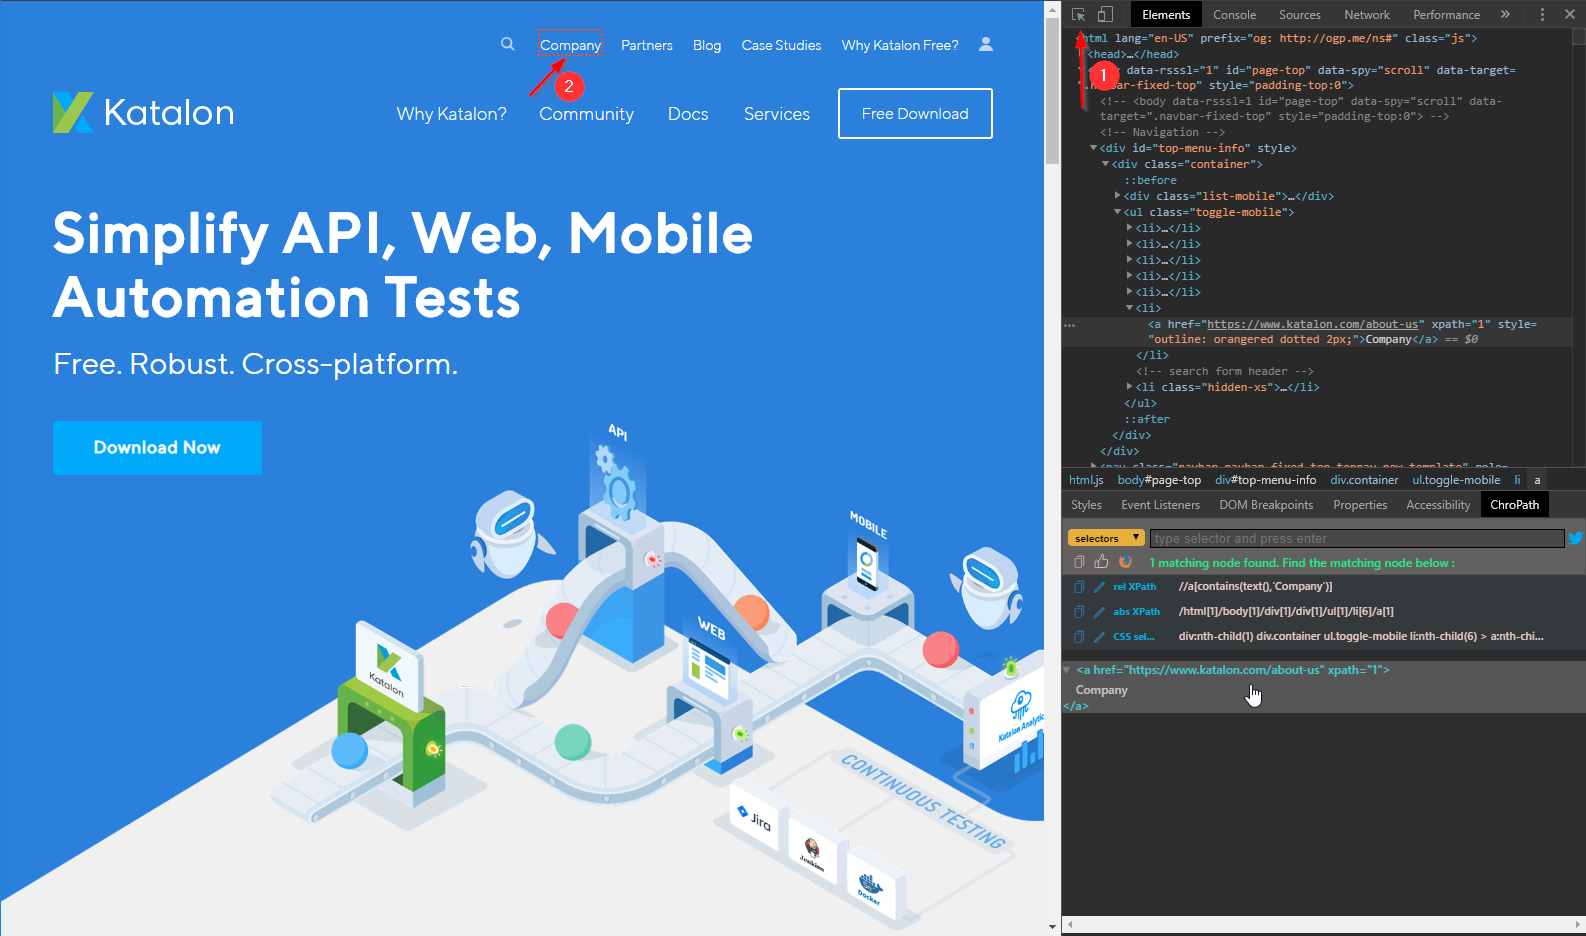
First, click on a symbol at the top of developer sidebar to enable element inspector, then select any element on the page. ChroPath offers you 3 possible selectors – relative XPath, absolute XPath or CSS selector. You can see the found element below these results. And again, when you hover over the result item, it becomes highlighted on the page. You can also write your own XPath into a text field and the XPath is evaluated and results are shown as well.
Conclusion
XPath is a powerful selector which has many different operators and methods for working with web elements. Think about the best option for specific element, do not rely on browser tools and their pre-generated paths. Don’t be afraid to tell your teammate, who is responsible for UI development, to add unique identifiers for web elements you use for test automation. It is much easier when you define XPath as //element[id=’whatever’] and you don’t have to care about long and difficult paths.