API Testing is one of the hottest trends of Software Testing in recent years and still keeps growing up till now. Instead of being handled solely by developers, testing API is presently a standard practice among many outsourcing teams. This short article will give you a comprehensive tutorial on how to perform REST API & WebServices Testing with Katalon Studio. Subsequently, in this article REST API & WebServices Testing, we will be discussing the below topics:-
- How to perform REST API & WebServices Testing with Katalon Studio?
- How to create a new project?
- What are the next steps after creating the first project?
- How to create a custom API/ Web Service method?
- What are some Katalon New Features?
How to perform REST API & WebServices Testing with Katalon Studio?
Install and set up Katalon Studio
If you have not set up Katalon Studio yet, please refer to this guide for further instruction:
Create a new project and set up the API automation test
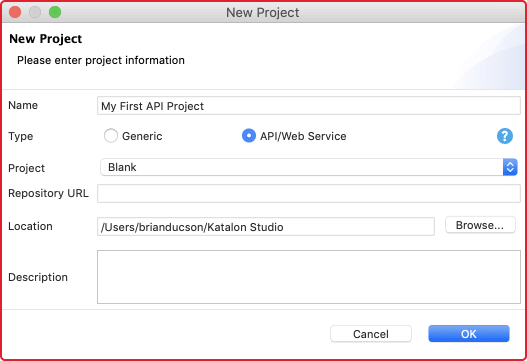
Step 1: Create a new project
Go to File → New → Project. Enter a project name along with its location to start a new project.
Once the project creation is confirmed, you will see a folder structure in the Test Explorer panel. This folder system serves to store all test resources. It is also where you begin your first API test.
Step 2: Create a new API test
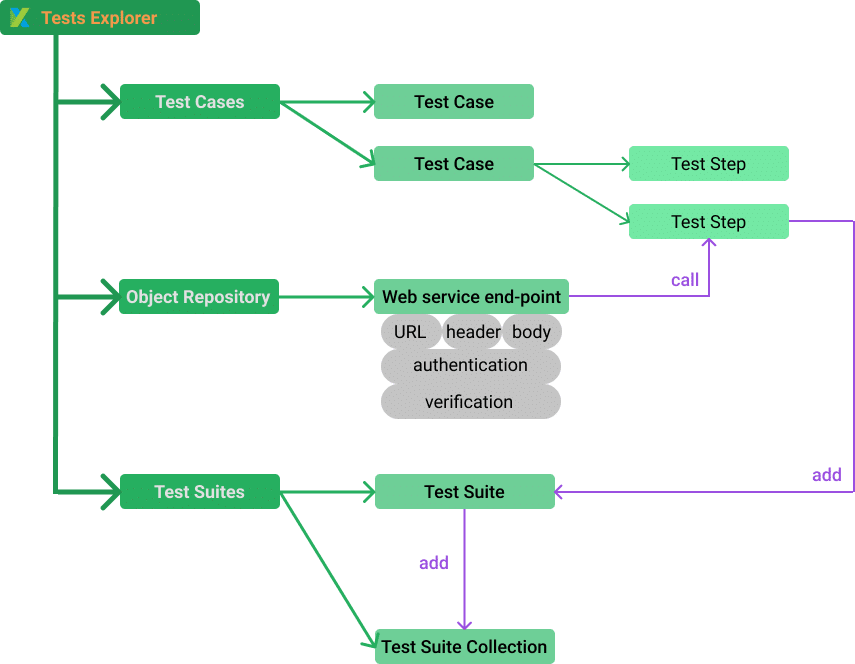
Before the creation of your first API test, let’s have a look at the format used to set up a testing project.
- Object Repository: Object Repository is a place that stores all Web service endpoints along with all information of request method, URL, header, content, and authentication. A folder system for better management integrates web service test objects in Object Repository.
- Test Cases: Test Cases stores/keep all test scenarios and is categorized by a folder system. Each test case includes some steps that illustrate a test scenario. You can execute a test case individually with a specified execution profile.
- Test Suites: Test Suites is where all test suites are stored. A test suite is a collection of test cases that verify a specific target. Test cases at the ‘test suite’ level can execute with a data-driven approach. The Test reports also generate at the ‘test suite’ level.
- Test Suite Collection: Test Suite Collection is a collection of Test Suites that verifies/ confirms a larger target. Test Suites at ‘Test Suite’ Collection level has specific Test environments specified.
Step 3: Create a new RESTful endpoint at Object Repository
Object Repository → New → Web Service Request
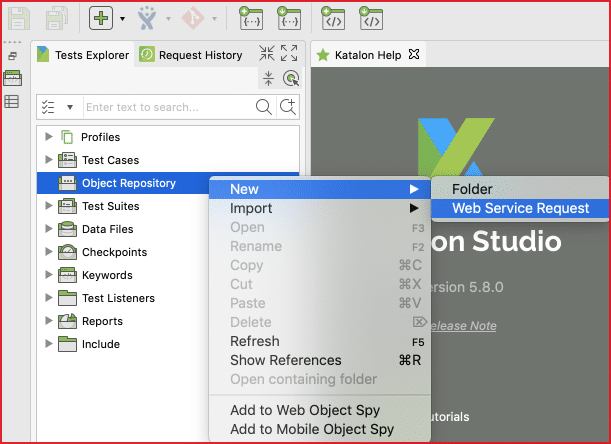
Katalon Studio stores Web service endpoints for testing at Object Repository, which is similar to Test Object in UI Test. At the “Create New Web Service Request” dialog, you can either choose to create a RESTful or a SOAP request.
“Request type” is a required field. You need to specify it at this very step. In contrast, “URL” is not required. You can set this value later in the next step.
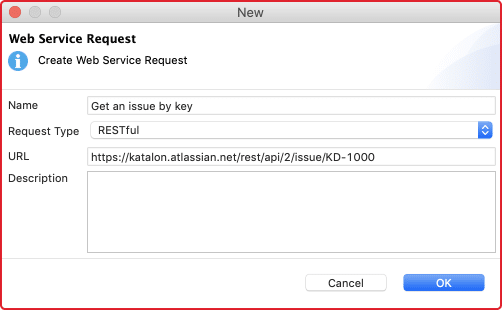
Click, “OK”. Then we are ready to enter more details to the first RESTful test.
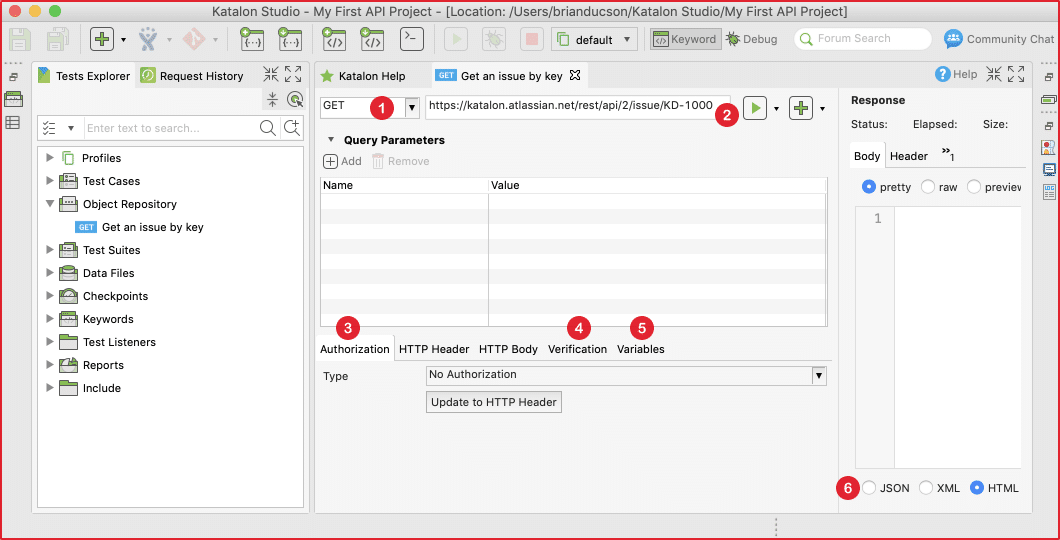
There are some critical concepts needed to specify when testing a RESTful request:
- Request method: You can choose one of these following methods for your first request test: GET, POST, PUT, or DELETE. The method needs to match the URL to have a valid request. For instance, let’s assume that your first test is a public API from the Jira Cloud version. In this case, you should choose/ select the GET method to receive information on an existing ticket using its ID.
- Request URL: Along with the request method, “request URL” tells the web server which API to utilize under test. Any mismatch between method and URL will lead to invalid request exceptions at runtime or wrong data response.
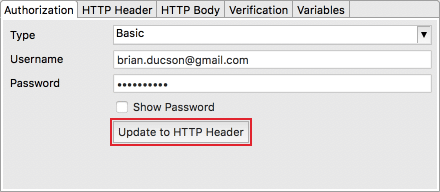
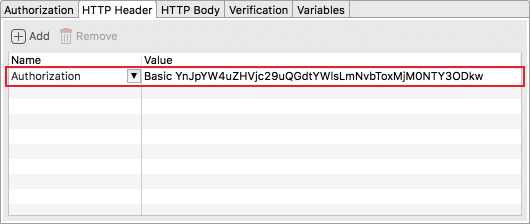
- Authorization: Authorization is a vital part of an API. It gets the correct data under permission (unless the data is public). Katalon Studio supports standard authentication methods:
Basic: The basic method requires username and password. Don’t forget to click ‘Update to HTTP Header’ so that the authentication can apply to ‘HTTP Header.’
- Verification: Verification is where you define assertion to ascertain that the response will contain the expected information.
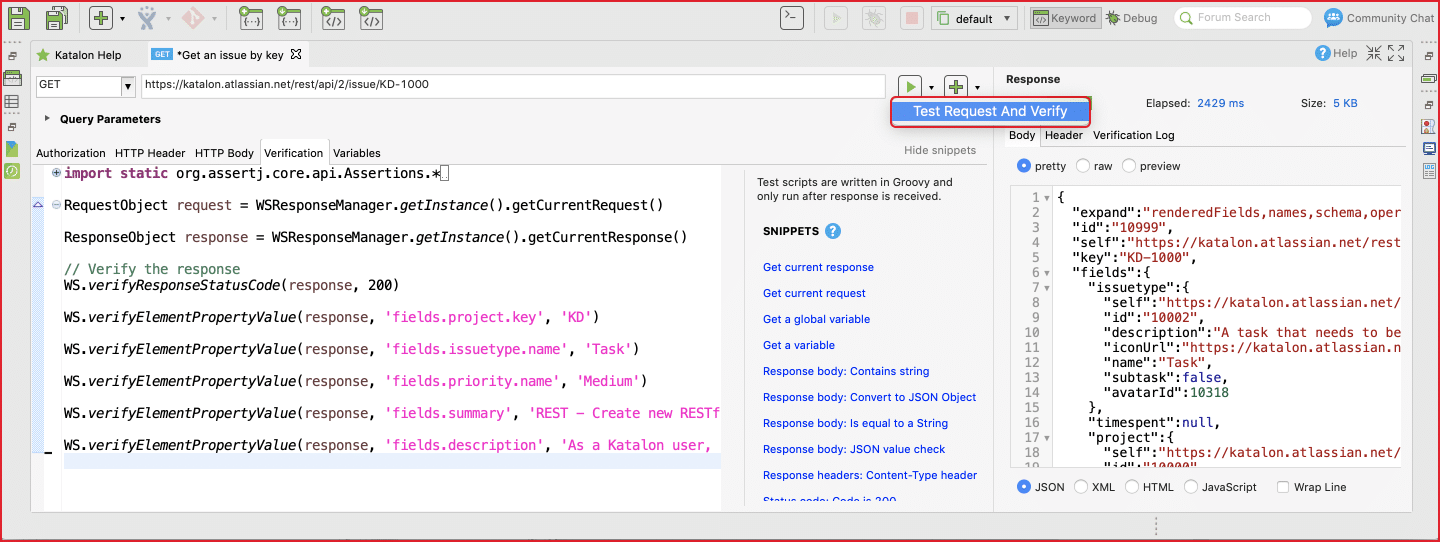
The verification tab of a request is similar to the Script tab of a test case. In other words, you can write custom scripts with built-in keywords or Groovy/Java scripts to check the response data. Besides built-in keywords, Katalon Studio also supports built-in snippets, which help you generate assertions with a single click. This feature is useful for testers who might find it challenging to deal with parsing or to assert with JSON data format.
The right panel of the request consists of the responses automatically displayed in a friendly format, and the verification results in Verification Log. To include verification script when sending the request, you need to choose the ‘Test Request and Verify’ option from the execution button.
The Verification script gives you quick feedback on the request status rather than an actual test. You can add more assertions at the ‘test case’ level in the next step.
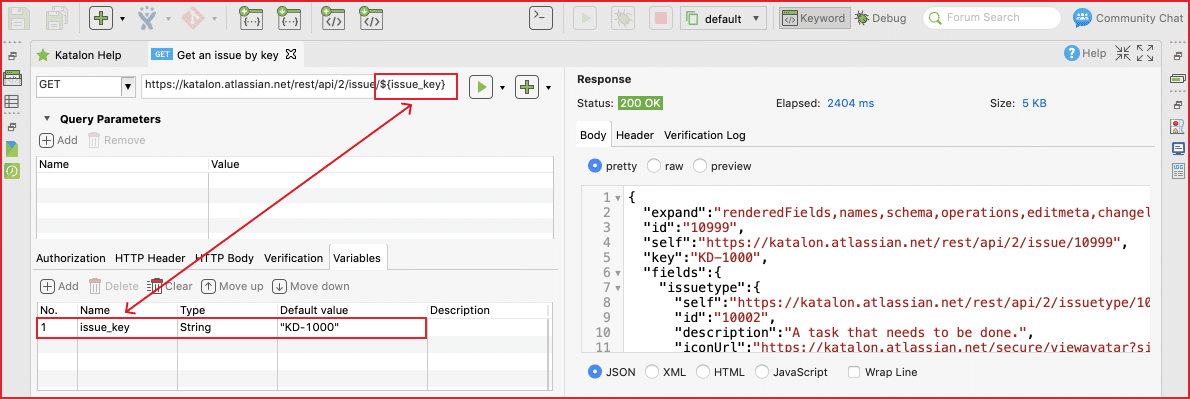
- Variables: Variables make API testing more strong and dynamic with the data-driven approach. In Katalon Studio, every part of the request can parameterize. In other words, we can use dynamic data for URL, authentication, HTTP Header, and HTTP Body to maximize the capability of data-driven testing. Let’s have a look at this example:
- Formatter: The response will automatically display in a proper format: JSON, XML, HTML, and JavaScript. It gives you a quick view of the response status.
Step 4: Create a new test case with an existing request.
While the request at Object Repository is helpful for fast testing, you can add the request verification at the test case level for better managing and reporting.
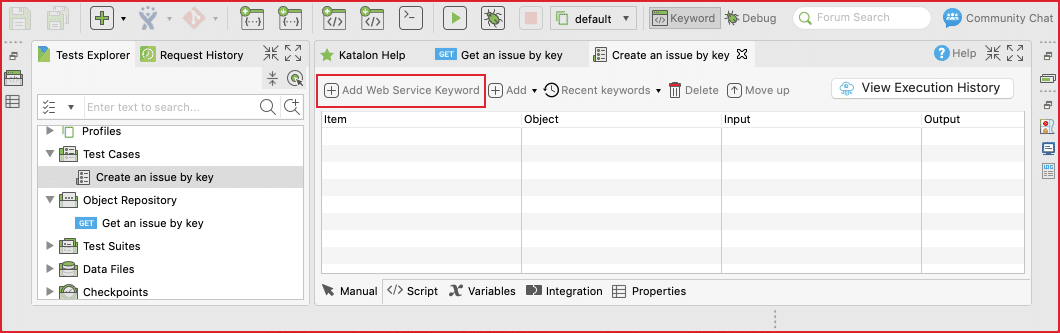
Step 5: Add an existing request to a test case
A request can insert into a test case with Web service built-in keywords. We can use many keywords to send the request, to verify the response, and to make the request as part of a more significant testing flow.
Following test case shows how we can call the request with verification steps from a test case:
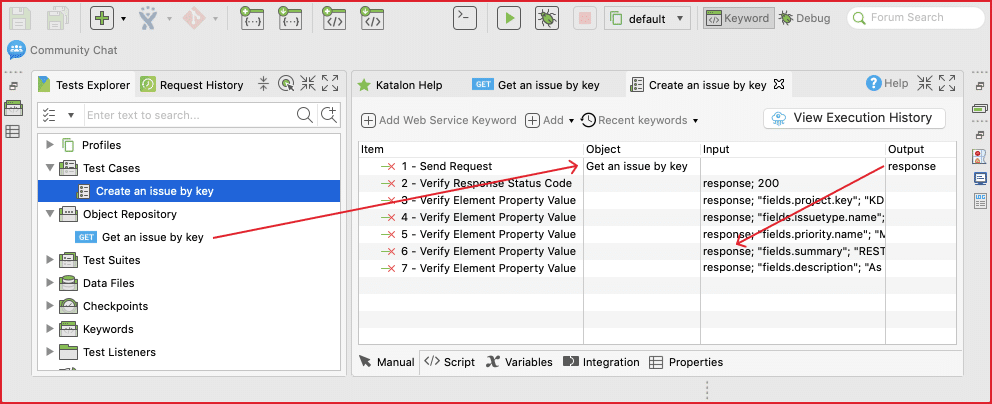
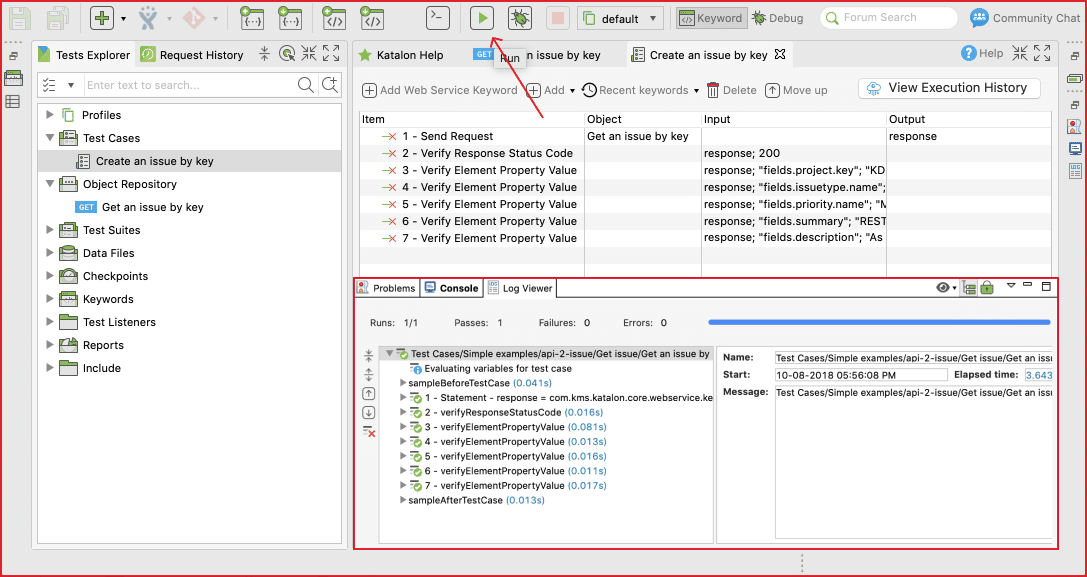
The test case can execute as a standard test case in Katalon Studio. We can view each verification step from the log.
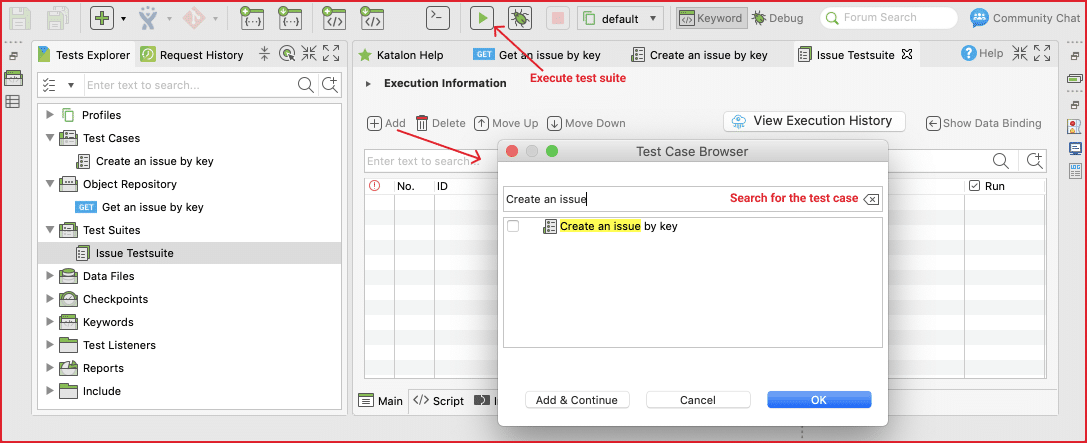
Step 6: Add a test case to the test suite
A test case can add to a test suite via either the drag-and-drop feature or the “Add test case” tool. Once the test case adds to the test suite, we can execute the entire test suite with the Run button (without selecting the browser as in UI testing)
Next Steps
Now you have finished creating your first test. To create tests for a real project with practical solutions, we are required to create more tests with more techniques:
- Parameterize your tests
- Apply the data-driven approach
- Create custom keywords/packages
- Call tests and reuse code
- Include error handling
- View test reports after test suite execution
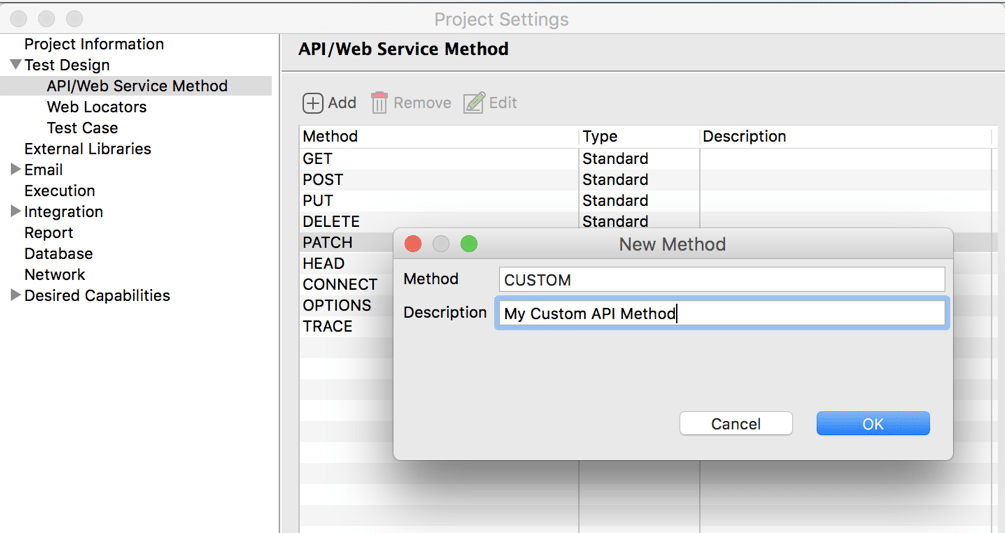
Create Custom API/Web Service Methods
This feature is only available for Katalon Studio Enterprise users.
You can create Custom API/Web Service Methods to expand RESTful Web Service Testing capabilities by going to Project Settings > Test Design > API/Web Service Method. Katalon handles custom API methods on top of the default set of supported methods.
Katalon New Features
The Katalon Studio has recently had a new monthly release to support BDD Cucumber. Which, in turn, is a testing approach in which test cases are written in natural languages to improve communication between technical staff and business stakeholders. BDD Cucumber also helps create test scenarios for the acceptance test phase.
@Issue_Tests
Feature: Verify issue information

Background:
Given The Jira System is available

@Get_By_Id
Scenario: Verify issue information by Id
  When I get information of an issue with Id "KD-1"
  Then I get response code "200"
  And The issue information as below:
      |project_key |issue_type |priority |summary                          |
      |KD |Bug |Low      |REST - Create new issue using API|

@Get_By_Id
Scenario Outline: Verify issue information by Id
  When I get information of an issue with Id "<issue_key>"
  Then I get response code "200"
  And The issue information as below:
      |project_key   |issue_type |priority   |summary |
      |<project_key> |<issue_type> |<priority> |<summary> |

Examples:
|issue_key|project_key |issue_type |priority |summary                          |
|KD-1     |KD |Bug |Low      |REST - Create new issue using API|
|KD-2     |KD |Bug |Low      |Update summary from API example  |
The instruction, as mentioned above, is all of what you need to achieve your very first API Testing in Katalon Studio. However, if yoau want to accomplish the best outcomes as well as could save lots of your testing time, you will need much more learning effort in API Testing. For example, we need to have appropriate implementations of techniques and awareness of whether we should test an API automatically or manually. And consequently, this tool will help you improve product quality exceptionally.