Node.js is a server-side runtime environment. Moreover, it is built on Chrome's V8 JavaScript engine. It is open-source, totally free of cost, and millions of developers use it across the globe. It is a runtime environment. Additionally, it includes everything you need to run a program written in JavaScript. You are required to Install Node JS framework before start building your Node.js application. The Node.js framework is available for a variety of operating systems such as Windows, Ubuntu, and OS X.
Node.js also can embed external functionality/library by using custom modules. We have to install these modules separately. Node.js provides a package manager for installing and managing all these external modules, which is called "Node Package Manager(NPM)".
In this article, we will cover the following topics for initial setup of Node.js:
- How to install Node.js and NPM on Windows?
- How to install Node.js and NPM on Mac?
- Node installation using "Homebrew".
- Node installation using "Node Version Manager - NVM".
How to Install Node JS and NPM on Windows?
Follow the below steps for successful installation of Node.js on windows:
Step 1: Download the installer:
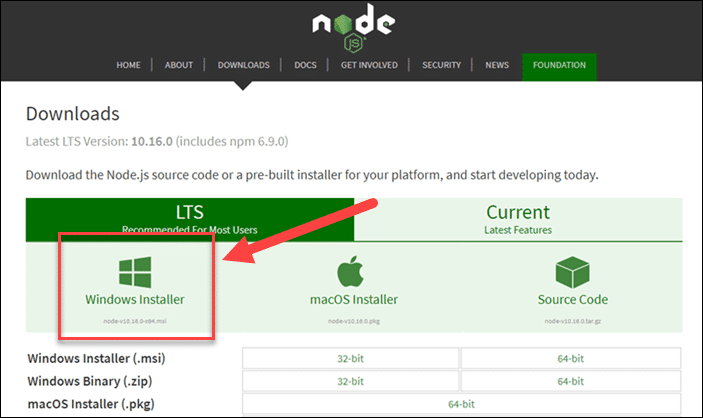
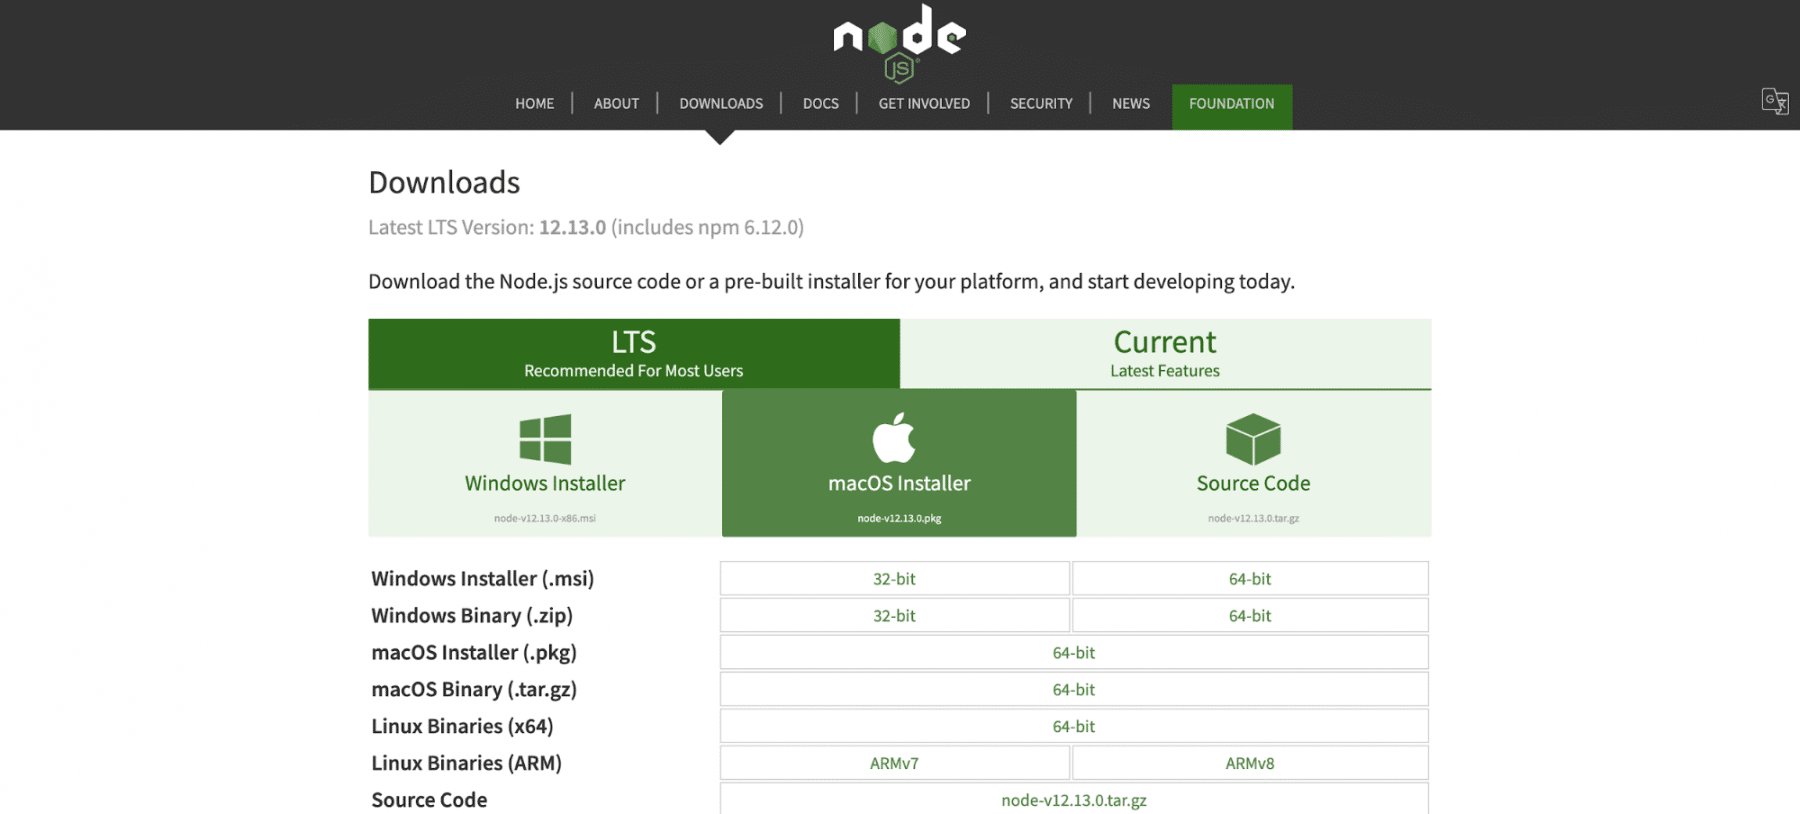
For downloading Node, navigate to https://nodejs.org/en/download and, as shown in the below figure, depending upon your system configurations (32bit or 64 bit). As shown below, click on the "Windows Installer" tab and download the installer specific to your OS configuration:
Major of the user's generally us the ".msi" installers as they provide easy installation steps. We'll also cover the installation using the ".msi" installers only in the below steps.
Step 2: Run the Node.js Installer
Once the installer finishes downloading, launch it by clicking the ".msi" installer file. Follow the wizard to complete the installation with steps as mentioned below:
- When you click on the ".msi" file, the system will ask if you want to run the software – click Run.
- Then you will be welcomed to the Node.js Setup Wizard – click Next.
- On the next screen, review the license agreement. If you agree to the terms, click Next. After that, install the software.
- The installer will prompt you for the installation location, as shown below.
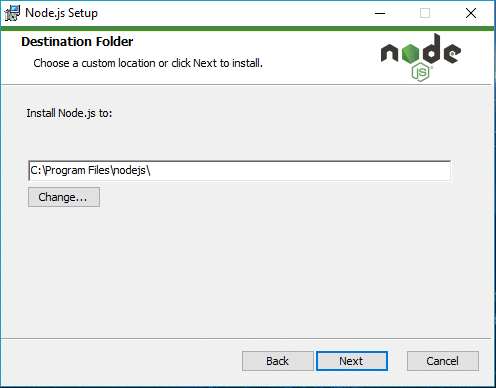
Chose the default location unless you have a specific need to install it somewhere else – then click Next.
Next, the wizard will let you select components to include or remove from the installation, as shown below:
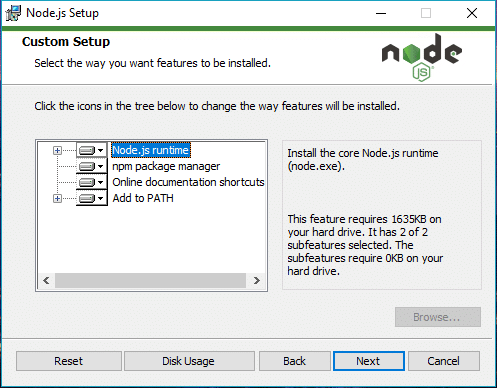
Once again, accept the defaults by clicking on the Next, unless you have a particular requirement. It will automatically include the "NPM" and documentation. Also, it will set the Node path to the System's path variable, so as it is accessible throughout the system.
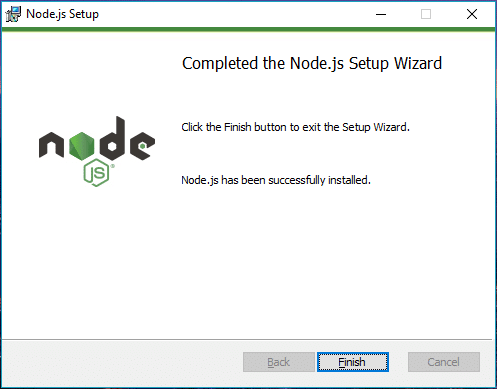
Lastly, click the Install button to run the installer. When it finishes, click Finish. The successful installation will show a dialogue box, as shown below:
Step 3: Verify proper installation of Node.js
To check whether the Node.js installation was successful on your PC, you can run the following command in your Command Prompt (regardless of if you're using cmd.exe, Powershell, or any other command prompt):
node -v
If the installation of Node.js is successful, the command prompt will print something similar to (but probably not exactly) this:
node -v // The command we ran - prints out the version of Node.js that's currently installed
v12.13.0 // The printed version of Node.js that's currently installed.
Step 4: Update the Local npm Version
As the final step in getting Node.js installed, we'll update the version of npm - the package manager that comes bundled with Node.js.
Node.js every time ships with a specific version of npm - Node.js doesn't (and shouldn't!) automatically update npm. The release cycle of the npm CLI client isn't in sync with the Node.js releases.
To fastly and easily update "npm", you can run the following command:
npm install npm --global // Update the `npm` CLI client
Now you've got Node.js on your Windows. It's time to start development using Node!
How to install Node.js and NPM on Mac
On Mac, a user can install Node.js using the following approaches:
- Node installation using the ".pkg" installer.
- Installing a Node using "Homebrew".
- Node installation using "Node Version Manager - NVM".
Let's discuss all of these approaches in the below sections:
Node installation using ".pkg" installer:
Similar to the windows ".msi*" installer, Node also provides the ".pkg" installer for Mac. Additionally, we can also download from the node website - "https://nodejs.org/en/download".
Follow the steps mentioned below for installation of Node.js and NPM using the ".pkg" installer:
Step 1: Download the Node.js ".pkg" Installer
As our first step, we need to get the installer for Node.js on macOS. To do so, we can head over to the Node.js Downloads page to download the installer, as we have seen in the above screenshot.
To install the macOS click the "Macintosh Installeer" option - this will download the ".pkg" installer for Node.js. Make sure you save it somewhere, which you'll be able to access it!
Step 2: Run the Node.js Installer
Now that you've got the installer downloaded, you need to run it. The installer is a pretty common interface - it won't take long to get through it (under a minute), even though there are a few parts to it. Refer to the below guide to understand it :
Introduction
- Select Continue
License
- Select Continue
- Select Agree
Installation Type
- Select Install
- Authenticate with your Mac to allow the Installation
- Select Install Software
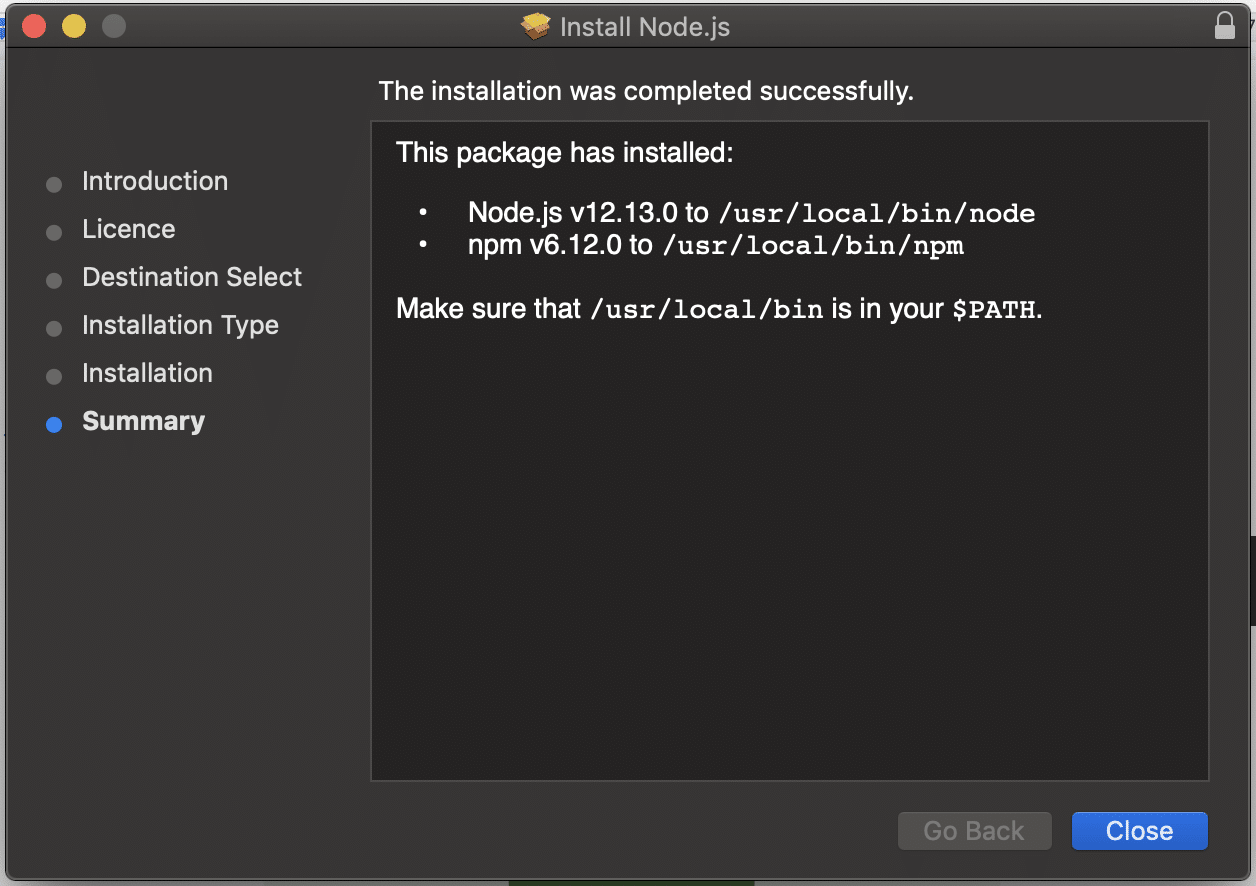
Summary
- Select Close
It is how your final successful installation will look like :
Step 3: Verify successful installation of Node.js
To ascertain that Node.js was installed correctly on your Mac, run the following command in your terminal :
node -v
If you properly install Node.js, you'd see something close to (but probably not exactly) this because it depends on the version you have downloaded :
node -v // The command we ran - tests the version of Node.js that's currently installed
v12.13.0 // The version of Node.js that's installed. It can be some other version.
Step 4: Update Your npm Version
We'll update your version of npm as a final step.
Node.js always ships with a specific version of npm - Node.js doesn't automatically update npm. The npm releases and Node.js releases are not synchronized. Consequently, there's almost always a newer version of npm than the one that is installed by default with a given version of Node.
To update your version of "npm" quickly, run the below command:
$ sudo npm install npm --global // Update the `npm` CLI client
Now you've got Node.js on your Mac. It's time to start exploring!
Step 5: Set NODE HOME in Environment Variable
For MAC or Linux based systems, execute below command on the terminal to ensure that NODE path sets in the PATH variable:
export PATH=/usr/local/git/bin:/usr/local/bin:$PATH
Where “/usr/local/bin” is the default path in which Node installation happened. (We can validate the same from the last screen of the installer, as shown in the above screenshot also.)
It is always advisable to write this command in .bash_profile or .zshrc, depending on which shell you are using so that these path export stay permanently on your system, and one can recognize them from all the terminal instances. Run the below command to add the details in the .bash_profile file permanently:
echo 'export PATH=/usr/local/bin:$PATH' >>~/.bash_profile
And run the following command to make it available to all users on the system:
source ~/.bashrc
Node installation using "Homebrew"
Homebrew is a free and open-source software package management system that simplifies the installation of software on Apple's macOS operating system and Linux. It installs packages to their directory and then symlinks their files into "/usr/local". We can use "Homebrew" for the installation of "Node.js" also. Follow the steps below to install Node.js and NPM using Homebrew:
Note: We assume that you have already installed "Homebrew" and "XCode" on your macOS.
Step 1: Install Node.js and NPM
Installing Node.js and NPM is pretty simple using Homebrew. Homebrew takes care of downloading, unpacking, and installing Node and NPM on your system. The whole process (after you have XCode and Homebrew installed) won't take more than a few minutes.
Open the Terminal app and type below command
brew install node
Homebrew will download some files and installs them. And that’s it.
Step 2: Validate Node.js and NPM was installed successfully
To see if the Node is installed successfully, type below command in the terminal:
node -v
It should print the version number. You’ll see something like this v12.13.0.
To see if NPM is installed successfully, type below command in the terminal:
npm -v
It should print the version number. You’ll see something like this 6.12.0
Step 3: Update Node and NPM
New versions of Node and NPM release frequently. Homebrew can be used to update the software it installs.
Ensure that the Homebrew has the latest version of the Node package. In the terminal type below command to update Homebrew:
brew update
Upgrade Node: Type below command in the terminal to update version of node:
brew upgrade node
It will update Node and NPM to the latest version.
Node installation using "Node Version Manager - NVM"
At certain times, there is a requirement that users want to have multiple versions of "Node.js" on their machines. It can be handled easily with the help of "NVM - Node Version Manager". Follow the steps below to install NVM and then install Node using NVM:
Step 1: Download NVM using the Install script
You can use either cURL or Wget to install NVM. Use the following commands to download and install NVM:
curl -o- https://raw.githubusercontent.com/creationix/nvm/v0.33.0/install.sh | bash  // Installation using cURL


or

wget -qO- https://raw.githubusercontent.com/creationix/nvm/v0.33.0/install.sh | bash  // Installation using Wget
It will download and install NVM on your machine.
Step 2: Verify NVM installation was successful
You can test whether the nvm is up and running on your machine, using the below command:
nvm --version
Consequently, the command will return something like (not necessarily exact) below:
0.33.0 # The current version of nvm - yours may differ!
It is always advisable to write this command in .bash_profile or .zshrc, depending on which shell you are using so that these path export stay permanently on your system, and one can recognize them from all the terminal instances. Run the below command to add the details in the .bash_profile file permanently:
echo 'export PATH=/usr/local/bin:$PATH' >>~/.bash_profile
And run the following command to make it available to all users on the system:
source ~/.bashrc
Step 3: Install the latest version of Node using NVM
To install the latest available version of Node.js, you can use the following command:
nvm install node
If you want to install a specific version of node, you can check all the available versions of the node and then install the particular version using the following commands:
nvm ls-remote  // This will list down all the available Node version

nvm install v12.15.0 // This will install Node 12.15.0
Now, type the following commands on the terminal to check the installation of different Node versions & which specific versions are in use :
nvm ls  // This will list all the Node versions installed on your machine.


nvm use v12.15.0 // This will set the Node version to 12.15.0
You can validate the current version of the node using the following command:
node --version
It should give you the version number as "12.15.0", it set using the above commands.
So, now you are all set with your Node installation and can proceed further with the Node application development.
Key Takeaways
- One can install the Node.js on the Windows operating system using the ".msi" installer which exists on the official site of Node.
- Same as windows, installation of Node.js on the macOS can happen using the ".pkg" installer provided by the official site of Node.
- On macOS, we can also install Node using the package manager "Homebrew".
- NVM provides an easy way to install and maintain multiple versions of Node on the same machine.