Designing an effective test automation framework is an art. Moreover, it needs viewing with different lenses like avoiding code duplication, maintainability, and improved readability of code. Various design patterns got designed and developed to standardize these aspects of software development. One of the essential design patterns is the "Page Object Pattern". Moreover, Cypress also provides the flexibility to implement this pattern while developing an automation framework using Cypress. Let's understand the intricacies of this pattern and how this can implement in Cypress by covering the details in the following topics:
- What is the Page Object Design Pattern?
- What are the benefits of using Page Object Pattern?
- How to Implement the Page Object Pattern in Cypress?
- How to refactor existing Cypress test to fit them in Page Object Pattern?
What is the Page Object Design Pattern?
Page Object Model is a design pattern in the automation world which has been famous for its test maintenance approach and avoiding code duplication. A page object is a class that represents a page in the web application. Under this model, the overall web application breaks down into logical pages. Each page of the web application generally corresponds to one class in the page object, but can even map to multiple classes also, depending on the classification of the pages. This Page class will contain all the locators of the WebElements of that web page and will also contain methods that can perform operations on those WebElements.
For Example, in our Application Under Test (http://shop.demoqa.com/), we have a different page where we do registration and login, a different page for checking the search results of any product type, another page for adding to cart and then a different page of verifying the cart.
So, ideally, a Page Object Pattern is if we split these pages into different page files or page objects, and we write every page-specific locators and methods in their file (JavaScript Class) and use then directly in the test scripts. A sample implementation of the Page Object Pattern will look like as follows:

As we can see from the above figure, each of the pages of the web application corresponds to the Page Object in the framework and that Page Object can be invoked in the Test Scripts to perform certain operations on the web page.
What are the benefits of using Page Object Pattern?
As we have seen that the Page Object Pattern provides flexibility to writing code by splitting into different classes and also keeps the test scripts separate from the locators. Considering this few of the important benefits of the Page Object Model are:
- Code reusability – The same page class can be used in different tests and all the locators and their methods can be re-used across various test cases.
- Code maintainability – There is a clean separation between test code which can be our functional scenarios and page-specific code such as locators and methods. So, if some structural change happens on the web page, it will just impact the page object and will not have any impacts on the test scripts.
How to Implement the Page Object Pattern in Cypress?
As we have discussed, Cypress also provides the flexibility to implement the automation framework using the Page Object Pattern. Let's understand how we can implement this design pattern in Cypress with the help of the following test scenario:
- Open the My Account page of ToolQA demo website - http://shop.demoqa.com/my-account/
- Then do the registration using a valid username, email, and password.
- Verify if the registration was successful or not.
- Search for a shirt and select 2 products as per the data provided in parameters.
- Browse the Checkout page and verify that the correct product is added in the cart.
- Enter the Billing Data along with the Login details.
- Place the order button and verify that the order has been placed successfully or not.
For the implementation part of the Page Object Design Pattern, as a first step, we will need to create a Page Class. A Page class is nothing but a class which contains web element's locators and methods to interact with web elements. To achieve this, create a new folder with the name 'Page Objects' under cypress/support directory and then under that, create files which will be nothing other Page Class that we will be used in the test scripts.
Note: The reason for not creating the page classes under Integration folder is because when you run your test cases from the terminal, it runs all the test cases present under Integration folder and your page classes have no test cases so it skips these files and then it is shown as Skipped in the report which might confuse people. So its better to keep it somewhere else.
Suppose we have to create a Page class for the Home Page. Writing a new class in JavaScript is very easy. We just have to mention at the top "class class-name" and to make all our methods available in the test scripts, write at the bottom the "export default class-name". In the class, we can create some methods and write some selectors which we require in our test for entering data or doing assertions as shown below:
class HomePage {
getUserName() {
    return cy.get('#reg_username');
}
getEmail(){
    return cy.get('#reg_email');
}
getPassword(){
    return cy.get('#reg_password');
}
getLoginUserName(){
    return cy.get('#username');
}
getRegisterButton() {
    return cy.get('.woocommerce-Button');
}
}
export default HomePage
Now we have a class ready and we have set it to export default. So for using these methods in our test, we just have to import them and use them.
But a question arises that till now, we have used fixtures and commands and we never imported them. So why do we need to import this Page Class? The reason for that is because Fixtures, Support, or Plugins are part of the Cypress Built-in Framework. Moreover, Cypress has the knowledge of their presence but here we are creating a totally new Design pattern as per our need. So we have to explicitly import them.
Let's create a sample test where we will import this Page class and create an object of it to invoke the method the Page class as shown below:
// type definitions for Cypress object "cy"
// <reference types="cypress" />
import HomePage from '../../support/PageObjects/HomePage';

describe('Automation Test Suite ', function() {

    //Mostly used for Setup Part
    before(function(){
    cy.fixture('example').then(function(data)
    {
        this.data=data ;
    })
    })

    it('Cypress Test Case', function() {
    //Object Creation for PageObject Page Class and assigning it to a constant variable

    const homePage=new HomePage();

    //Calling
    cy.visit('https://shop.demoqa.com/my-account/');
    homePage.getUserName().type(this.data.Username);
    homePage.getEmail().type(this.data.Email);
    homePage.getPassword().type(this.data.NewPassword);
    homePage.getRegisterButton().click();

    //Checking whether the Registration is successful and whether UserName is populated under login section
    homePage.getLoginUserName().should('have.value',this.data.Username);

    // For Loop for Accessing productName array from Features File
    this.data.productName.forEach(function(element){
        cy.selectProduct(element[0],element[1],element[2]);

    })
As we can see from the above code snippet, the Page Class has been imported before all the test methods and then an object "homePage" has been created using the new operator. Now with his new object created, we can access all the methods that we have created in Page Class. Now instead of using the selectors directly(as done in the previous article of fixtures), we can directly use the method of the Page Class to perform certain operations on the Page Elements. After putting the Page class and the test scripts at their corresponding positions, the sample folder hierarchy of the project will look like as shown below:
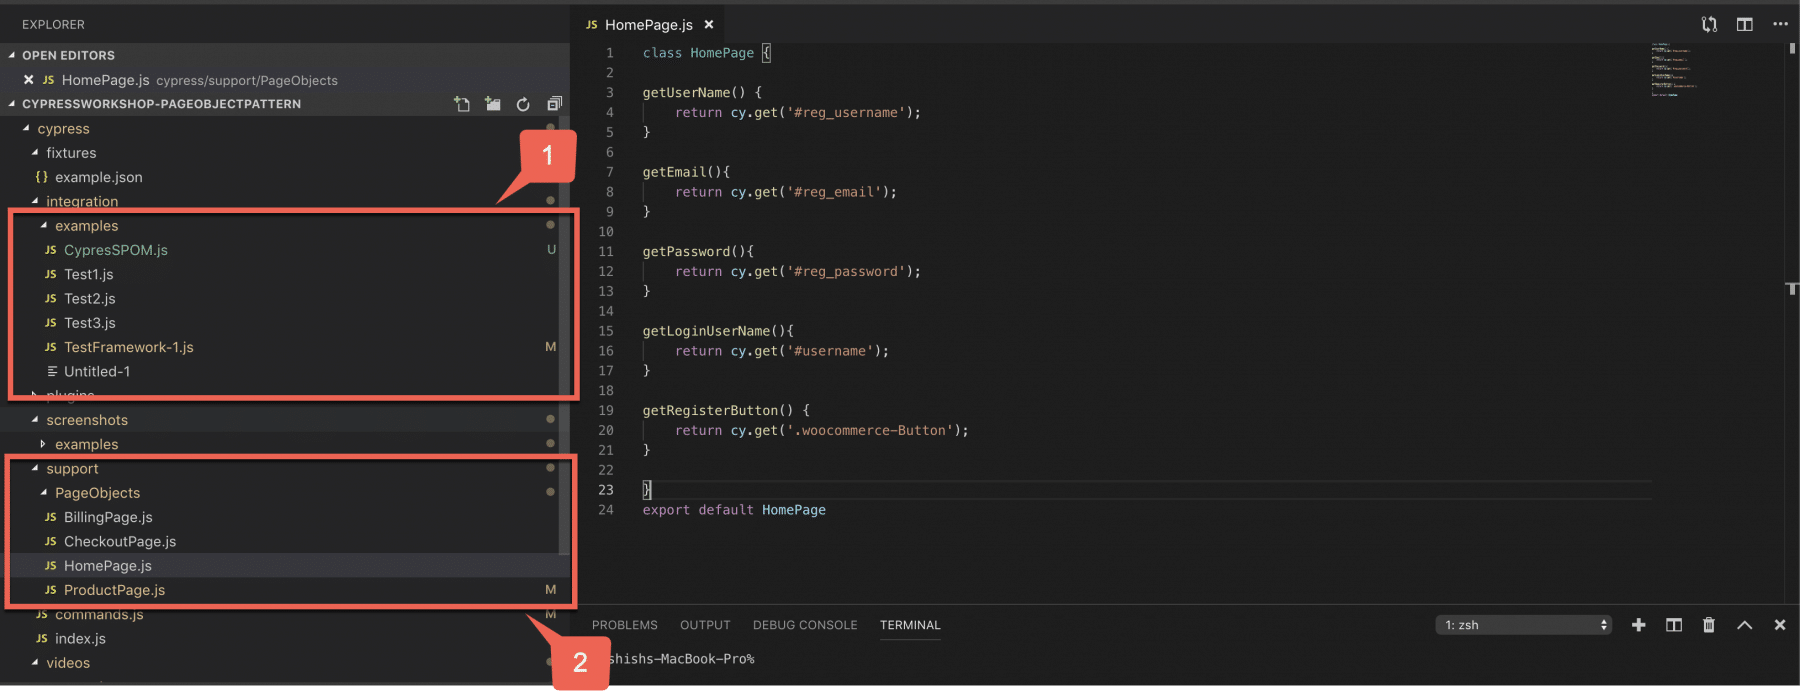
As seen in the above screenshot, marker 1 highlights the tests which will be getting locators and methods from the page classes that we have created. Marker 2 is highlighting the position where to save our page classes which has information about web elements for different pages such as HomePage, ProductPage, BillingPage, and checkout page.
Now, let's understand if we already have some tests which have been implemented without Page Objects. Additionally, we will also understand how to refactor them to convert to the Page Object Pattern.
How to refactor existing Cypress test to fit them in Page Object Pattern?
In the above section, we have created one of the page class. Additionally, we have experienced how we can write our code in the Page Object Design Pattern. This has made our code much more readable and very easy to maintain. Now let's create more page classes of other pages we have for our Application Under Test and completely change our test case.
As mentioned above, our next step will be to search for the shirts. After that, we will add them to the cart based on size and color. If you remember we covered the same scenario in the article "Custom commands in Cypress". Let's try to refactor the same scenario with the help of the page object model. To achieve the same we will need to perform the following steps:
- Create a javascript page class for ProductPage. Then, declare all the methods and elements selectors we need and export the class.
- In the previous article, as most of the code to handle this was written in command.js, so import this class in the same file.
- Create a new object for ProductPage class.
- Access the methods that we have written in ProductPage class.
So let's first create a new Page Class. Name it as ProductPage to handle the product search results and adding to the cart. Ideally, we should have created different classes for Product Search and Cart Handling. But just for an example, we are covering both in a single class as shown below:
class ProductPage {
    getSearchClick() {
        return cy.get('.noo-search');
    }
    getSearchTextBox(){
        return cy.get('.form-control');
    }
    getProductsName() {
        return cy.get('.noo-product-inner h3');
    }
    getSelectSize() {
        return cy.get('#pa_size');
    }
    getSelectColor() {
        return cy.get('#pa_color');
    }
    getAddtoCartButton() {
        return cy.get('.single_add_to_cart_button');
    }
    }

export default ProductPage
After creating the class, let's import it in the command.js file. After that, let's create a new object of it to access all the methods mentioned above in commands.js.
import ProductPage from '../support/PageObjects/ProductPage';

Cypress.Commands.add("selectProduct", (productName, size , color) => {
    // Creating Object for ProductPage
    const productPage=new ProductPage();

    // Doing the search part for Shirts.
    productPage.getSearchClick().click()
    productPage.getSearchTextBox().type('Shirt');
    productPage.getSearchTextBox().type('{enter}')

    productPage.getProductsName().each(($el , index , $list) => {
        //cy.log($el.text());
        if($el.text().includes(productName)) {
            cy.get($el).click();
        }
    })

    // Selecting the size and color and then adding to cart button.
    productPage.getSelectColor().select(color);
    productPage.getSelectSize().select(size);
    productPage.getAddtoCartButton().click();
 })
So, here actually the custom command's class is importing and using the Page class. Additionally, the test script will use the same command.js to perform the needed action. Just like the article "Custom commands in Cypress".
So, the test script will still be the same and will look as below:
// type definitions for Cypress object "cy"
// <reference types="cypress" />

describe('Cypress Page Objects and Custom Commands', function() {

    //Mostly used for Setup Part
    before(function(){
    cy.fixture('example').then(function(data)
    {
        this.data=data ;
    })
    })

    it('Cypress Test Case', function() {

    //Registration on the site
    cy.visit('https://shop.demoqa.com/my-account/');
    cy.get('#reg_username').type(this.data.Username);
    cy.get('#reg_email').type(this.data.Email);
    cy.get('#reg_password').type(this.data.NewPassword);
    cy.get('.woocommerce-Button').click();

    //Checking whether the Registration is successful and whether UserName is populated under login section
    cy.get('#username').should('have.value',this.data.Username);
    })

    // For Loop for Accessing productName array from Features File and Using the custom command
    this.data.productName.forEach(function(element){
        // Invoke the Custom command selectProduct
        cy.selectProduct(element[0],element[1],element[2]);
    })
})
Next, we can add page objects for other web pages also. We can also invoke their methods on their corresponding objects to complete the user journey. You can refer to a sample project mentioned below. This will give you a quick look at all the Page Objects being created for the above-mentioned test scenario:
https://github.com/aashishk7/CypressWorkshop-PageObject.
When we run(as per details mentioned in the article "Test Runner in Cypress") the above-mentioned Project which has all the page objects for the Demo Site, It will show the sample run as follows:
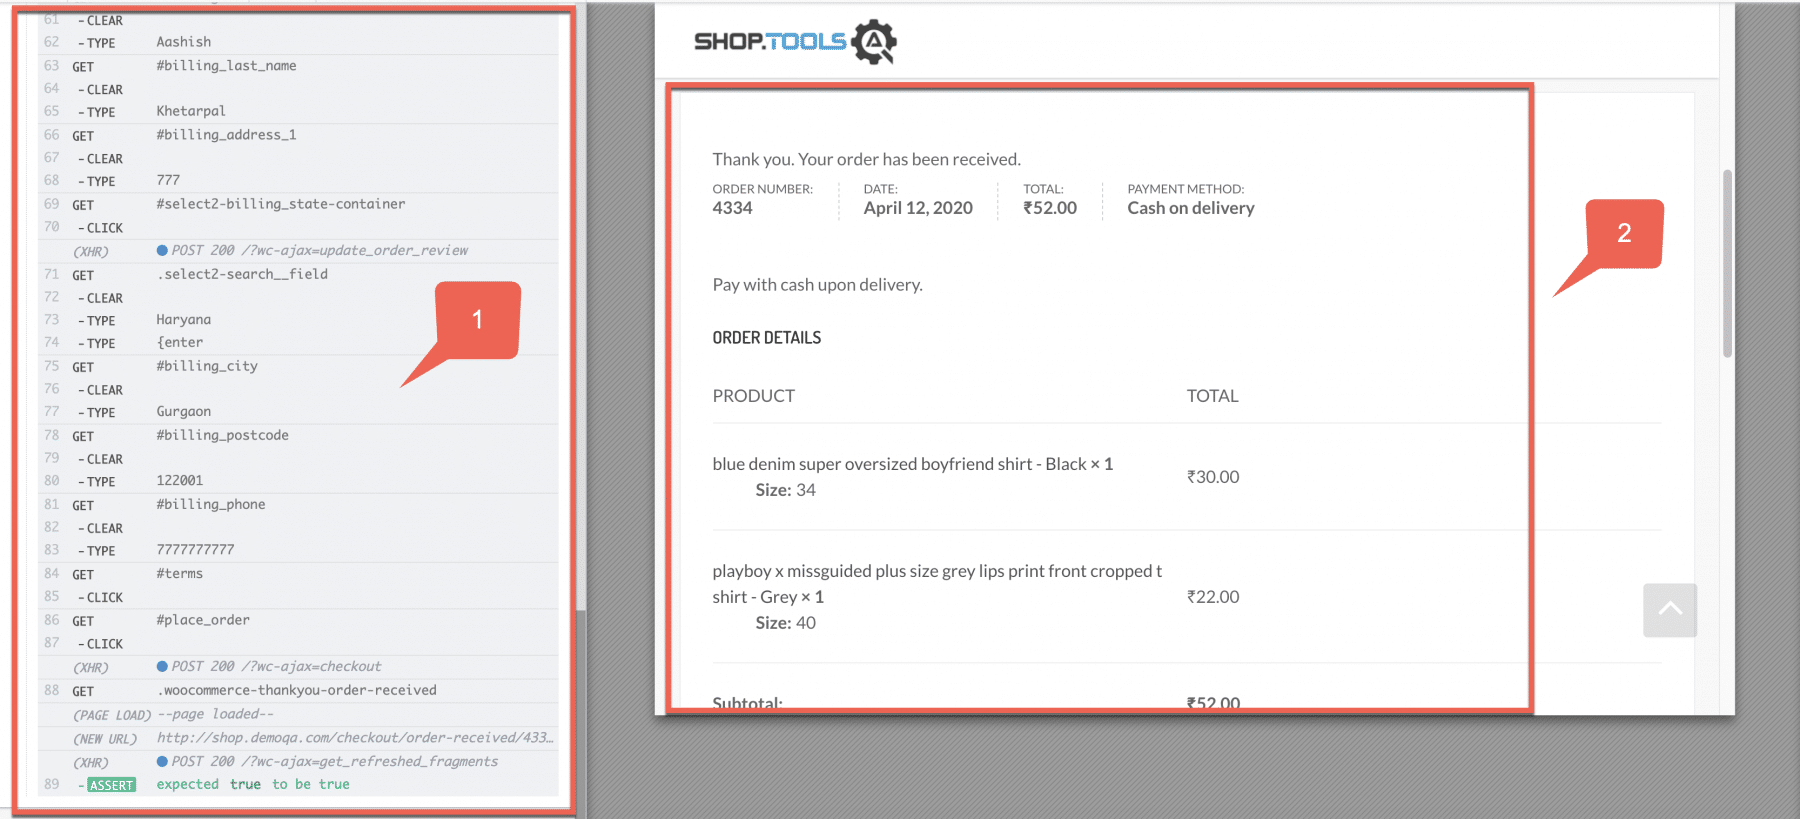
In the above screenshot, marker 1, shows that all 89 steps written in the Cypress test have been executed successfully. On the right-hand side, highlighted with marker 2, the order for 2 products has been placed successfully. Also, its order number has also generated.
So, by now we know how to write a new Page Object. We also know how to refactor the existing project to implement the Page Object pattern in Cypress.
Key Takeaways
- The Page Object Patterns provides an easy way to segregate the test code from the page elements. Additionally, it makes the code reusability and maintainability very easy.
- Cypress also provides the features to implement Page Object Pattern and include the same in test scripts.
- Apart from test scripts, even Custom commands can include and implement the Page Objects.
Let's move to the next article. There we will learn about various kinds of configurations Cypress provides and how to manage those configurations.
If you want to learn more you can look at this video series: ++Cypress video series++
