In the last post about Live testing in CrossBrowserTesting, we performed a Live Test on a website and had our first experience viewing a website on a remote system. It is amazing to see and test a website on thousands of browsers without installing any of our personal systems. Live Testing is one of the most powerful features of CrossBrowserTesting by SmartBear and just viewing the website on a remote screen is not enough. Live Testing in CrossBrowserTesting is loaded with top features in the cross-browser testing industry and this tutorial is dedicated to Live Test Settings in CrossBrowserTesting. These features are incomparable to any other platform you may encounter on the internet.
In this tutorial, we will explore the advanced tools and options available through live testing for better and efficient testing. This tutorial is divided into two sections:
- Live Test Settings in CrossBrowserTesting.
- Advanced Options in Live Testing by SmartBear CrossBrowserTesting.
Let's look at each of the settings and tools one by one.
Live Test Settings in CrossBrowserTesting
Live Test settings in the Live Testing section provide different options and preferences for the user to perform Live Testing according to them. Live Test Settings can be accessed from above the Run Test button in the Live Test section.

Click on the dropdown and you will be able to see different options and preferences available in this setting.

1. Client Setting in Live Test Setting
Client refers to the client-server streaming technology that would be used to test the website on the browsers. It contains two options namely WebRTC and HTML5.
-
WebRTC: WebRTC or Web Real-Time Communication is a new technology that has been gaining popularity for a couple of years now due to a reduction in latency and improved accuracy and efficiency. As the name suggests, it is used for real-time communications and these type of communication often include videos, images etc. So, if you are using WebRTC for testing your website, you will notice a faster response from the server and a reduced lagging between the command you send and the output you see like scrolling the webpage of the website. It will also affect the frame rate at which the user would play the videos on the remote system while testing.
-
HTML5: This is the normal technology we use today in most of the streaming facilities like streaming a video. Actually, WebRTC uses HTML APIs only to provide real-time communication but with more code on top of it to improve performance. Therefore, this option will provide low-quality experience as compared to webRTC. In CrossBrowserTesting, when you select HTML5 in the live setting, you will get another preference as shown.
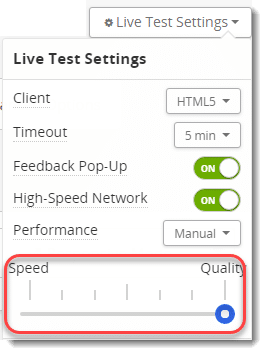
This is a speed-quality trade-off. Since HTML5 technology is not so efficient in providing the cast service to the client, the user gets an option to either compromise on speed or on quality for the testing. So, if the user chooses "speed", the quality will be poor and vice-versa.
2. Timeout Setting in Live Test Setting
Timeout is a preference for the user to select the time after which the Live Testing will automatically close down. In the options given, the user can select 5 minutes, 10 minutes or 15 minutes for the timeout of the session.
3. Feedback Pop-Up in Live Test Setting
As the name suggests, feedback pop-up is a pop-up that appears when the user closes the live testing window or it gets timed out. It is meant for software improvement by SmartBear. So if you have toggled it on, you will receive the popup every time the test is finished. A feedback popup can be seen in the Live Testing introduction post.
4. High-Speed Network Setting in Live Test Setting
Turning on high-speed network redirects the traffic through the Akamai technologies network which is more stable and gives better quality performances in the live testing. This feature is highly recommended for better testing purposes but since this technology works similar to the proxy server, having firewall restrictions may not allow the connection.
These options are user-inclined and a user may or may not want to change these settings according to them. While it is good to have them on the screen for the convenience of the user. The next setting that the user encounters while performing live testing is advanced options.
Advanced Options in Live Testing by CrossBrowserTesting
Advanced options in Live Testing contain a few more settings for the convenience of the user. With the use of advanced options in the Live Testing, the user can make use of additional features available in CrossBrowserTesting such as recording the video while performing the tests, etc. Advanced options tab is located just beside the address bar.

As seen in the above image, advanced options in Live Testing contain three additional toggle options.
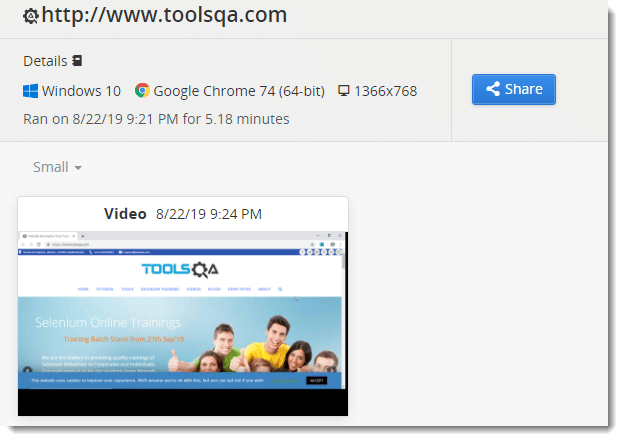
1. Record Video
Record video option records the complete testing experience in a video which is available to the user after the test is complete in the test results. To know about the test results, you can visit this link. This option is also available in the tool panel available on the live screen when we run the tests. It will be discussed later. It should be noted that the video will be recorded for a maximum of 10 minutes.
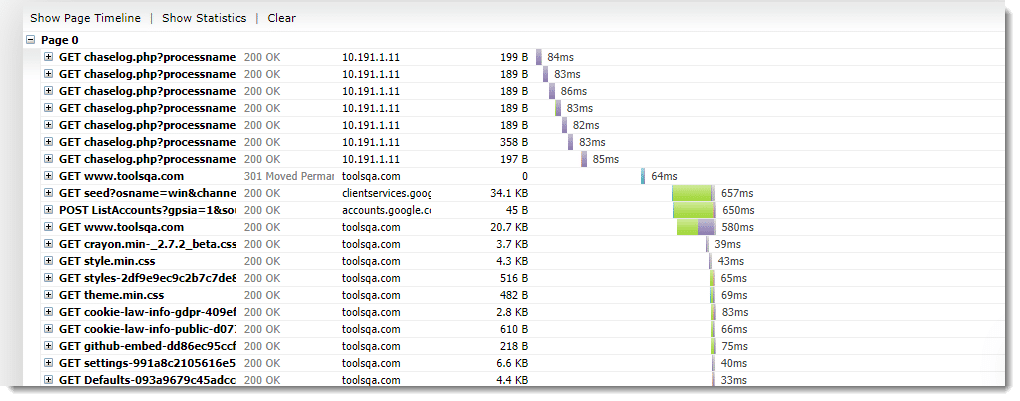
2. Record Network
Record network option records the network traffic that was encountered during the complete testing session. Once the session is over, the network traffic can be viewed in the test results. Similar to the record video option, this option is also available on the live screen panel when you run the live test.
3. Specify Local Connection
This option will prompt you to enter the local connection on which the test has to run. By default, this option will select the most recent setting and the user is generally not required to enter it manually. But, if the user is running multiple local connections, it is necessary to specify it.
These were some handy features and options available in CrossBrowserTesting before the user runs the test. There are a few more options available on the live screen after the test has started. Once the user has run the test, they will see a tool panel on the screen with very useful and essential tools available in it. I am sure you will not find such tools on other cross-browser testing platforms. The details about each option in the tool panel will be discussed in the next tutorial.