So far, in our articles on Docker Container, we have dealt with one container at a time. However, Docker provides us with the flexibility to deal with and run multiple containers as well as using a tool to work on them called Docker Compose. Consequently, in this article, we are going to discuss this in detail. We will cover the following topics:
- What is a Docker Compose?
- Installing Docker Compose
- What are its main features?
- Docker-Compose command
- How to set environment variables in Docker-Compose?
- Syntax rules for .env file
- How to use Docker Compose?
- Where should we use Docker Compose?
- Should it be used in production?
- Docker-compose config: multiple compose files
- Multiple compose file
- Extending services using "extends"
- What is the difference between Dockerfile and Docker Compose?
What is a Docker Compose?
It is a tool that defines and executes Docker applications with multiple (more than one) containers. Additionally, e use a configuration file "YAML" with the compose for configuring Docker application's services. Moreover, when we use YAML, we can create and start all the application services with a single command.
Docker Compose runs multiple containers as a single service. So, for example, if the application requires MySQL and NUnit, we can start both the containers at once as a service using the YAML file. Moreover, we need not start each container separately.
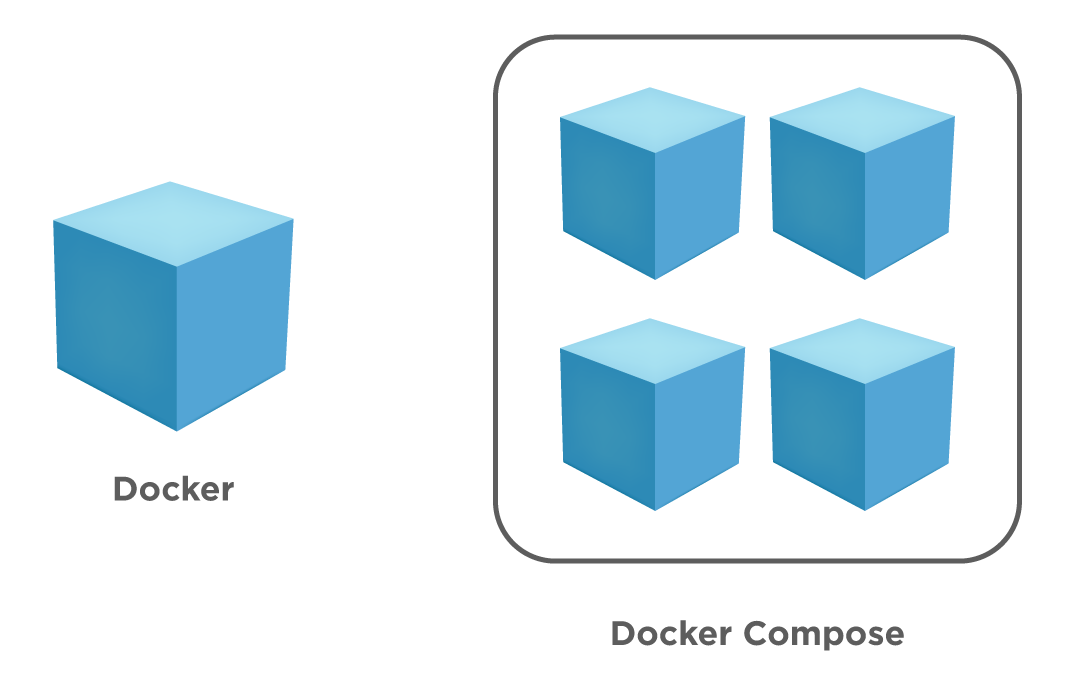
So if Docker runs single container applications, we can scale it up to contain multiple containers as shown above using Docker Compose. Notably, it works effectively in all environments, including development, production, testing, staging, and CI ( Continuous Integration) workflows.
The running of an app is a three-step process as summarized below:
- First, define the app environment in a Dockerfile.
- Second, create a "docker-compose.yml" file that defines the services to be run together in an isolated environment.
- Finally, execute/run docker-compose up. Consequently, the tool starts and runs the entire app.
Installing Docker Compose
We have to fulfill a prerequisite before we can install it on our machine. Consequently, this prerequisite is listed below:
- Firstly, we should install the Docker Engine on any machine before installing it as it is dependent on Docker Engine to perform any meaningful tasks.
Therefore, once we successfully install the Docker Engine, we can proceed with the installation of the compose tool.
For the scope of this article, we will discuss the installation on Linux OS. First, perform the following steps on the Linux machine to install the Compose.
- Firstly, download the current stable release of Compose with the following command.
docker curl -L "https://github.com/docker/compose/releases/download/1.27.4/docker-compose-$(uname -s)-$(uname -m)" -o /usr/local/bin/docker-compose
Subsequently, the following/ below screenshot shows the execution of the above command.
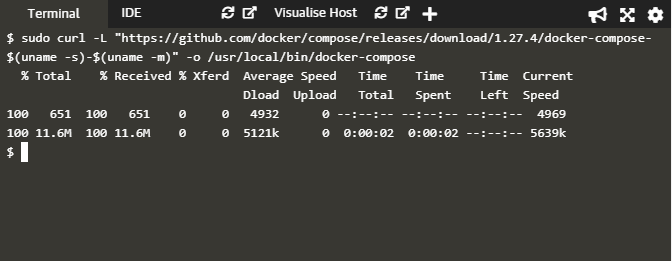
Note the download details. Moreover, once the tool downloads, we have to provide "execute" permissions using the next command.
- Secondly, change the permission for the binary to make it executable.
docker chmod +x /usr/local/bin/docker-compose
Moreover, we don't have to install this tool explicitly. In other words, once we download the tool and give it execute permission, we can use it to perform various tasks. So once we give the permission, we can verify the installation using the following command given in step 3 below.
- Thirdly, verify the installation using the following command:
$ docker-compose --version
Moreover, the screenshot for the above steps is as below.
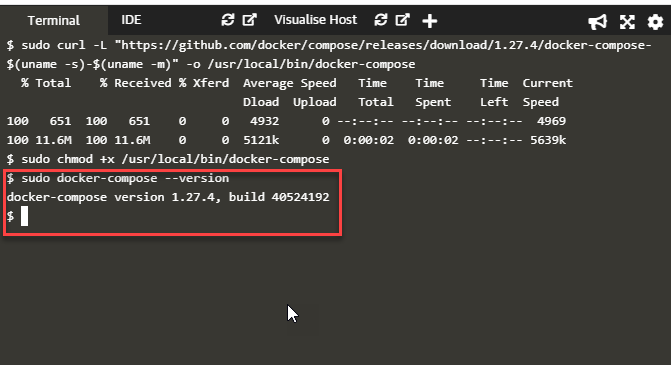
As seen from the above screenshot, once we download and give execute permission to the Compose tool, it is ready to be used. Consequently, next, we verified the installation using the command "sudo docker-compose --version". Additionally, the output of this command shows the version and build number of the Compose tool. Consequently, it signifies a successful installation.
What are the main features of Docker Compose?
Following are some of its features:
- Firstly, Compose helps to have multiple isolated environments on a single host. Consequently, for this, Compose uses a project name. By default, the project name is the name of the base directory. But, we can set it to any other custom name using the COMPOSE_PROJECT_NAME environment variable or "-p" command-line option.
- Additionally, it preserves volume data when we create the containers. If Compose finds the containers in the previous runs, it copies the old container data into a new container.
- Moreover, using Compose, we recreate only those containers that have changed. Additionally, it caches the configuration to create a new container so that when we restart a service that is not changed, it reuses the existing containers.
- Also, it supports the variables and moving a composition between environments. Compose has support for variables in the Compose file, which we can use for customizing the composition of various environments or maybe different users.
Conclusively, now that we have discussed some of the essential features, let us now move on to the command section.
Docker-Compose command
We use the "docker-compose" command to define and run applications with multiple containers in Docker. Additionally, the general syntax of the 'docker-compose' command is as follows:
docker-compose [-f <arg>...] [options] [COMMAND] [ARGS...]
Here the [options] specify various options that can be used with the 'docker-compose' to facilitate readable output. Additionally, the [COMMAND] specified various commands we can give to execute or run applications using Compose.
The following table described [options] that we use with the docker-compose command.
| Options | Description |
|---|---|
| -f, --file FILE | Used if we have an alternate compose file (default: docker-compose.yml) |
| -p, --project-name NAME | Used to specify an alternate project name (default: directory name) |
| --verbose | More output for the executed command |
| --log-level LEVEL | Set log level (DEBUG, INFO, WARNING, ERROR, CRITICAL) |
| --no-ansi | don't print the ANSI control characters. |
| -v, --version | Display version and exit |
| -H, --host HOST | Daemon socket to connect to |
| --tls | Use TLS; (implied by –tlsverify) |
| --tlscacert CA_PATH | Trust certificates signed only by this CA |
| --tlscert CLIENT_CERT_PATH | TLS certificate file path |
| --tlskey TLS_KEY_PATH | TLS key file path |
| --tlsverify | Use TLS and verify the remote |
| --skip-hostname-check | Skip the daemon's hostname check against the name specified in the client certificate |
| --project-directory PATH | Used to specify an alternate working directory (default: the path of the Compose file) |
| --compatibility | When set = Compose tries to convert deploy keys in v3 files to their non-Swarm equivalent. |
Similarly, the second table below shows various [commands] used with docker-compose.
| No | Command | Description |
|---|---|---|
| 1 | build | Build/rebuild services |
| 2 | bundle | Generate a Docker bundle from the Compose file |
| 3 | config | Validate and view the Compose file |
| 4 | create | Create services |
| 5 | down | Stop/ remove containers, networks, images, and volumes |
| 6 | events | Receives real-time events from containers |
| 7 | exec | Execute a command in a running container |
| 8 | help | Get help on the specified command |
| 9 | images | List images |
| 10 | kill | Kill containers |
| 11 | logs | View output from containers |
| 12 | pause | Pause services |
| 13 | port | Print the public port for a port binding |
| 14 | ps | List containers |
| 15 | pull | Pull service images |
| 16 | push | Push service images |
| 17 | restart | Restart services |
| 18 | rm | Remove stopped containers |
| 19 | run | Run a one-off command |
| 20 | scale | Set number of containers for a service |
| 21 | start | Start services |
| 22 | stop | Stop services |
| 23 | top | Display the running processes |
| 24 | unpause | Unpause services |
| 25 | up | Create and start containers |
| 26 | version | Show the Docker-Compose version information |
For example, let us execute the "--version" command, giving the below output.
docker-compose version 1.25.5, build 8a1c60f6
How to set environment variables in Docker Compose?
Compose also deals with environment variables. Therefore, we can substitute environment variables in compose files or even use environment variables with the 'docker-compose' command.
For example, suppose we have the following environment variable set.
$ cat .env
TAG=v1.7
The environment variable is TAG, and its value is v1.7 with the above command.
Moreover, we can use this $TAG environment variable in the YAML file as follows:
version: '2'
services:
  web:
    image: "webapp:${TAG}"
Additionally, it means when the 'docker-compose up' command executes, the web service-defined web app with version 1.7 (value of ${TAG}) will download.
Note: The value of the environment variable in Shell takes precedence over the value of that variable in the env file.
Moreover, we can also pass multiple environment variables to compose a file at once from an external file through 'services' containers with the 'env-file' option as shown below.
web:
  env_file:
    - webapp-variables.env
Here we have passed the file 'webapp-variables.env', which contains more than one environment variable.
Alternatively, we can also set an environment variable on a container with a 'docker-compose run' command using the -e option.
docker-compose run -e DEBUG=1 web python consoleapp.py
So when we set the environment variables using various options, Compose uses the following priority to decide which value to use:
- Compose file
- Shell environment variables
- Environment file
- Dockerfile
- Variable is not defined
In addition to the above, Compose also has some inbuilt environment variables that define its command line behavior. Consequently, you can refer to Compose CLI environment variables.
Syntax rules for .env file
In Docker compose, we can declare default environment variables in an environment file with ".env" extensions as shown in the above example. Note that we usually place this file in the current working directory.
When working with the '.env' file, we should ensure that we apply the following syntax rules to the '.env' file:
- Each line in the 'env' file should be in the format VAR=VAL.
- Moreover, lines that start with '#' are processed as comments and hence ignored.
- Also, we ignore the blank lines.
- Moreover, quotation marks are not handled, which implies they are part of the VAL.
In Compose, we can define our environment variables for variable substitution in the Compose file. Moreover, we can also use to define the following CLI variables:
- COMPOSE_API_VERSION
- COMPOSE_CONVERT_WINDOWS_PATHS
- COMPOSE_FILE
- COMPOSE_HTTP_TIMEOUT
- COMPOSE_PROFILES
- COMPOSE_PROJECT_NAME
- COMPOSE_TLS_VERSION
- DOCKER_CERT_PATH
- DOCKER_HOST
- DOCKER_TLS_VERIFY
At runtime, the values in the environment override the values defined in the '.env' file. Additionally, values passed through command-line arguments during command execution override the '.env' file values.
How to use Docker Compose?
Now that the installation is complete, we can use it to run applications. Subsequently, it is a three-step process outlined below:
- Firstly, create a 'Dockerfile' that defines the app environment to reproduce the environment anywhere.
- Secondly, create a 'docker-compose.yml' file that defines services that make up the app. It helps the services to run together in an isolated environment.
- Finally, execute the 'docker-compose up' command to start the Compose and run the entire app at once.
Now let us take an example to perform the above steps so that we can use Docker Compose. Here we will make use of compose to set up a WordPress app with MySQL database. Therefore, for this purpose, we will start both the containers, WordPress and MySQL, simultaneously using Compose. This example is only for demonstration purposes. Hence we will run it only in our local environment. Moreover, we will be writing only the docker-compose.yml file and then start these containers using the 'docker-compose up' command.
So let us begin with the example. First of all, we will create a folder, say, my_wordpressApp, and then switch to this directory.
mkdir my_wordpressApp
cd my_wordpressApp
Once done, we will create a docker-compose.yml file using any editor like 'vi' or 'vim' and update the following contents in it.
version: '3.3'

services:
   db:
     image: mysql:5.7
     volumes:
       - db_data:/var/lib/mysql
     restart: always
     environment:
       MYSQL_ROOT_PASSWORD: somewordpress
       MYSQL_DATABASE: wordpress
       MYSQL_USER: wordpress
       MYSQL_PASSWORD: wordpress

   wordpress:
     depends_on:
       - db
     image: wordpress:latest
     ports:
       - "8000:80"
     restart: always
     environment:
       WORDPRESS_DB_HOST: db:3306
       WORDPRESS_DB_USER: wordpress
       WORDPRESS_DB_PASSWORD: wordpress
       WORDPRESS_DB_NAME: wordpress
volumes:
    db_data: {}
As shown in the above file, we have a DB service for MySQL 5.7 image and a WordPress image (latest version). Additionally, we have used environment variables to specify the DB string (MYSQL_ROOT_PASSWORD, MYSQL_DATABASE, etc.) as well as to specify WordPress container details (WORDPRESS_DB_HOST, WORDPRESS_DB_USER, and so on). Subsequently, now we will execute the following command.
docker-compose up -d
Additionally, we can see the output of this command in the below screenshot.
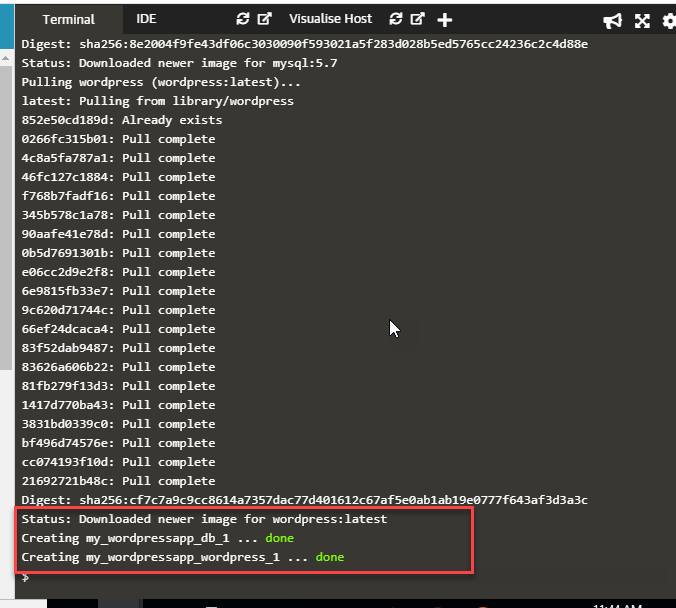
The above image downloads and starts both the containers, as shown in the above screenshot. Consequently, we will execute the following command to verify that WordPress and MySQL containers are up and running.
docker-compose ps
Once this command executes, we get the following output.
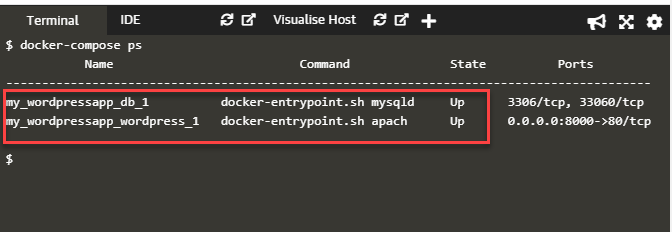
Thus using Docker Compose, we can download and set more than one container at once without having to do it one by one. Additionally, for more examples of applications using Compose, refer to Awesome Compose Repository.
Where should we use Docker Compose?
It facilitates the use of multi-container applications by means of the YAML file. Here we can set the required amount of container numbers, their builds, storage designs, etc. Moreover, we can configure, build, run all these containers with a single set of commands. So it lifts the load off the Docker of maintaining multiple containers.
Hence, when we have multi-container applications, Compose is a great alternative for development, testing, continuous integration workflows, staging environments, etc. Additionally, we can perceive compose as an "automated multi-container workflow" that we can use in these stages of application development.
Should Docker Compose be used in production?
Like in a development environment, using a single server to deploy an application is the easiest way. But if we want to scale up the applications, we can use Docker Compose on a Docker Swarm cluster. Additionally, to use Compose in production, we need to make specific changes to the app configuration. Subsequently, these changes include:
- We have to remove any volume bindings for the application code so that code cannot be changed from the outside and stays inside the container.
- Moreover, we may have to bind to different ports on the host.
- Additionally, we need to set new environment variables or set existing ones differently, like reduce the verbosity of logging, remove debug information, etc. In addition to this, we have to set additional environment variables for any external services used by the application.
- We also need to avoid application downtime. In such cases, we might have to specify policies like restart: always.
- Additionally, sometimes we might have to add some extra services to the applications specifically in production. In such a case, we have to change our app configuration.
To specify the above changes, we might want to have a separate production.yml in addition to the docker-compose.yml file. Moreover, the file production.yml file will only have production-specific configurations. Hence we can execute both these files so that we can set all configurations in the production environment. Subsequently, to run both the YML files, we can provide the following command.
docker-compose -f docker-compose.yml -f production.yml up -d
The following section discusses using multiple compose files and the extends keyword.
Docker-compose config: multiple compose files
Above, we have discussed the docker-compose. yaml file. We can have multiple compose files and share configuration. Moreover, there are two approaches using which we can share configuration.
- We can extend the entire Compose file by using multiple Compose files.
- In addition to the above, we can use the "extends" field and extend individual services. (This is applicable only for Compose file versions up to 2.1)
Subsequently, let us now discuss both these approaches.
Multiple compose files
We know that compose reads a file 'docker-compose.yml' that contains the base configuration. In addition to this, there is an optional 'docker-override.yml' file which Compose also reads if it is present. The override file contains the configuration that is to override for existing or new services. Moreover, we can customize a Compose application for different workflows or environments by using multiple compose files.
A Compose uses the "-f" option to use multiple files with the base compose file as the first file. Additionally, compose merges these various files in the order in which we specify them on the command line. Moreover, we must ensure that all paths in the files are relative to the base compose file. A notable feature of override files is that they need not be valid Compose files. Also, they usually contain small fragments that define the configuration. Therefore, we must specify all the paths relative to the base file.
If there are multiple compose files, namely, docker-compose.yml and docker-compose.prod.yml, then we can use the 'docker-compose command' as follows :
docker-compose -f docker-compose.yml -f docker-compose.prod.yml up -d
Moreover, it will deploy all the services specified in these files.
Note: We use docker-compose.prod.yml mainly to deploy the services in a production environment.
Extending services using "extends"
We can use the "extends" keyword that enables sharing configuration among various files and/or projects. For example, we use the "extends" keyword in docker-compose when we have more than one services that use a common set of configurations. Therefore, using the 'extends' keyword, we define a common set of service configurations in one place to refer them from anywhere.
Additionally, consider the following docker-compose.yml. Here we have used the 'extends' keyword.
web :

  extends :

         file : common-services.yml

         service : webapp
In this file, the extends keyword instructs the Compose that the configuration defined for the 'webapp' service in the file "common-services.yml" should be reused.
Note: The "extends" keyword is supported in earlier Compose file formats up to Compose file version 2.1. However, Compose version 3.x does not support it.
What is the difference between Dockerfile and Docker Compose?
The following table lists a few of the common differences between the two:
| Dockerfile | Docker Compose |
|---|---|
| A Docker using Dockerfile manages single containers. | A Compose manages multiple containers. |
| A Dockerfile creates a Docker image. | Compose is used to create application, web, DB Containers in one go. |
| A Dockerfile is a simple text file that contains the commands a user could call to assemble an image. | Compose is a tool for defining and running Docker applications with multiple containers. |
| We can execute commands like run, from, entry point, etc., from the Dockerfile to manipulate images and containers. | Compose uses docker-compose.yml to define the services that make up our app to run them together in an isolated environment. |
Key TakeAways
- We discussed that Compose is a tool that helps us work with multiple containers. Moreover, when we want to scale up Docker applications to work with more than one container, we use Compose.
- Additionally, it maintains a compose file, 'docker-compose.yml,' to define more than one container. Moreover, we execute this file using 'docker-compose up,' which defines and creates the containers defined in the compose file.

