In the last tutorial, we briefly touched on the topic of containers and containerizarions. To recall, a container is a standard software unit. It has all the code, and its dependencies packed up in that unit and helps run the application quickly and reliably across the computing environments. So let us discuss Docker containers in this article.
A Docker container is a standalone, lightweight, executable package of software. As already mentioned, since it's a container, it has everything bundled up together that is needed to run an application like application code, system tools, runtime, binaries, libraries, etc.
As part of Docker containers, we will discuss the following topics in this article.
- What are Docker containers?
- Why we need Docker containers?
- How does a Docker container work?
- Docker container commands
- docker run command - launch a container Image/ Run container
- Next is the docker ps command - List Docker Containers
- *docker commit command - Save Docker containers
- docker stop command - Stop containers*
- Next is, docker history command - View Docker container history
- docker top command - View container processes
- docker rm command - Remove a Container
- Also, docker stats command - Get the container statistics
- docker pause command - Pause/unpause a container
- docker attach command - Attach to a container
- And, docker kill command - Kill a container
- How to use privileged Docker containers?
- Are privileged Docker containers a good idea?
- How to secure containers?
What are Docker containers?
In our earlier chapter on "Docker Images", we discussed Docker images in detail. We know that the Docker image is a static entity, and to run the Docker image, we have to associate it with a container. In other words, Docker images become containers at runtime or when they run on Docker Engine.
So a Docker container has the following characteristics:
- Standard: The Docker containers are portable since they follow the industry standard.
- Lightweight: Docker containers share the host machine's OS kernel and hence do not need an OS per application. It reduces licensing and server costs and also gives higher efficiency.
- Secure: Applications are safer when packaged in Docker containers. Docker also provides the most robust isolation capabilities for its containers in the industry.
Docker containers are the Docker images at runtime and are lightweight, standard, and secure in a nutshell. So when exactly Docker container technology came into existence?
It was in 2013 that the Docker container technology's launch happened as an open-source Docker Engine. Therefore, one can view the Containers as 'organizational units' of Docker. Additionally, we have portable software running in our container. Like cargo ship containers, we can move this container (ship the software), modify, manage, create, remove, or destroy it.
So in simple terms, if the Docker image is a template or blueprint, then the container is a running copy of this image. We can have multiple copies of this image, which means we can have multiple containers with the same image.
Why we need Docker containers?
Various problems may arise when we run the software. For example, we might have developed our software on the Debian version of Linux, and the production environment might be having a Red Hat version. Or we might have used python 3 as our developing language, and the testing environment may use another version of python.
Alternatively, even if we somehow achieve the uniformity of software versions irrespective of the various stages of the software development cycle, there can be other factors like network topology, storage or security policies, etc., of machines on which the software has to run. Therefore, it results in problems that make our applications challenging to run.
To solve such problems, we bundle the application, code, the binaries it requires to run, and all other dependencies into a Docker image and then ship it to other environments. Then this image runs in a container in various environments.
So by using the Docker containers, we achieve uniformity of running the software in all types of infrastructure, and we need not worry about other details like software versions, network topologies, storage policies, etc.
Therefore, we can summarise the reasons why we need Docker containers as follows:
- Docker containers allow us to deploy, replicate, move, or back up an entire workload more easily and quickly than virtual machines. As a result, it saves us a lot of time and complexity.
- With containers, we have cloud-like flexibility to any infrastructure that runs containers.
- Docker containers are advanced forms of Linux Container (LXC) and allow us to build libraries of images, build applications from those images and launch them and the containers on local and remote infrastructure.
- Additionally, Docker containers solve the problem of moving and running the software from one computing environment to another, like from the development environment to testing or staging or production environment.
- Docker containers also facilitate moving applications and images from a physical machine to a virtual machine in a private/public cloud.
In conclusion, since a container contains an entire runtime environment like application, dependencies, binaries, libraries, configuration files, etc., into one package, we can easily abstract the differences in OS distributions and its underlying infrastructure and only concentrate on software.
So containerization of applications/software simplifies the software professional's life.
How does a Docker container work?
In this section, we will see the basic working of a Docker container. But, first, let us understand the lifecycle of a Docker container.
The following diagram shows a container lifecycle:
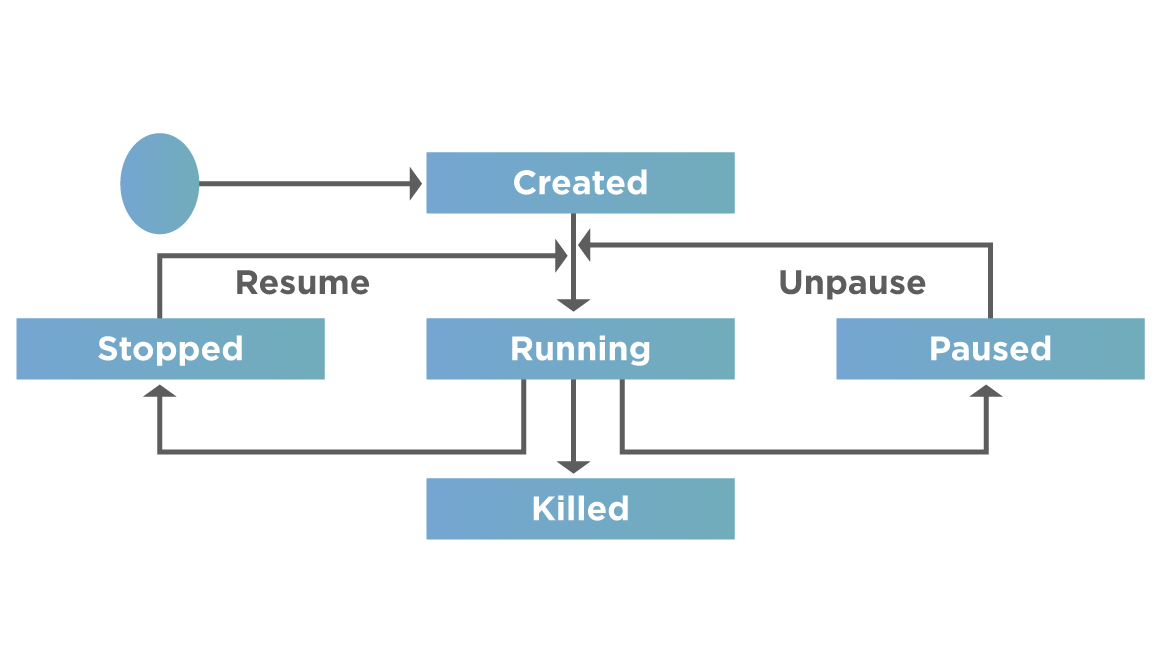
As shown in the above lifecycle, a Container will have the next stages in its lifecycle:
- Created: Initially, a docker container gets created.
- Running: Then, we execute the container that puts it into the running state
- Killed: If we are done with the docker container or no longer need it, we kill the container.
- Paused: We may also want to pause the container for some time and then unpause
- Stopped: Alternatively, we may stop the container for some external work and then resume its execution so that it is running.
Working of Docker containers
The following diagram gives us an insight into the working of the Docker containers:
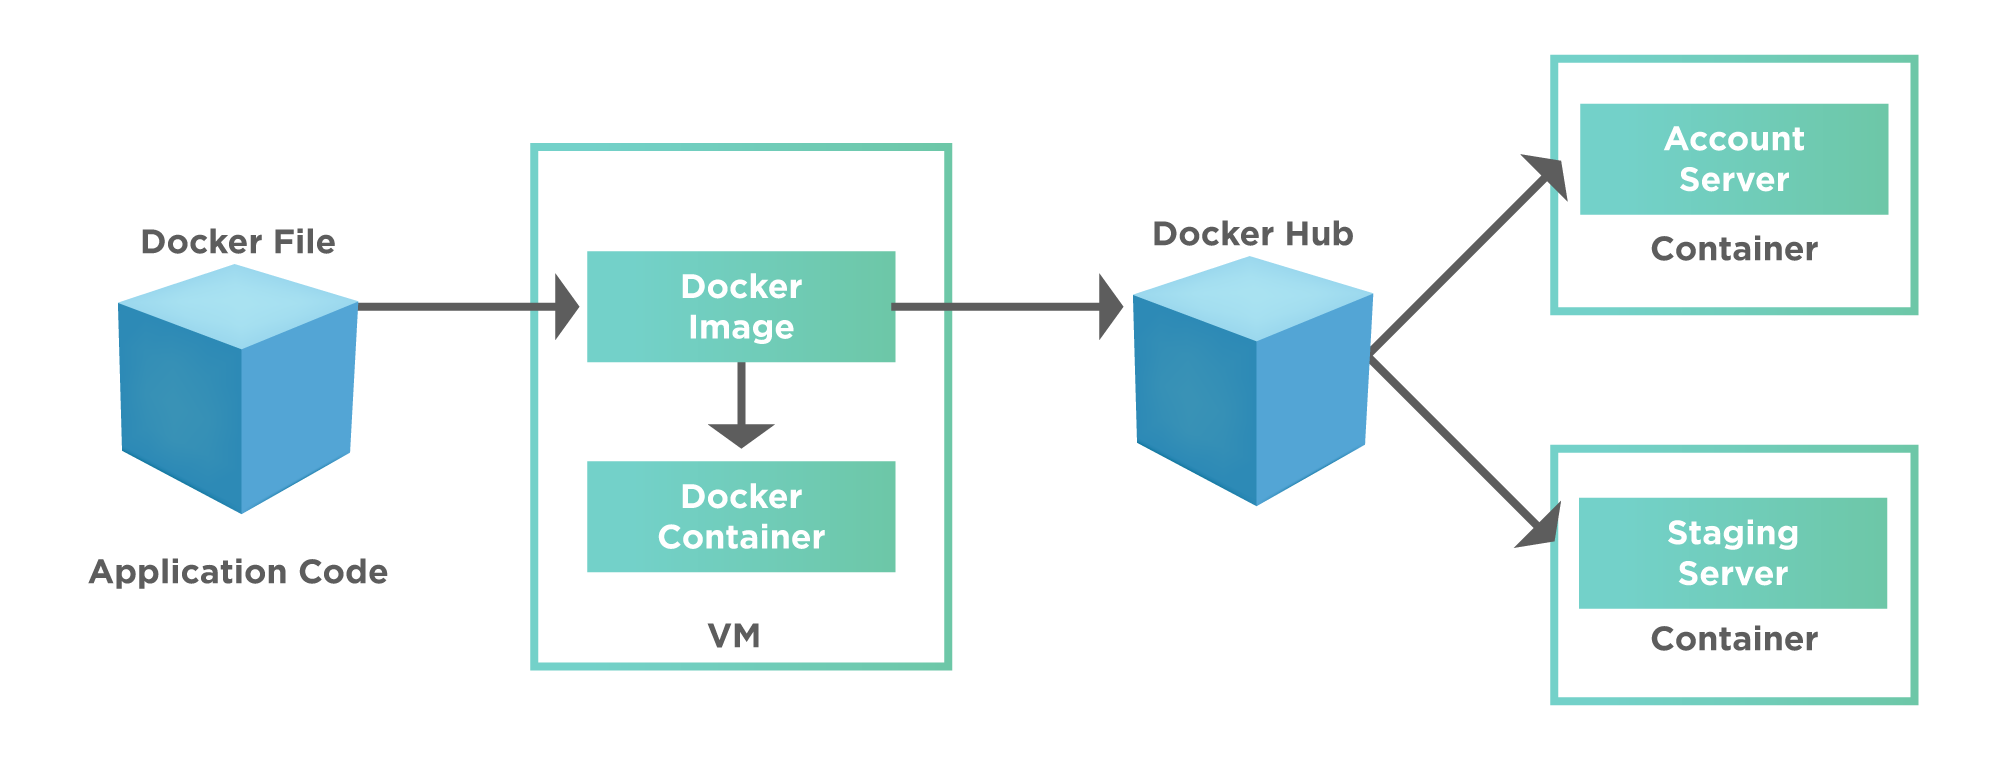
We can explain the above diagram in the following steps.
- A developer first writes a docker file. This docker file contains the entire project code.
- The docker image then builds from this docker file.
- This docker image uploads to the docker hub. Docker hub is a cloud-based repository to hold docker images.
- Other teams like accounts, QA, production, staging, etc., can then pull this docker image from the docker hub.
We will go into the details of each of these steps as we proceed with this series.
Docker container commands
In our 'Docker images' topic, we have gone through various commands to manipulate images. Containers contain running images, and to effectively work with containers, we need to manipulate containers too.
Manipulation of containers involves starting/stopping containers, creating, running, listing processes of containers, restarting containers, etc. All these actions related to manipulating containers are supported in Docker by providing appropriate commands for each of these actions.
Let us now discuss some of the container commands that are used to change various states of the container or, in other words manipulating containers as we discussed above.
Docker run command - launch a container Image/ Run container
The “run” command in Docker executes a container.
The running of containers is managed/ handled with the Docker run command. To run a container in an interactive mode, the Docker container should launch first.
The general syntax of the run command is :
docker run [OPTIONS] IMAGE [COMMAND] [ARG...]
The 'docker run' command will first create a writeable container layer over the given image and then start it using the above command. So the command 'docker run' is equivalent to first expecting '/containers/create' and '/containers/(id)/start'.
For example, the following command:
docker run ubuntu bash
Press Ctrl+p, and the control will return to the OS shell. Then we will be running an instance of the ubuntu bash system.
The output/ result of the above command is as below.
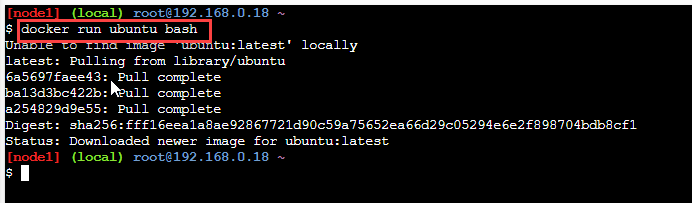
As we can see, the execution of the above command results in downloading the latest image for ubuntu since it didn't already exist.
docker ps command - List Docker Containers
We can list the containers present on the machine. We can do it by using the 'docker ps' command.
The general syntax of the command is:
docker ps [OPTIONS]
Without an option, the 'docker ps' command lists all the currently running containers. We use the '-a' option with the 'docker ps' command when we want to list all the containers present on the machine.
For example, to list all the containers in the host machine, we give the following command.
docker ps -a
The above command gives the following output.
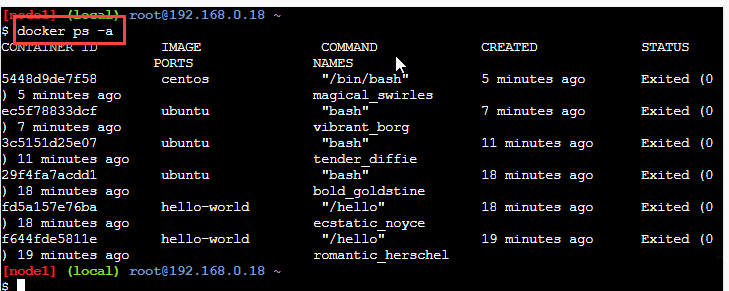
As seen in the above screenshot, the command lists all the containers present on the system.
docker commit command - Save Docker containers
We can save the containers using the 'commit' command. When the container is running and we call the commit command, the container pauses. The commit command creates a new image from the container's changes. The general syntax of the commit command is:
docker commit [OPTIONS] CONTAINER [REPOSITORY[:TAG]]
For example, let us commit a currently running container to a new container named 'testimage'.
The screenshot shows the execution of this command.
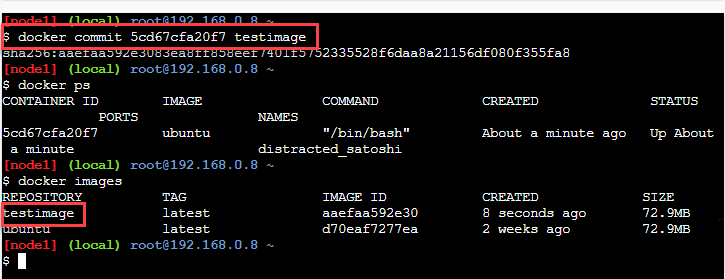
In the above screenshot, we have listed the running containers with the 'docker ps' command. Then we execute the 'docker commit 5cd67cfa20f7 testimage'. Now we again list the images using the 'docker images' command. We can see the docker image testimage that gets newly created.
docker stop command - Stop containers
The container can stop using the 'docker stop' command. The general command syntax is as follows:
docker stop ContainerID
Here, ContainerID is the Id of the container to be stopped.
Note: We can get the ContainerID of the container by executing the 'docker ps' command explained above.
The stop command returns the id of the container that has stopped.
We can see the example to stop the container in the below screenshot.
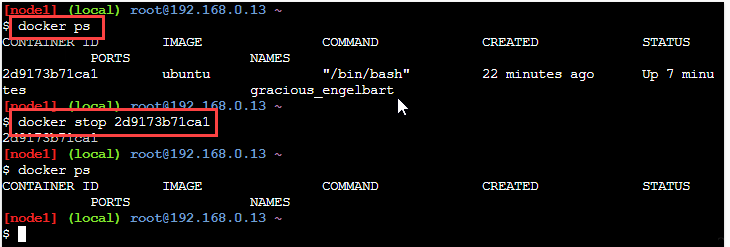
In the above screenshot, we have a running container, 'ubuntu'. We call the 'docker stop' command with the containerId of the ubuntu container. The next command to check the list of running containers verified that the ubuntu container stopped.
docker history command - View Docker container history
We can use the "docker history" command to view all the commands that ran with the specified via a container. The general syntax of the command is :
docker history ImageID
Here ImageID is the id of the image for which we want to see all the commands that ran.
Note: We can get the imageID of the container by executing the 'docker ps' command explained above.
This command returns all the commands run against the specified image. For example, consider the below command:
docker history ubuntu
Here we have given the imageId as 'ubuntu'. The output of this command is as follows:
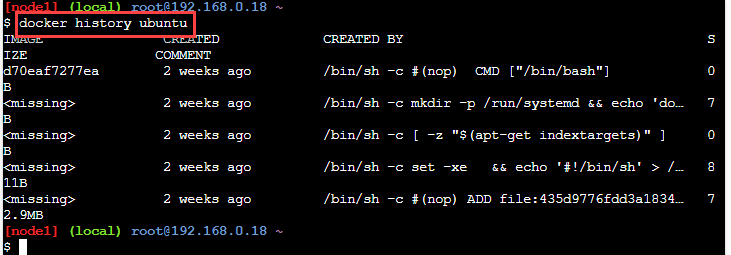
The above command will show all the commands that ran against the ubuntu image.
docker top command - View container processes
With the 'docker top' command, we can see the top processes within the container. The general syntax of the 'docker top' command is:
docker top ContainerID
The ContainerId is the id of the container for which we need to list the top processes. On execution of this command, the output shows the top processes within a container.
Please refer to the below example to see the execution of the 'docker top' command.
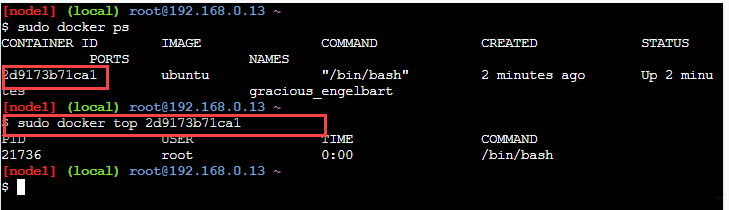
In the above screenshot, we have provided the container Id of the running container for the 'docker top' command. The output of the command shows process details within the container.
docker rm command - Remove a Container
If we do not need a container anymore, we can remove or delete it from the system. We can achieve it by using the 'docker rm' command. The general syntax of the 'docker rm' command is as follows:
docker rm ContainerID
Here, ContainerId is the Id of the container that we have to remove. The command returns the Id of the container that we removed successfully.
As an example, consider the following screenshot.
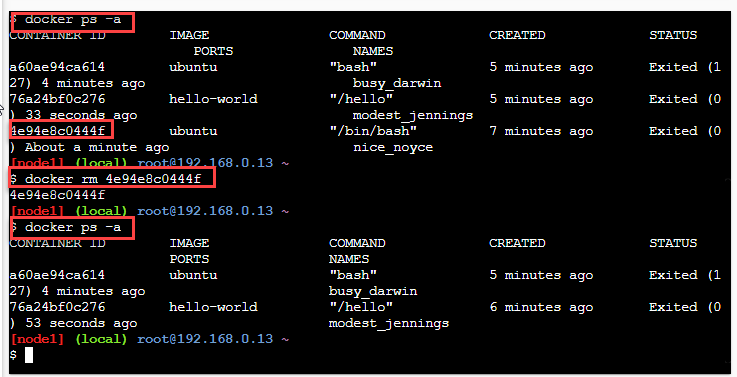
As seen from the above screenshot, we have various containers in our system (docker ps command shows it). We want to remove the ubuntu container from the system. Hence we provide its Id (4e94e8c0444f) to the docker rm command.
To verify the remover of the container, we again list all the containers. Now we see the Container with id = 4e94e8c0444f is no more listed.
docker stats command - Get the container statistics
The 'docker stats' command gives us the statistics of a running container. This command has the general syntax:
docker stats ContainerID
This command will return the CPU and memory utilization of the specified container. For example, observe the following command,
docker stats 2d9173b71ca1
The above command gives the following output.
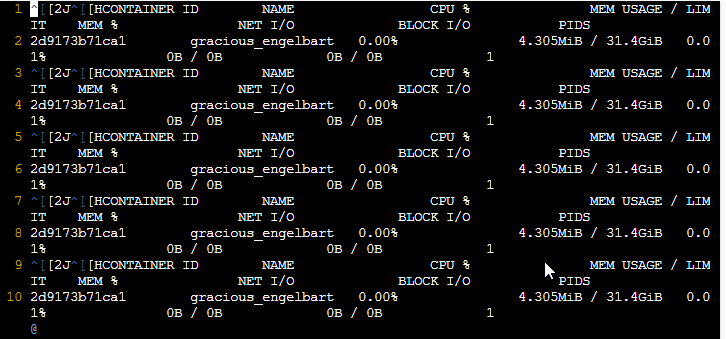
As seen, the output of the above command shows the CPU, memory, and I/O utilization for the container with id = 2d9173b71ca1.
docker pause command - Pause/unpause a container
We can temporarily stop or pause a running Docker container. Also, a paused container can be unpaused and made to run again. For these actions, we use 'docker pause' and 'docker unpause' commands, respectively.
The general syntax of the 'docker pause' command is:
docker pause ContainerID
The Container ID is the id of the container which needs to pause. We can see the command execution to pause the container in the below screenshot.
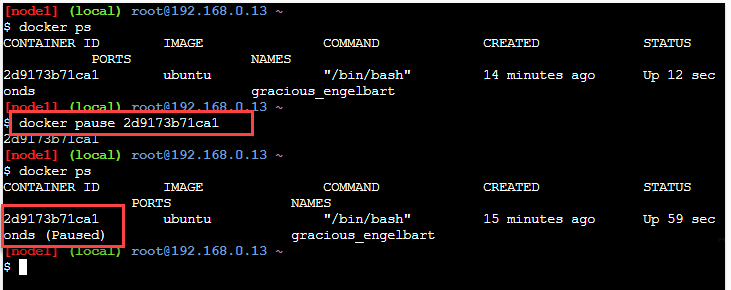
From the screenshot, we can see the status of the container that the pause command paused (shown in the red rectangle).
Similarly, the general syntax for the unpause command is as follows:
docker unpause ContainerID
It will unpause the container specified by ContainerId that paused earlier. The screenshot below shows the working of the "unpause" command.
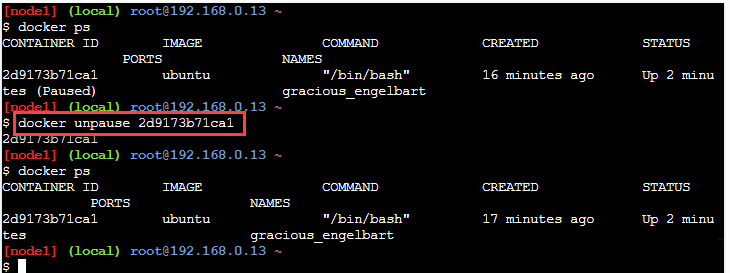
So we have a paused container 'ubuntu' in the above example. Then we call the 'docker unpause' command with the containerId. It will unpause the container.
docker attach command - Attach to a container
The 'docker attach' command helps us to attach the local standard input/output and error streams to the running container. For example, by attaching the terminal's standard I/O and Error stream to the running container, we can view the container's output and control the container interactively.
The general syntax of 'docker attach' is as below:
docker attach ContainerID
It will attach the container with 'ContainerID' to the terminal's standard input, output, and error streams.
The following screenshot shows the working of this command.
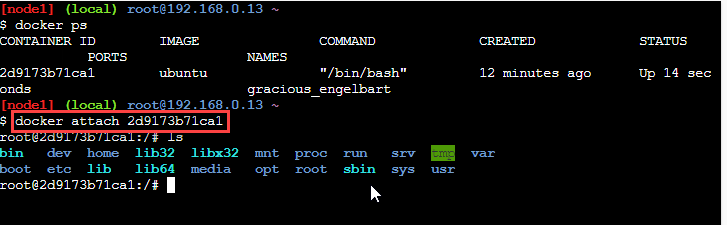
The above command has attached the standard I/O and error to the container.
docker kill command - Kill a container
We can also kill the processes in a running container using the 'docker kill' command.
The general syntax of this command is:
docker kill ContainerID
The parameter ContainerId is the Id of the container whose processes get killed using this command.
Consider the following screenshot wherein we have shown the working of the 'docker kill' command.
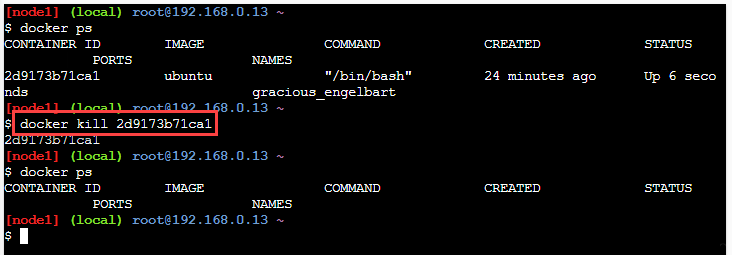
In the above screenshot, we have one running container with Id '2d9173b71ca1'. Now we execute the 'docker kill' command with the above container Id. When we list the running containers once again, we find the container has disappeared, which means it got killed.
So now we have covered some of the important commands that we use to manipulate containers. We can find more such commands at docker commands.
How to use privileged Docker containers?
Running a Docker container in a 'privileged mode' is one of the most useful features provided by Docker. First, let us understand what a privileged container is.
A Docker container is privileged when it runs with a privileged mode. A Docker privileged mode grants the Docker container to access the root capabilities of all the devices on the host system.
It means a privileged Docker container has access to the host's kernel features and other device capabilities. A privileged container can even install a new Docker instance inside it. Essentially, a privileged mode allows running docker inside a docker.
The following diagram outlines the privileged container functionality.
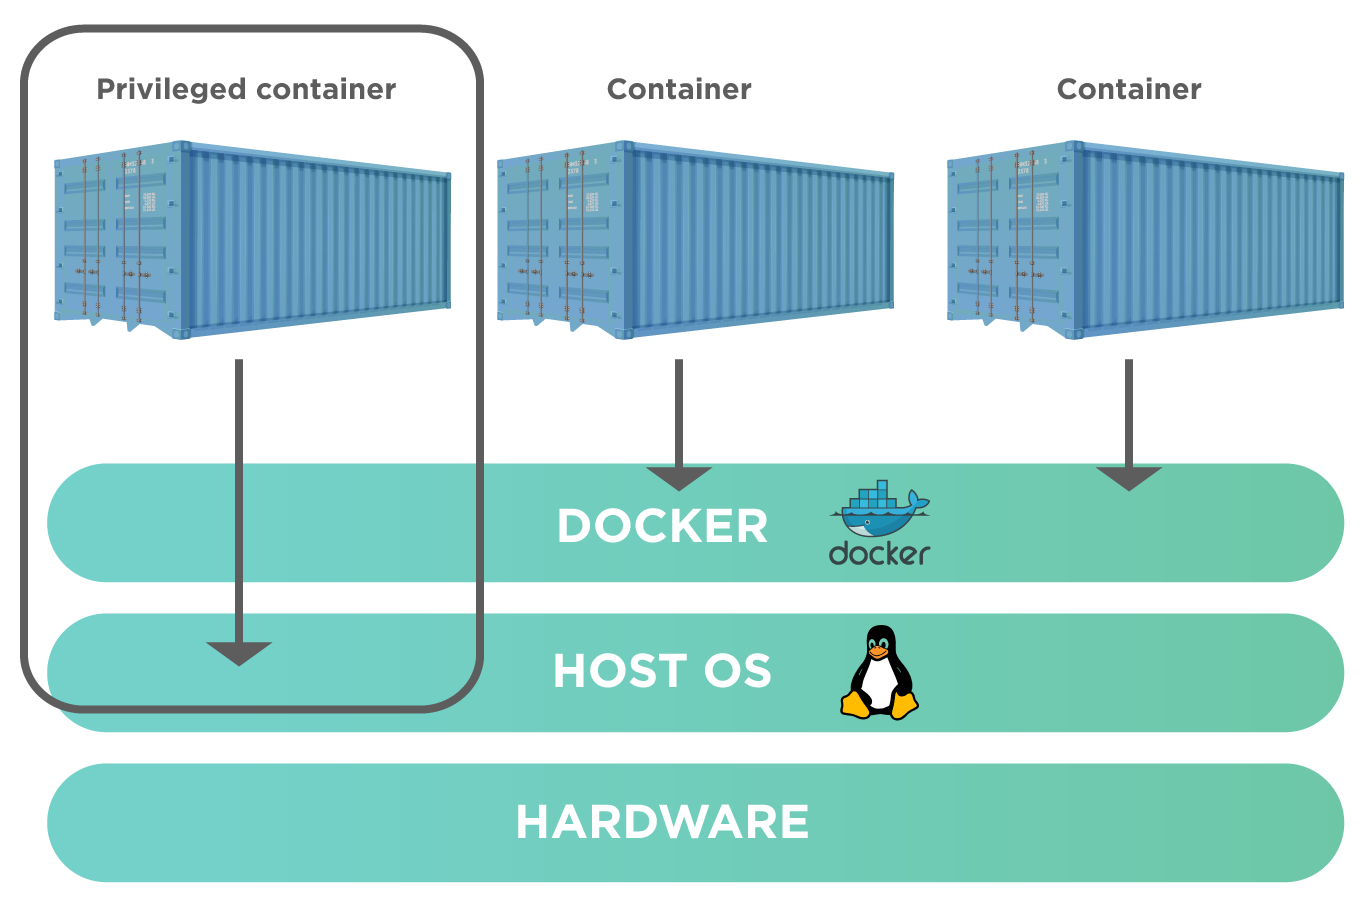
As we see from the above diagram, a privileged container has access to the host system on which Docker runs, unlike other normal containers.
We can check if a given container is privileged or not by using a command 'docker inspect' as follows:
docker inspect --format='{{.HostConfig.Privileged}}' [container_id]
Here '[container_id]' is the id of the container we want to inspect to check if it's privileged or not.
Consider the following screenshot.
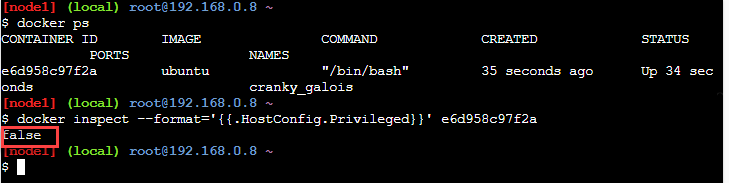
In the above screenshot, we have one running container. Now we execute the docker inspect command to check if it is a privileged container. We see that the command returns false. It means the container is not privileged.
For privileged containers, the command returns true.
If we want to run a container in privileged mode, then we can proceed as follows.
We provide a flag "--privileged" while running the container. So for running the container in privileged mode, the docker run command will be:
docker run --privileged [image_name]
So if we want to run our ubuntu container from the example above in a privileged mode, we can give the following command.
docker run -it --privileged ubuntu
It will open an interactive mode for the ubuntu container. To verify if the container is indeed running in privileged mode, let us try to mount a temporary file system. But, first, let us give the command.
mount -t tmpfs none /mnt
Once this command executes, we can list the disk space statistics using the following command.
df -h
The output of this command is as follows:
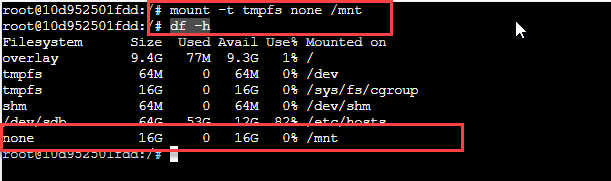
The above output shows the file system that we just created. It means the ubuntu container is running in a privileged mode and can even mount a new file system.
Are privileged Docker containers a good idea?
Although we can have docker containers running in a privileged mode, Docker doesn't encourage running containers in privileged mode.
- The main reason for this is exposing kernel and hardware resources of the host system to the outside world poses a potential threat to the system.
- Having privileged containers also poses a security risk to any organization as malicious users can control the systems. In addition, even legitimate users can misuse the privileges for malicious activities.
Therefore, our recommendation is not to use privileged containers in Docker.
But in case we have to use privileged containers, we can minimize the risk of malicious activities by 'user namespace remapping' that remaps the user for a specific container (which needs root privileges) to a less privileged host system user.
This way, the container views the user as root, but the host system views it as a normal user.
But how to achieve this remapping?
Remapping happens by assigning a range of UIDs functioning within the container namespace as normal UIDs (ranging from 0 to 65536) with no privileges to the host. Two files,*** /etc/subuid*** for user ID range and /etc/subgid for group ID range, manage the user configuration.
By default, Docker uses a user and group named dockermap to achieve remapping. Click here to find more on remapping in Docker.
How to secure containers?
Docker containers are more secure than virtual machines. It is because Docker also allows applications to break into smaller, isolated, and loosely coupled components. So it, in a way, restricts the hackers significantly. But regardless of the secured system, there is always a chance of a security breach of technology, and hence we have to follow certain best practices to secure Docker containers.
Below we have listed some of these best practices we can follow while working with Docker.
- Run containers as a non-root user: As discussed in the previous section, running containers in privileged mode might expose the system to hackers. Hence we should avoid running containers in the privileged mode as far as possible by using a user with non - root privileges.
- Use their private registry: Instead of using a public image registry that might have non-secure images, it is better to use one's private registry. Organizations can host a private registry by using on-premise infrastructure or using third-party registry services like Amazon ECR.
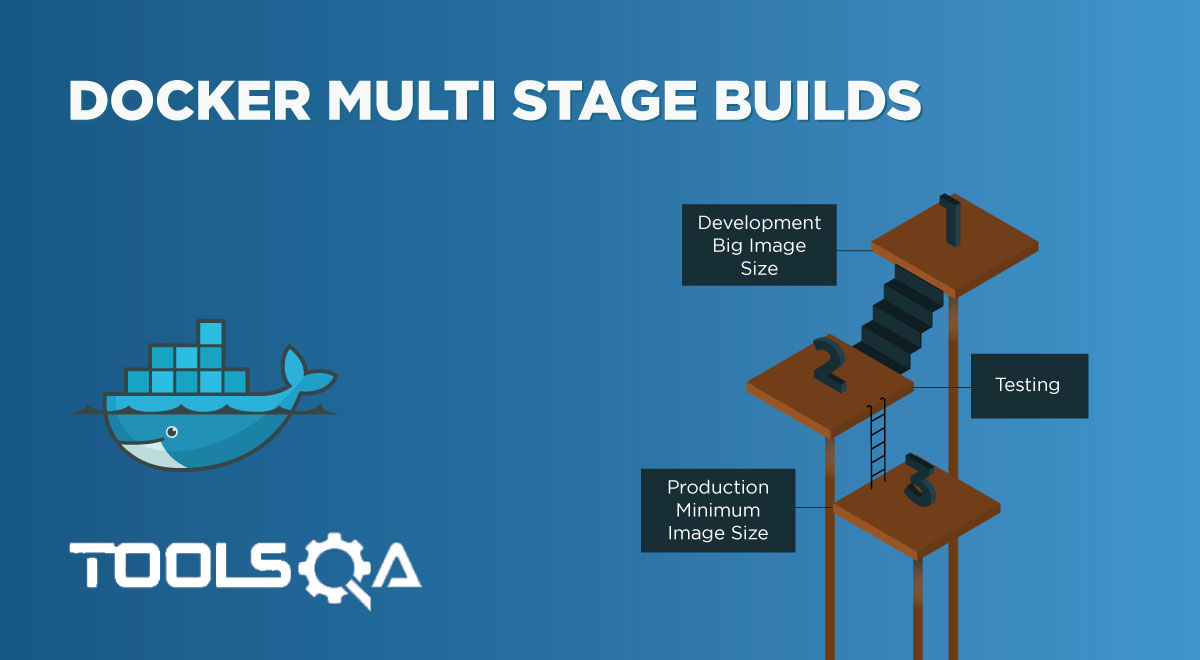
- Keep images smaller, lean, and clean: The larger the image, the greater is the threat. So we should be cautious while pulling the images from the registry. The images should be the ones with the lowest footprint and then add binaries and dependencies to the application. We can also use a multi-stage build feature to optimize image size.
These are some of the significant ways using which we can secure our containers while working with Docker.
Key Takeaways
- The docker containers are components using which we can run docker images.
- Docker containers allow us to simplify and minimize the workload in the system.
- We can manipulate the states of docker containers using various docker commands. We have discussed the major Docker container commands with explanations and examples in this article.
- The Docker containers can also run in a privileged mode in which containers gain root capabilities and have root access to the host system. Though we can easily switch the Docker container into the privileged mode, the docker itself does not recommend using containers in a privileged mode.