As we all know, property represents the characteristics or traits of a specific object which possesses a value that can be evaluated or measured in defined terms. Similarly, in computer science, the term property is used to represent or describe attributes associated with an object or data structure. Various programming language provides defined syntax to define and use properties. A Property is generally a named string that has a specific value, and we can access via a script or program. Properties provide the extended functionality to store the general information at a central place and then can be accessed at various locations depending on the exposed scope. SoapUI also provides the capability to define and access properties at multiple scopes, which makes the maintenance of tests very easy by allowing them to flow specific characteristics across tests and scopes.
Let's understand in detail how we can work with the properties in SoapUI by covering the details under the following topics:
- What are Properties in SoapUI?
- Default Properties in SoapUI.
- Custom Properties in SoapUI.
- What are the different categories of Properties in SoapUI?
- Also, what are Global Properties in SoapUI?
- What are Project Level properties in SoapUI?
- And, What are Test Level Properties in SoapUI?
What are Properties in SoapUI?
As we discussed, SoapUI provides the capability to add and use properties. Properties in SoapUI help in achieving the followings:
- Properties can store the configurations such as endpoints, login credentials, etc. which will make it easy to manage them. Also, if there will be changes in any of these, it will require the change to be made in one place only.
- Properties receive values/data from the response of a target service, which can act as input to a test step/assertion.
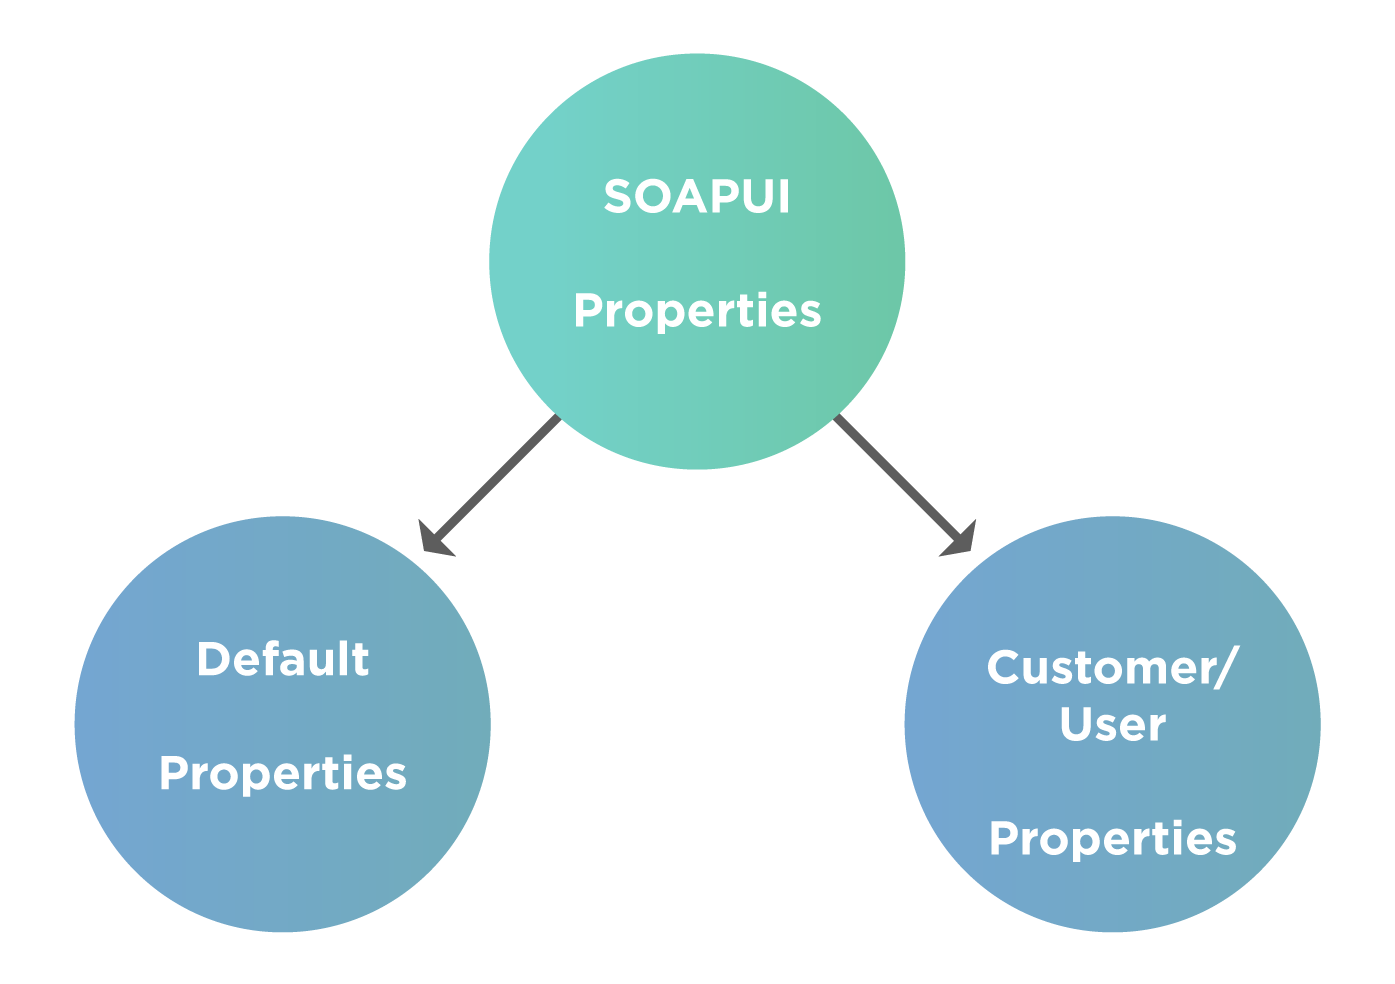
All the properties in SoapUI are of two types, categorically, based on whether they are in-built provided by SoapUI or they are defined by the user. The below figure shows a broad categorization of properties in SoapUI:
Let's understand in more detail about these types of properties with the help of examples. Suppose we have created a SOAP or REST project in SoapUI for the REST service* or SOAP service, as defined in the article "SoapUI Projects".
Now, let's understand how we can view, define, and use the Default and Custom properties in SoapUI projects:
Default properties in SoapUI
Default properties in SoapUI are the properties which come by default with SoapUI as soon as you create a new project. You can view all the default properties in the bottom section of the "Project Navigator". It will show various properties depending on which section you select in the "Project Navigator". Few of these properties are as shown below in the following sections:
Workspace default properties:
When you select the "Workspace" in the "Project Navigator", it will show the "Default Properties" for the workspace as shown below:
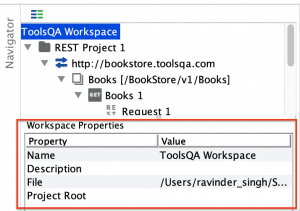
These properties will be accessible to all the projects and the project elements in the selected workspace.
Project default properties:
When you select a "Project" in the "Project Navigator", it will show the "Default Properties" for the project as shown below:
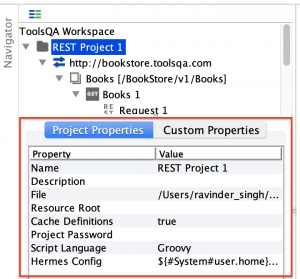
These properties will be accessible to elements under the selected project.
Service default properties:
When you select the "WebService " in the "Project Navigator", it will show the "Default Properties " for the WebService as shown below:
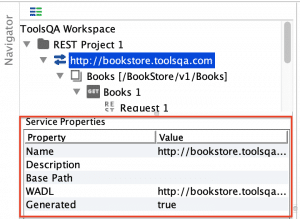
These properties will be accessible to methods under the selected WebService.
Resource default properties:
When you select the "WebService" in the "Project Navigator", it will show the "Default Properties" for the WebService as shown below:
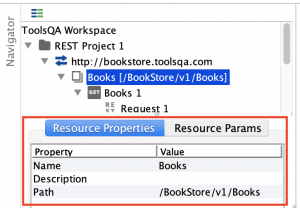
These properties will be accessible to elements under the selected resource of the WebService.
Method default properties:
When you select the "WebService" in the "Project Navigator", it will show the "Default Properties" for the WebService as shown below:
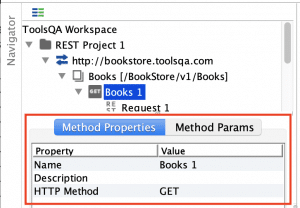
These properties will be accessible to elements under the selected method of the WebService.
Request default properties:
When you select the "WebService" in the "Project Navigator", it will show the "Default Properties" for the WebService as shown below:
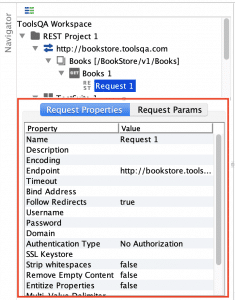
These properties will be accessible to elements under the selected request of the WebService.
Apart from the default properties provided by SoapUI, we can also provide Custom Properties at various levels. Let's understand the details of those:
Custom Properties in SoapUI
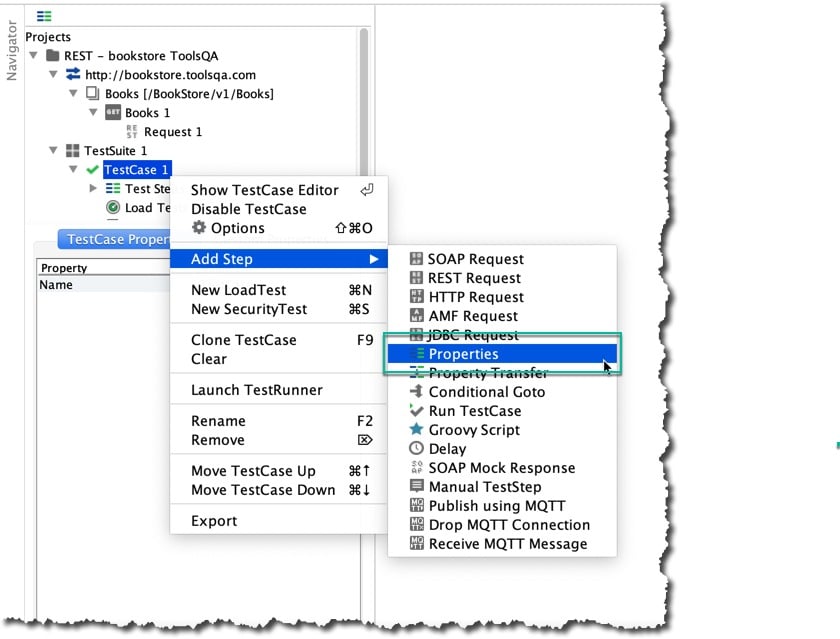
The user-defined or custom properties are the set of properties that the end-user defines as per the requirement. We define these properties majorly at the test level. To add Custom Properties for a test step in the SoapUI test, follow the steps as shown below:
- You shall right click on the Test Step and then click on "Add Step" as highlighted and then select Properties.
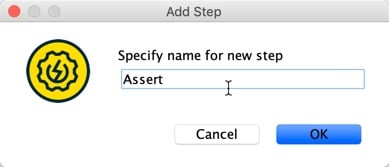
- Once you have chosen the properties, you will see the below Dialog box to provide the name for the set of properties:
3. After specifying a logical name, SoapUI will present the below-displayed screen to add the properties for the test case.
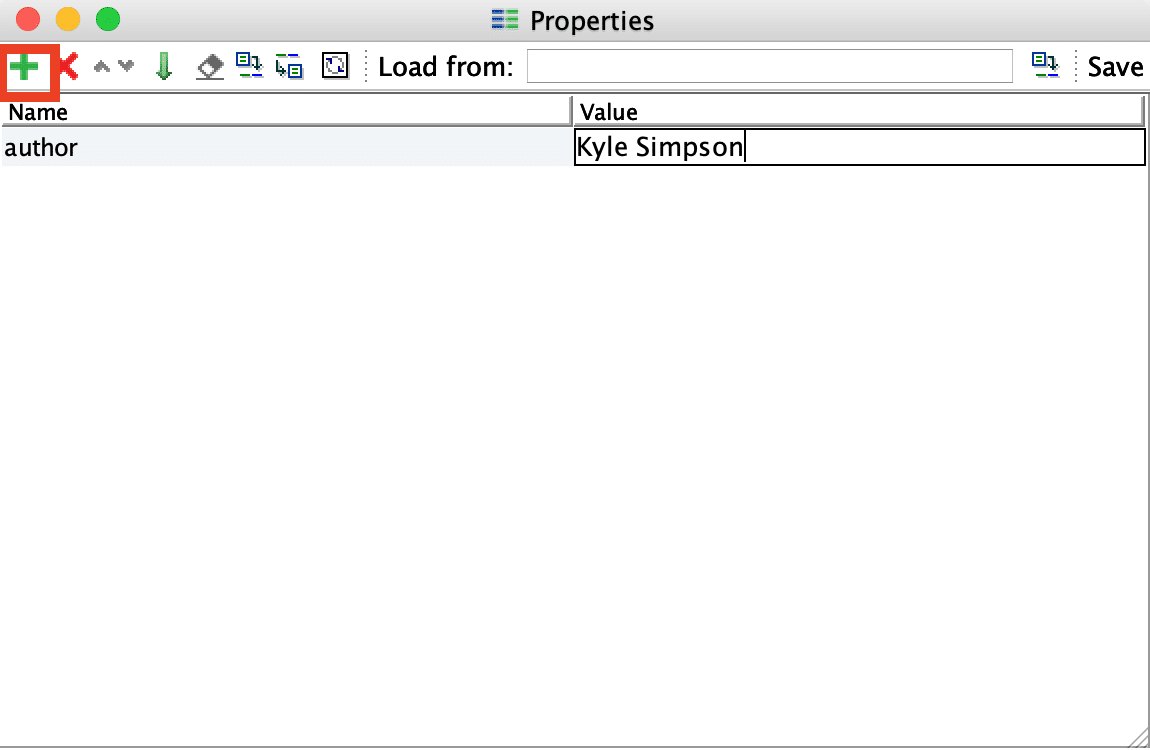
- Click on the highlighted "+" button to add a new property. As mentioned in the above snapshot, you can use the Name of the property, which is author and value as "Kyle Simpson" from the response of BookStore API.
So, this way, we can add as many Custom properties to the Test Step and then use the same during the validations or other actions in the SoapUI Tests.
What are the different categories of Properties in SoapUI?
Properties in SoapUI are classified based on the scope of the property it's defined. The scope is level inside a project or across the projects to which the property is recognized and accessible.
SoapUI recognizes majorly three categories/regions in which properties classify. These are:
- Global Properties.
- Project Level Properties.
- Test Level Properties.
Let's understand all these in detail in the following sections:
What are Global Properties in SoapUI?
Global properties specify/define the properties associated at the global level of SoapUI. When we say global, that means we can access such properties across the workspace, projects, test suites, and test cases.
How to define a global property in SoapUI?
The global properties can be accessed either from the Preferences tab in the SoapUI toolbar or from
File --> Preferences --> Global Properties from the menu bar as highlighted in the below screenshot.
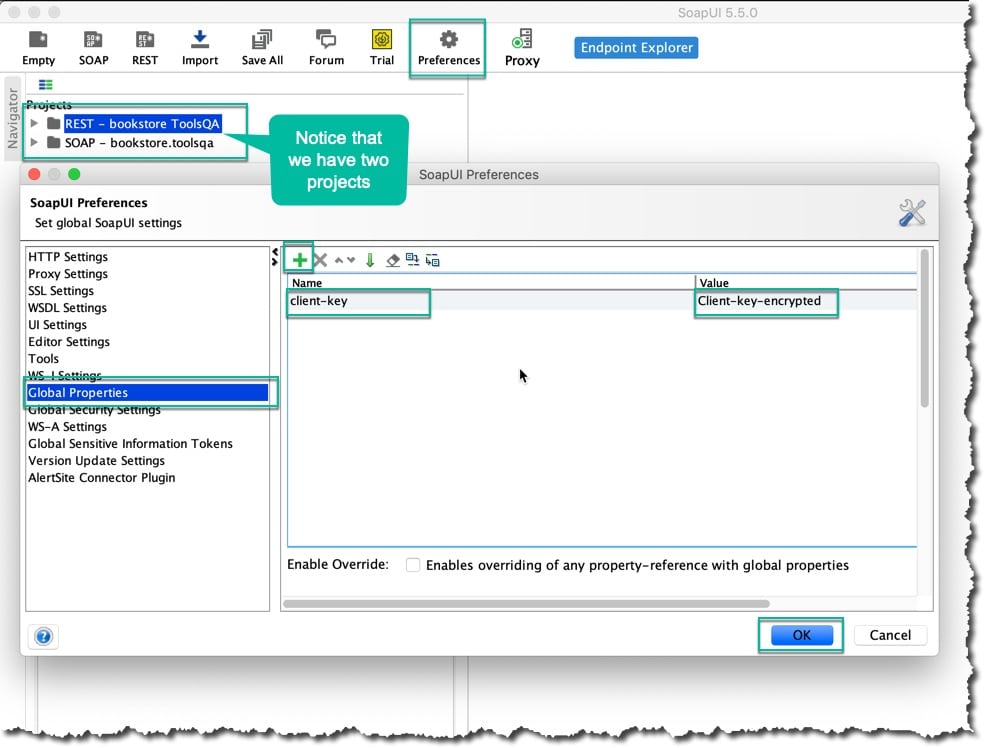
Now to define a new global property, click on the Add (+) button as shown above.
Suppose, in the SoapUI workspace, and we do have two WebServices: One SOAP project and another REST project, which need a client-secret to request the server, and we share the client-secret across both the services.
To handle this scenario, we can add a global property with "client-key" as crucial and "Client-key-encryption" as value, as shown in the above screenshot.
Now, let's see how we can access these properties across both the projects:
How to access a global property in SoapUI?
To access any property in SoapUI, we can use the following syntax:
${KeyOftheProperty}
Where $ is the unique character to so be prefixed and then under the curly braces provide the key required to be accessed.
Suppose, we want to access the above-defined key "client-key" and pass that as a header while invoking the requests. We can follow the steps shown below to achieve the same:
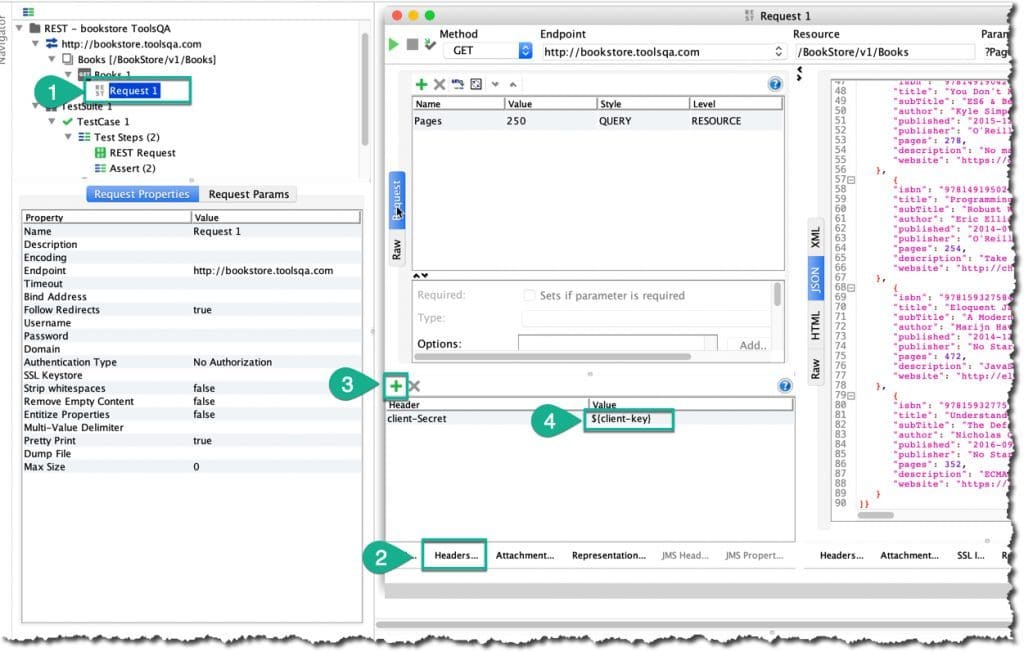
As shown above, we have added a user-defined header to the REST request by below-mentioned steps:
- Navigate to the REST project in the workspace and launch the request, which displays books details, by double-clicking on the highlighted request.
- Click on the "Headers", as highlighted by step 2, SoapUI will now facilitate adding headers manually before making the request.
- Click on the Add button, as highlighted in Step 3, and provide the name of the header that you want to set.
- Now, in step 4, to access the global property, specify ${client-key}, which is the global property set.
Now execute the request by clicking on the play button. After execution, you can check the headers sent in the request by clicking on the "Raw" button as shown below:
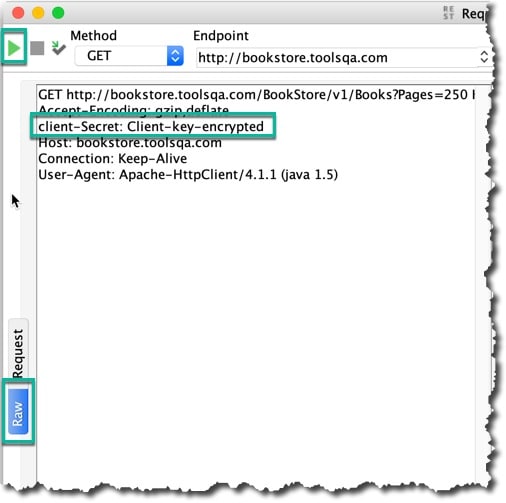
As we can see, the header value passed to the request is the same as defined for the global property. This way, we can create properties at the global level, which we can access across all the projects in that workspace.
Note: We can try accessing the same property in the SOAP project using the same steps as mentioned for the REST project.
What are Project level Properties in SoapUI?
Project level properties specify the properties which are associated with the current project only. The scope of such a property will be across all the TestSuits in the same project. But like global properties, these properties will not be available and accessible across projects.
How to define a project level property in SoapUI?
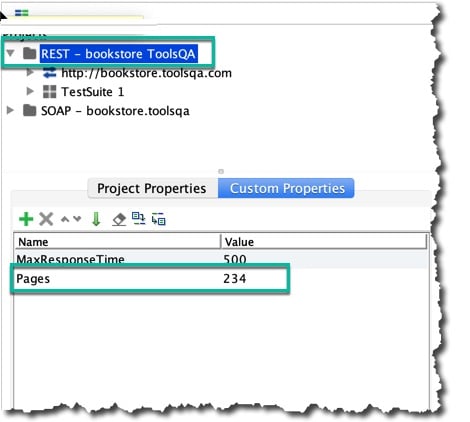
We can add a new property at the project level by selecting the project and clicking on the "+" button under the custom properties. Suppose, we want to add a new property to project "REST - bookstore ToolsQA", namely "Pages" with a value 234 as shown below:
How to access a project level property in SoapUI?
Now let's see how we can use the above-defined project level property. Suppose we want to add an assertion based on the value of the property. We cIt can be done, as shown below:
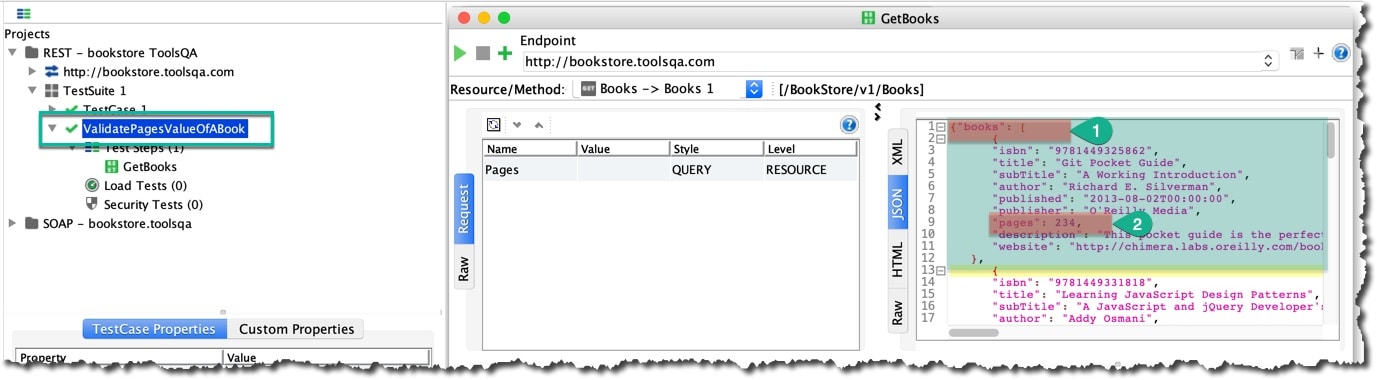
In the shot above, we have a Here we have added a test to validate the pages of the book (see highlighted on the left side) with the name "ValidatePagesOfABook", while on right side of screenshot it has been highlighted that:
- Step1: The response of bookstore service contains an array of books.
- Step 2: Each object of books arrays contains an attribute page, the value of which is 234
Further, add a JsonPath match assertion to validate the pages attribute value as shown below using the Project properties:
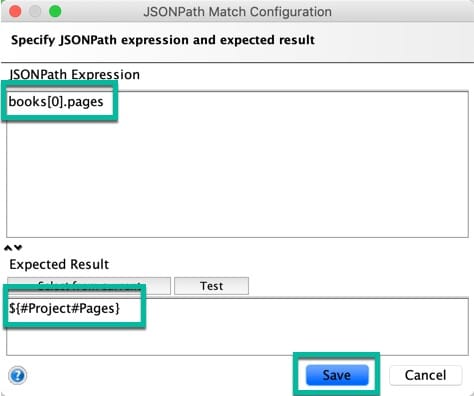
In the snapshot above, we have used two expressions:
- To fetch the pages of the first object of books array
books[0].pages
In a JSON, we can traverse array by using index starting from 0, and using the dot operator. We can further access child attributes.
- To fetch the expected value from project property
${#Project#Pages}
As a global property, to fetch any property, including the project property, we start with keyword dollar and curly braces (${ ). Further, we specify the type of property prefixed with hash and key of the property that we want to access. Hence using the expression above, it will fetch a Project level property with key "Pages" that we have already defined.
What are Test level properties in SoapUI?
We have seen that properties can be defined and used either at the project level or at a global level. To deep dive further, Properties in SoapUI can also define at "Test Level" only whose scope will be limited to a test step only. We can Test level properties at three levels:
- Test-Suite level properties
- Test Case level properties
- Test Step level properties
Let's understand all of these in further details:
What are Test-Suite level properties in SoapUI?
These types of properties specify the properties associated with the current test suite. All the components can use this property under this test suite, i.e., test case, test step, script, but not by another test suite.
To understand clearly, assume you want to verify the title of the book, which has 234 pages. Here the title needs to be accessed in multiple tests of the same test suite. For this kind of usage, we can opt for Test Suite level properties as highlighted below:
Steps to add a Test Suite Level property are similar to adding a Project level property, the only difference is here, instead of the project you need to select the test-suite and add a custom property as shown below:

In the above screenshot, we have added a property with Name as "FirstBookTitle" and value as "Git Pocket Guide" under the test suite "TestSuite1".
Now, to access the "TestSuite" level property, we just need to prepend it with "TestSuite#" as shown below:
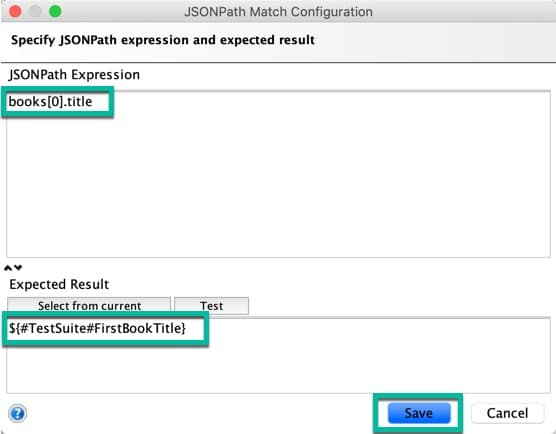
So, the syntax to access a test-suite level property is:
${#TestSuite#FirstBookTitle}
What are Test-Case level properties in SoapUI?
These are the properties that are associated with the current test case. We can use this property by all the subset (test step, script) of the test cases. You can set the value for a Test-Case level property in a similar way you added the test-suite level properties. The only difference is, instead of selecting the test-suite, you need to select the test case for which you want to define the property.
Similarly, to access the Test Case level property, you can use the following syntax:
${#TestCase#PropertyName}
Again, the syntax to fetch a test-case level property is similar to fetching a project/test-suite level property. Instead of keyword TestSuite to fetch test-suite level property, we use a TestCase.
What are Test-Step level properties in SoapUI?
Test Step properties are the properties that are associated with the current test step. We can use this property by all the subset (test step, property transfer, script) of the test steps.
Moreover, the implementation of this level of properties is very similar to the TestCase properties; the only difference is of the scope of usage.
To access the Test Step level properties, you can use the following syntax:
${#TestStep#PropertyName}
Here, the keyword TestStep is used to fetch the value of the property.
Key Takeaways
- Properties hold values that we can use at various places. For example, setting up the header and extensively in assertions
- Additionally, properties classified as default, and custom properties basis their definition.
- Moreover, based on the access scope, we can define them from the Global level to all the way to test step level.
Conclusively, in the next article, we will learn about all the more advanced ways of using properties, which is around property transfer.