When developing a front-end application, one of the most expected things a programmer wants to do is to manipulate the document structure in some way. It happens by using the Document Object Model (DOM), which is a set of APIs for controlling HTML and styling information. In this article, we will cover the following details related to DOM manipulation using JavaScript:
- What is DOM?
- How to access DOM elements using JavaScript?
- First, accessing elements by ID
- Second, accessing elements by TagName
- Third, accessing elements by className
- How to manipulate DOM elements using JavaScript?
What is DOM?
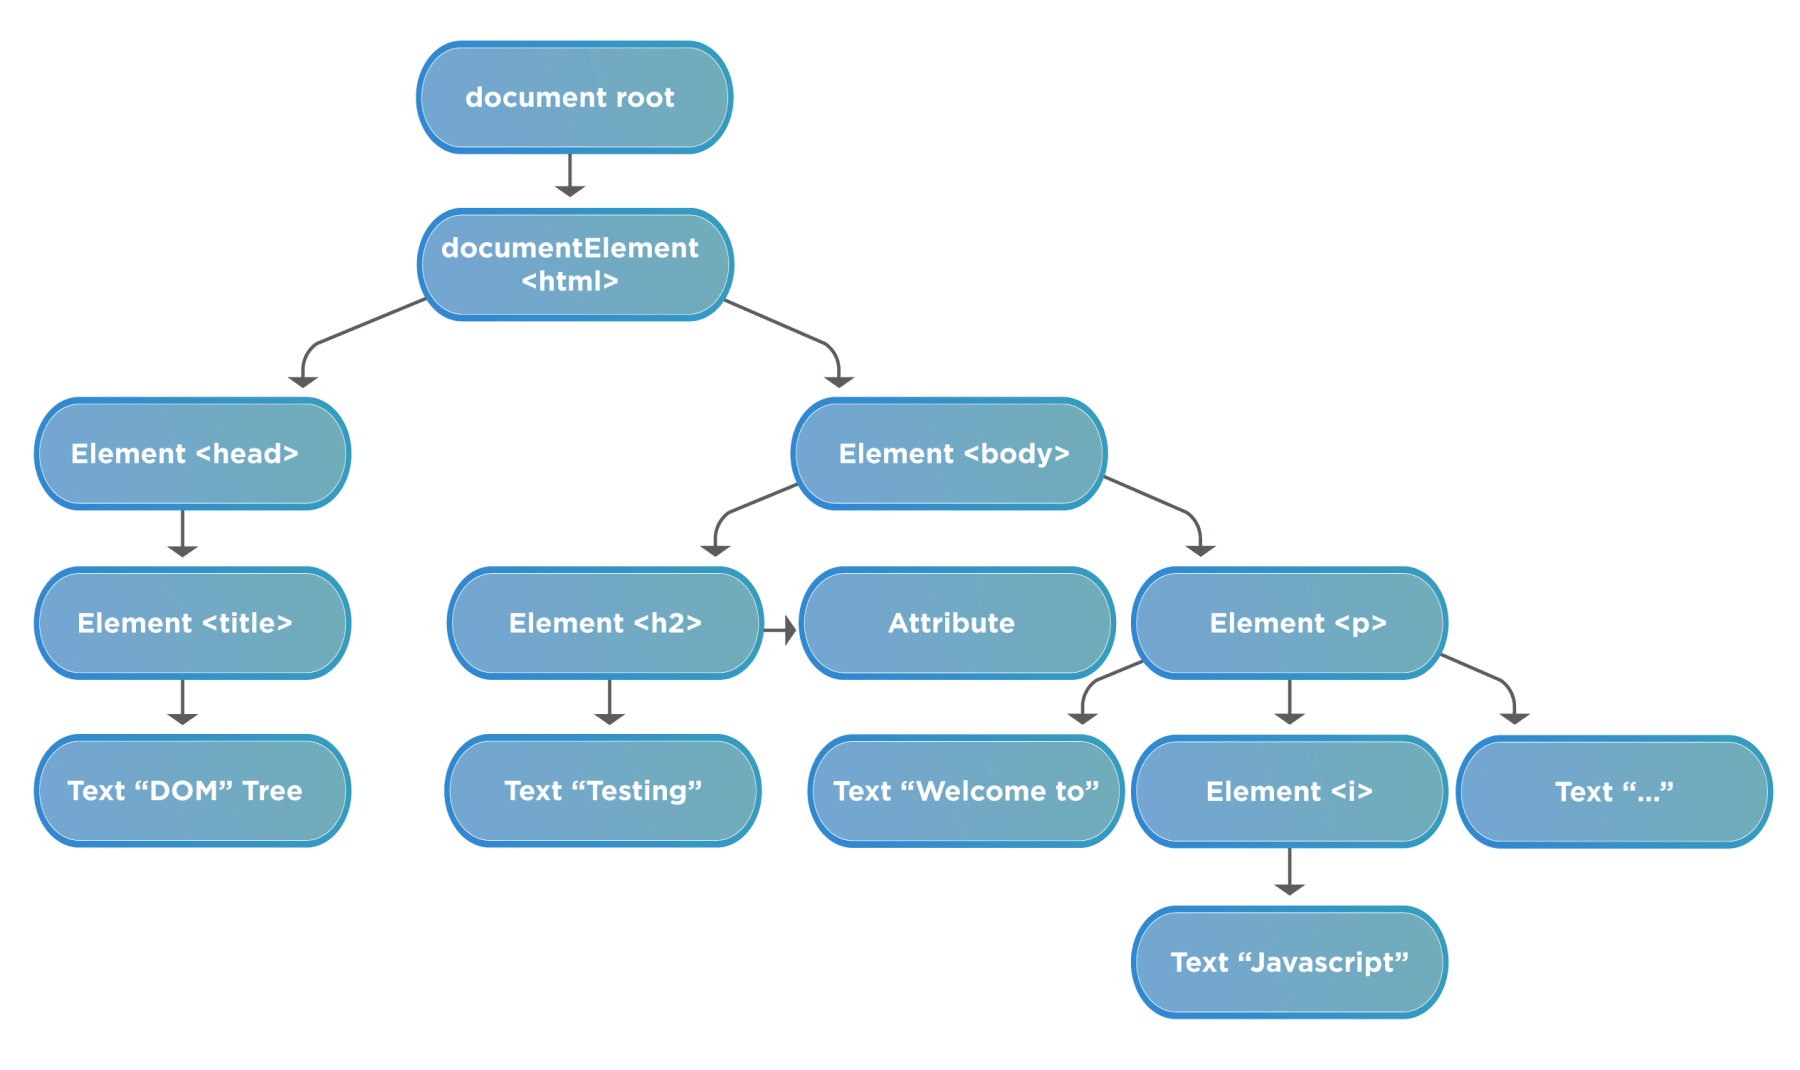
DOM is a data representation of the objects in the HTML and XML pages. The document loaded in your browser is represented by a document object model. Moreover, it is a "tree structure" representation created by the browser that enables the HTML structure to be easily accessed by programming languages. Additionally, the DOM represents the document as nodes and objects. In this way, programming languages can connect to the page. Furthermore, a simple structure of a web page DOM will look like below:
Before starting working on the DOM, we should understand the following terminologies related to DOM:
-
Element node: It represents any element that exists in the DOM.
-
Root node: This is the top node in the tree, which in the case of HTML, is always the "HTML" node.
-
Child node: This is a node that is directly inside another node. For example,
<h2>is a child of<body>in the above example. -
Descendant node: *This is a node that exists anywhere in the hierarchy of another node. For example,
<h2>is a descendant of<html>in the above example. -
Parent node: This is a node that has another node inside it. For example,
<body>is the parent node of<h2>in the above example. -
Sibling nodes: The nodes which sit on the same level in the DOM tree. For example,
<h2>and<p>are siblings in the above example. -
Text node: This is a node that contains a text string.
As we are now clear about the fundamental terminologies used in a document, let's move to the next section to understand how the DOM elements can be accessed using JavaScript.
How to access DOM elements using JavaScript?
A webpage in JavaScript is a document, and JavaScript provides an object "document", which designates the complete webpage. Moreover, the document object provides various properties and methods to access and manipulate the web elements loaded on the page. To identify and access the DOM elements, JavaScript uses three ways:
- First, Accessing elements By ID
- Second, Accessing elements By TagName
- Third, Accessing elements By className
Let's understand the details of each of these ways in the following sections:
Accessing a DOM element By ID:
JavaScript can find HTML elements in the DOM based on the "id" of the element. The document object provides a method "getElementById()" to accomplish this task. Moreover, its syntax looks like below:
Syntax:
document.getElementById(“IDName”);
- Let's understand the usage of the "getElementById" method with the help of the following code snippet.
<html>
	<body>
		Demonstrating getElementById in javascript:    </br>
	    <b id="bold">Tools QA Tutorial</b>

	    <script type="text/javascript">
	  	// Get the element by Id and update text on that
    		document.getElementById("bold").innerHTML = "Tools QA";
    	</script>
    </body>
</html>
- Save the file with name getElementByID.html. After that, open it in any browser (Chrome, Firefox, or IE). It should show the output as:
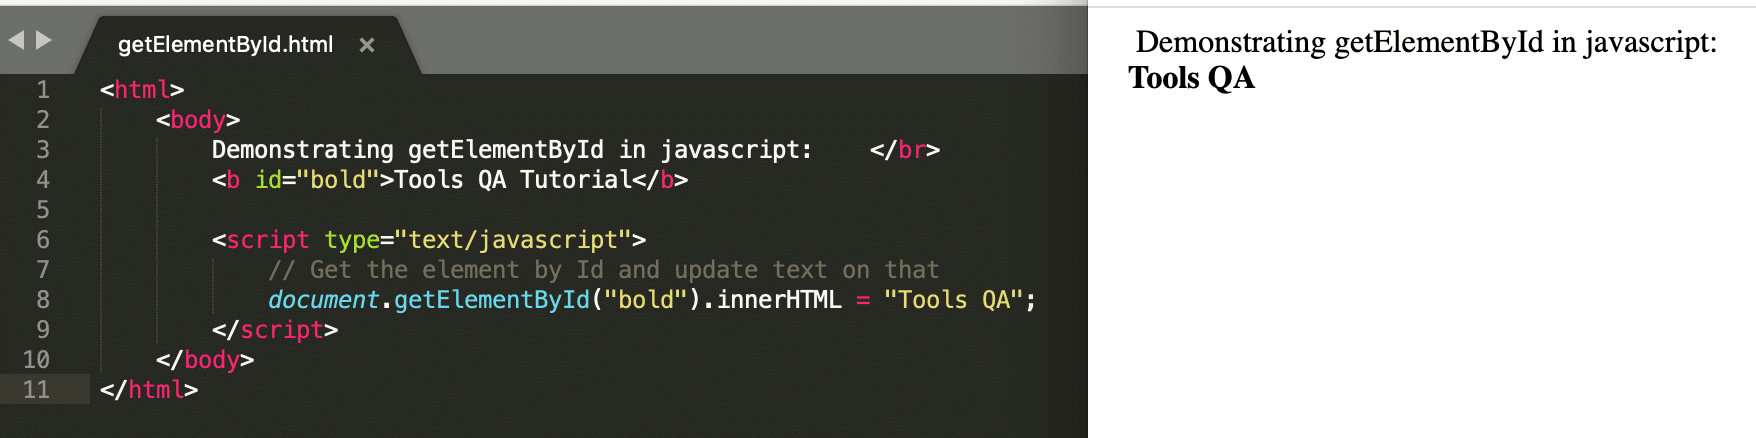
- In the above example, we can see that element by id "bold" has been found. In addition to that, we also changed its attribute innerHTML to Tools QA.
Note:- We will be covering the InnerHTML function in the below section, "How to manipulate DOM elements by using JavaScript?"
Accessing a DOM element By TagName:
JavaScript can find the elements in the HTML based on the "tagName" and return an array of matching nodes. The inbuilt function, of document object, available for this is getElementByTagName(). Additionally, its syntax looks like below:
Syntax:
document.getElementByTagName(“tagName”);
- Let's understand the usage of "getElementByTagName" method with the help of following code snippet:
<html>
	<body>
		Demonstrating getElementByTag in javascript:    </br>
	    <b>Tools QA Tutorial</b>

	    <script type="text/javascript">
	  	// Get the element by tag <b> and update text on that
    		document.getElementsByTagName("b")[0].innerHTML = "Tools QA";
    	</script>
    </body>
</html>
- Save the file with name getElementByTagName.html. After that, open it in any browser (Chrome, Firefox, or IE). It should show the output as:
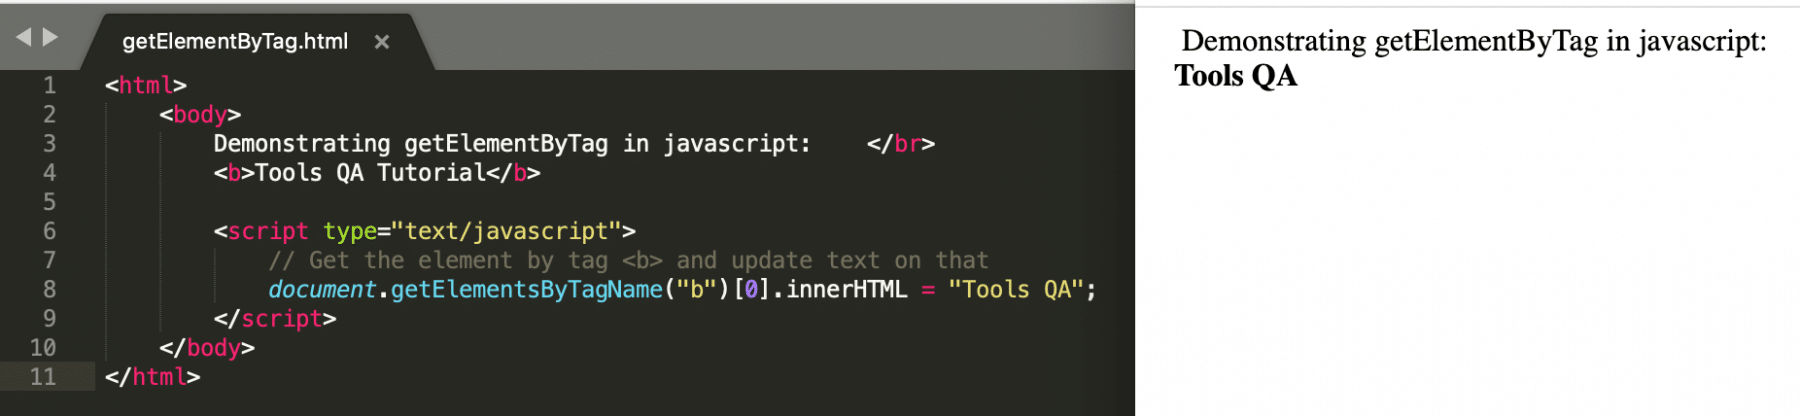
- In the above example, we can see that the element by HTML tag "<b>" has been found. Additionally, we changed its attribute innerHTML to Tools QA.
Accessing a DOM element By ClassName:
JavaScript can find the element in the HTML based on the className attribute of the element and returns an array of matching nodes. The inbuilt function available in this operation is getElementByClassName(). Additionally, its syntax looks like below:
Syntax:
document.getElementByClassName(“ClassName”);
- *Let's understand the usage of "getElementByClassName" method with the help of following code snippet:
<html>
	<body>
		Demonstrating getElementsByClassName in javascript:    </br>
	    <b class="bold">Tools QA Tutorial</b>

	    <script type="text/javascript">
	  	// Get the element by className "bold" and update text on that
    		document.getElementsByClassName("bold")[0].innerHTML = "Tools QA";
    	</script>
    </body>
</html>
- Save the file with name getElementByClassName.html. After that, open it in any browser (Chrome, Firefox, or IE). It should show the output as:
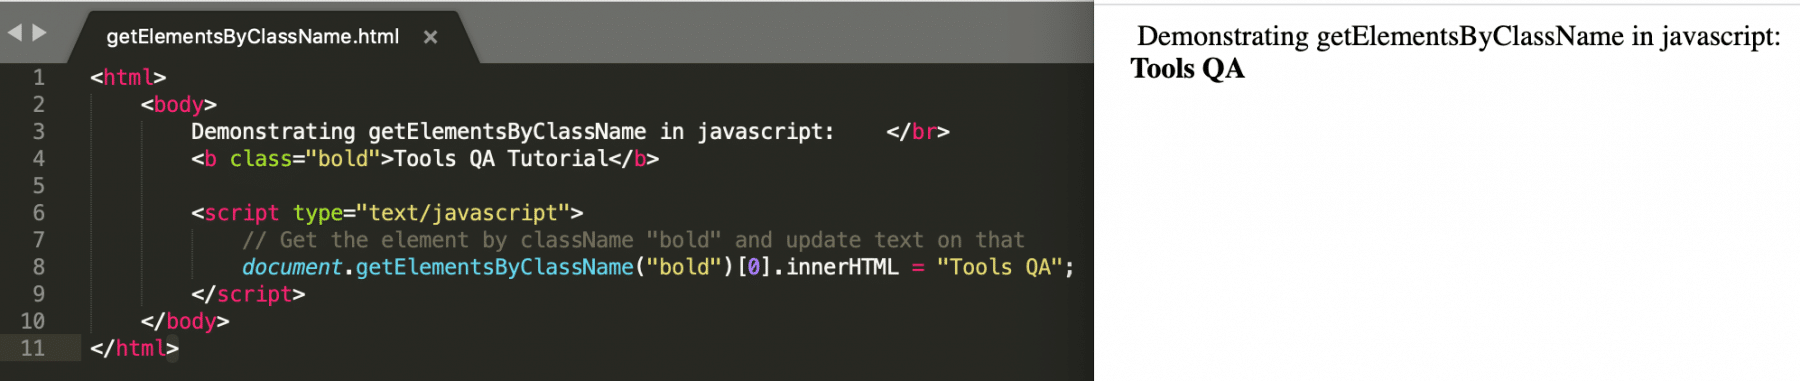
In the above example, we can see that element by className "bold" has been found. Additionally, we changed its attribute innerHTML to Tools QA.
How to manipulate DOM elements by using JavaScript?
Apart from accessing the elements, JavaScript provides some methods and properties which can manipulate or change the values of the DOM elements. Few of those methods and properties are:
- write
- innerHTML
- attributeName
- Style.property
- setAttribute
- createElement
- appendChild
- removeChild
- replaceChild
Let's discuss all of these methods and properties in detail in the below sections:
write
This method writes new elements or text to the HTML page. Additionally, its syntax looks like below:
Syntax:
document.write(“data”);
- Let's understand the usage of "write()" method with the help of following code snippet:
<html>

   <body>

      Demonstrating document's write function in javascript:

   </br>

      <script type = "text/javascript">

         document.write("Tools QA Tutorials");

         document.write("</br>");

         document.write("<b>JavaScript Tutorial</b>");

      </script>

   </body>

</html>
- Save the file with the name documentWriteFunction.html. After that, open it in any browser (Chrome, Firefox, or IE). It should show the output as:
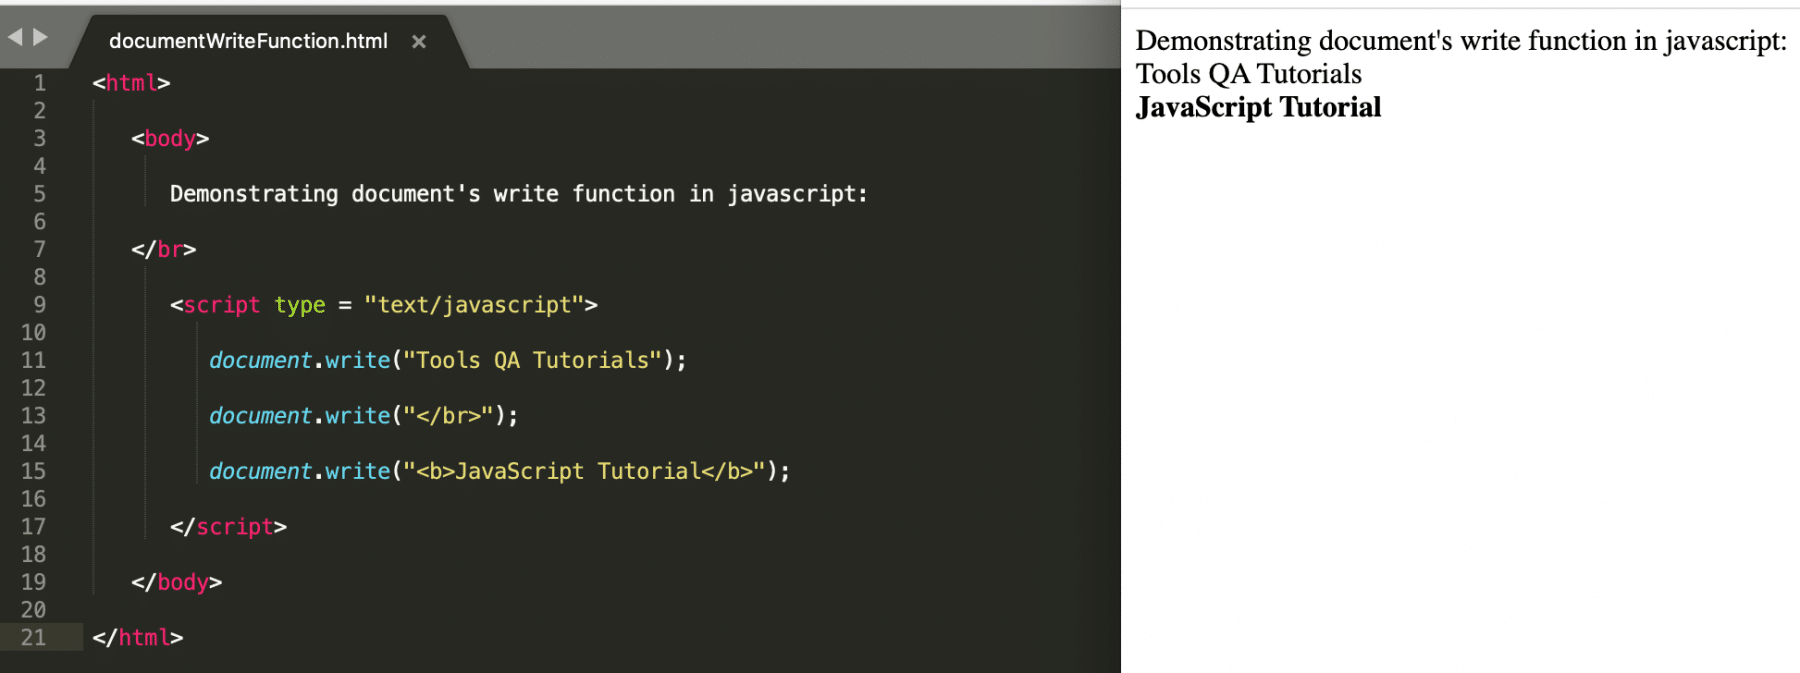
- In the above example, we use the write function to add a text as well as to add a new HTML element.
innerHTML
It is a property that we use to get or set the HTML or XML markup contained within the element. Also, its syntax looks like below:
Syntax:
node.innerhtml = “changingText”;
Where,
node: is any web element that can be found on the web page using document.getElementBy<Id/tagName/className>.
- Let's understand the usage of "innerHTML" property with the help of following code snippet:
<html>

   <body>

      Demonstrating innerHTML property in javascript

   </br>

   <b id="example">JavaScript Tutorial</b>

      <script type = "text/javascript">

         document.getElementById("example").innerHTML="Tools QA";

      </script>

   </body>

</html>
- Save the file with the name innerHTML.html. After that, open it in any browser (Chrome, Firefox, or IE). It should show the output as:
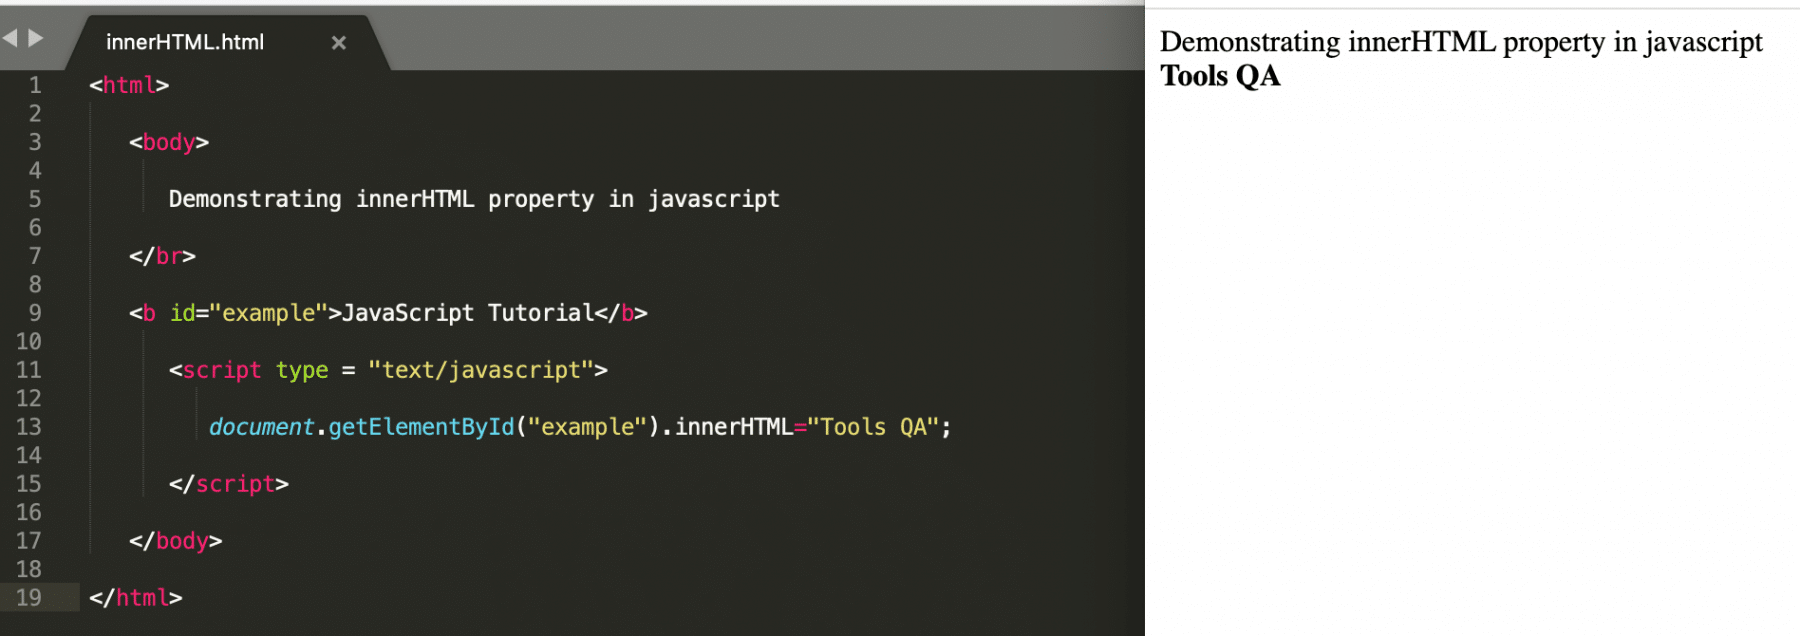
- In the above example, we can see that the innerHTML property updates the text of the HTML element.
attributeName
We use his property is used to get and update the value of an attribute of an HTML element. Additionally, its syntax looks like below:
Syntax:
node.atrributeName = value;
Where,
node: is any web element that can be found on the web page using document.getElementBy<Id/tagName/className>.
- Let's understand the usage of "attributeName" property with the help of following code snippet:
<html>

   <body>

      Demonstrating attributeName property in javascript

   </br>

   <b id="example">JavaScript Tutorial</b>

      <script type = "text/javascript">

         // Update the "id" of the element to "demo" which has "id" as "example"
         document.getElementById("example").id="demo";


         // Get the element with "id" as "demo" and update its innerHTML text
         document.getElementById("demo").innerHTML="Tools QA";

      </script>

   </body>

</html>
- Save the file with name attributeName.html. After that, open it in any browser (Chrome, Firefox, or IE). It should show the output as:
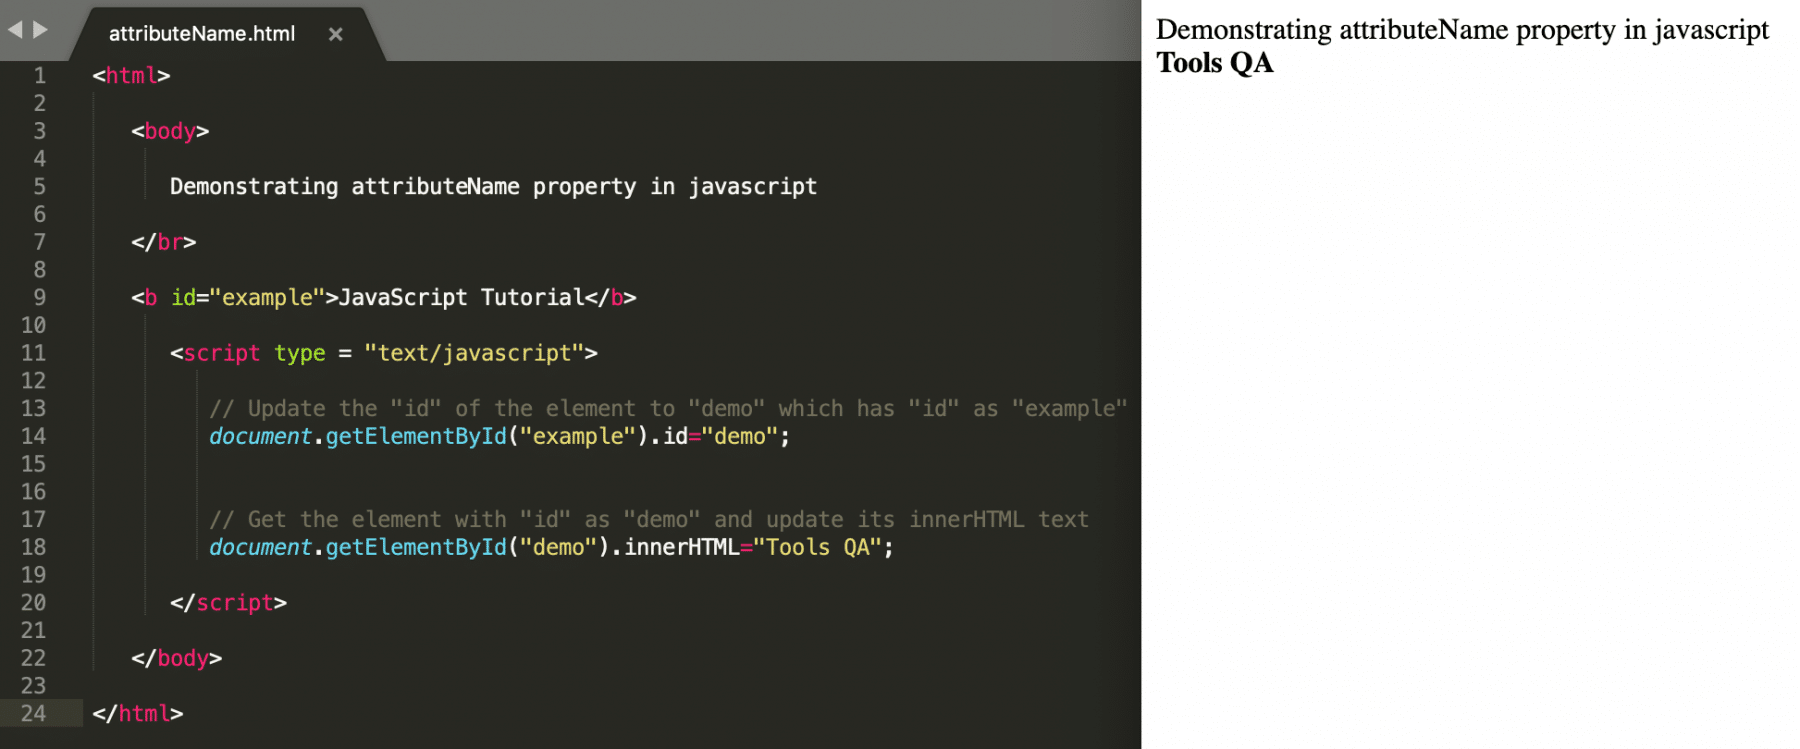
- In the above example, the element is first changed from "example" to "demo" and then based on id "demo," we are manipulating the text of the element.
Style.property
We use this property to set or edit the existing style properties of an HTML tag. Also, its syntax looks like below:
Syntax:
node.Style.attribute = value;
Where,
node: is any web element that can be found on the web page using document.getElementBy<Id/tagName/className>.
- Let's understand the usage of "Style.attribute" method with the help of following code snippet:
<html>

   <body>

      Demonstrating updating style properties in javascript

   </br>

   <b id="example">JavaScript Tutorial</b>

      <script type = "text/javascript">

         document.getElementById("example").style.color = "red";

      </script>

   </body>

</html>
- Save the file with name styleProperties.html. After that, open it in any browser (Chrome, Firefox, or IE). It should show the output as:
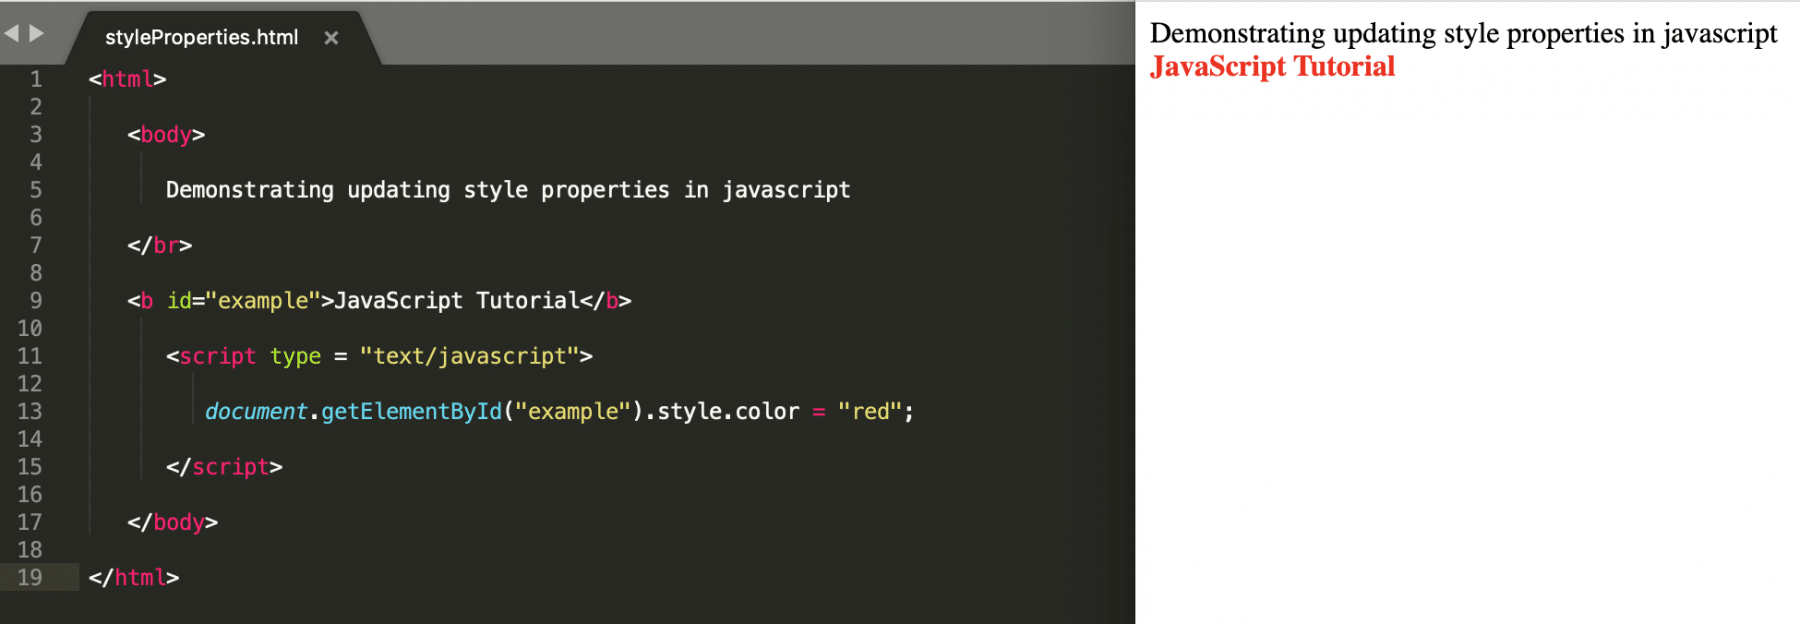
- In the above example, the style attribute "color" has been updated to "red".
setAttribute
We use this function to create or update an attribute for the existing HTML element. Additionally, its syntax looks like below:
Syntax:
node.setAttribute(attributeName, attributeValue);
Where,
node: is any web element that can be found on the web page using document.getElementBy<Id/tagName/className>.
- Let's understand the usage of "setAttribute()" method with the help of following code snippet:
<html>

   <body>

      Demonstrating setAttribute function in javascript

   </br>

   <b>JavaScript Tutorial</b>

      <script type = "text/javascript">

         document.getElementsByTagName("b")[0].setAttribute("id","example");

         document.getElementById("example").innerHTML="Tools QA";

      </script>

   </body>

</html>
- Save the file with name setAttribute.html. After that, open it in any browser (Chrome, Firefox, or IE). It should show the output as:
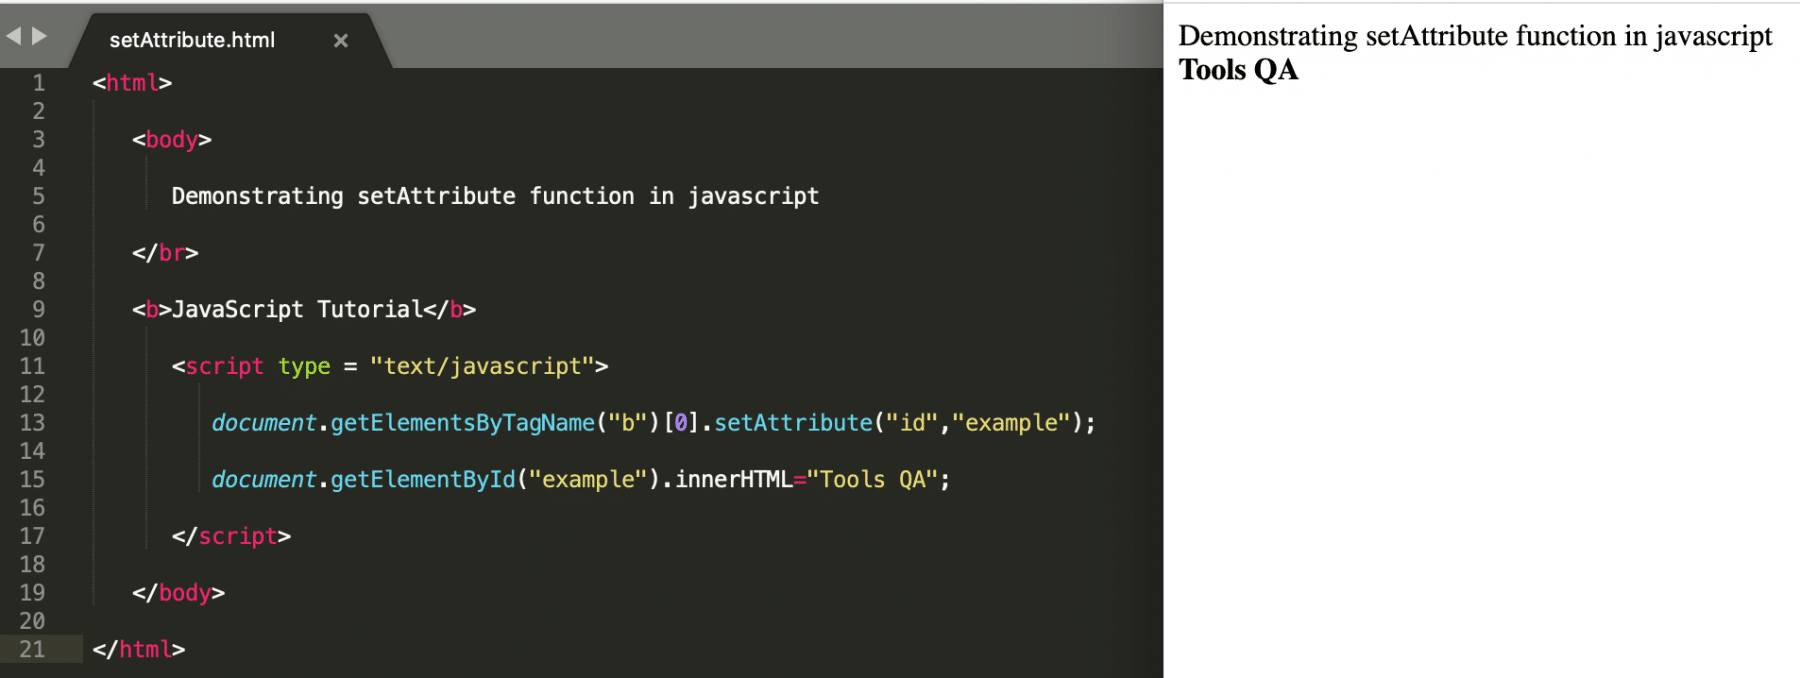
- In the above example, the element is first added a new attribute "id" with value "example" to the
<b>tagged HTML element and then based on id "example", we are manipulating the text of the element.
createElement and appendChild
This createElement() method is used to create a new element in the HTML DOM. Once the creation of element happens, it can append to a parent element using the appendChild() method. Moreover, its syntax looks like below:
Syntax:
// Create a new node
var node = document.createElement(tagName);

// Append the node to parent
document.parentTag.appendChild(node);
- Let's understand the usage of "createElement()" method with the help of following code snippet:
<html>

   <body>

      Demonstrating createElement function in javascript

   </br>

   <b>JavaScript Tutorial</b>

      <script type = "text/javascript">

         var b = document.createElement("a");

         b.innerHTML="ClickME";

         document.body.appendChild(b);

      </script>

   </body>

</html>
- Save the file with name createElement.html. After that, open it in any browser (Chrome, Firefox, or IE). It should show the output as:
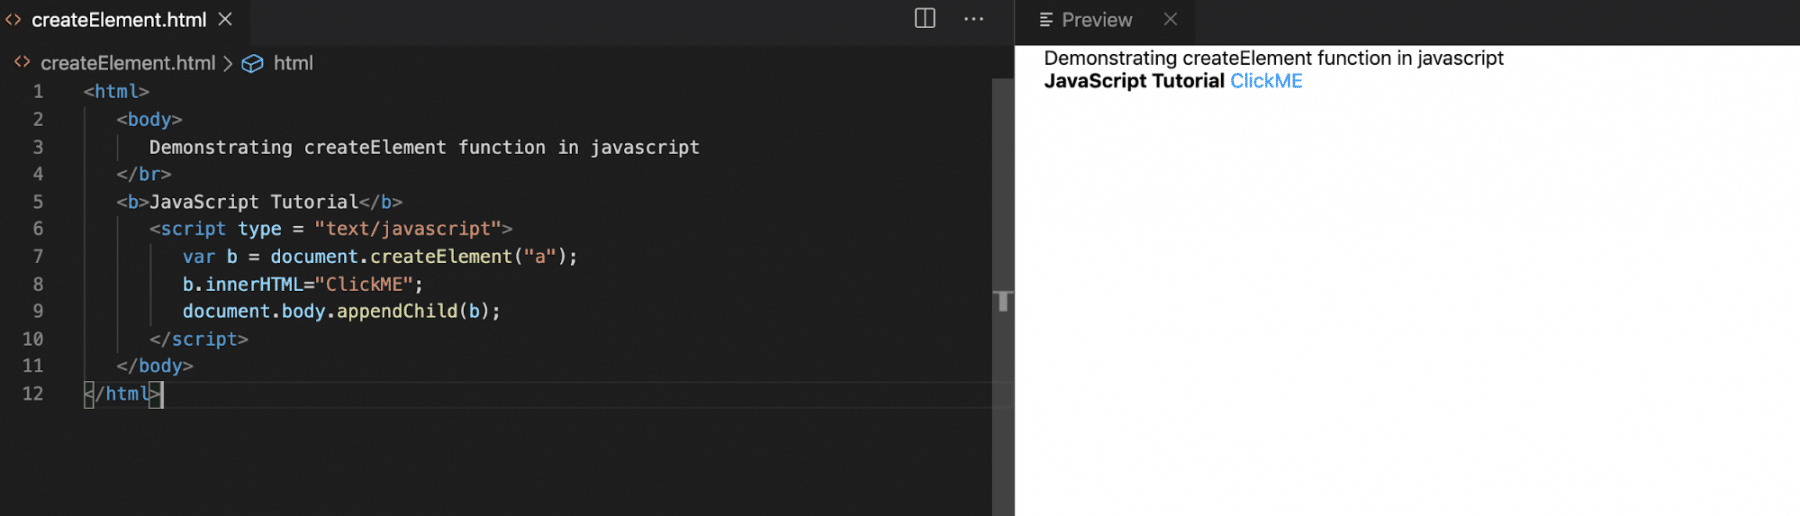
- In the above example, we created a new "anchor" element with the help of the "createElement" method and then appended the element to the document's
<body>element. Hence, it displays on the HTML page.
removeChild
This function removes an HTML element from the document. Also, its syntax looks like below:
Syntax:
node.removechild(childNode);
Where,
node: is any web element that can be found on the web page using document.getElementBy<Id/tagName/className>.
- Let's understand the usage of "removeChild()" method with the help of following code snippet:
<html>

   <body>

      Demonstrating removeChild function in javascript

   </br>

   <b>TOOLS QA</b>

   </br>

   <b id="demo">JavaScript Tutorial</b>

      <script type = "text/javascript">

        document.body.removeChild(document.getElementById("demo"));

      </script>

   </body>

</html>
- Save the file with name removeChild.html. After this, open it in any browser (Chrome, Firefox, or IE). It should show the output as:
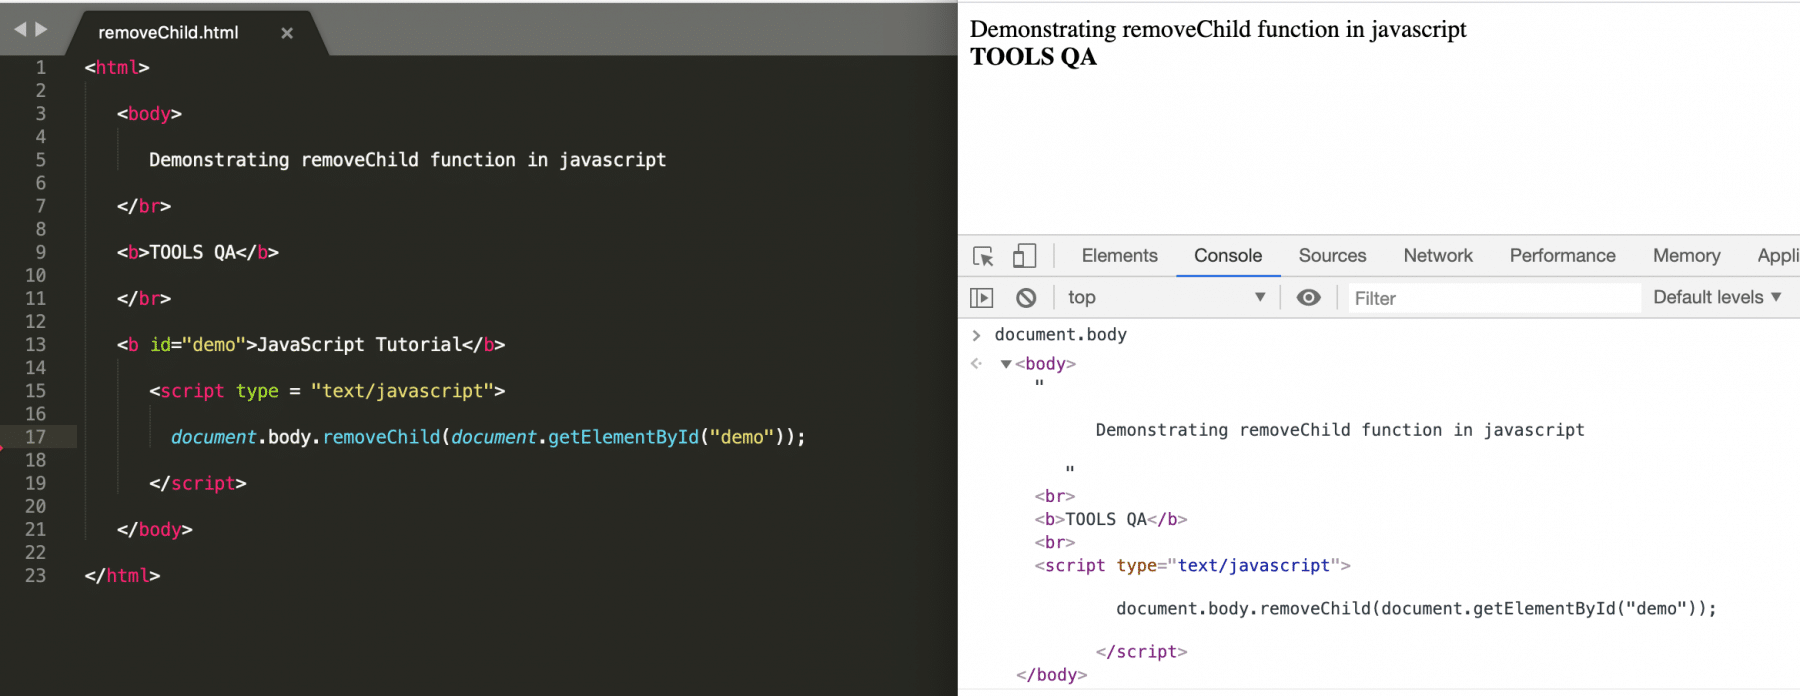
- In the above example, we removed the HTML element, which was having "id" as "demo", due to which the value "JavaScript Tutorial" could not print on the webpage. Also, as shown in the above screenshot, the same can be validated by checking the value of "document.body" on the Chrome console.
replaceChild
The replaceChild() method replaces a child node with a new node. The new node could be an existing node in the document, or you can create a new node. Additionally, its syntax looks like below:
Syntax:
node.replaceChild(newnode, oldnode);
Where,
node: is any web element that can be found on the web page using document.getElementBy<Id/tagName/className>.
- Let's understand the usage of "replaceChild()" method with the help of following code snippet:
<html>
   <body>
      Demonstrating replaceChild function in javascript: </br>

      <ul id="myList"><li>Coffee</li><li>Tea</li><li>Milk</li></ul>

      <button onclick="replaceListValue()">Replace first value of list</button>

      <script type = "text/javascript">

         function replaceListValue() {
            // Create a new list element
            var newListElement = document.createElement("li");
            var textNode = document.createTextNode("Water");
            newListElement.appendChild(textNode);

            // Replace the first element of list by the newly created element
            var list = document.getElementById("myList");
            list.replaceChild(newListElement, list.childNodes[0]);
         }

      </script>

   </body>

</html>
- Save the file with name replaceChild.html. After that, open it in any browser (Chrome, Firefox, or IE). It should show the output as:
In the above example, we replace the first element of the list on the click of the button. The replaceChild method also achieves the same.
Key Takeaways
- The document loaded in a browser is represented by the document object model (DOM). Moreover, it is a data representation of the objects in the HTML page.
- Also, the ID, Tag Name, or Class Name of the HTML elements can access the DOM elements.
- In addition to the above, JavaScript also provides various methods such as setAttribute, createElement, appendChild, removeChild, etc. Moreover, we can use them to manipulate/change multiple HTML elements within the page at run time.
To conclude, let's now move to the next article to understand one of the essential topics of Javascript, which is "Closures in JavaScript".