In the previous article, we covered Using Addons in TestProject; we saw how we could use the already available community addons in TestProject, which have been built by others. However, should we not find the addon we want, we can also create our Addon in TestProject. TestProject provides this in the form of private Custom AddOns in TestProject. In this article, we will cover the following details related to the building Custom Addons in TestProject:
- How to create custom Addons in TestProject?
- How to develop custom Addons in TestProject?
- And how to use capabilities in custom Addons in TestProject?
How to create a custom Addon in TestProject?
TestProject provides the capability to create your private add-ons, which you can customize as per the needs of your application, project, or organization and will be available just for you. Follow the steps mentioned below to create a custom Addon in TestProject:
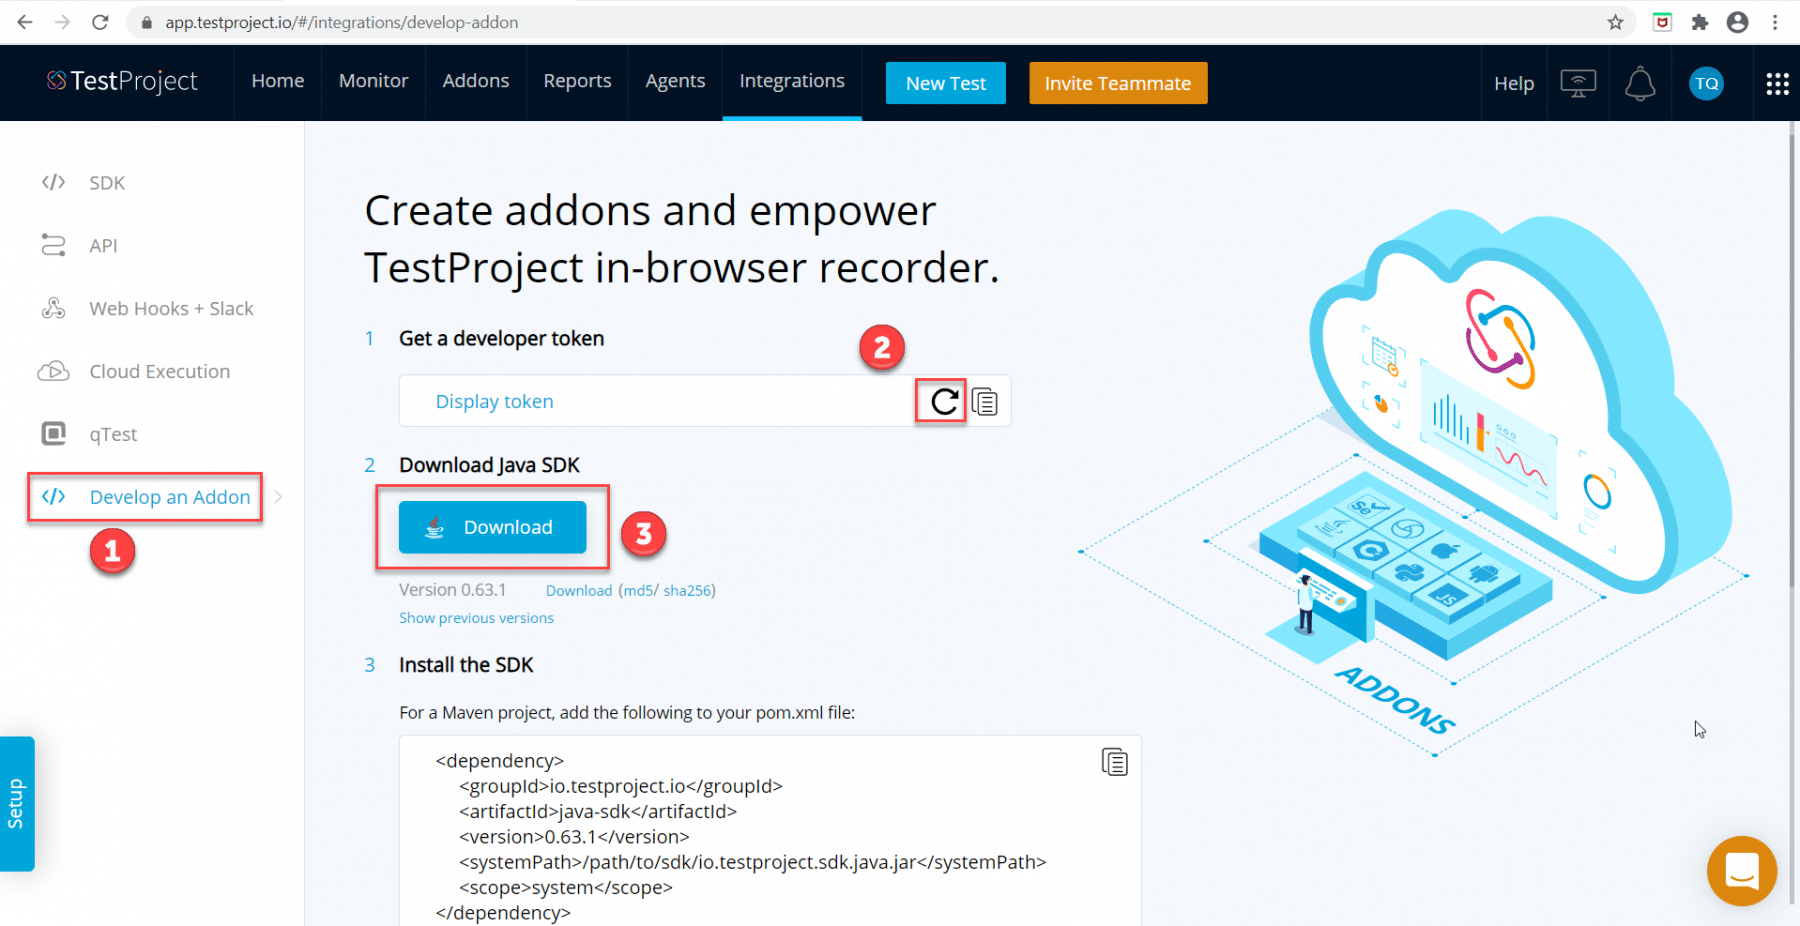
Step 1: Log in to the TestProject website with your credentials. Click on the Integrations section in the top menu and perform the following actions:
- First, click on Develop an Addon.
- Secondly, get the Developer Token after clicking on the highlighted section by marker 2.
- Finally, download Java SDK after clicking on the download button, as highlighted by the marker 3.
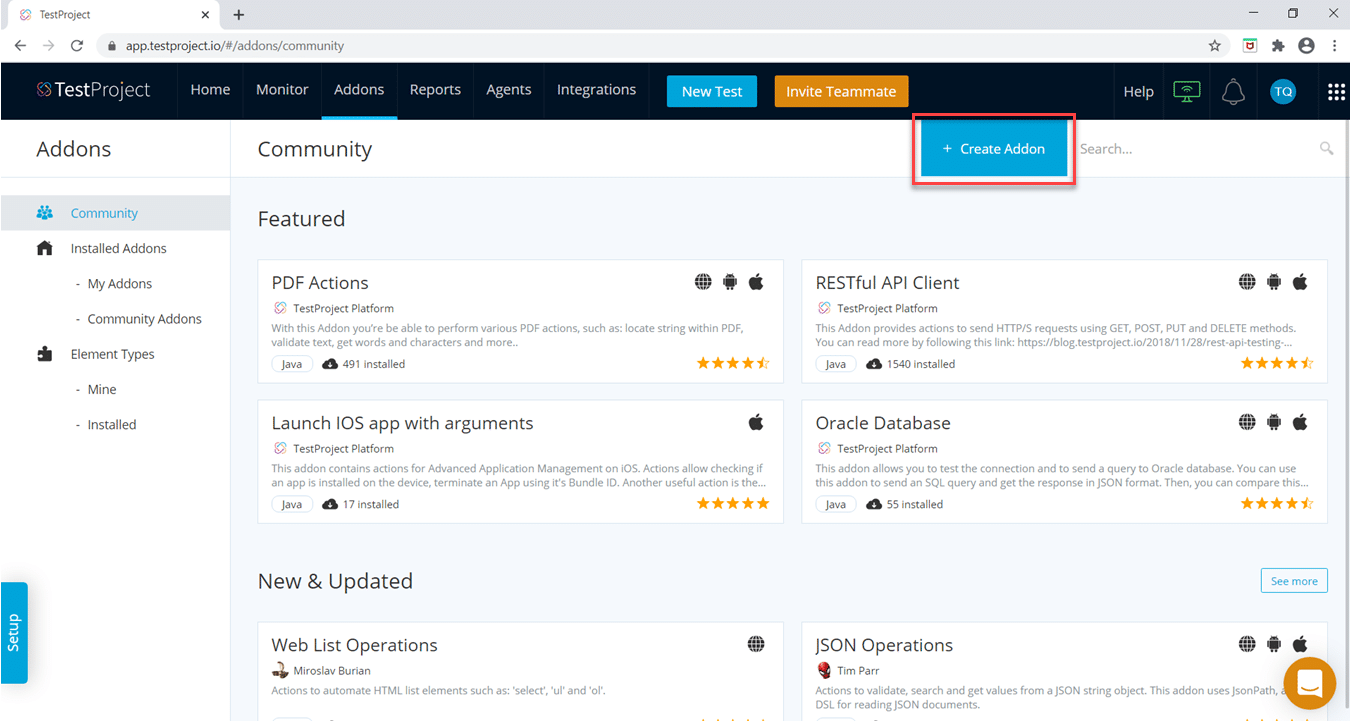
Step 2: Click on the "Addon" section from the top menu bar and then click on the "Create Addon" button as highlighted below:
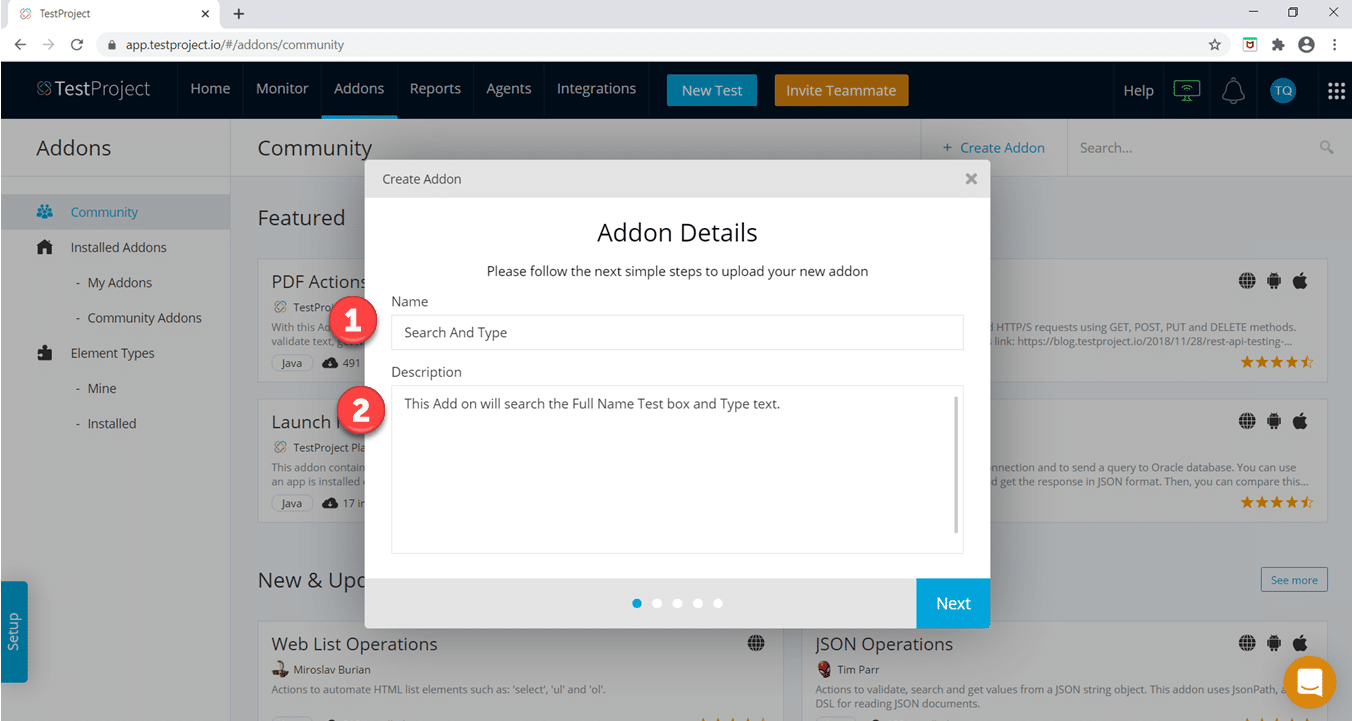
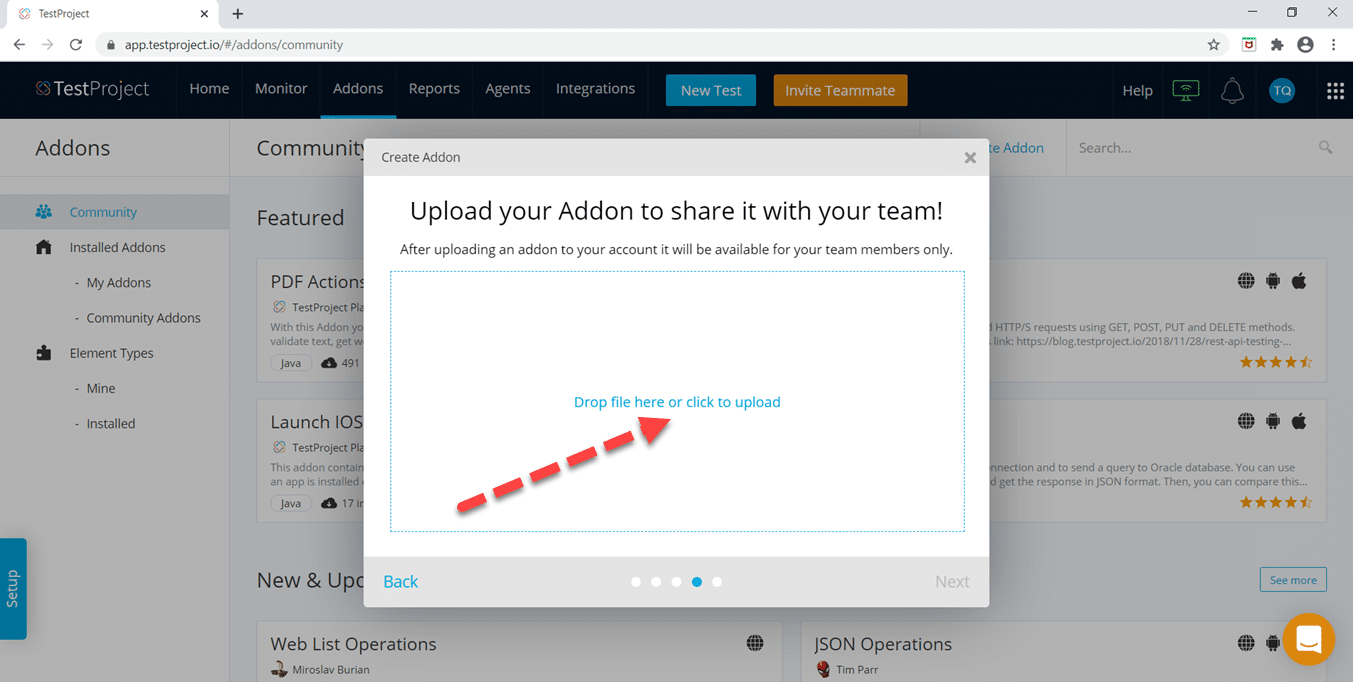
Step 3: As soon as we will click on the Create Addon button, a popup window will appear, in which we need to fill "Name of Addon" and the "Description of Addon". After filling the required details marked by marker 1 and marker 2, click on Next Button, as highlighted below:
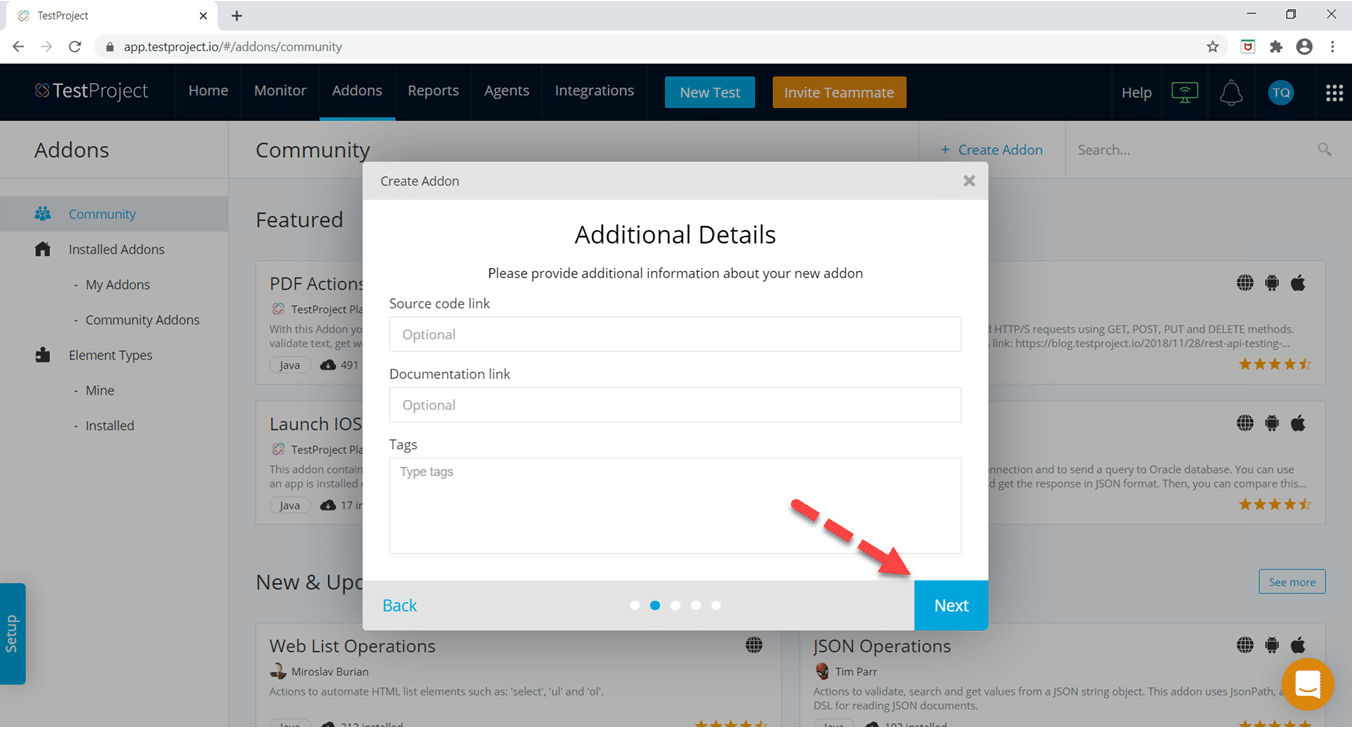
Step 4: After clicking the Next button, then the Additional Details popup window will appear in which we need to fill the "Source Code Link", "Documentation Link", and "Tags" fields. These fields are optional, so we can skip them if we'd like. After filling the required details, click on the Next Button.
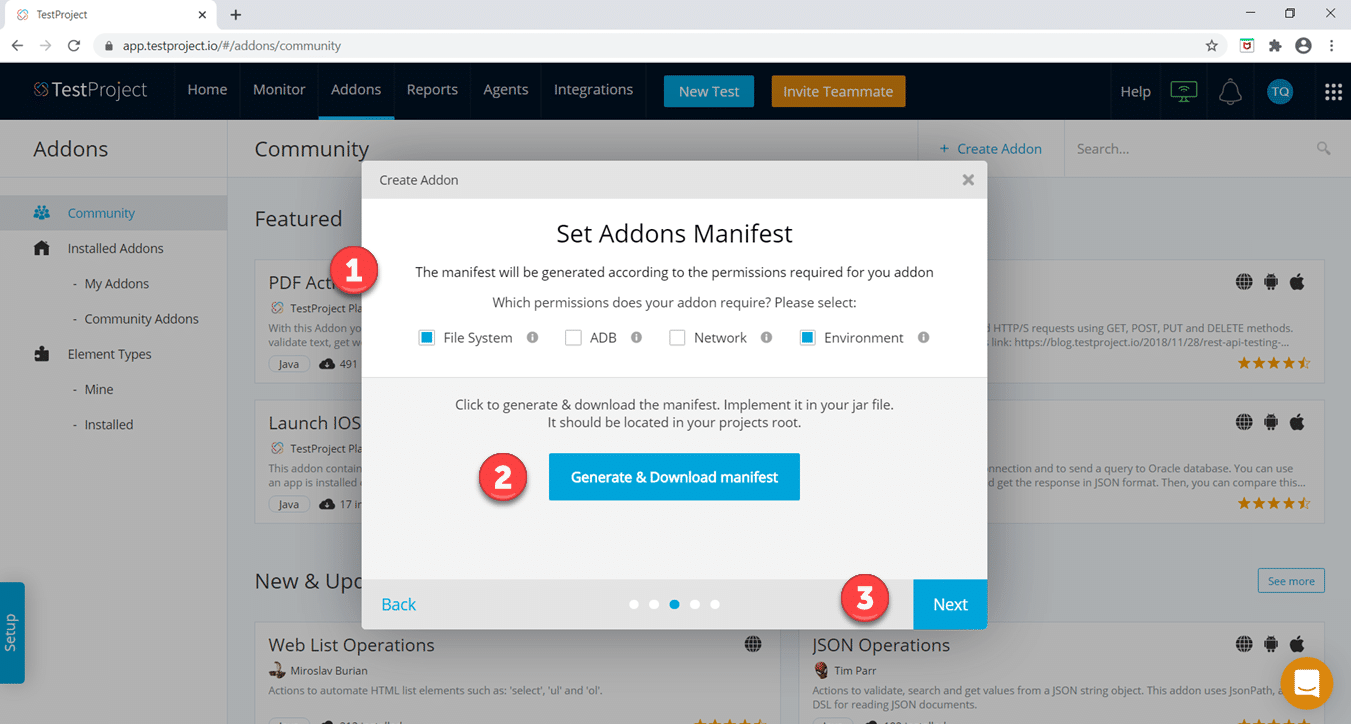
Step 5: After clicking the Next button, another popup window will appear in which we need to perform the following actions:
- Set the permissions on the manifest file. These permissions define the various permissions which the addon actions may need while executing the actions on the Test Agent.
- Click on the "Generate and Download Manifest" button and save the Manifest.json file.
- Click on the Next button.
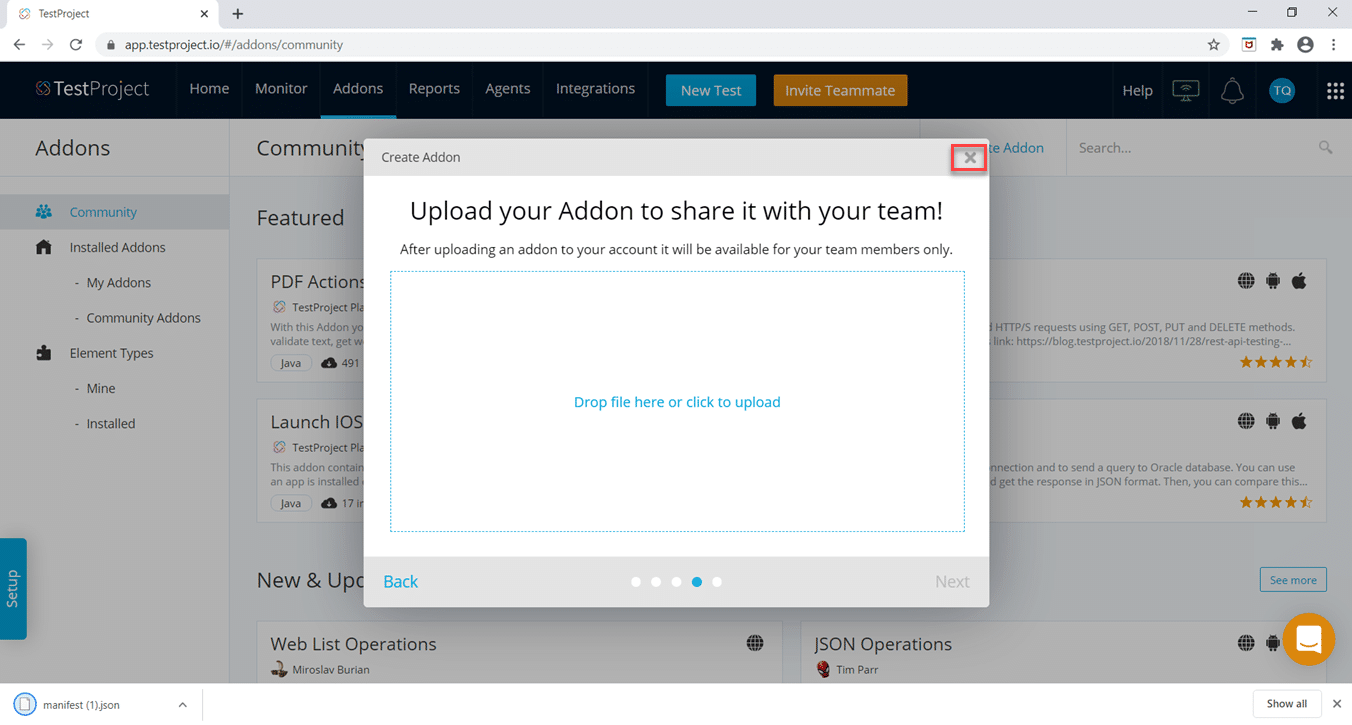
Step 6: After clicking the Next button, we will upload the developed addon.
Note: We can return to this window again once we finish with the development of our new addon. So as of now, click on the Close button to close the popup.
So, that's all for creating the initial addon in TestProject. In the next section, we will code the implementation of our custom addon.
How to develop a custom Addon in TestProject?
So, we created the custom addon in the TestProject. Now, it is time to develop the functionalities this addon can provide. As we mentioned earlier, we will use the TestProject SDK for the development of the addons. At this time, TestProject recommends using the JAVA SDK of TestProject for creating TestProject Addons. Follow the steps as below to develop your addon:
Step 1: Let's suppose we want to build an addon to "search the Text box whose id is username" in the ToolsQA Demo website. Furthermore, if it will first clear the text box and it will type text ToolsQA. As we can see in the below screenshot, the id of the Full Name text box is "username".

To begin developing this addon, we need to assure that the following pre-requisites fulfill:
- *Eclipse or IntelliJ IDEA editor installs, and maven properly configures.8
- Java and Maven path properly configures on the system.
Step 2: First, let's create a maven project in the chosen IDE. The sample project structure should be like the below image. We will talk about each file separately in further sections. It is a default structure for any Maven-based project:
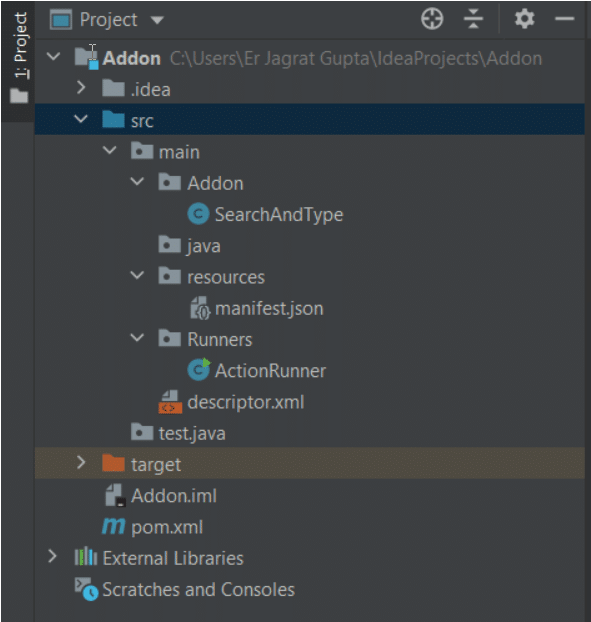
In the resources folder, copy the manifest.json file provided while creating the addon in the previous section. The content of the manifest.json file will look as below:

Here, the important thing about the above manifest.json is the "guid " which will uniquely recognize the addon in TestProject. There will always be a unique guide for each addon. Beyond the guide, the manifest.json file gives us the information about the list of permissions the addon has. These are the same permissions that we created while creating the addon in the previous section.
Step 3: Now, being a maven based project, we will modify the pom.xml file to include the needed plugins and dependencies below:
<?xml version="1.0" encoding="UTF-8"?>
<project xmlns="https://maven.apache.org/POM/4.0.0"
         xmlns:xsi="https://www.w3.org/2001/XMLSchema-instance"
         xsi:schemaLocation="https://maven.apache.org/POM/4.0.0
         http://maven.apache.org/xsd/maven-4.0.0.xsd">
    <modelVersion>4.0.0</modelVersion>

    <groupId>groupId</groupId>
    <artifactId>Addon</artifactId>
    <version>1.0-SNAPSHOT</version>

    <build>
        <sourceDirectory>src</sourceDirectory>
        <plugins>
            <!-- Assembly Plugin - Create a JAR with dependencies for uploading to
            TestProject -->
            <plugin>
                <artifactId>maven-assembly-plugin</artifactId>
                <configuration>
                    <descriptors>
                        <descriptor>src/main/descriptor.xml</descriptor>
                    </descriptors>
                </configuration>
                <executions>
                    <execution>
                        <id>make-assembly</id>
                        <phase>package</phase>
                        <goals>
                            <goal>single</goal>
                        </goals>
                    </execution>
                </executions>
            </plugin>
            <!--Tests Plugin-->
            <!-- Compile Plugin -->
            <plugin>
                <artifactId>maven-compiler-plugin</artifactId>
                <version>3.5.1</version>
                <configuration>
                    <source>1.8</source>
                    <target>1.8</target>
                </configuration>
            </plugin>
        </plugins>
    </build>
    <properties>
        <maven.compiler.source>7</maven.compiler.source>
        <maven.compiler.target>7</maven.compiler.target>
    </properties>
    <dependencies>
        <dependency>
            <groupId>io.testproject</groupId>
            <artifactId>java-sdk</artifactId>
            <version>1.0</version>
            <!-- Update the location of the sdk as required so put your directory path
                 according to storage location of your sdk.jar file  -->
            <systemPath>C:/Users/Er Jagrat Gupta/Downloads/TestProject_SDK_0.63.1.jar
            </systemPath>
            <scope>system</scope>
            <!-- Local file won't be assembled by maven-assembly-plugin -->
        </dependency>
    </dependencies>
</project>
- We need to include the maven assembly plugin.
- We need to include the maven compiler plugin for a successful maven compile operation.
- Additionally, we need to include the compiler source and target values inside the properties tag.
- We need to include the TestProject java-sdk dependency inside the dependency section and give the path of the java sdk jar file (which we download in the previous section) inside the systemPath tag.
Step 4: Create a descriptor.xml file inside the src\main folder. It is a Maven component, which generates the assemblies.
<?xml version="1.0" encoding="UTF-8"?>
<assembly>
        xmlns="https://maven.apache.org/plugins/maven-assembly-plugin/assembly/1.1.0"
        xmlns:xsi="https://www.w3.org/2001/XMLSchema-instance"
        xsi:schemaLocation="https://maven.apache.org/plugins/maven-assembly-plugin/assembly/
        1.1.0 http://maven.apache.org/xsd/assembly-1.1.0.xsd">
    <id>jar-with-dependencies</id>
    <formats>
        <format>jar</format>
    </formats>
    <includeBaseDirectory>false</includeBaseDirectory>
    <dependencySets>
        <!--Assemble all runtime dependencies-->
        <dependencySet>
            <outputDirectory>/</outputDirectory>
            <useProjectArtifact>true</useProjectArtifact>
            <unpack>true</unpack>
            <scope>runtime</scope>
        </dependencySet>
        <!--Extract TestProject SDK Properties-->
        <dependencySet>
            <outputDirectory>/</outputDirectory>
            <useProjectArtifact>true</useProjectArtifact>
            <scope>system</scope>
            <unpack>true</unpack>
            <includes>
                <include>io.testproject:java-sdk</include>
            </includes>
            <unpackOptions>
                <includes>
                    <include>testproject-sdk.properties</include>
                </includes>
            </unpackOptions>
        </dependencySet>
        <!--Exclude TestProject SDK from the resulting JAR-->
        <dependencySet>
            <outputDirectory>/</outputDirectory>
            <unpack>true</unpack>
            <scope>system</scope>
            <excludes>
                <exclude>io.testproject:java-sdk</exclude>
            </excludes>
        </dependencySet>
    </dependencySets>
</assembly>
The descriptor.xml file generally combines all the plugins and 3rd party libraries we linked into our jar and generates the jar-with-dependencies file. This file provides information about:
- Assembling of all run time dependencies.
- Extracting the TestProject SDK properties from the java-sdk file.
- It also excludes the TestProject SDK from the resulting jar to remove unnecessary storage.
Step 5: Now, the configurations finish. We will start with the development of our addon functionality. To do this, we will first create a package named Addon. Inside it, we will create a class named SearchAndType. The sample code will look as follows:
package main.Addon;
import io.testproject.java.annotations.v2.Action;
import io.testproject.java.sdk.v2.addons.WebAction;
import io.testproject.java.sdk.v2.addons.helpers.WebAddonHelper;
import io.testproject.java.sdk.v2.drivers.WebDriver;
import io.testproject.java.sdk.v2.enums.ExecutionResult;
import io.testproject.java.sdk.v2.exceptions.FailureException;
import org.openqa.selenium.By;
import org.openqa.selenium.WebElement;

@Action(name="Search and Type")
public class SearchAndType implements WebAction{

@Override
public ExecutionResult execute(WebAddonHelper webAddonHelper) throws FailureException
    {
        WebDriver driver=webAddonHelper.getDriver();
        WebElement searchField = driver.findElement(By.id("userName"));
        if (!searchField.isDisplayed()) {
            webAddonHelper.getReporter()
                    .result("No input field was found with the id: s");
            return ExecutionResult.FAILED;
        }
        searchField.clear();
        searchField.sendKeys("ToolsQA");
        return ExecutionResult.PASSED;
    }
}
Let's Understand the above code line by line:
- First, We need to import all the packages required to implement the code. These are the packages imported from the TestProject SDK and provide the capabilities required to perform the actions:
package main.Addon;
import io.testproject.java.annotations.v2.Action;
import io.testproject.java.sdk.v2.addons.WebAction;
import io.testproject.java.sdk.v2.addons.helpers.WebAddonHelper;
import io.testproject.java.sdk.v2.drivers.WebDriver;
import io.testproject.java.sdk.v2.enums.ExecutionResult;
import io.testproject.java.sdk.v2.exceptions.FailureException;
import org.openqa.selenium.By;
import org.openqa.selenium.WebElement;
- We will create a class SearchAndType, which uses the WebAction Interface provided by the TestProject SDK. Also, we will annotate the class with the @Action annotation and give the name that will display as the name of Addon.
@Action(name="Search and Type")
public class SearchAndType implements WebAction
- *Now, we will implement the execute method that contains the webAddonHelper as an object and return ExecutionResult as an enum. As we have overridden this method, we annotate with @Override annotation.
@Override
public ExecutionResult execute(WebAddonHelper webAddonHelper) throws FailureException
- Now, we will get the reference to the WebDriver object using the webAddonHelper
WebDriver driver=webAddonHelper.getDriver();
- Now, we will inspect the text box that we want to search and type text on it. After that, we implement the logic that if the text box is displayed, then it will clear that textbox and type ToolsQA text and also it will return the status as Passed (otherwise, it Fails).
WebElement searchField = driver.findElement(By.id("userName"));
        if (!searchField.isDisplayed()) {
            webAddonHelper.getReporter()
                    .result("No input field was found with the id: s");
            return ExecutionResult.FAILED;
        }
        searchField.clear();
        searchField.sendKeys("ToolsQA");
        return ExecutionResult.PASSED;
Step 6: Once the required code develops, our last task is to implement the ActionRunner class. To do this, we will create another package named Runners inside the main folder. It is the entry point for the addon and implements the "main " method. Consequently, our code for ActionRunner class should be like below code:
package main.Runners;
import main.Addon.SearchAndType;
import org.openqa.selenium.WebDriver;
import io.testproject.java.classes.DriverSettings;
import io.testproject.java.enums.DriverType;
import io.testproject.java.sdk.v2.Runner;

public class ActionRunner {

    private final static String token="Paste your dev token value here generated from Step 1";

    public static void main(String[] args) throws Exception {
        DriverSettings settings=new DriverSettings(DriverType.Chrome);
        try(Runner runner=new Runner(token,settings))
        {
            SearchAndType box=new SearchAndType();
            WebDriver driver=runner.getDriver(box);
            driver.navigate().to("https://demoqa.com/text-box");
            runner.run(box);
        }
    }
}
Let's understand the above code line by line:
- We need to import all packages required to implement the code.
package main.Runners;
import main.Addon.SearchAndType;
import org.openqa.selenium.WebDriver;
import io.testproject.java.classes.DriverSettings;
import io.testproject.java.enums.DriverType;
import io.testproject.java.sdk.v2.Runner;
- *Create the ActionRunner class and inside; it defines the variable token in which we need to give the value of the dev token that we have already generated from Step 1. This token is required to connect to the TestProject account.
public class ActionRunner {

    private final static String token="Paste your dev token value here generated from Step 1";
- *Create the Main method, and inside it, we need to define the object of DriverSettings class for executing the test in the required browser. We will keep the token variable and the settings as an object inside the Runner class. Now, we will create an object of the SearchAndType class created in Step 11 and pass this object into the getDriver method.
- After that, we will write the code for navigating to the required URL, and with the help of the run method, we will execute our SearchAndType class with the help of its object.
DriverSettings settings=new DriverSettings(DriverType.Chrome);
        try(Runner runner=new Runner(token,settings))
        {
            SearchAndType box=new SearchAndType();
            WebDriver driver=runner.getDriver(box);
            driver.navigate().to("https://demoqa.com/text-box");
            runner.run(box);
        }
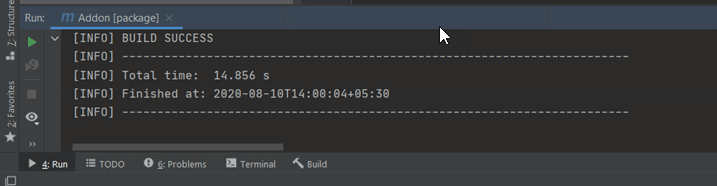
Step 7: Once our code is ready, we can execute the maven operations: "maven-clean " and "maven-compile".
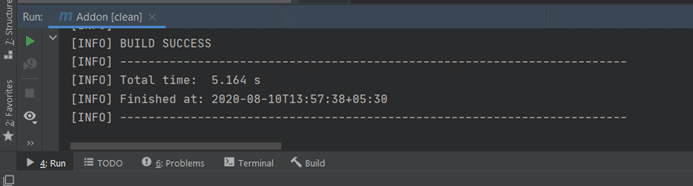
Assuming everything goes well, the "Build Success " message will display on the console.
Step 8: Once maven clean and compile operations finish, then we need to operate "maven-package" through which we will be able to create our required jar file in the target folder. The build success message will confirm the generation of the jar file, as shown below:
A new file name "Addon-1.0-SNAPSHOT.jar " will now be generated, as shown below:
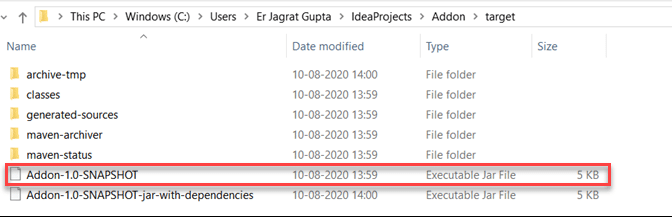
So, now our addon is developed. Additionally, it is ready to be uploaded in the form of the jar file in TestProject. Subsequently, let's see how we can provide these developed functionalities to the addon in TestProject.
How to use custom Addon capabilities in TestProject?
In this section, we will upload the implemented custom addon and execute that addon in TestProject. To implement it, we need to follow the below steps:
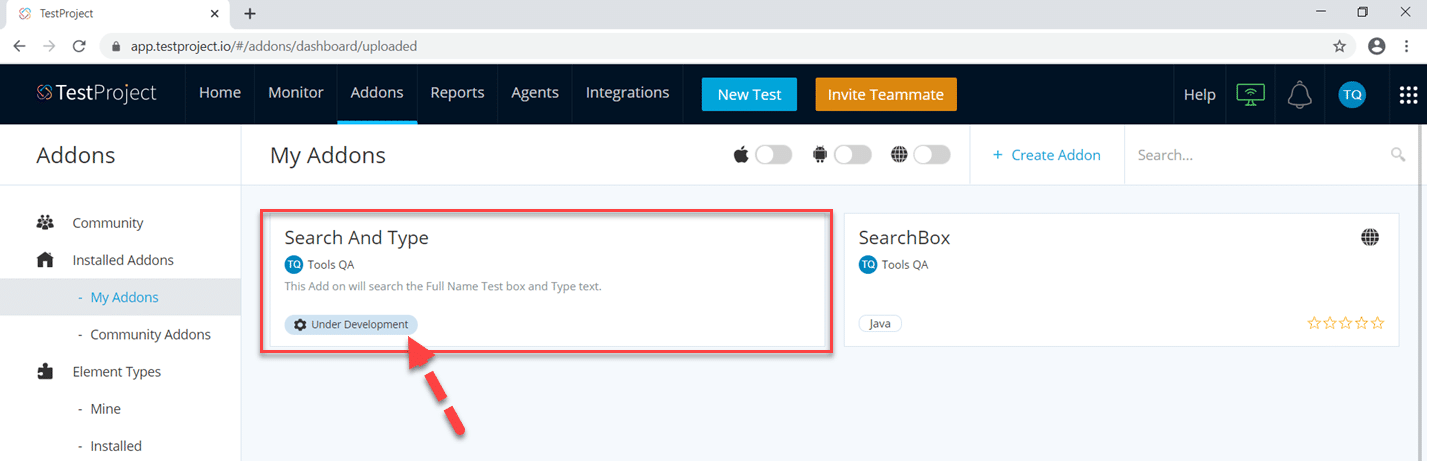
Step 1: First, log in to your TestProject cloud account. Under the Addons section, click on My Addons. Here, we will see our Addon Name with an "Under development " tag that we created in Step 6 of this article. Now, click on this Addon.
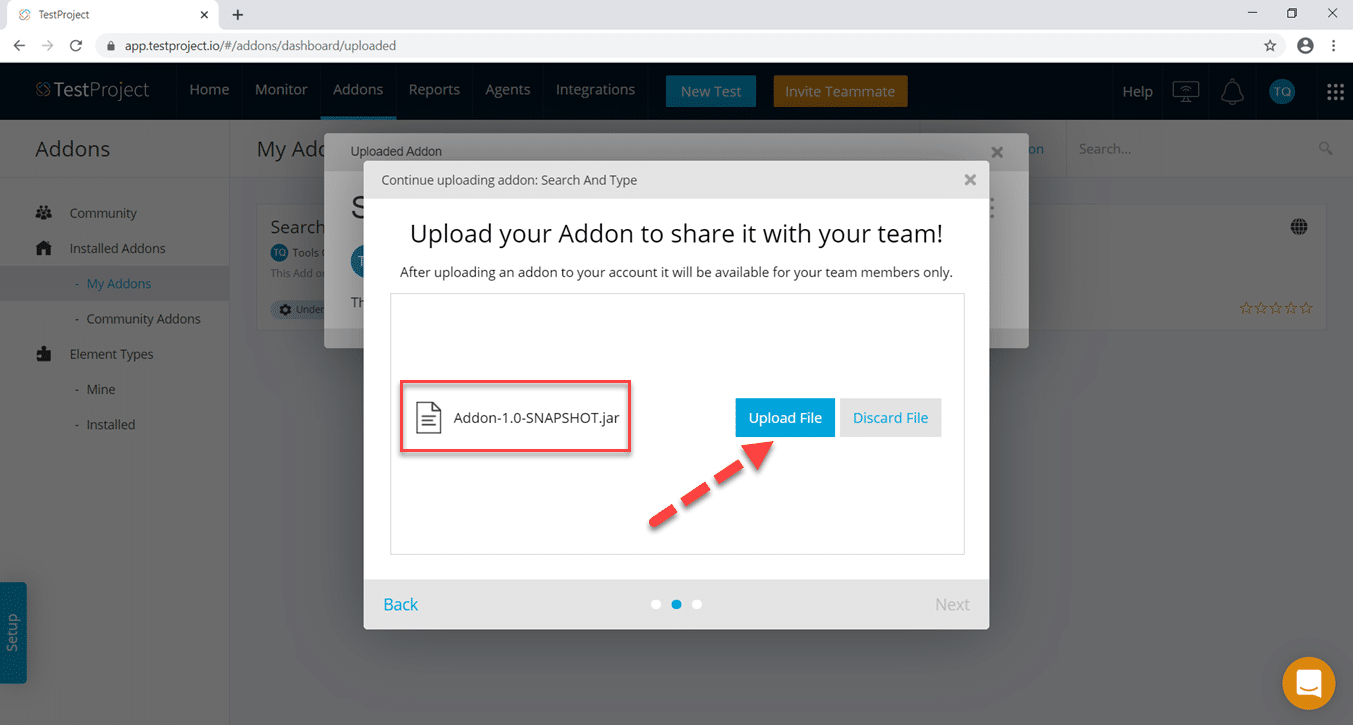
Step 2: Secondly, after clicking on the addon name, the pop-up window appears to upload the jar file highlighted in Step 14. Upload the jar file here.
Step 3: Thirdly, once we uploaded the jar file, we will see it, and now we need to click the Upload file button.
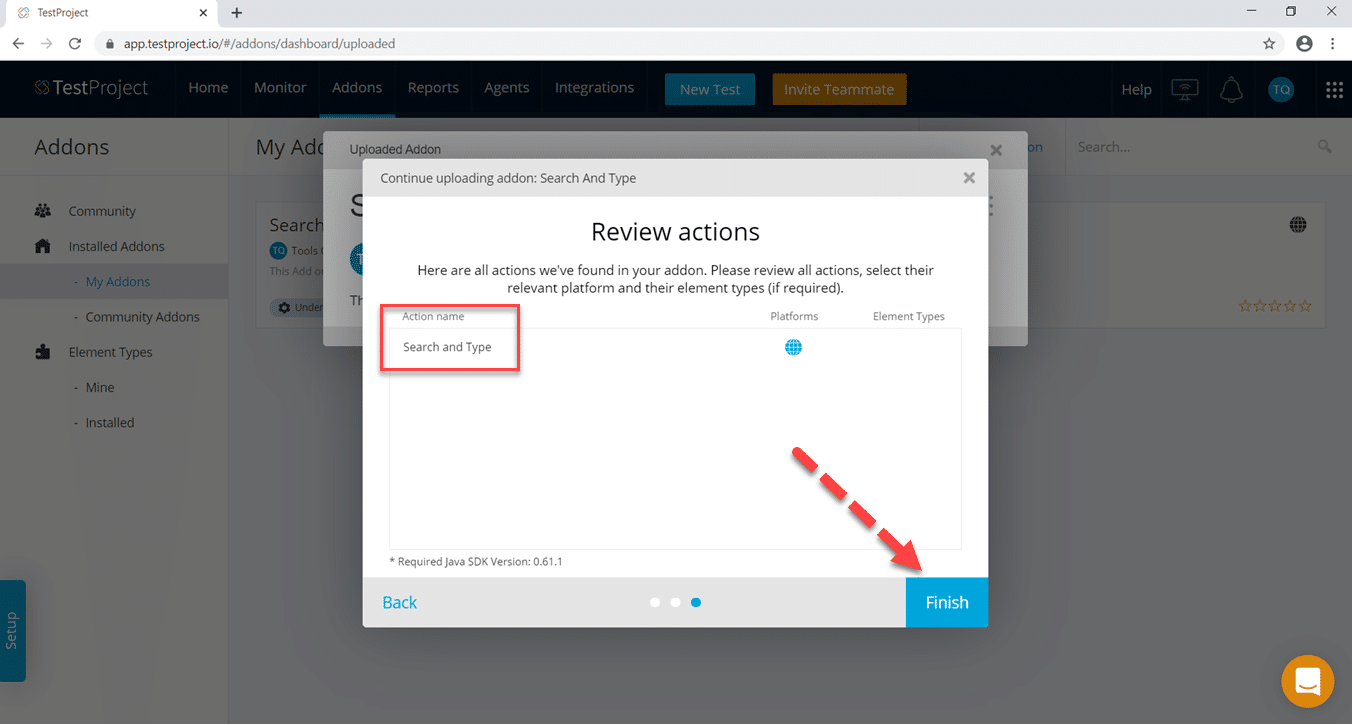
Step 4: Fourthly, once the above operation completes, the Review Action screen will appear. After that, we can see the name of the action is set correctly as "Search and Type". Now, click on the Finish button.
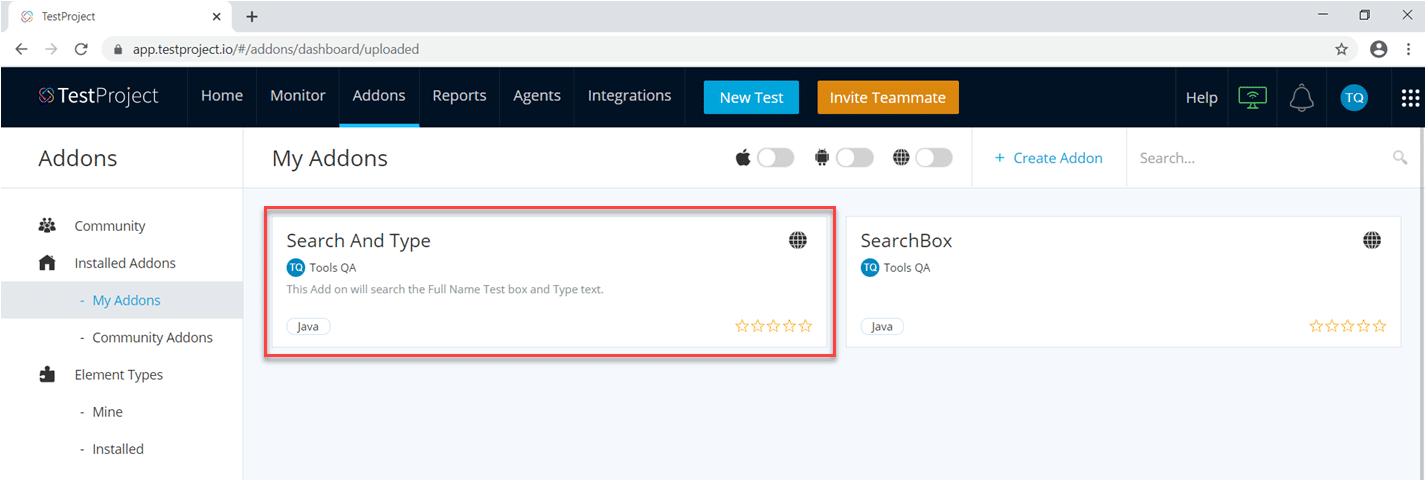
Step 5: Fifthly, once we click the finish button, we will see the Uploaded addon screen. Congratulations - our addon is finally developed and uploaded in TestProject.

We can now see the removal of the "Under Development " tag from the addon.
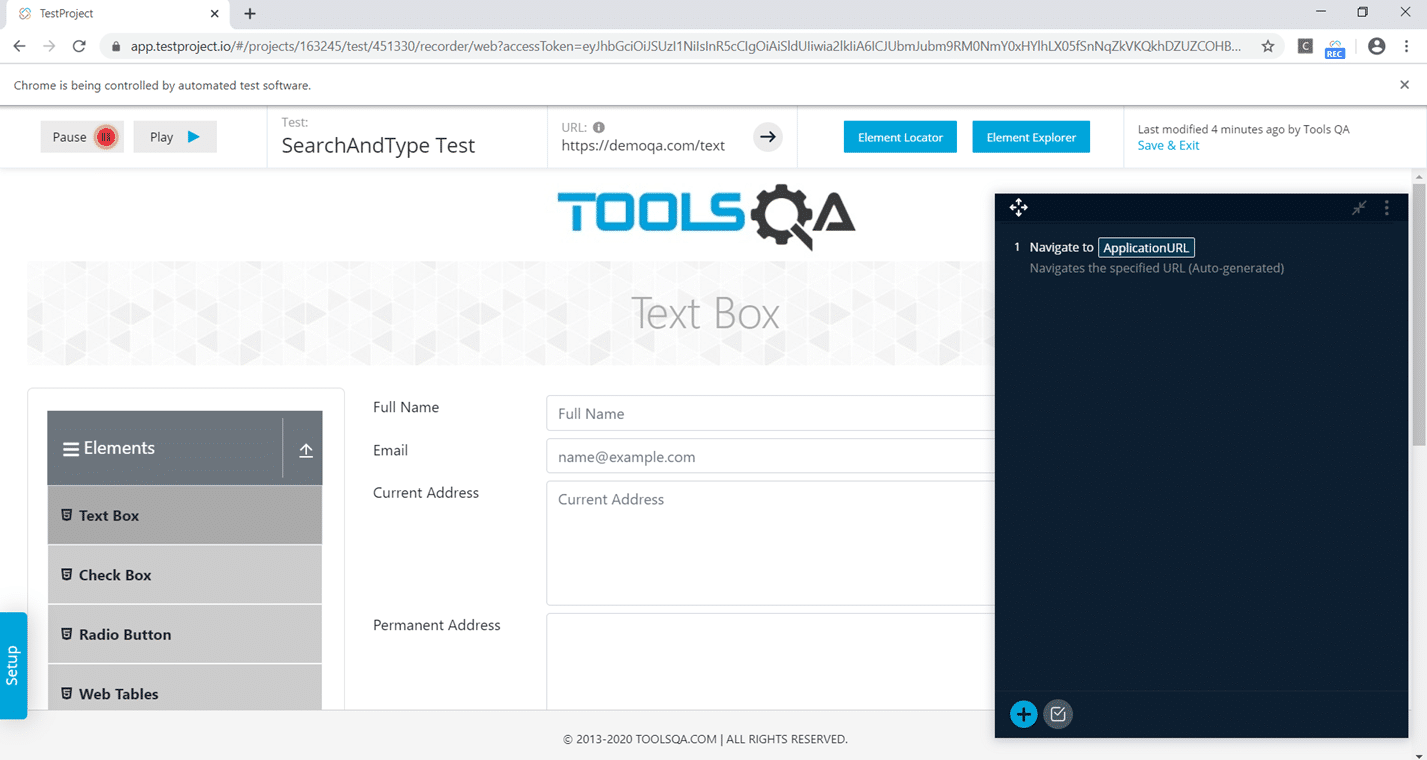
Step 6: Now, to test out the addon, we will create a project and record a test case in the project. We need to record through the test until the required URL of demoqa.com opens.
Step 7: Now, we need to perform the following actions to add our developed addon:
-
First, click on the + icon highlighted in the image.
-
Secondly, click on the Element Action Link inside the Type section.
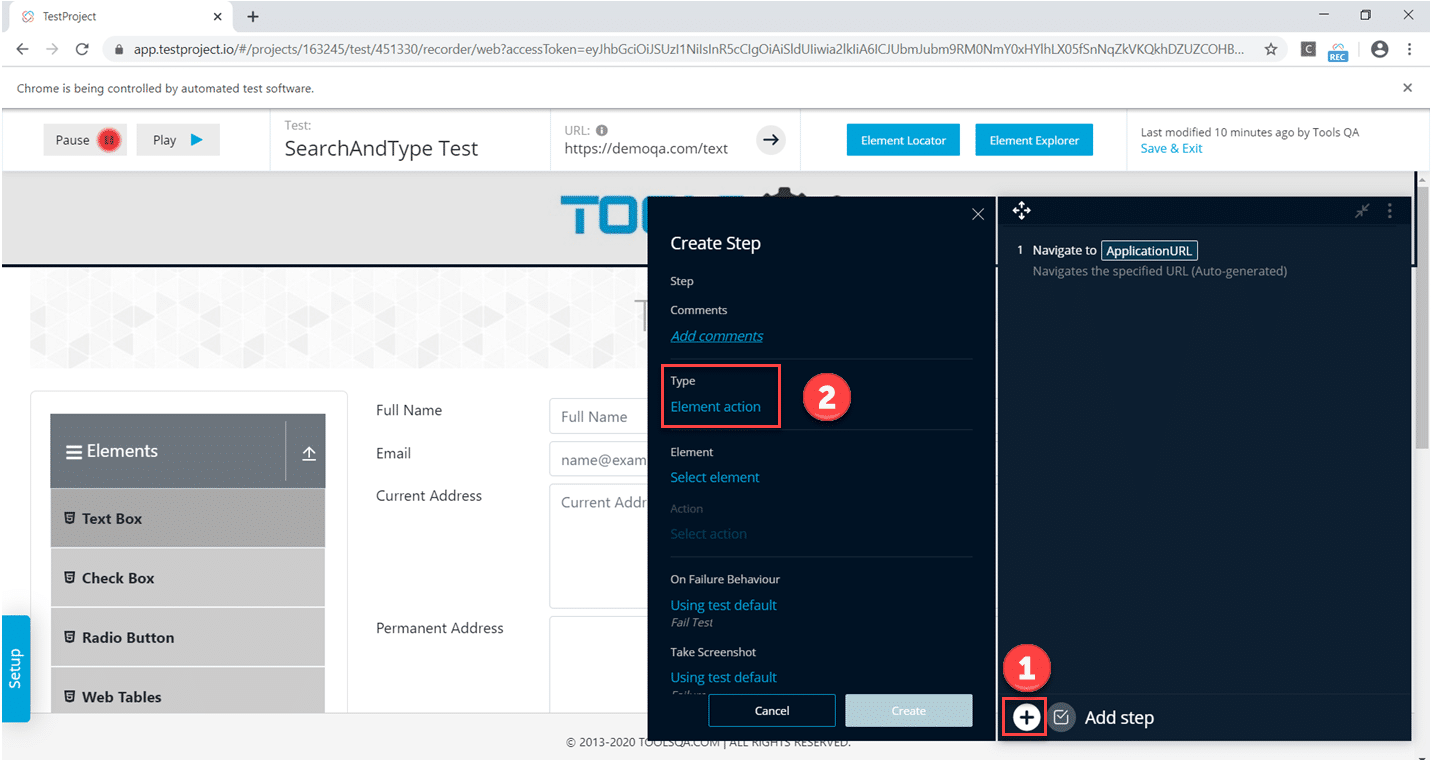
-
Thirdly, select the Action Radio button.
-
Fourthly, click on the check icon highlighted in the image.
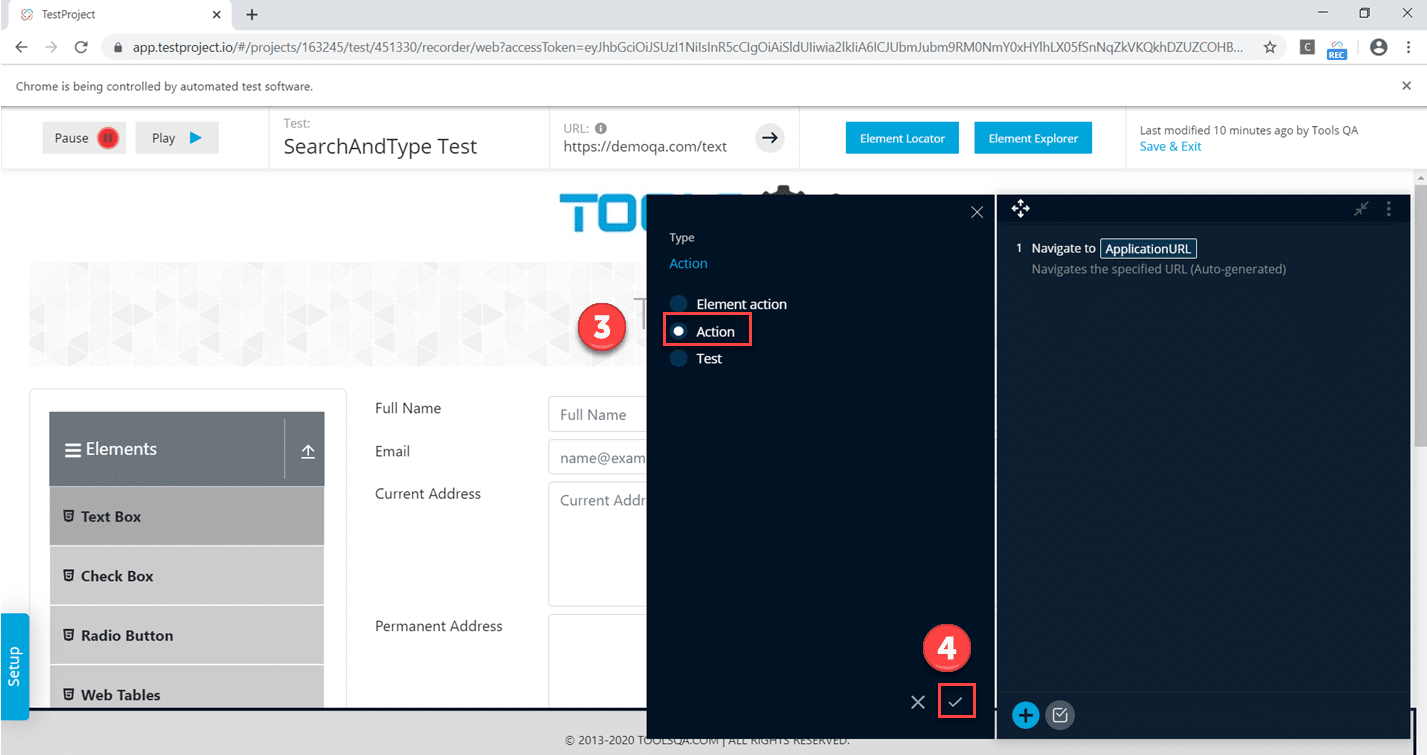
Step 8: Now, we can see that the Action is inside the Type section in the below Image. Now click on the "Select Action " link inside the Action section.

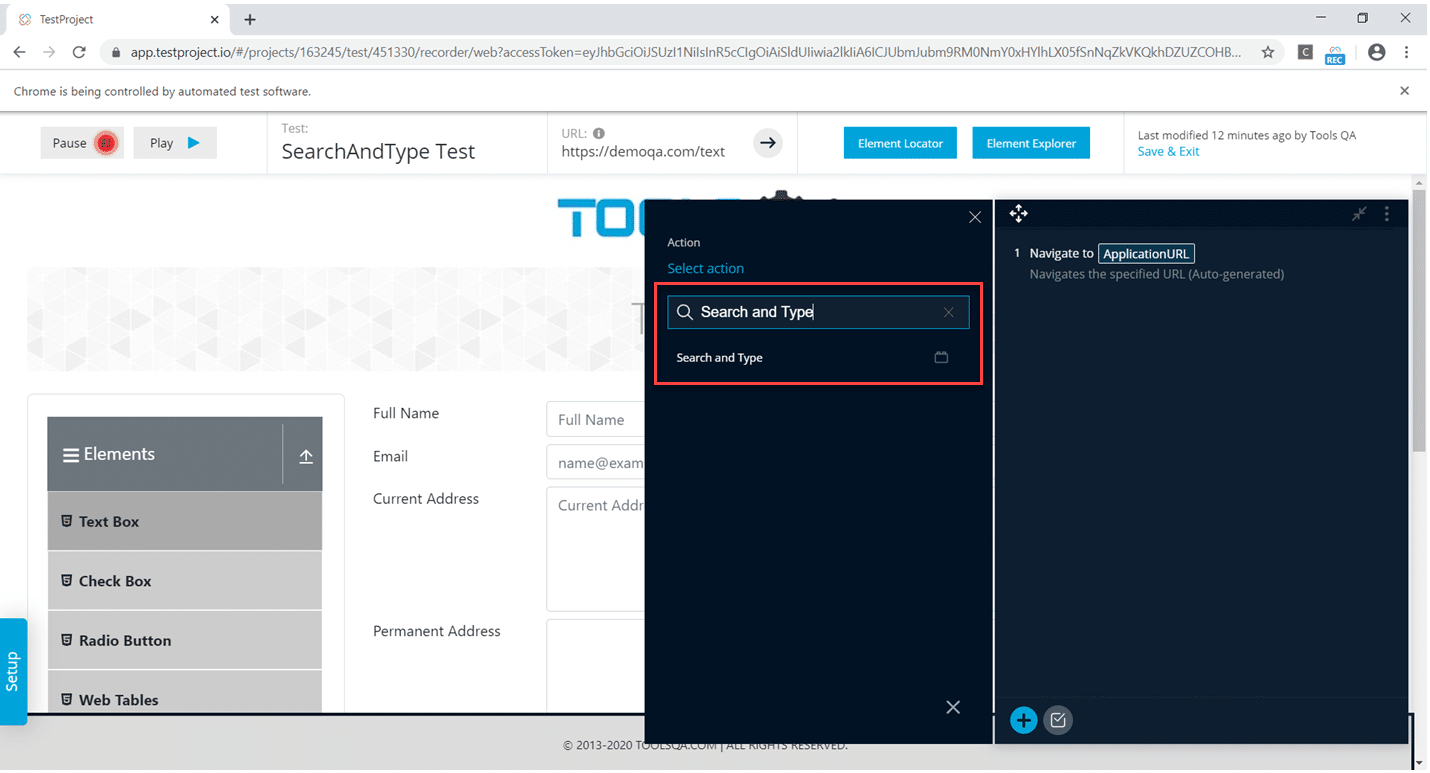
Step 9: Now, search for the action called "Search and Type", which is the name we provided for our developed addon:
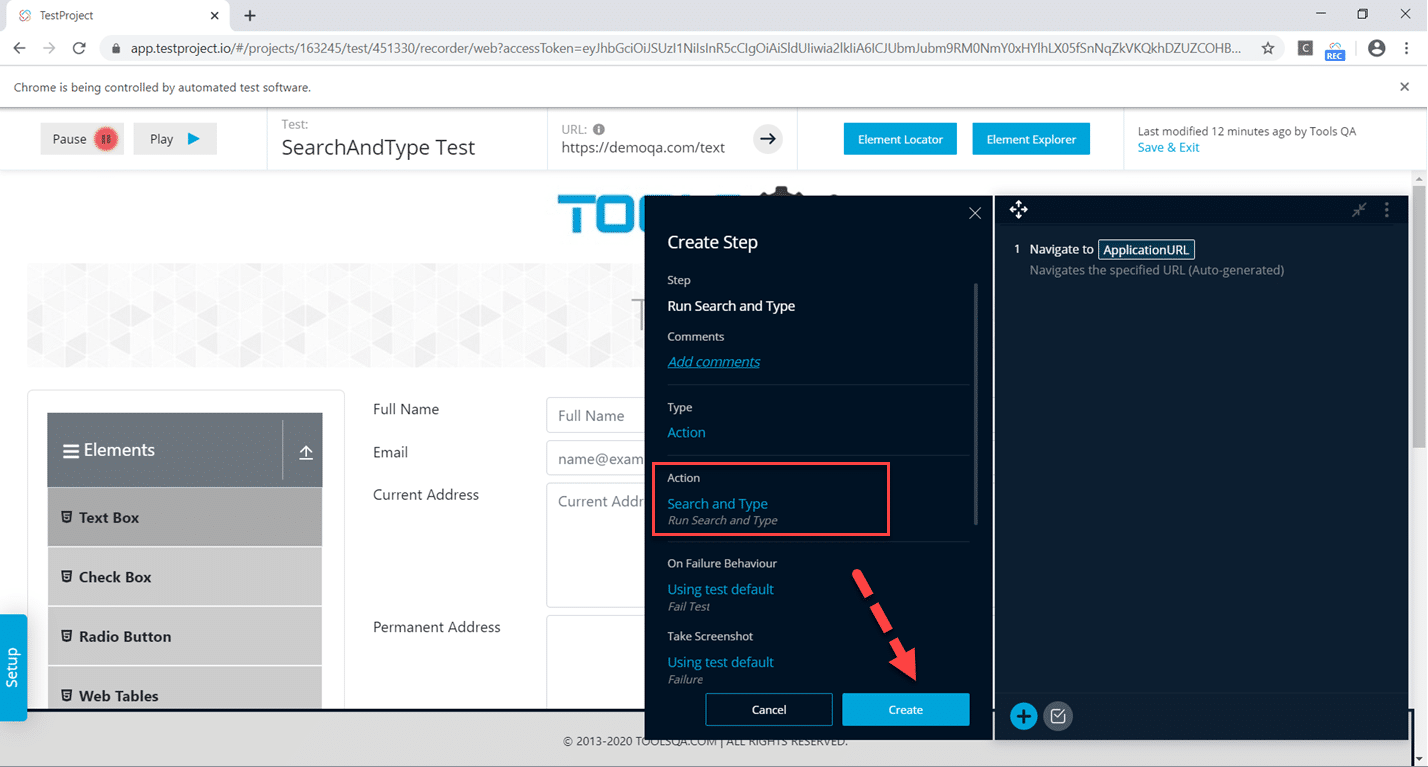
Step 10: We can see the developed addon in the Action section. Now click on the Create button.
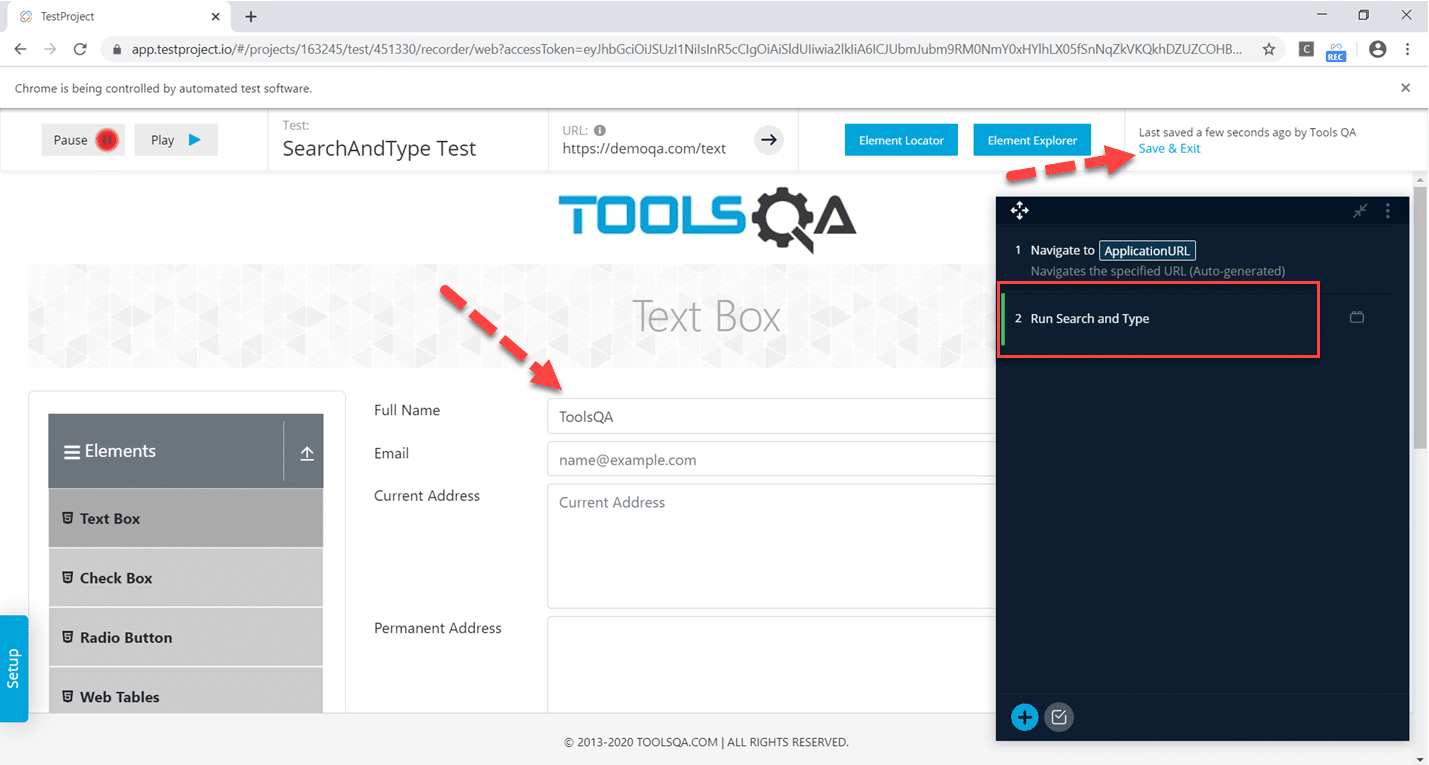
Step 11: After we click the Create button, it will execute the code for our addon. "ToolsQA " will be typed inside the text box, and the test step will be displayed. Now click on Save and Exit hyperlink.
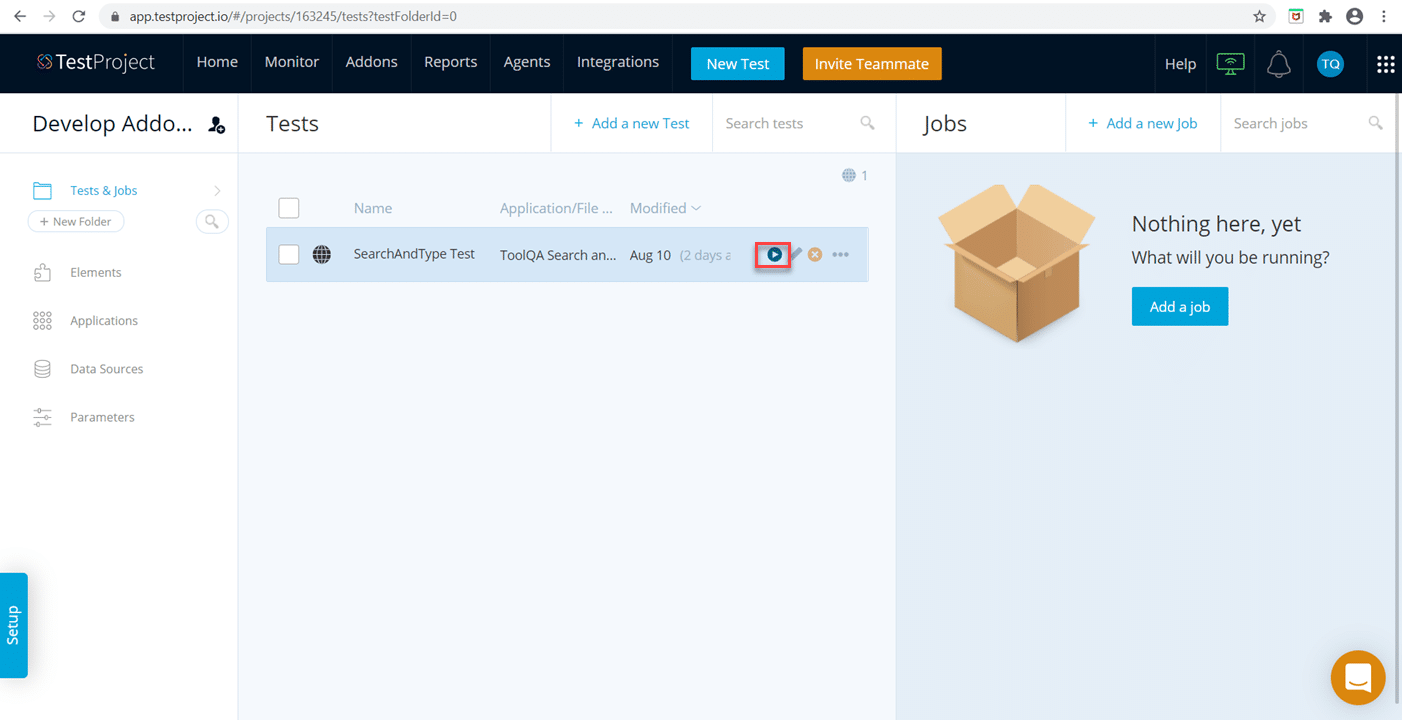
Step 12: Now, the creation of our new Addon Test Case finishes. Hit the run icon highlighted in the below image, select the agent and launch the test case execution.
Step 13: After the successful run, the Report will generate.
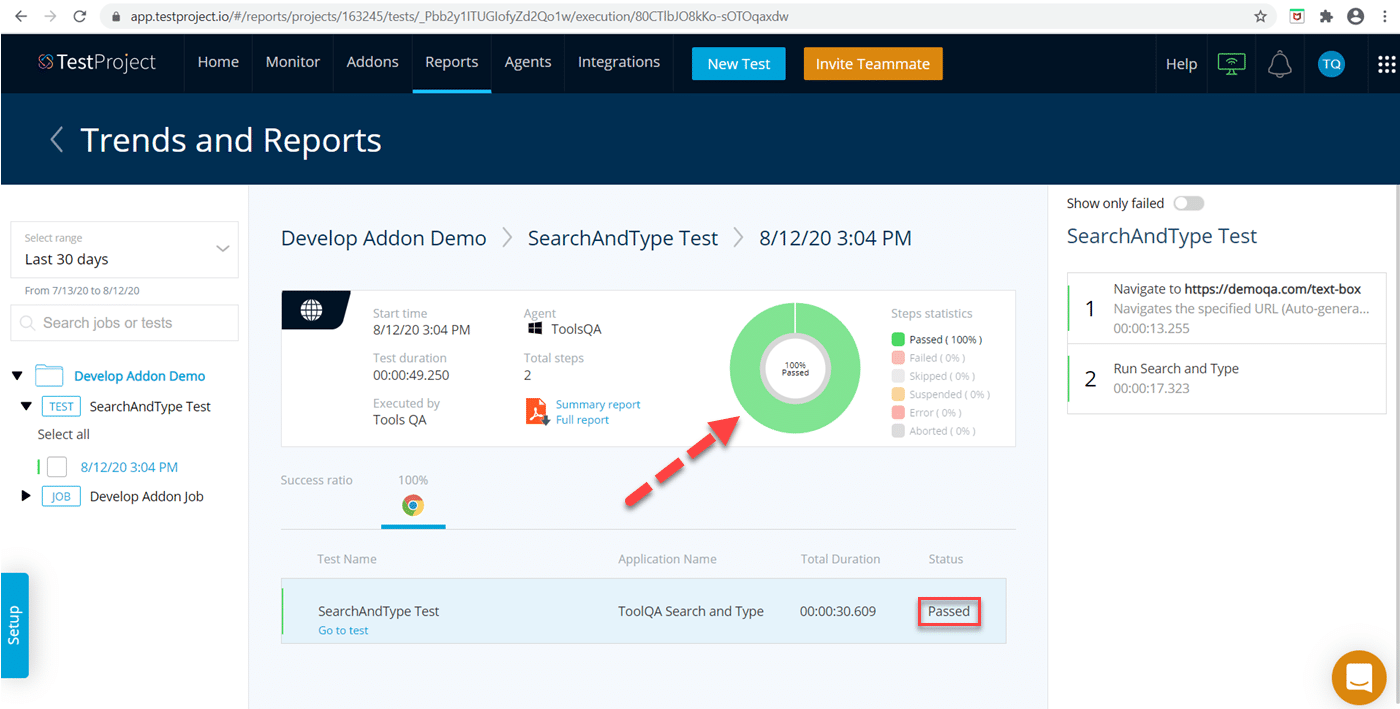
It concludes our learning of creating a new custom addon in TestProject and using it in our Test Cases.
Key Takeaways:
- A custom Addons in TestProject is an addon privately developed by the user and used for their projects in TestProject.
- Additionally, we can develop a custom Addon with the help of supporting functions provided by the TestProject Java SDK.
- Lastly, once we develop the custom Addon, we can import it as a jar file in TestProject and use it within our test cases.