The ever-evolving mobile platforms of iOS and Android often present some of the most significant challenges for developers and testers. The sheer number of mobile device types and operating systems makes testing mobile apps difficult and time-consuming. Fortunately, TestProject makes mobile testing simple and straightforward. It removes the hassle of adding and managing different components and dependencies. TestProject simplifies mobile test development and execution for connecting your mobile device to the computer. TestProject supports both android and iOS devices, so you can quickly test across all of your major mobile platforms. It speeds up the mobile test automation development process with its test recorder. Therefore, you can easily create test automation without writing any code. In this tutorial, we will learn how to prepare your mobile devices for testing and writing our first mobile test automation using TestProject.
Subsequently, in the article, Mobile test automation using TestProject, we will cover the following details in a hands-on example using an Android device:
- How to set up a mobile device for use in TestProject?
- How to create a mobile test using TestProject?
- Also, how to configure a mobile application for test automation in TestProject?
- How to record a mobile test using TestProject?
- Similarly, how to execute the mobile test using TestProject?
How to set up a mobile device for use in TestProject?
Before we can start with the development of test cases for mobile automation, we will need to set up the mobile device, which we will be using to create and run the test cases. As a first step, we need to activate developer mode on our Android device. It can be done by following the steps mentioned below:
-
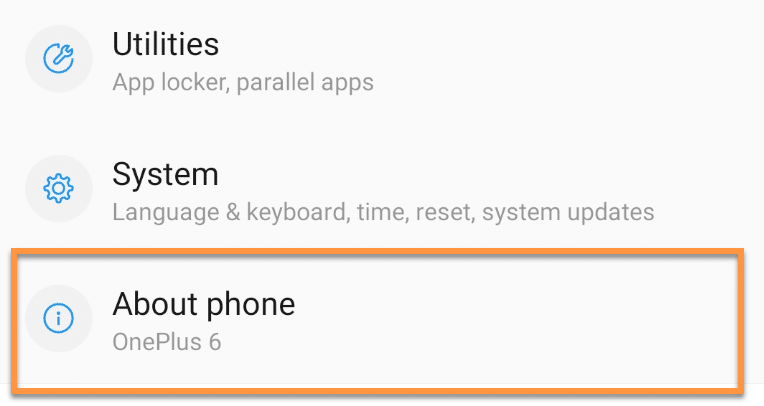
Firstly, navigate to the "settings " in your device. Select "About " or "About Phone", depending upon your device manufacturer. Tap the About phone section as shown in the image below:
-
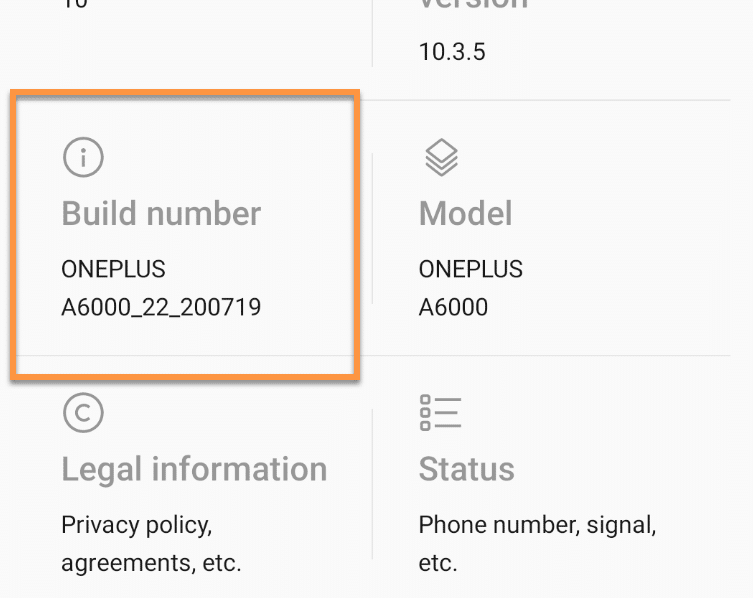
Secondly, you will find various information about your handset in the About menu, which may include the android version and hardware details. Search for "Build Number " in the menu. Consequently, the Build Number contains the build details of the device, as shown below:
-
Thirdly, tap on the "Build Number " 7 times. A message will appear displaying the number of taps remaining to enable the developer options (shown in the image below ). Keep on tapping until this message disappears, and you have enabled developer options.

-
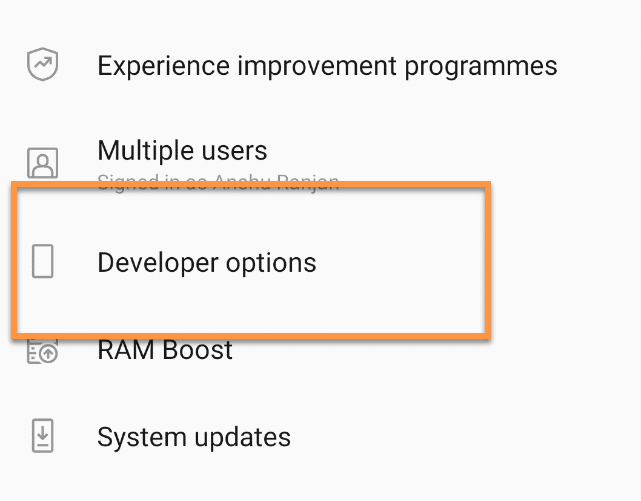
Fourthly, navigate back to the Settings menu and then find the option for "System". Please tap on the system option to get into its menu. Scroll down, and you will find the "Developer Options " as marked in the image below.
-
Fifthly, once the developer option appears, tap on it to open the menu. Scroll and select the option that says "USB Debugging". Once USB Debugging is active, your device is ready for use with TestProject. Connect your device to any local machine with TestProject's agent installed. You can do it using a USB cable. Once successfully connected, a pop-up should appear on your mobile device, asking you to "Allow USB debugging". After that, click on allow. Your device should now work with TestProject, meaning you can start creating your first test.
Note: The navigation for Build Number and Developer Options may vary slightly, depending upon the manufacturer and Android version. In this tutorial, we are using Android 10. In older versions, you may observe a slight difference.
Now that your device is now ready and connect to the TestProject agent, let's see how we can record a mobile test case using TestProject:
How to create a mobile test using TestProject?
Test case development for mobile automation is almost similar to web automation development in TestProject. One of the only significant differences being that we need to make sure that a mobile device connects to our system through a USB, and our agent is active. Additionally, once these pre-requisites complete, we can proceed to create a mobile test case. For this example, we create a new Project for mobile automation in TestProject. Consequently, to learn how to create a project and add tests to it, please visit our previous tutorial on "Creating your first test in TestProject".
To record a mobile test, we need a test application. We are using the Android "calculator " as a test application, as it is available on almost all mobile devices. Now, let's see how to configure this application in TestProject to kick off the automation using TestProject:
How to configure a mobile application for test automation in TestProject?
To configure a mobile application for test automation in TestProject, follow the steps as mentioned below:
-
Firstly, navigate to the project page from the TestProject home page. Click on "+ Add a new Test " or "New Test " button. It will open up a pop-up window, as shown in the image below. After that, select Mobile as the test type and then click on the Next button as marked by the arrow in the below image.

-
Secondly, you will then come to the "Add test details " page. Here you can provide the Name and Description of the test. For example, here we have entered the name "Calculator". Because, we will automate the calculator application present in the Android device. The description section is optional; if you'd like, you can add a description to the test or can also leave it blank. Subsequently, once you enter the information, click on the Next button.

-
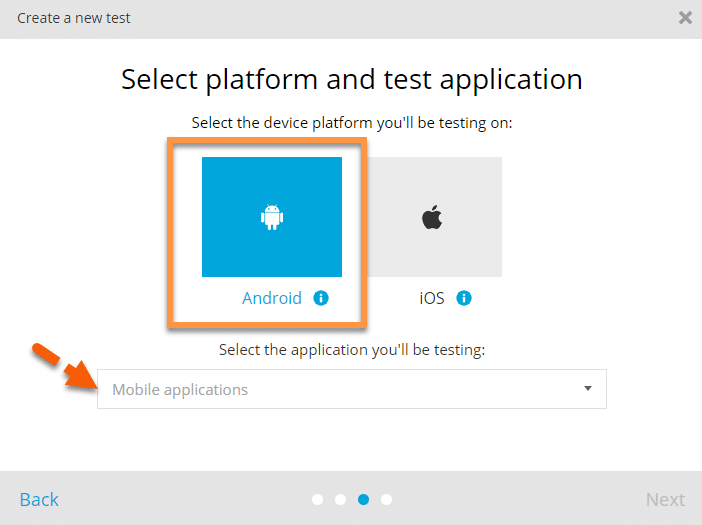
Next, the "Select platform and test application " page will appear. You will now select the platform for your mobile device. Since we are using an Android device, we have chosen Android, as marked in the below image. Below that, you can see a dropdown labeled as "Mobile Application". This is where we will be configuring the automation application. Finally, click on the dropdown to expand it.
-
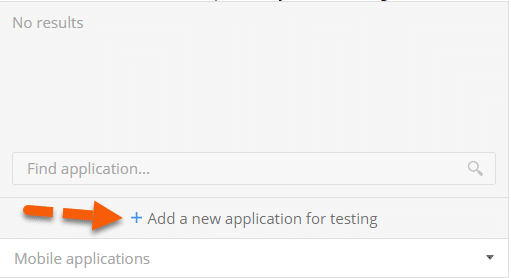
Once you click on the dropdown, it will open up the list of all the applications previously used. Because we are performing our first mobile test, the dropdown will not show any available applications yet. So, let's add a new application for testing. Subsequently, to add a new application, click on the "+ Add a new application for testing " link as marked by the arrow in the below image:
-
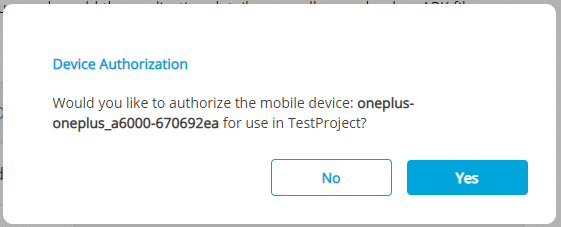
After that, a pop-up message will appear asking you to authorize the connected device as shown in the image below. Please verify that you would like to authorize it for use with TestProject automation.
-
The Android Application page will open. As shown below, there are three ways in which you can configure the mobile application you'd like to test with TestProject:
Select Device and Android app
- From Device: You can tell TestProject to automatically detect the applications that are present on your connected device and will let you pick any of these from the list for test automation.
- Upload APK: You can download APK (Android Package Kit) of the application and can upload it to TestProject. TestProject will then use this APK as the target for executing tests on your device.
- Add Manually: *You can manually add "Package" and "Activity" information about the mobile application that you want to automate.
-
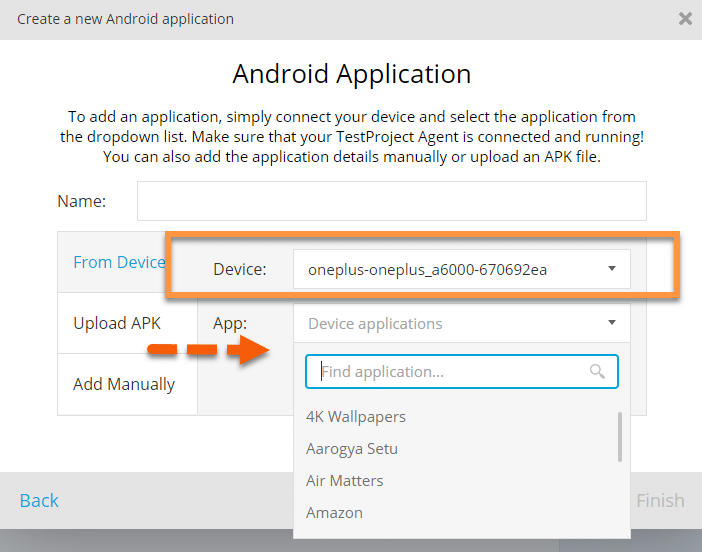
For this tutorial, we will use the first option. So, click on the "Device " dropdown and select the target device you'd like to test. Next, click on the "Device application"dropdown. It will open up a list of all the applications installed on your mobile device. Scroll through the available applications to find the one you want to automate.
-
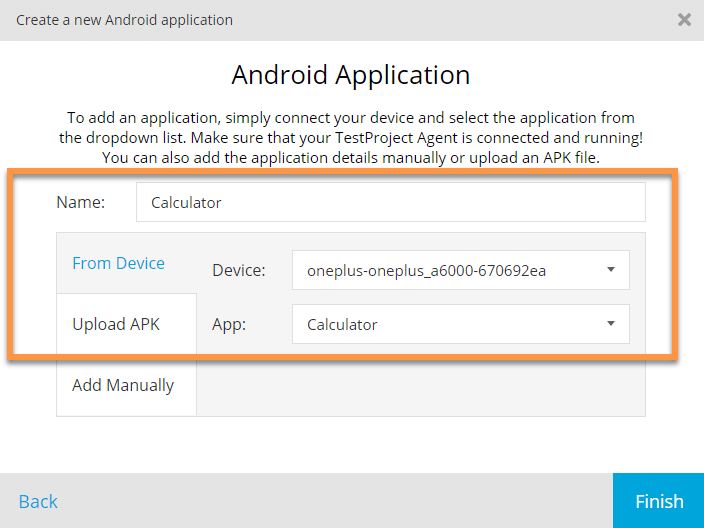
For example, in this tutorial, we want to automate the "Calculator " application, which is available on almost every Android device. So, we have selected the same in the application dropdown. You can view the same in the image below. Once done, click on the "Finish " button, as shown in the image.
-
Now, you will land back to the previous screen to "Select platform and test application". As seen in the image below, we have selected a platform Android and the application Calculator. Click on the Next button to proceed.

Now, we have a mobile application ready for test automation using TestProject. Let's now see how we can record a mobile test case using TestProject:
How to record a mobile test using TestProject?
As we have completed the necessary configurations for the mobile test and has also specified the application that we will be using for testing, we are now ready to record our first mobile test using TestProject. We will use the Test Recorder capability of TestProject to record our first mobile test. Follow the steps as mentioned below to record the test case:
-
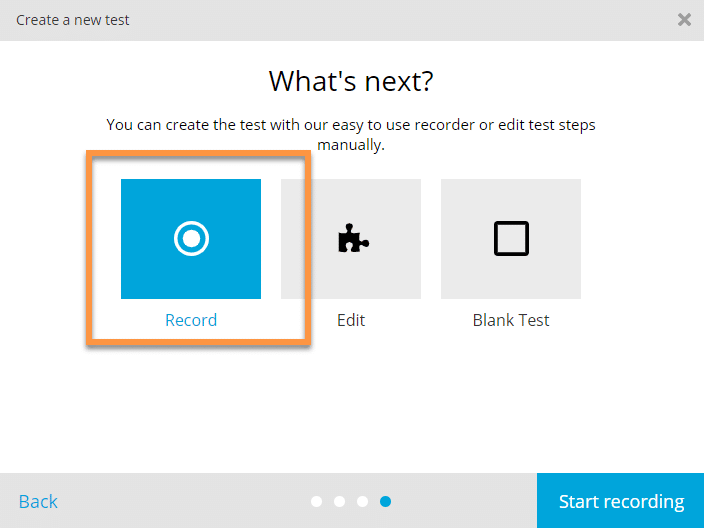
Continuing from the previous section, once we click on the Next button on the "Select Platform and test application" screen, we will lead to the "What's next?" page. Here we will need to select the method by which we want to create our test case. Click on the "Record " to select it and then click on the "Start Recording" button to start recording the test case as shown in the below image:
-
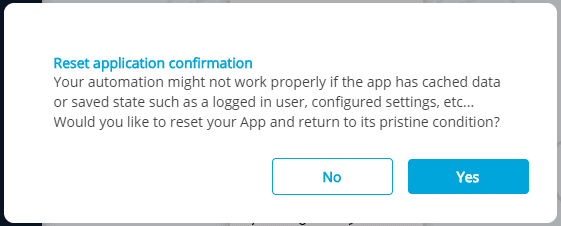
Once the test recording starts, you will receive the following message, as shown in the image below. Sometimes, the application is open in your device or may have saved some cached data; this may cause the application state to be different than expected. Resetting the application will start it with a fresh state. Depending on your requirements, choose the reset option that fulfills your needs - either a fresh state or keeping the existing state.
-
In our test case, we want a fresh state, so we will choose to reset the application each time we open it. So, we will select "Yes " from the message box.
-
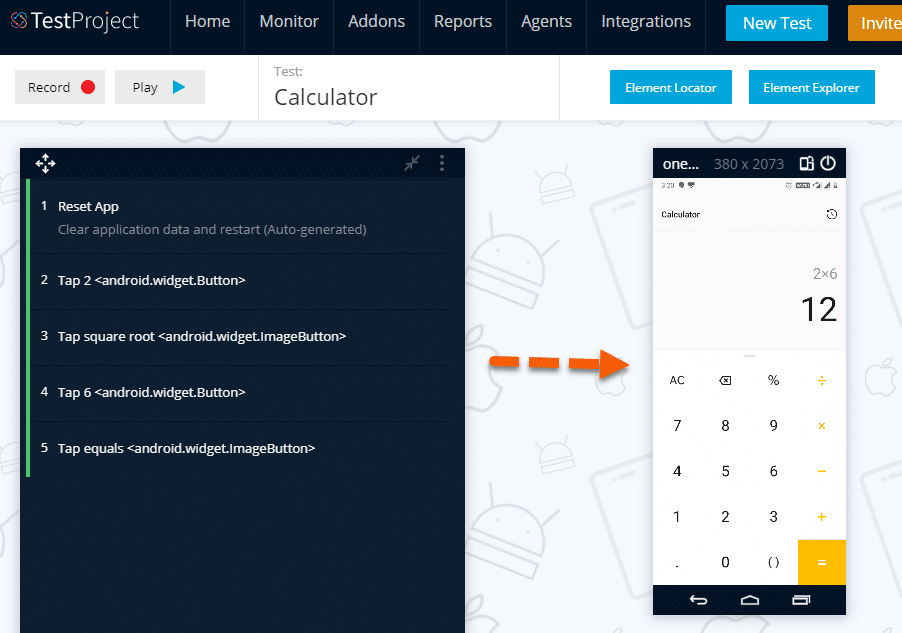
Once we select this option, a reset test step will be added at the beginning of the test, as shown in the image below. Also, an emulator wizard will open up in the window, showing a real-time view of what executes on the device. As we have selected a calculator as our desired application, the first step of the test has opened the calculator application.
-
Now we can start recording our test. The mobile test recording is very similar to the process of recording a web test. To create our recording, we will need to step through our test scenario by interacting with the emulator. Each action we perform on the emulator will record as a test step in the recorder. For example, here we are trying to tap on numeric 2 in the calculator, as shown in the image below. To do that, we can move our cursor to the element, and the element will get highlighted. Now, all we need to do is to click on the number, and the step will record as a test step. We can repeat the same to create more test steps as needed.

-
As shown in the below image, we tried to find multiplication results of 2 and 6 using a calculator application. All the steps corresponding to each test step have been recorded and added to our test. The execution of the below test will result in output in the emulator, as shown in the image below.
-
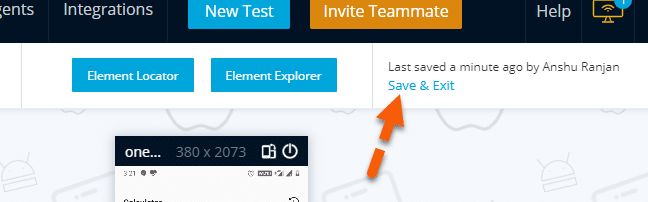
Once we create our test steps, we will need to save it. Click on the "Save & Exit " button as pointed by the arrow in the below image. It will save all of your test steps and close the test window.
-
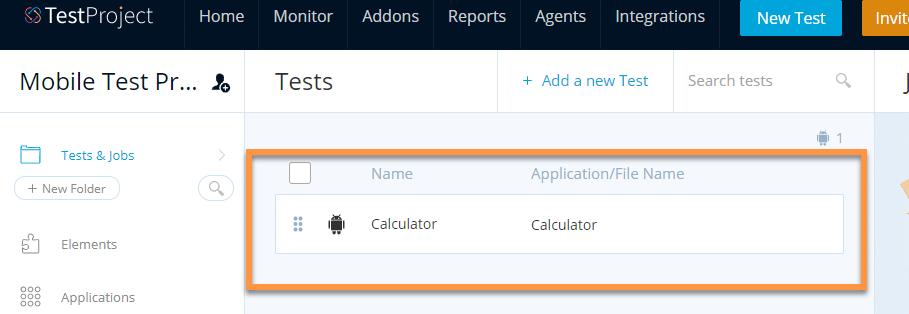
The test will be saved and will appear in your Tests repository, as seen in the below image.
Congratulations! We have successfully recorded a mobile test case using TestProject. Let's now see how we can execute this same test using TestProject.
How to execute the mobile test using TestProject?
Executing a mobile test case using TestProject is very similar to running a web project, apart from the apparent pre-requisites of device setup and application definition.
Before we start the mobile test execution, we will need to ensure that the following pre-requisites are in place:
- A device connects to the machine where TestProject's agent installs, using a USB cable.
- The device authorizes to connect with TestProject, as covered in the previous sections.
- TestProject's agent should be active (running) on the local machine.
Now, to execute a mobile test case using TestProject, follow the steps outlined below:
-
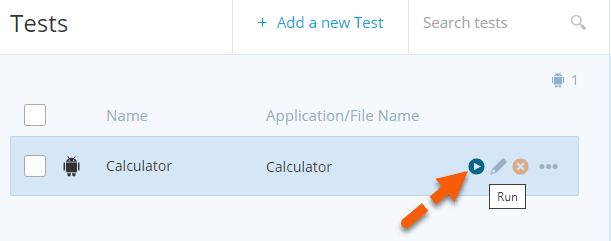
From the TestProject Home page, navigate to the mobile project created in the previous sections. Inside the project, we will find the recorded test case. To execute it, click on the "Run " button as highlighted by the arrow in the below image.
-
Once we click on the run button, a "Run android test " pop-up will be displayed, as shown in the image below. Now, it's a simple three-step journey to execute our first mobile test using TestProject.
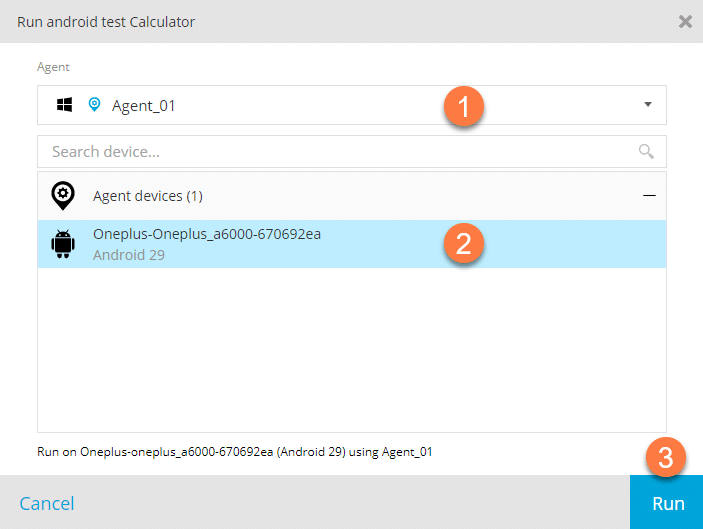
- First, select the active agent on your local machine from the Agent dropdown.
- Second, select the Android device from the search device search bar.
- *Thirdly, click on the *Run button, and the test will execute on your device.
-
The test will execute on the connected device, so you can watch the automated execution on the device as it is happening. Once the test is complete, the execution status, along with all other details, will be generated in the Reports section. To view the report for the execution, we will need to navigate to the Reports tab.
-
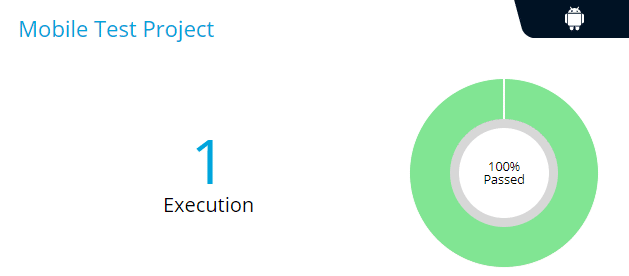
Click on the Reports tab at the top of the TestProject application. Scroll down to the mobile test project as in the below image. Here we can see that we have executed one test, and that passes successfully. To know more detail about the project, click on the project name to navigate to the detailed report page.
-
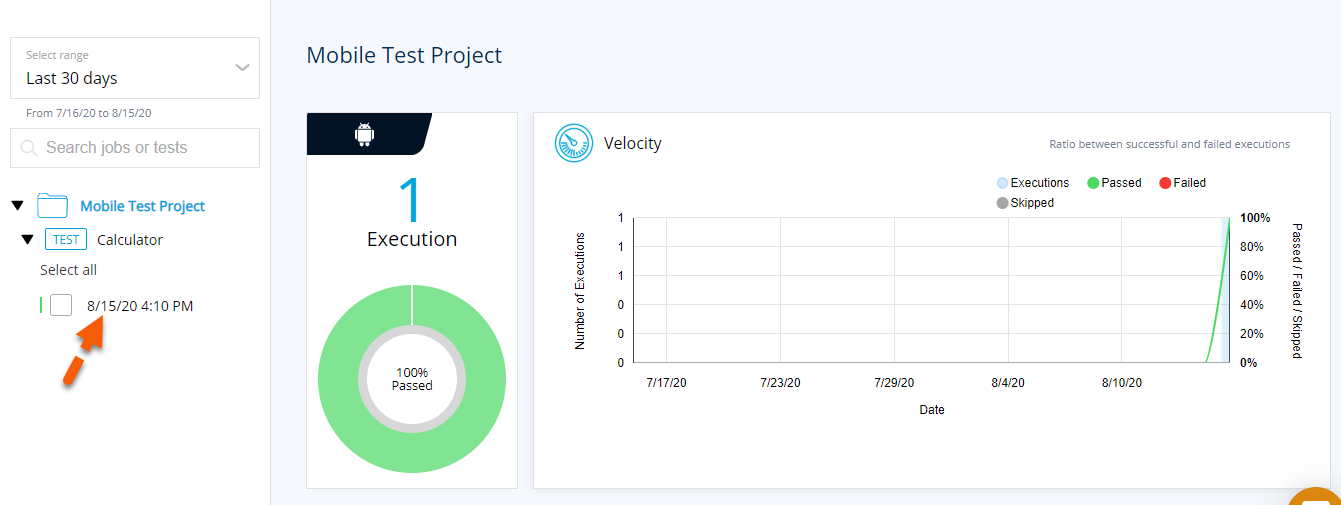
Clicking on the project will open the detailed report, as shown below. To get the individual report, click on the date and time for the execution, as marked by the arrow in the image below.
-
It will open up the individual test report. You can refer to the article "Understanding the Test Reports" to gain a more in-depth understanding of every component of the test reports.
We have now completed our journey of creating a mobile test using TestProject. Most application steps can record using the TestProject test recorder. However, if you want to use advanced programming language features for the test development, you can also use the TestProject's OpenJDK. The OpenSDK provides capabilities build on both Selenium and Appium. We can use it to develop advanced automated tests using TestProject.
Key Takeaways
- Setting up a mobile device and application in TestProject is easy. Connect a mobile device, authorize it, select one of the installed applications, and you are ready to test.
- Additionally, TestProject's test recorder speeds up the development of automated tests for Android and iOS mobile applications.
- Moreover, TestProject's built-in, real-time emulator mimics your mobile device screen. It allows you to record your actions directly from TestProject.
- Also, the built-in element inspector can efficiently inspect any element. Additionally, it offers different actions or validations to develop your test.