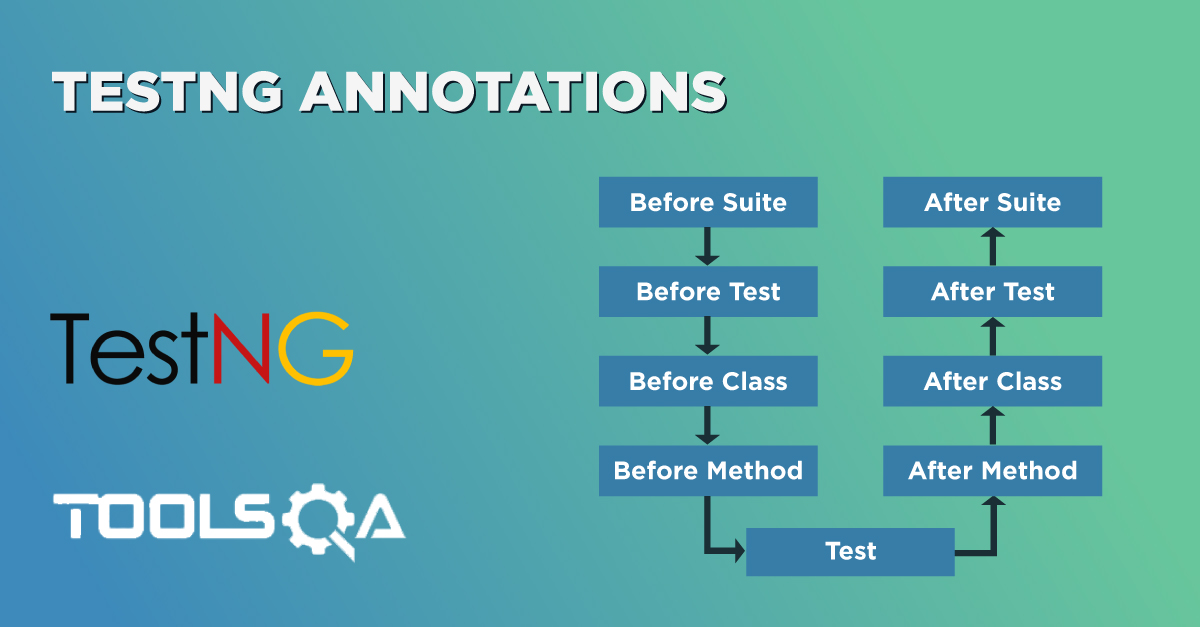
In the last tutorial, we discussed the annotations in TestNG and how to use them in our tests and how to run multiple tests all at once, i.e., running a TestNG test suite. Discussing the hierarchy, we learned how TestNG decides which test to run first and which one to run next. This tutorial is in the continuation of the previous one. This tutorial is about TestNG Groups. TestNG groups combine the tests into groups and let the tester choose which ones to run and which ones to ignore. Along with it, we can combine different groups in TestNG, use a regular expression, and much more. Ready to learn the following out of this tutorial? :
- What are TestNG Groups?
- Group of Groups in TestNG
- How To Include and Exclude Groups In TestNG?
- Regular Expressions and TestNG Groups
What Are TestNG Groups?
Groups in TestNG denotes the process of grouping different tests together into a straightforward group and running these tests together by just running the group in a single command. It does not even matter if they belong to different classes.
As an example, let's say you have a hundred tests of a class ToolsQA and in it ten methods of front-end design, ten methods of functional tests, and so on. You probably like to run all the front-end tests together in a batch. And you want all of them to be in a single test suite. With the help of grouping, you can easily overcome this situation by including all the front-end tests into one group.
TestNG also allows us to group test inside groups, which we discussed in the later section of this tutorial. Grouping saves us from defining many classes in our test source code and then running these classes separately, resulting in avoiding the wastage of our time. This situation also helps us in preventing the recompilation of test cases again and again, according to our needs.
It is important to note that Groups are declared in the testng.xml file in the TestNG and can be found inside <test> tag or <suite> tag.
Also, remember that the groups defined in <test> tag apply to only that particular test tag, but the groups defined in <suite> tag apply to all the <test> tags in the XML file.
For example, in the first case below, we have defined the group inside the "suite" tag.
<suite name="test_suite">
   <groups>
      <run>
         <include name="UI Test"/>
      </run>
   </groups>
  <test name="Check Login Page">
     <classes>
         <class name="com.demoqa.Check_Login_Page"/>
         </classes>
     </test>
     <test name="Response Status">
    <classes>
       <class name="com.demoqa.Response_Status"/>
    </classes>
    </test>
</suite>
Since the "groups" is inside the suite tag, it will run all the tests in the XML file. For the second case, see the following tweak in the above code:
<suite name="test_suite">
  <test name="Check Login Page">
      <groups>
         <run>
            <include name="UI Test"/>
         </run>
      </groups>
     <classes>
         <class name="com.demoqa.Check_Login_Page"/>
         </classes>
     </test>
     <test name="Response Status">
    <classes>
       <class name="com.demoqa.Response_Status"/>
    </classes>
    </test>
</suite>
Now the groups will work only inside the test tag with the name Check Login Page.
How To Create Groups?
Before getting more complicated in groups, let's create a simple group test that we discussed in the above section. In the below code, we will check:
- Whether we are getting the title of the webpage correctly or not.
- Find an element "Sortable" on the website and click the element.
We will be using our demo website demoqa.com for this task. Refer to our tutorial of Selenium Webdriver to know in-depth about the code.
Write the following code inside your file named TestNG.java (You can choose any TestNG test case file you want).
import org.openqa.selenium.By;
import org.openqa.selenium.WebDriver;
import org.openqa.selenium.chrome.ChromeDriver;
import org.testng.annotations.Test;
import org.testng.Assert;

public class TestNG {
	WebDriver driver;
    // Saving the expected title of the Webpage
    String title = "ToolsQA - Demo Website For Automation";


    @Test
    public void starting_point(){
    	System.out.println("This is the starting point of the test");
    	//Initialize Chrome Driver
    	//driver.manage().timeouts().implicitlyWait(1,TimeUnit.SECONDS);
    	 driver = new ChromeDriver();
    	 driver.get("https://demoqa.com/");
    }


    @Test(groups = { "demo" })
    public void checkTitle() {
       String testTitle = "Free QA Automation Tools For Everyone";
       String originalTitle = driver.getTitle();
      Assert.assertEquals(originalTitle, testTitle);
    }

    @Test(groups = { "demo" })
    public void click_element() {
       driver.findElement(By.xpath("//*[@id=\"sidebar\"]/aside[1]/ul/li[1]/a")).click();
        System.out.println("Home Page heading is displayed");
    }
}
In the above code, we have defined three tests and one method each under them. The following are the method names:
- starting_point() - It will initialize the Chromedriver and will enter the URL demoqa.com automatically.
- check_title() - It will check whether the title of the web page is equal to the variable "test_title" or not. I have placed the wrong title, so this method should fail.
- click_element() - This method will find an element called "Sortable" on the web page with the help of XPath and will click it.
We have used the group name called "demo" but only on two methods, namely check_title and click_element. Once we are done with the code, we need to tell our XML file about the groups (if we want to run according to the groups).
To include the name of the groups, create a TestNG XML like this:
<!DOCTYPE suite SYSTEM "https://testng.org/testng-1.0.dtd" >
<suite name="Test-Suite" >
   <test name="ToolsQA" >
   		<groups>
   			<run>
   				<include name = "demo"></include>
   			</run>
   		</groups>
       <classes>
          <class name="TestNG" />
       </classes>
   </test>
 </suite>
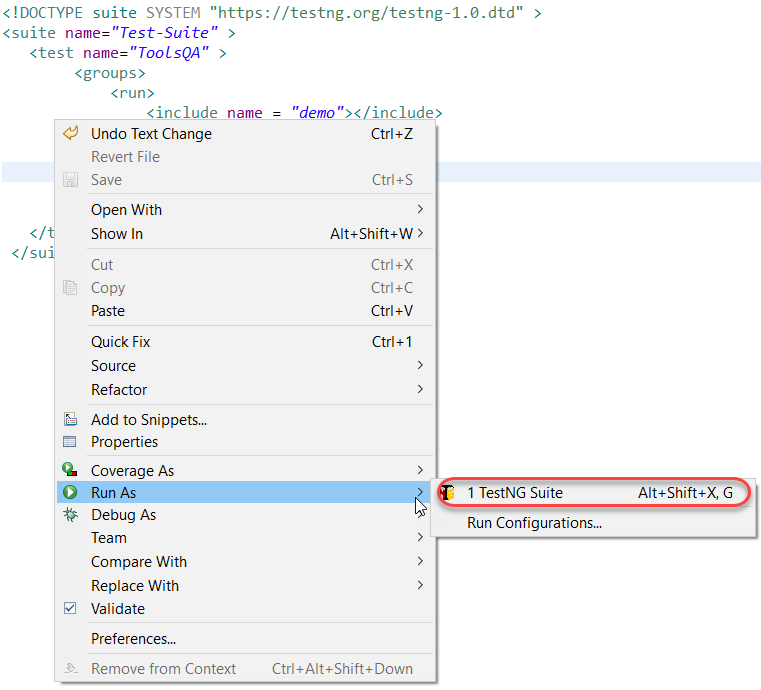
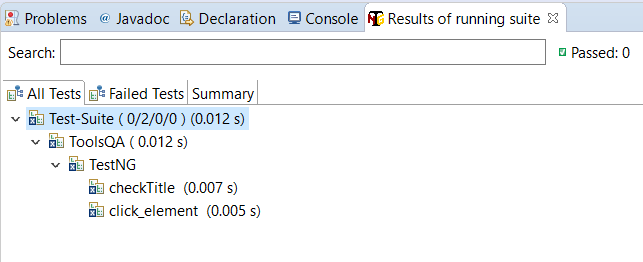
We have included the name of the group "demo" inside our XML file within the "include" tag. By this, we expect to run only two tests because only two tests are included in the group "demo".
Right-click on the file -> Run As - > TestNG Suite
 Check the results on the bottom half of the screen.
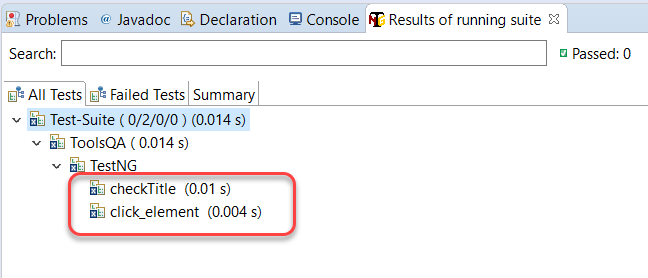
As expected, only two tests ran, which were inside the group "demo". Notice that they both must have failed since we were initializing the Chromedriver in the first test, which never ran.
You can create your groups and shuffle the tests in these groups to see the results. But did you know, we can also include groups inside of groups?
TestNG Groups Inside Groups
TestNG provides the flexibility of providing groups inside another group and running them according to your needs. We can term them "nested groups", but this is no official term. Let's create a group inside a group in our XML file.
Take a look at the below XML:
<!DOCTYPE suite SYSTEM "https://testng.org/testng-1.0.dtd" >
<suite name="Test-Suite" >
   <test name="ToolsQA" >
   	<groups>
   		<define name = "SuperGroup">
   			<include name = "demo"></include>
   		</define>
   		<run>
   			<include name = "SuperGroup"></include>
   		</run>
   	</groups>
       <classes>
          <class name="TestNG" />
       </classes>
   </test>
 </suite>
Above, we created a new group with the name 'SuperGroup' and included our group demo into it. Then we called the newly created group (SuperGroup) for execution by including it in the run tag. The output will be like this:
It will be the same as the previous output. As a practice, you can create multiple groups and include all inside this one group. You can try different scenarios.
Simple, isn't it? TestNG is very easy to learn, and groups just provide extra power to these tests and annotations. The above section just told us about including other groups in TestNG groups. It raises a simple question in my mind, and I am sure your's too. What if we want to exclude a particular group and run the rest? This question must have been raised while developing TestNG, and hence they provided the solution for it.
How To Ignore (Exclude) a group in TestNG?
Till now, to run the groups, we have included them inside the "include" tag, which is quite obvious since we want to "include" them in our test run. Similar to this, we can ignore the groups by putting them under the "exclude" tag. This minor tweak can be seen in the XML file below.
<!DOCTYPE suite SYSTEM "https://testng.org/testng-1.0.dtd" >
<suite name="Test-Suite" >
   <test name="ToolsQA" >
   	<groups>
   		<run>
   			<exclude name = "demo">
   			</exclude>
   		</run>
   		</groups>
       <classes>
          <class name="TestNG" />
       </classes>
   </test>
 </suite>
By putting our group "demo" inside the exclude tag, we are requesting TestNG to ignore the test cases under the group "demo". So, any guesses how many tests will run? Check the below output to see if you are right or wrong.

Only one test runs because it is the only test that was not inside the "demo" group.
This leaves us with one more point to remember while creating groups. A regular expression helps in defining a generalized pattern to include in the field we apply them. For example, using regular expressions we can command the computer to include only those people from the database who live in a place starting from A and ending from D. It becomes a generalized way. Can we use regular expressions inside the groups in TestNG? We definitely can.
How To Use Regular Expressions With TestNG Groups?
TestNG Groups gives us the freedom to include regular expressions inside the include/exclude tag. By this, we can just define a generalised pattern which is there inside more than one groups so that we do not need to write the complete group names. To find this, we have changed the group name to demo1 and demo2 for checkTitle() and click_element() methods respectively.
import org.openqa.selenium.By;
import org.openqa.selenium.WebDriver;
import org.openqa.selenium.chrome.ChromeDriver;
import org.testng.annotations.Test;
import org.testng.Assert;

public class TestNG {
	WebDriver driver;
    // Saving the expected title of the Webpage
    String title = "ToolsQA - Demo Website For Automation";


    @Test
    public void starting_point(){
    	System.out.println("This is the starting point of the test");
    	//Initialize Chrome Driver
    	//driver.manage().timeouts().implicitlyWait(1,TimeUnit.SECONDS);
    	 driver = new ChromeDriver();
    	 driver.get("https://demoqa.com/");
    }


    @Test(groups = { "demo1" })
    public void checkTitle() {
       String testTitle = "Free QA Automation Tools For Everyone";
       String originalTitle = driver.getTitle();
      Assert.assertEquals(originalTitle, testTitle);
    }

    @Test(groups = { "demo2" })
    public void click_element() {
       driver.findElement(By.xpath("//*[@id=\"sidebar\"]/aside[1]/ul/li[1]/a")).click();
        System.out.println("Home Page heading is displayed");
    }
}
Now we have a pattern in the groups i.e. the word "demo" is common in both the groups. Include the regex in your XML file and check whether TestNG accepts the regular expression or not.
<!DOCTYPE suite SYSTEM "https://testng.org/testng-1.0.dtd" >
<suite name="Test-Suite" >
   <test name="ToolsQA" >
   	<groups>
   		<run>
   			<include name = "demo.*">
   			</include>
   		</run>
   		</groups>
       <classes>
          <class name="TestNG" />
       </classes>
   </test>
 </suite>
Notice the expression demo.* in the include tag. demo.* denotes that whatever group name starts with demo (no matter what it has ahead of it) should be included in the test. Check the output in your eclipse and see if it has both demo1 and demo2 running or not. It will!!
This was all about using groups in TestNG. Remember that groups are very important since you always need to group the tests in bigger projects rather than executing them one by one. Practice grouping of tests as much as you can. In the next tutorial, we will show you another type of tests called the dependency test in TestNG.