In the last tutorial about running test cases in TestNG, we learned about how to create a test and run it in Eclipse. But, often, we do not run a single test on our project. To test the behavior of our software or project, we need to run multiple tests all at once. Moreover, running them manually one by one is not the way. This process of running multiple tests at once is called a test suite, and performing it in TestNG is called TestNG Test Suites. Therefore, it will be the center point of this tutorial covering the following topics:
- What Is A Test Suite?
- How To Create and Run TestNG Test Suite?
- How To Create A TestNG XML File To Execute TestNG Test Suites?
- Creation of TestNG Test Suites in the XML file.
What is a Test Suite?
As I said in the introduction of this tutorial, the collection of TestNG Tests together is called a Test Suite. A test suite can run multiple tests at once by executing the test suite. Additionally, these test cases can be dependent on each other or may have to be executed in a specific order independently. Moreover, running the TestNG test suite gives us the capability to manage our test execution.
It is important to remember that the TestNG does not let us define the test suites inside the test code or the main testing source code. Hence, we need to create a TestNG XML file for the same and execute this file.
Don't worry. This post will cover all the essentials. Subsequently, let's see how to create and execute a TestNG Test Suite.
How To Create and Run TestNG Test Suite?
Running a test suite in TestNG requires us to create a TestNG XML file and executing it to achieve the goals. Through this TestNG XML file only, we will be able to create and handle multiple test classes in the TestNG framework. In addition to this, the XML file will be the target file where you will configure your test run, set test dependency, include or exclude any test, method, class or package and set priority, etc.
How To Create A TestNG XML?
To create TestNG XML file for running the TestNG test suites, follow the given steps:
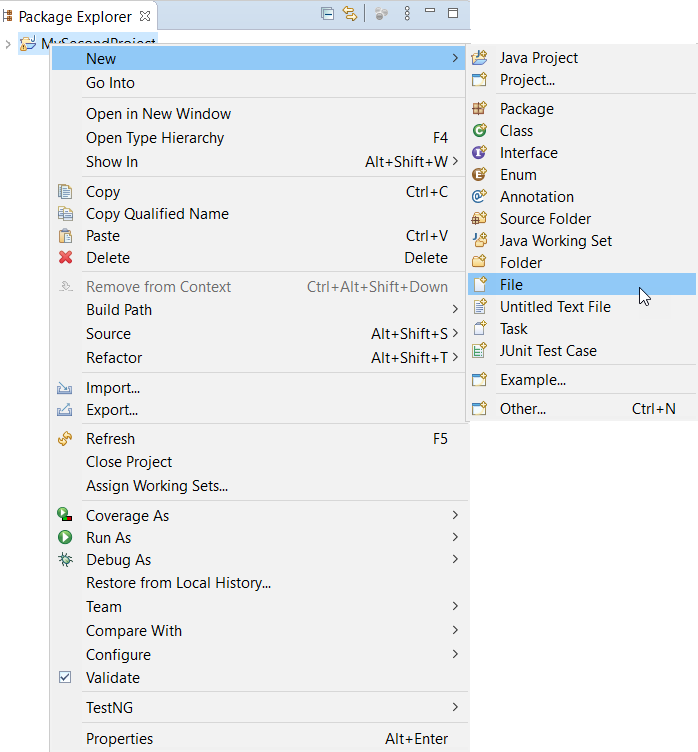
1.Right-click on the Project folder, go to New and select File as shown in the below image.
-
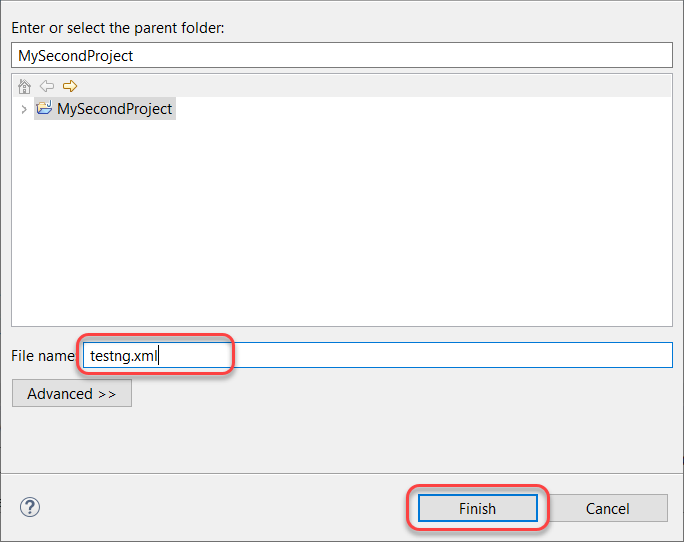
In New file wizard, add filename as 'testng.xml' and click on the Finish button.
-
Finally, it will add a testng.xml file under your project folder, and we are all set to write our first TestNG XML to run TestNG test suites.
After that, add the below-given code in your testng.xml file.
<!DOCTYPE suite SYSTEM "https://testng.org/testng-1.0.dtd" >
<suite name="Test-Suite" >
   <test name="ToolsQA" >
       <classes>
          <class name="TestNG" />
       </classes>
   </test>
 </suite>
Note: You can select any name for your Test Suite & Test Name as per your requirement. To know more about the TestNG test case file denote here, please refer to How To Write Test Cases In TestNG?
After giving appropriate names, now your testng.xml file will look like this:
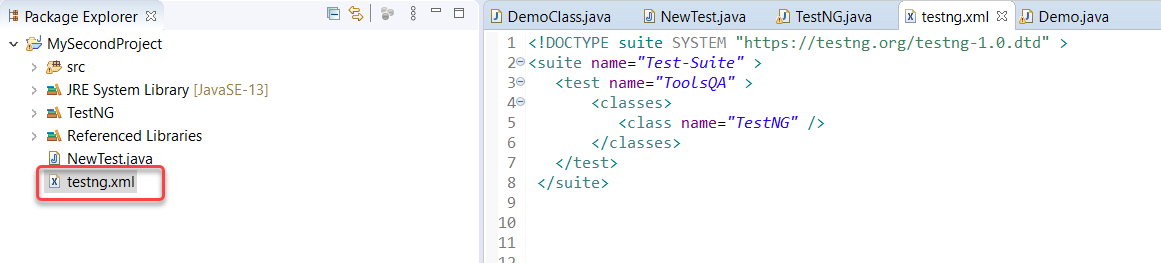
This TestNG XML code does not need any explanation. It is effortless to read and write.
<suite>- The suite tag can be given any name and denotes the test suite name.<test>- The test tag can be given any name and indicates your test sets.<classes>- This is the combination of your package name and test case name and cannot write anything else.
Note: that there is no package name in the above-written code. It is because TestNG.java is inside the default package. For example, if the package name is ABC, then this would be written as ABC.TestNG.
How to Run the TestNG Suite?
Now it's time to run the TestNG XML file we just created. Subsequently, run the test by right click on the testng.xml file and select Run As > TestNG Suite.

It will take a few seconds to start the TestNG execution engine. After that, once the execution is complete, visit the reports section on the bottom half of the Eclipse.
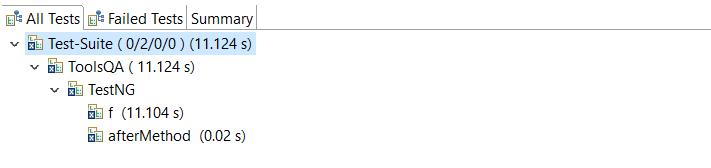
You can view that the TestNG test file has run. You can learn how to read reports in How To Analyse the TestNG Reports section.
To conclude, this was our simple example of creating and running a testng.xml file in Eclipse.
How to Create a TestNG Test Suite?
In the previous section of executing the TestNG XML file, we just ran one test. How did we figure that out? The class tag of the XML file denotes the tests you want to run.
Moreover, we just mentioned a single class tag as the focus was mainly on the XML file creation. Now when you have learned how to build the XML, it's time to learn how to build a Test Suite (multiple tests) using testng.xml.
It is again not a complicated task since one class denoted one test. All you need to do is to add your test case names to your XML file in <classes> tag.
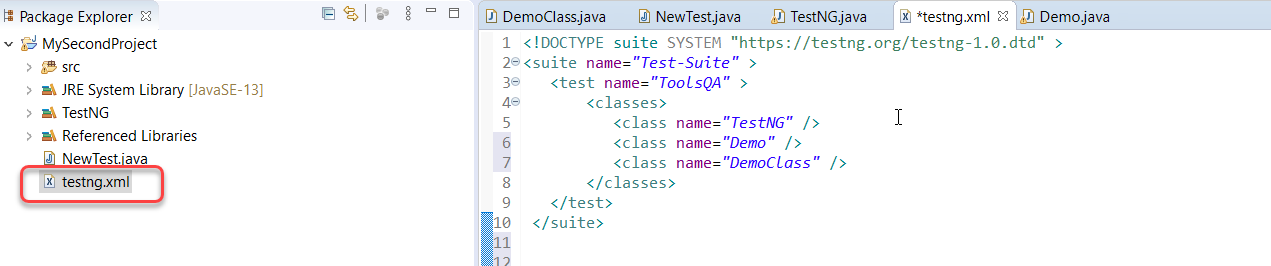
The above test will execute only those tests, which are in the testng.xml file's class tags. You can go ahead and check the reports to see how the tests have run. The rest of the test cases will remain untouched. Additionally, the TestNG is a straightforward and robust framework that derives power from the annotations it offers. In the next tutorial, we will look into TestNG annotations and how to implement them in our tests.