In the last tutorial we learned about creating the Git repository, we talked about the .git folder which was created inside the repository when we executed the git init command. If you can't see the folder, it is probably because your hidden folders are not visible (use ls -a in such a case). Before starting with this tutorial, I would like to mention a small note that this tutorial comes under the advanced feature of Git. You might not be using it at all in your Git journey and will not need it as such. This is just for your learning purposes. There is no need to learn it or there is no harm in skipping it. Coming back, let see it through the Git Bash.
Open Git Bash, navigate to our repository that we created in the last tutorial, type:
ls -a

You can see that we have two folders inside the First Project repository. One of them is the .git folder and the other is the one we cloned in the last tutorial. A .git folder is required to log every commit history and every other information required for your remote repository, version control, commits etc. These things are saved in different folders which have different meanings. Once the folder is created, open it and see the contents of the folder. They will look probably like this:
- Hooks
- Info
- Objects
- Config
- Description
- HEAD
Later on, after discussing each of these folders, we will also learn about what happens when we delete the .git folder in git.
Hooks folder in the Dot Git Folder (.git)
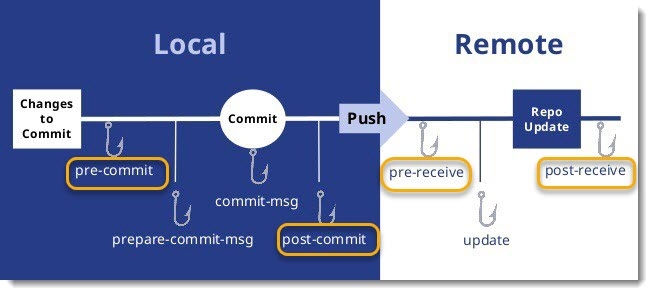
This folder has a few script files inside it. These script files are known as Git Hook Scripts. Git hooks are the scripts that are executed before or after the events. These events can be any Git event including the common Git events like commit, push, or receive. These scripts increase the productivity of the developer.
A pre-commit script is the one that is executed before executing the commit event. This may include checking the spelling errors etc. Similarly, a post-commit script is executed after the commit is done. You can enter the hooks folder to see the different scripts in it with the pre-commit script that we just talked about. You can change these scripts or update them according to you.
Note: This feature of editing the script is not needed in your day-to-day operations on Git. However, you might need its help once you advance through the software and have multiple repositories under your command. You might need to lay down specific instructions for the same.
In the above image, it can be seen with a flow diagram that a pre-commit is executed before commit, post-commit after the commit, and so on.
Info folder in the Dot Git Folder (.git)
Info folder contains the exclude file inside it. As the name suggests, exclude file is used for excluding some specific patterns in the code that you don't want Git to read or execute as to say. Remember that this file is local and personal to you and is not shared among the developers that clone your project. If there is something that should be ignored by all of the developers in the project, then that comes under the .gitignore about which we will talk in the later tutorials.
Objects folder in Dot Git Folder (.git)
Objects folder is a very important folder in the .git directory. In Git, everything is saved in the objects folder as a hash value. By everything I mean every commit, every tree or every file that you create is saved in this directory. With every object, there is a hash value linked to it, through which Git knows where is what. The folders are created accordingly. For example, you can see that as soon as you initialize your Git repository, the object folder is empty. Now, let say I create a new file called harish.txt.

Now, look at the object folder. It now has 2 folders info and pack but they are empty.

Let's write something into the file and commit it and see the changes.
How do the objects folder save the hash value?
- Type this command:
echo "this is my first file" > harish.txt

Note: This way we can write anything to the file through Git Bash only. You can also use a text editor about which we will learn in later tutorials.
- Add your file to the staging area with this command
git add harish.txtand press enter.

- Commit the changes by this command:
git commit -m "Committing my Changes"

Note: Do not focus on any of the things like adding to staging area etc for now. We will discuss all this in the later tutorials and clear the concepts.
Look inside the objects folder now. New folders have been created now.
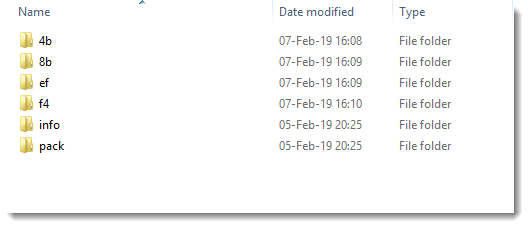
These contain the hash value of the events you just did. Git tracks and recognizes everything by converting it to the hash value. The folders are named according to the hash value saved inside. Talking in layman's terms, hashing is a popular method (data structure) of converting your data to hash value (random combinations of letters and digits) which is only decodable by trusted sources. Due to its nature, hashing is today used most popularly in security measures. But in Git it is not used mainly as a security feature. Hashing in Git is used to be able to trust and create stable data where collision does not occur which means two same files can be saved because they will have different hash values. Hash acts as a medium for having your data in a form that can be converted and used to any other technology in the future. Since hashing acts as mediocre, we can anytime create technologies that take input as the hash value and not the source code files. This way, the code you save today can also be viewed years later due to this feature of Git. Go to the folders and see the hash value has been created.

The above image is of the 4b folder inside the objects folder.
Config Folder in Dot Git Folder (.git)
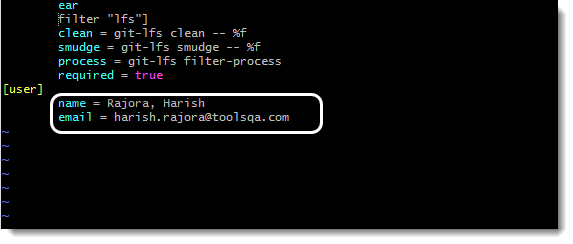
The config file contains your configuration which has already been discussed in detail while Setting up the Credentials in Git. All the configuration you set for your project is saved permanently in this file like username, email, etc. You can modify it once you set them but you don't need to do it again and again. Once you edit the configuration setting, they are saved permanently. You can view them by typing this command: vi ~/.gitconfig
Description File in Dot Git Folder
Description contains the data about the repositories which can be seen on GitWeb only. This file is none of a programmer's use. It is just for seeing the repositories on GitWeb. You can learn about GitWeb here.
HEAD File in Dot Git Folder (.git)
Head file contains the reference to the branch we are currently working on. It is a symbolic reference to the branch and not the normal reference. The difference being that the normal reference contains the Hash value as we saw in the above Objects folder. It refers to something directly like pointers in programming. A symbolic reference is a reference to another normal reference. It means that the symbolic reference will refer to a normal reference and as learned, that normal reference will be referring to the actual value. It is a type of two-step reference. So in this case, Head refers to somewhere else which contains the hash value of the branch we are working on. Note here that the head always points out the last checked-out revision. If you have checked out a branch recently, then it will point to the branch. If that revision is a commit, then the head will point to the commit.
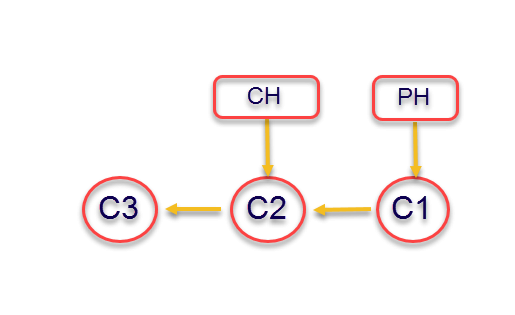
PH here refers to the previous head. C2 or commit 2 is the last checked-out commit and therefore even though there has been another commit (C3) after that, the current head (CH) still points to the commit 2.
To see the content of the Head file you can just type the command: cat .git/HEAD
Press enter after the command.

So by now, it is pretty clear how important the .git folder is for us and is required for us to work in the repository. But what would happen if I delete this folder manually? We will see it.
Deleting Dot Git Folder (.git)
By learning about the subdirectories located inside the .git directory in the above section, it is quite clear that everything that we do in our project/repository is saved inside the .git directory. Deleting this folder will delete our entire history. If you haven't cloned it, all the version and history is erased from Git. Though your source file will remain as it is. To delete the .git folder, just go to Git Bash and delete the folder by typing the command: rm -rf .git

After pressing enter, list all the directories to see if .git is deleted or not.

As you notice, .git is not present in the list. By this, we have deleted our .git folder and the entire work we saved in it. You can easily guess that all the work is saved in .git by looking at the size of the folder. It sometimes exceeds 10GB of space.
Let's see how Git now executes the command related to the repositories since we removed the .git folder.
Try to commit a file (It does not matter whether you have a file for commit or not):
git commit

Git throws an error stating that the directory in which you are executing the command is not a repository.
This means that the repository is not available. You can also see that it mentions "or any of the parent directories" in parentheses. This is because when Git cannot find the .git folder in the current directory it searches for the same in the parent directory. Since all our files are specific to this particular repository, it will find nothing related to it in the parent directory.
So, if you have not cloned your project, it is better not to delete the .git folder. Although, you can fetch a few things saved inside the parent directory. We will move on to our next tutorial now.

