In this section up till now, we have learned a lot about branches. We learned the basics of branches, how to create them on our local repository, and tried a few operations on them, such as deleting the branches, checking them out, etc. But can you recall why did we create the branches in the first place? Well, if you think that we create branches to work on different features at different times, you are correct. We do not leave the branches hanging once their work finishes. We merge branch in Git with the master branch (or any other branch) to depict that the feature addition is successful and ready for release. It is the part we perform before deleting the branches. This tutorial revolves around the same operation in Git. But, there are a few things you should know before proceeding.
Pre-Requisites:
Once you have gone through these prerequisites, you can go ahead and explore the following topics in this tutorial:
- Why do we merge branch in Git?
- How to merge branch in Git?
Why do we merge branch in Git?
We create Branches to work separately on a feature without disturbing the main stable branch, also known as the master branch. But, the fate of branches is to get merged. We create them so that they can merge after finishing work on them. Merging a branch into the master branch symbolizes that the feature you were developing into that branch is complete and tested and is now ready to be a part of the software.
A small example will make this clear. Let say you are currently working as usual on your software, and suddenly, a new requirement comes up. It is very urgent and should execute as soon as possible. The straightforward steps for this would be to create a new branch from production or master or any other branch. Work on the feature in this branch. Test this branch. Finally, merge it with the master.
A single repository generally contains multiple branches in Git. A simple merge of two branches is represented pictorially as below:

As seen in the above image, the top branch merges into the master branch after three commits.
Syntax to merge a branch in Git
A merge operation can be executed by typing the command
git merge <branch_name>
So what does Git do behind the scenes when you type this command? When the command executes, git replays all the commits from the time this branch got diverted, i.e., from time marked as "1" in the image to the time the branch is merged into the master, i.e., the time marked as "2". These commits that happened since the branch diverged from the master branch will then log to a single branch, i.e., the top branch in our case.
How to merge branch in Git to another branch?
In this section, we will follow step by step process to merge a branch called "dev" into another branch called the "master" branch. Before merging, we need to log some changes into the branch. For this, let's switch to the branch that we will merge by the following command:
git checkout <branch_name>

Now open a file using notepad and make some changes to the file. (Create a file if there is none).
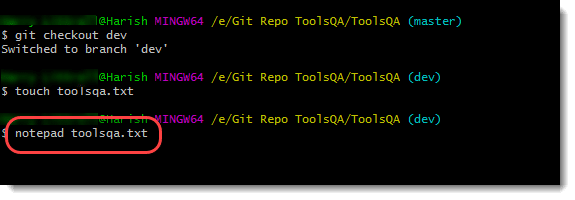
Close the file and commit these changes (After adding the file to the staging area).

Perform Git Log operation to check the commit using oneline flag (Refer Git Log).
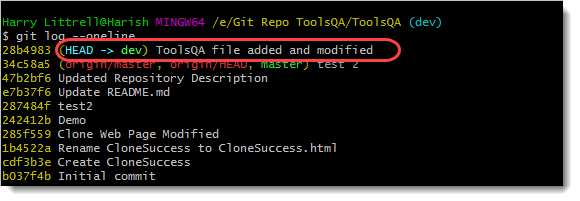
Now switch to the branch to which we will merge the changes (master in this example).

Execute the following command to merge the branch dev to the branch master.
git merge <branch_name>
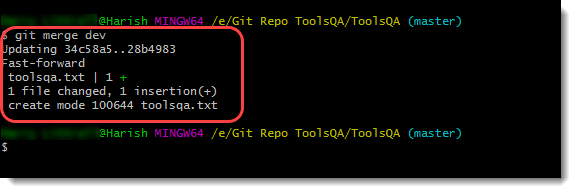
The output will show a successful merge along with the file name, i.e., toolsqa.txt.
Recheck the log to see the merge.
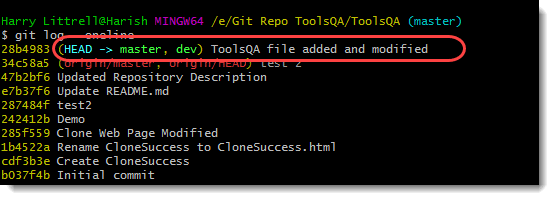
The highlighted line starts with (HEAD -> master, dev). The Head is a pointer that tells us where the HEAD currently is. In this case, it is at two branches simultaneously. The name of these two branches depicts that the second branch merges into the first branch, i.e., the dev branch merges into the master branch, and both of them are in the same position. By the term same position, it means that no further commits happen after the merging. If there were, the head pointer would move to that commit.
Once done, we can now successfully delete the branch (Refer Deleting Branches in Git).

A branch can merge into any branch that the user wants. In this example, to demonstrate, we have used the master branch. It is of high importance to note that when a new branch creates in Git, it inherits the commits from that branch. Look at the following image:

The creation of the top branch happened upon completion of three commits in the master branch (the green circles). The same goes for the bottom branch, whose creation took place after four commits performed. Now let's see the same image with every branch removed but the top branch.

As seen in the image, when I delete every other branch, this looks like a single linear branch. Well, that is what it is. If taken individually, from the point of creation of branch, it inherits all the commits. Moreover, it depicts as if it was a part of the project from the start. It is beneficial since the feature we are creating may need to take help from the previous commits and tags along the way of its development. The commits that you perform in this branch will not hinder any other branch in any way.
I hope your hands are now in the habit of branches, and performing operations on them is comfortable for you. In the next tutorial, we will talk about tags in Git. Keep practicing!!
Common Questions On Git Merge
Can I undo the changes done by the git merge?
Yes, the changes done by the git merge command can be undone through git reflog and git hard reset commands.
What is squashing in Git?
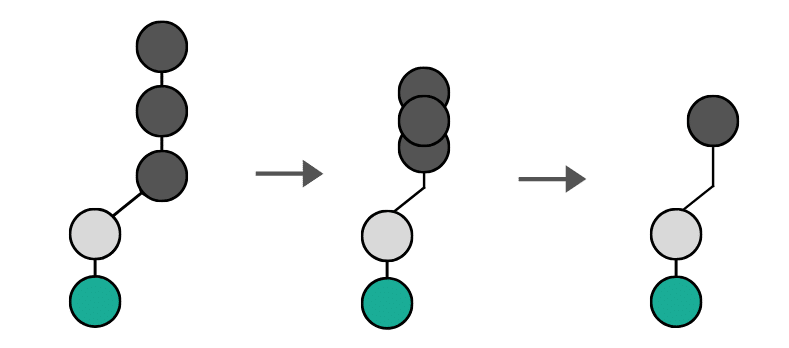
Squashing in Git is compressing all the commits to a single commit. Squashing a commit many times or let say n time for n commits will squash it to a single commit. The following image depicts git squash:
What happens when two users modify the same line and then perform git merge?
This type of situation is merge-conflict in Git. In Git, when two users try to modify the same line, Git gets confused about which changes to keep and which to reject. It is a merge-conflict.
I hope after reading this article you will be able to merge branches in Git with ease.
Happy Learning!


