In the software field, every tool gives the flexibility to use the tool's functionality according to the user's requirements. Moreover, this flexibility comes into the form of "Configurations". In the same way, Jenkins also provides its configurations so that user uses it according to its ease and requirements. So, in this article, we will discuss some important and most widely used Jenkins configurations. Subsequently, let's see how the Jenkins configure options work by covering the details under the following topics:
- What are the Global settings in Jenkins?
- What is the Home Directory configuration in Jenkins?
- How to configure the Home directory in Jenkins?
- What is the System message configuration in Jenkins?
- How to configure System message in Jenkins?
- What are the Executors configurations in Jenkins?
- How to configure Executors in Jenkins?
- What is the Usage option configuration in Jenkins?
- What is the Quiet period configuration in Jenkins?
- How to configure the Quiet period in Jenkins?
- What is Jenkins URL?
- What are the Environment variables in Jenkins?
- How to configure Environment variables in Jenkins?
- What is Usage statistics?
- What is the Git Plugin option?
- And, what is Email notification?
What are the Global settings in Jenkins?
As a Jenkins admin, Configure System(Option to configure Jenkins settings) is the most prominent section of Jenkins. Here, the admin can define global settings that apply to all the projects that are present in Jenkins. Now, the question is how to navigate towards the Configure System option in Jenkins. Subsequently, to navigate to the Configure System option, kindly follow the below steps:
Note: Kindly note that we are assuming that Jenkins is already installed in the system and we are logged in using the admin account. Additionally, for installing the Jenkins, please visit the InstallJenkins article.
Step 1: Firstly, navigate to the Jenkins dashboard and after that, click on the "Manage Jenkins " option highlighted below:
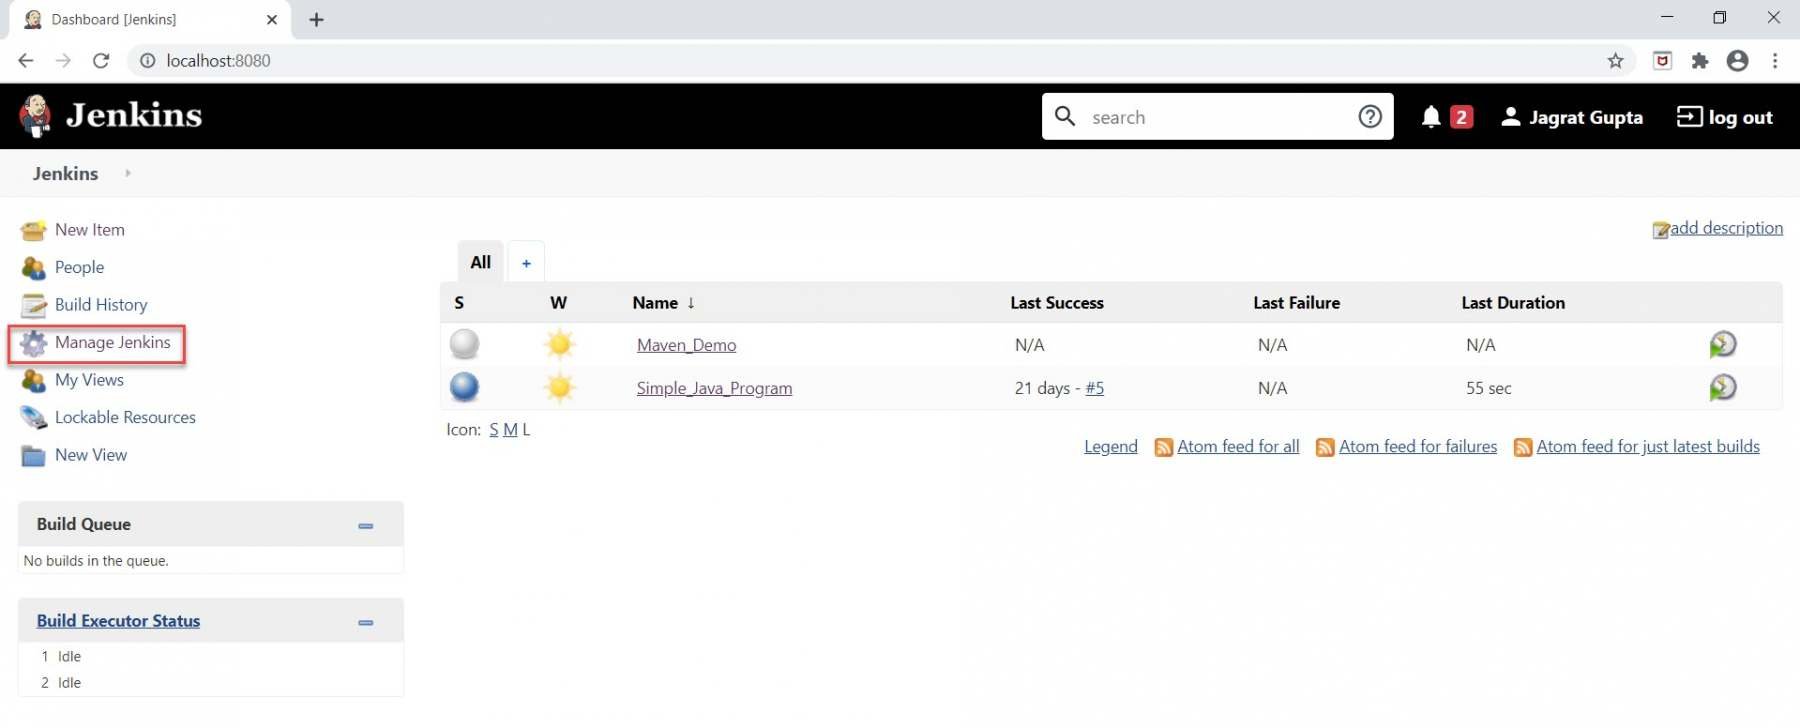
Step 2: Secondly, as soon as we will click on the "Manage Jenkins" option, we will be redirected to the "Manage Jenkins" page. Here, we need to click on "Configure System " highlighted in red under the "System Configuration" section.
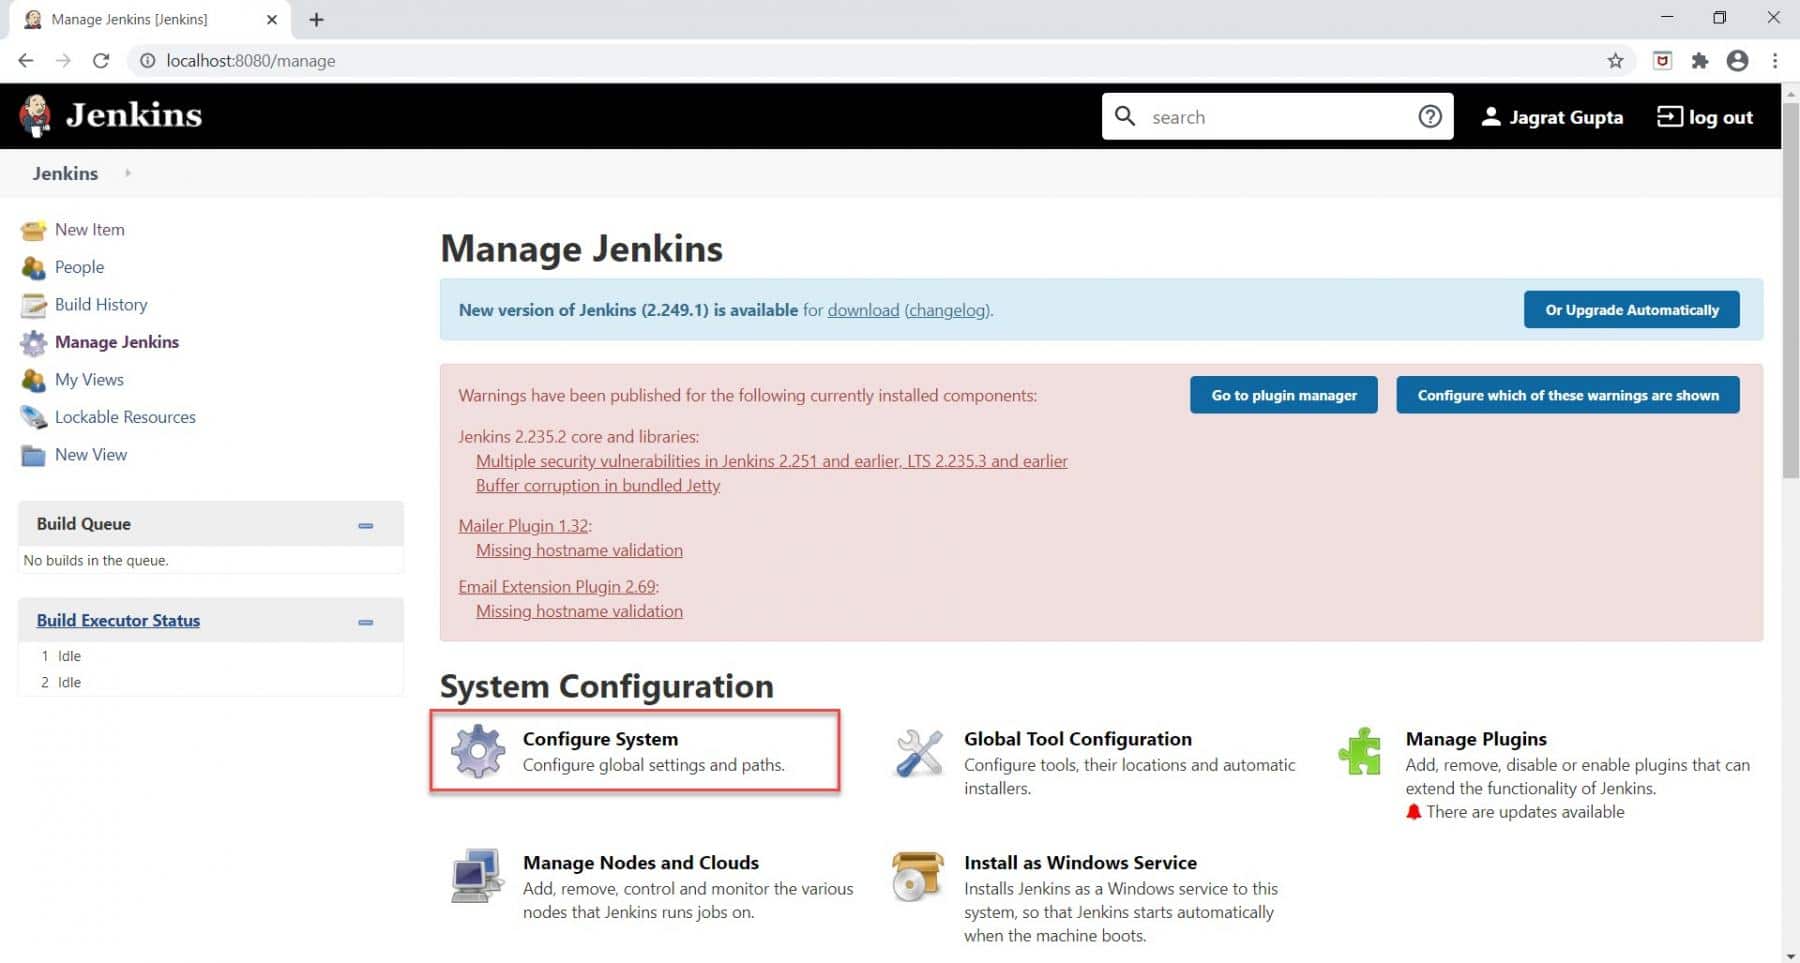
Step 3: Thirdly, we will click on the Configure System link. Subsequently, we will go to the configuration page as displayed below:
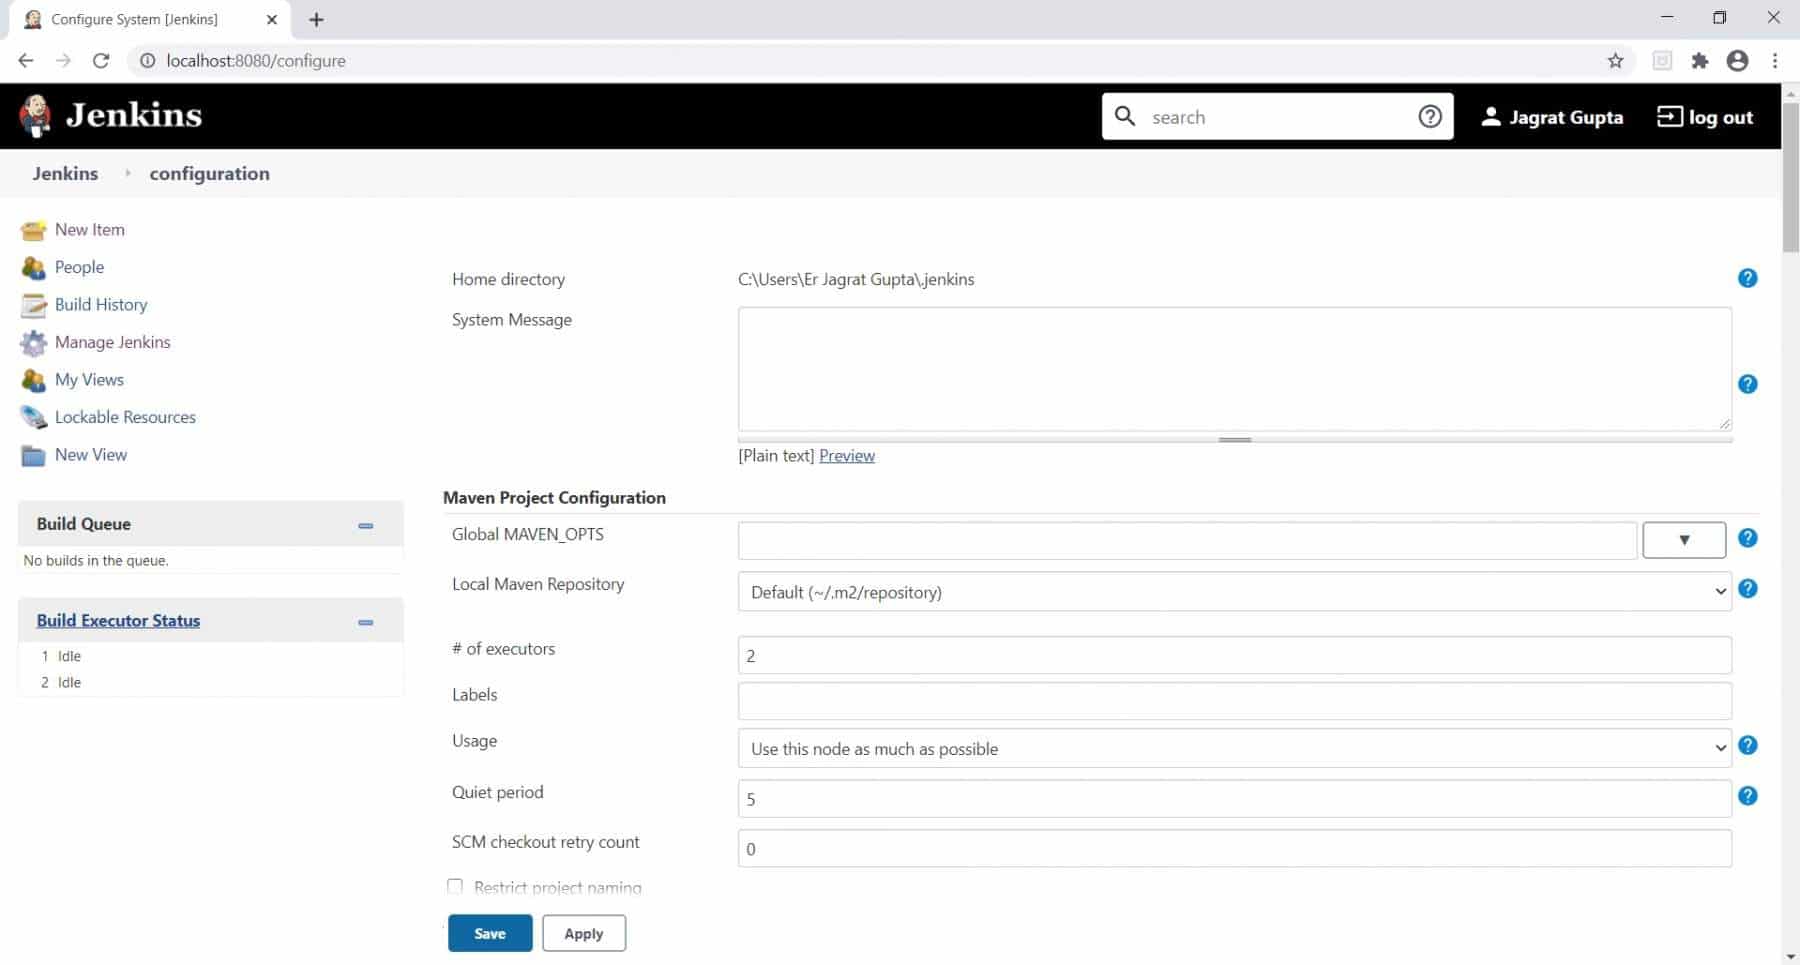
So in this way, we are on the configurations page in Jenkins. No, let's see some most popular and most widely used options on this page of Jenkins:
| Option | Description |
|---|---|
| Jenkins home directory | This attribute tells us the placement of our home directory of Jenkins in the system. |
| System Message | A system message displays the messages on the Jenkins dashboard page. |
| Executors | This configuration option tells us that how many parallel jobs can be run at the Jenkins machine. |
| Usage option | This option tells us that how Jenkins schedules build on any node. |
| Quiet period | When this option is non-zero, newly triggered builds of this project will be added to the queue, but Jenkins will wait for the specified period of time (in seconds ) before actually starting the build. |
| Jenkins URL | This option, by default, depicts the HTTP address of Jenkins installation in the form of localhost. We can write DNS (Domain Name ) of our machine or overwrite the localhost with the IP address of the machine. |
| Environment variable | Environment variables apply for every build on every node. They can be used in Jenkins' configuration (*as $key or ${key} *) and will be added to the environment for processes launched from the build. |
| Usage statistics | This option is used to track usage data in Jenkins. |
| Git Plugin | This option is used to set global git username and email details in Jenkins. |
| Email notification | This option is used to configure email related configurations to send email regarding build result after running builds. |
Consequently, let's understand the meaning, usage, and details of all these options in the following sections:
What is the Home Directory configuration in Jenkins?
The first attribute is the Home directory on the configuration page. This attribute tells us where our home directory of Jenkins is placed in the system. Additionally, in this home directory, we can see the log information, plugin information, jobs storage information that we created in Jenkins, and some other configuration-related information. So by default, Jenkins stores all of its data in this directory on the file system.

We can validate the home directory in the file system also like the below image:
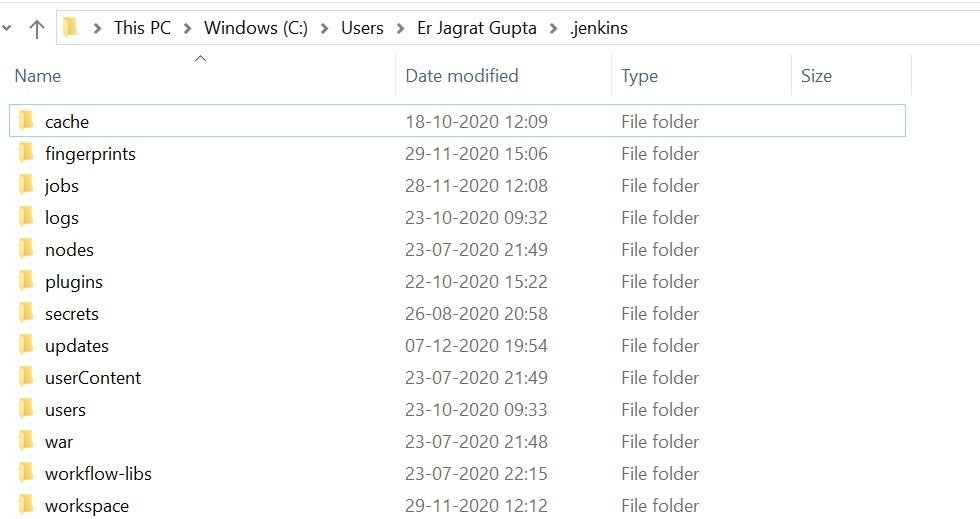
In the next sub-section, let's see how to configure the home directory in Jenkins.
How to configure the Home directory in Jenkins?
In the previous section, we discussed the concept of the Home directory. Now, in this section, let's see how to configure the home directory in Jenkins? Follow the steps as mentioned below to configure/change the Home Directory:
Step 1: Firstly, copy all the items that are present in the current directory and paste them into the new directory. For creating the new directory, just go to the location where you want to paste all items as we moved towards the desktop. After that, create a folder like we created Jenkins Home, and inside that folder paste all the items from the existing Jenkins directory.

Step 2: Secondly, go to the Environment Variables option on Windows and create a new variable like JENKINS_HOME. After that, paste the new directory path in the variable value section like in the below image:
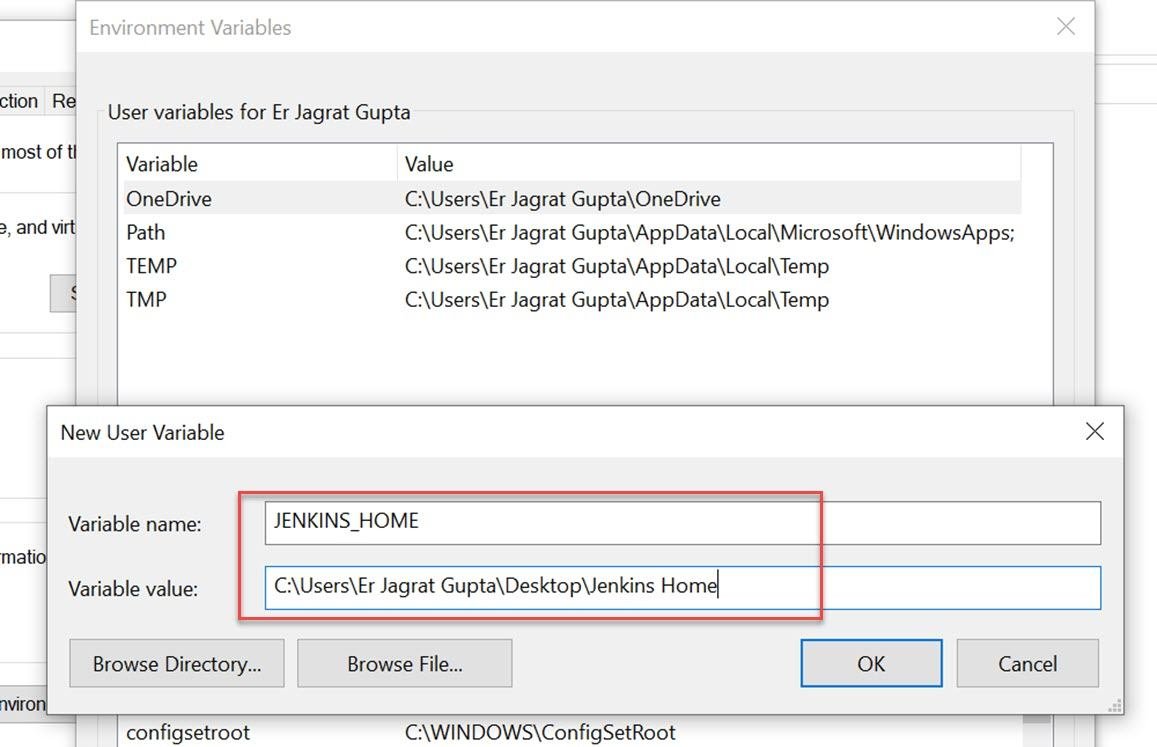
Step 3: Thirdly, restart Jenkins and go to the Configure System page again and this time we can see the changed directory here:
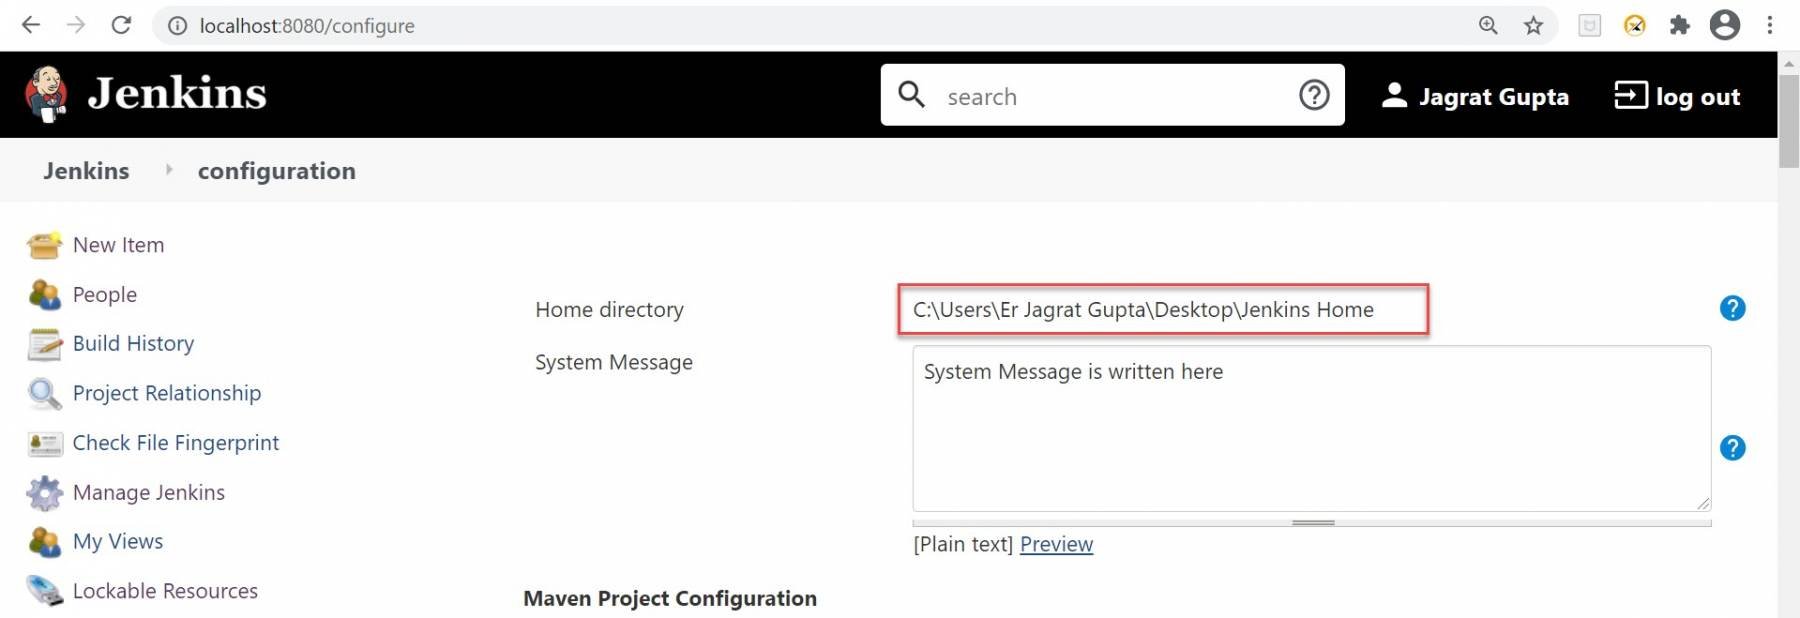
In the above image, we can see that the Home directory is changed. So, in this way, we can change the Home directory in Jenkins.
What is the System message configuration in Jenkins?
The System message displays messages on the Jenkins dashboard page. Moreover, the purpose of this configuration is to post any type of notification to users. When we see the Jenkins dashboard page then generally we don't see any message in the highlighted area as shown in the below image:
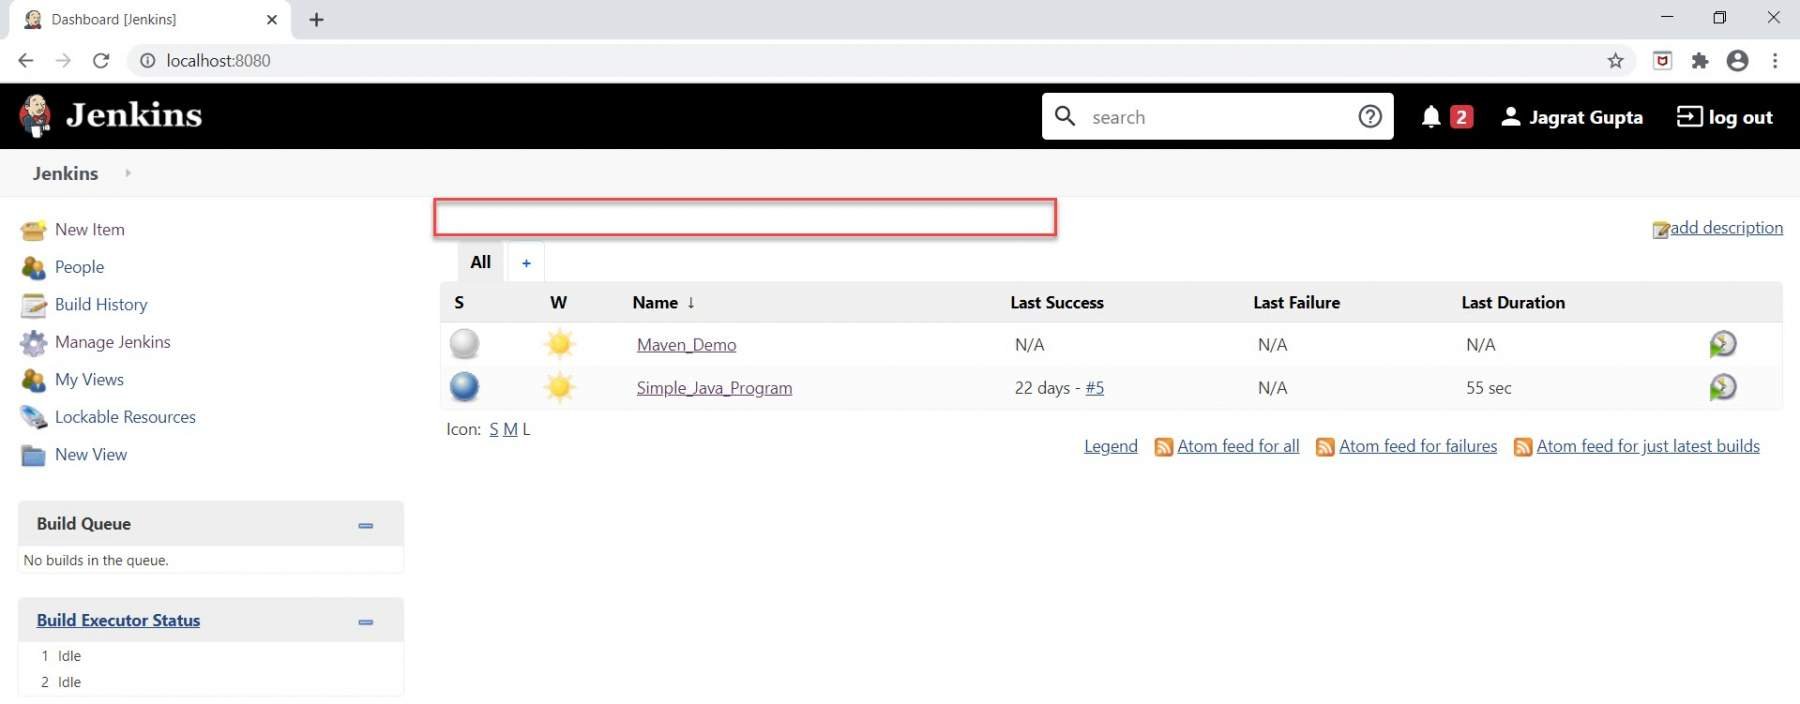
Now, let's see in the next sub-section that how to configure system message in Jenkins.
How to configure system message in Jenkins?
If we want to display a message then got to configure the System Message option and do the following things:
- Put a message in the System message textbox.
- Click on the Save button.
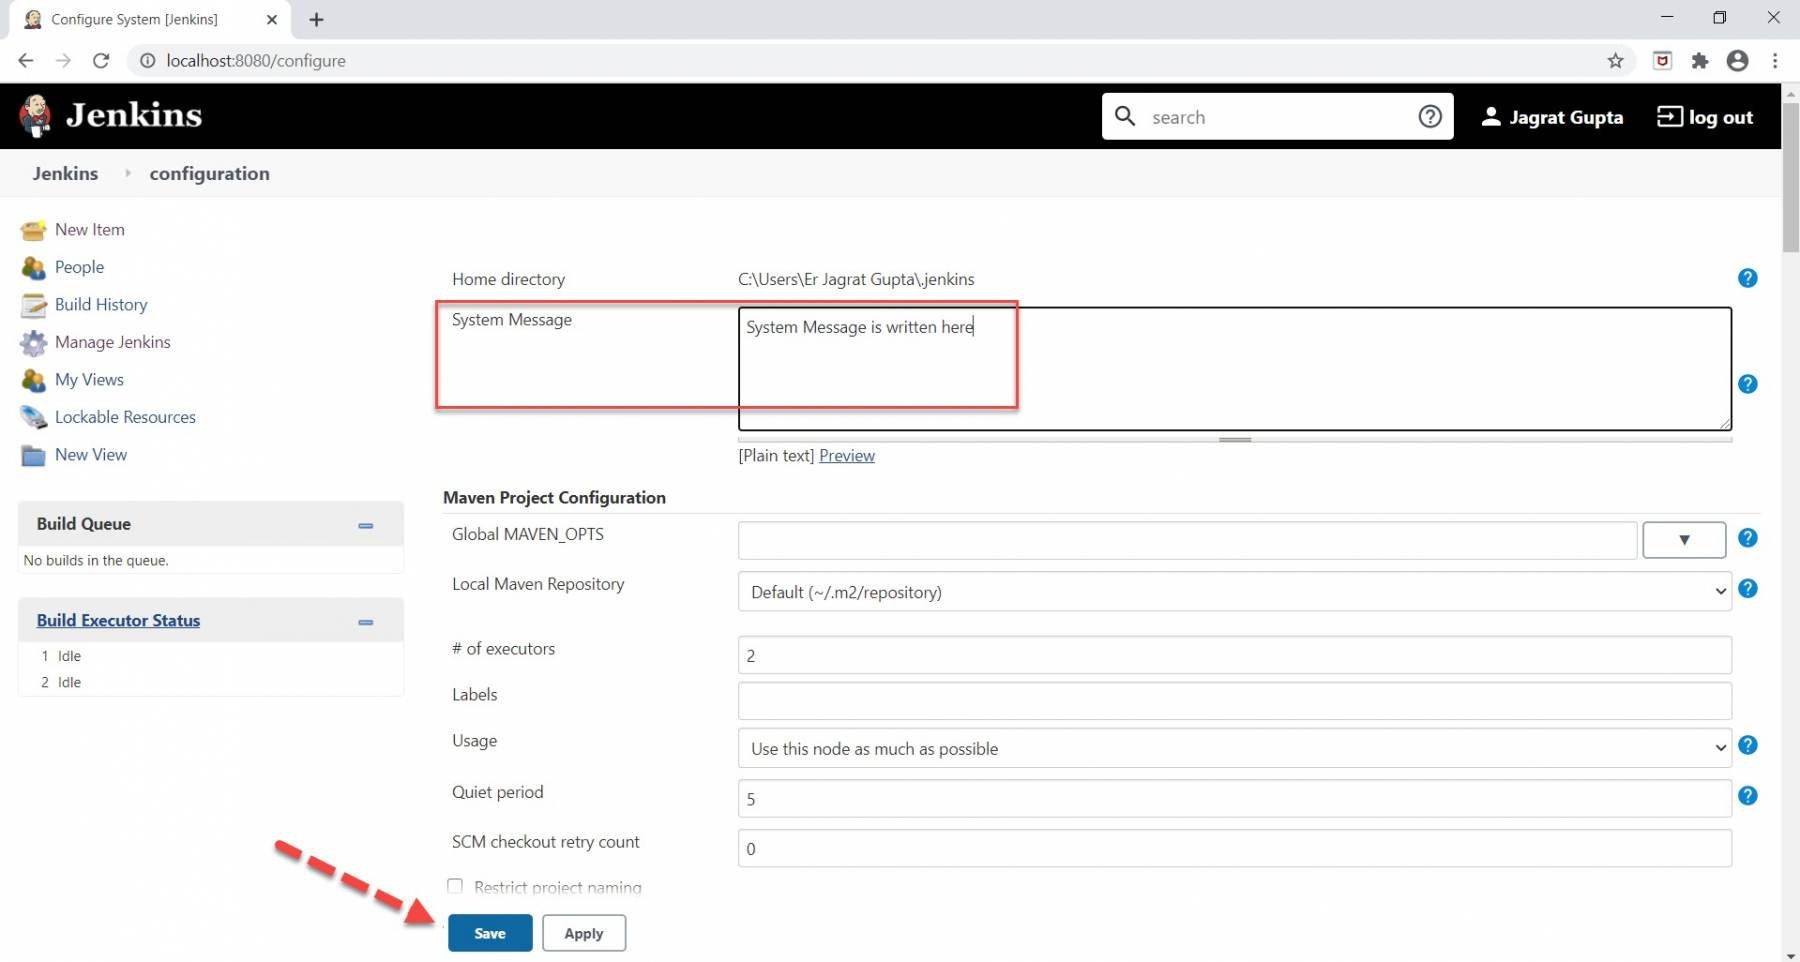
After click on the Save button, we will be redirected towards the Jenkins dashboard page and now we can see the message in the highlighted section as shown in the below image:
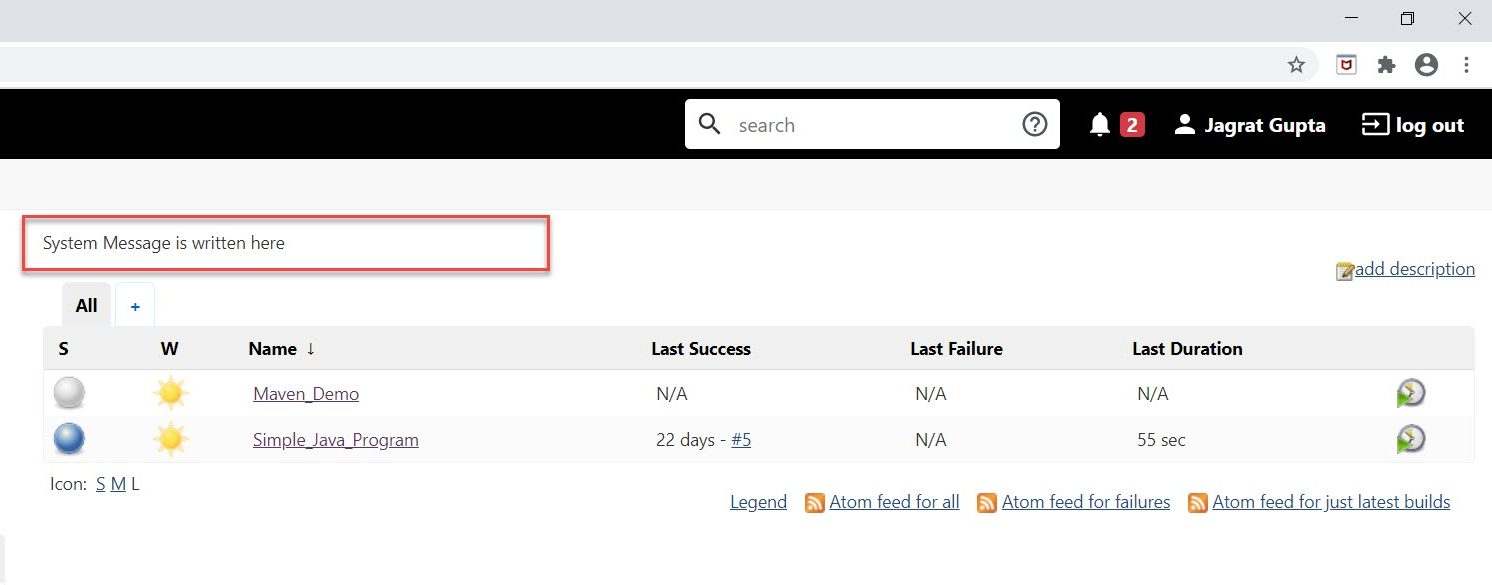
So, this way we can edit the message to provide any notifications to the users.
What are the Executors configurations in Jenkins?
This configuration option tells us that how many parallel jobs can be run on the Jenkins machine. As in the below image, we are seeing number 2, so it means that two parallel jobs can be run at a time. We can increase this number according to our requirements.

In the next sub-section, we will see how to configure executors in Jenkins?
How to configure Executors in Jenkins?
If we change the number of executors, the number of executors(as shown by the arrow) under the Build Executor Status section will increase correspondingly, as shown below:
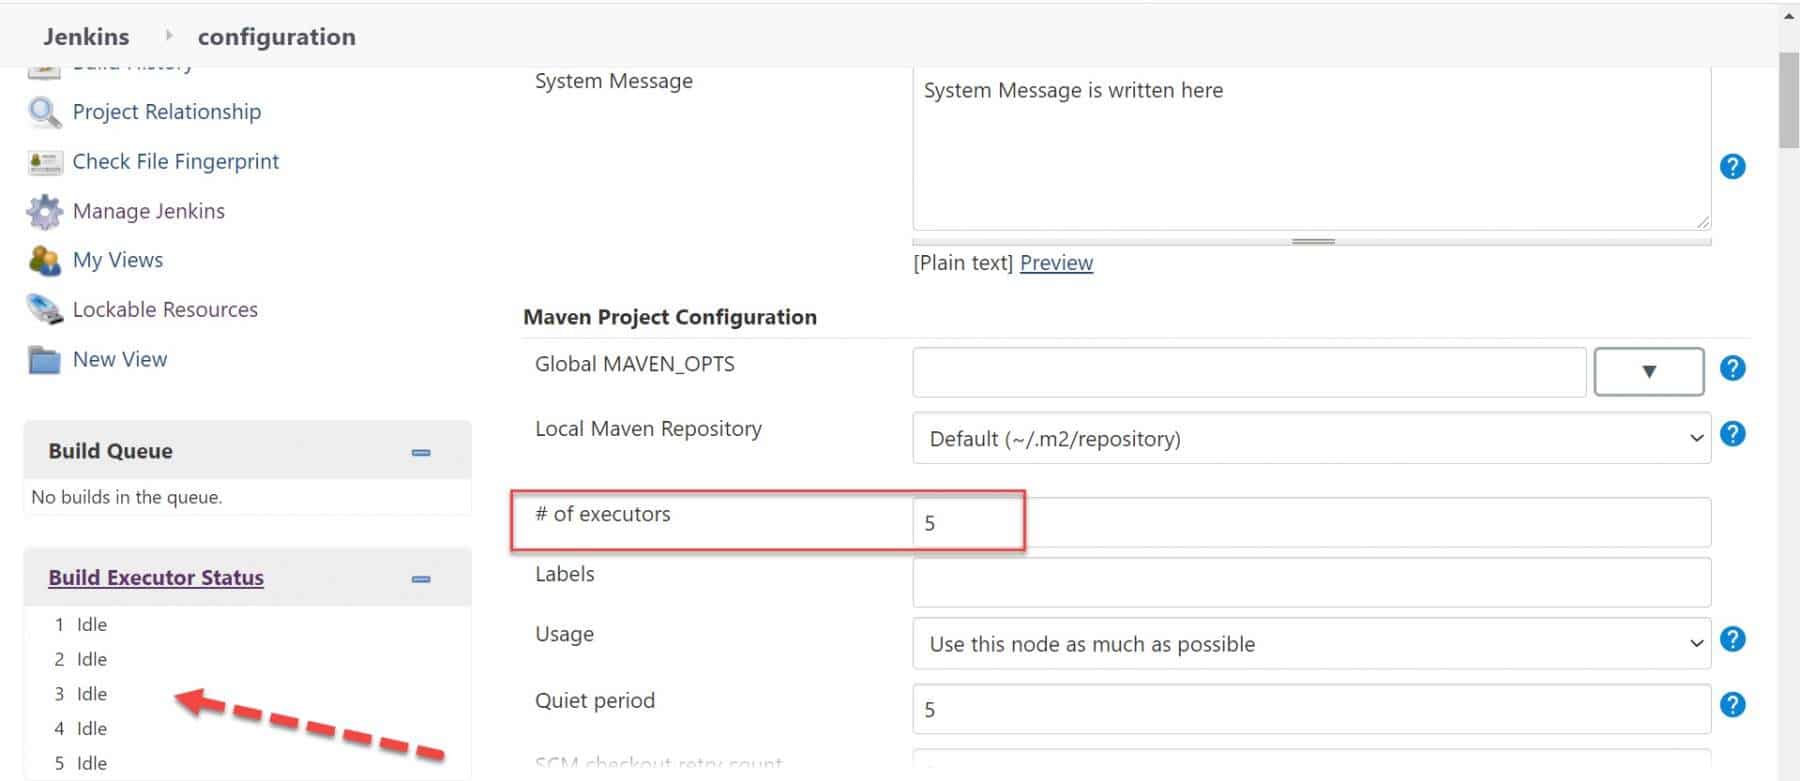
Kindly note that we will see in further articles regarding distributed builds that how can we use these executors.
What is the Usage option configuration in Jenkins?
The Usage option configuration in Jenkins is used when we work on the concept of the nodes. A node is basically a machine that is part of Jenkins's environment and capable to execute projects or pipelines. This option tells us that how Jenkins schedules build on any node. There are two modes in this options:
- Use this node as much as possible: This is the default option. Jenkins freely uses this node. Whenever there is a build that can be done by using this node, Jenkins will use it.
- Only build jobs with label expressions matching this node: In this mode, Jenkins will only build a project on this node when that project is restricted to certain nodes using a label expression, and that expression matches this node's name and/or labels. This allows a node to be reserved for certain kinds of jobs.

Note: As far as the configuration of these nodes is concerned, we will talk about it in further upcoming articles regarding distributed builds in this Jenkins series.
What is the Quiet period configuration in Jenkins?
When this option is non-zero, newly triggered builds of this project will be added to the queue, but Jenkins will wait for the specified period of time (in seconds ) before actually starting the build. As in the below image, the Quiet period is mentioned as 5, so Jenkins will wait for 5 seconds before starting the new build that is already present in the queue.

In the next subsection, we will see how to configure the Quiet period in Jenkins.
How to configure the Quiet period in Jenkins?
In the previous section, we saw the concept of the Quiet period. So, in the current section, let's see how to configure the Quiet period. Kindly follow the below steps to achieve it:
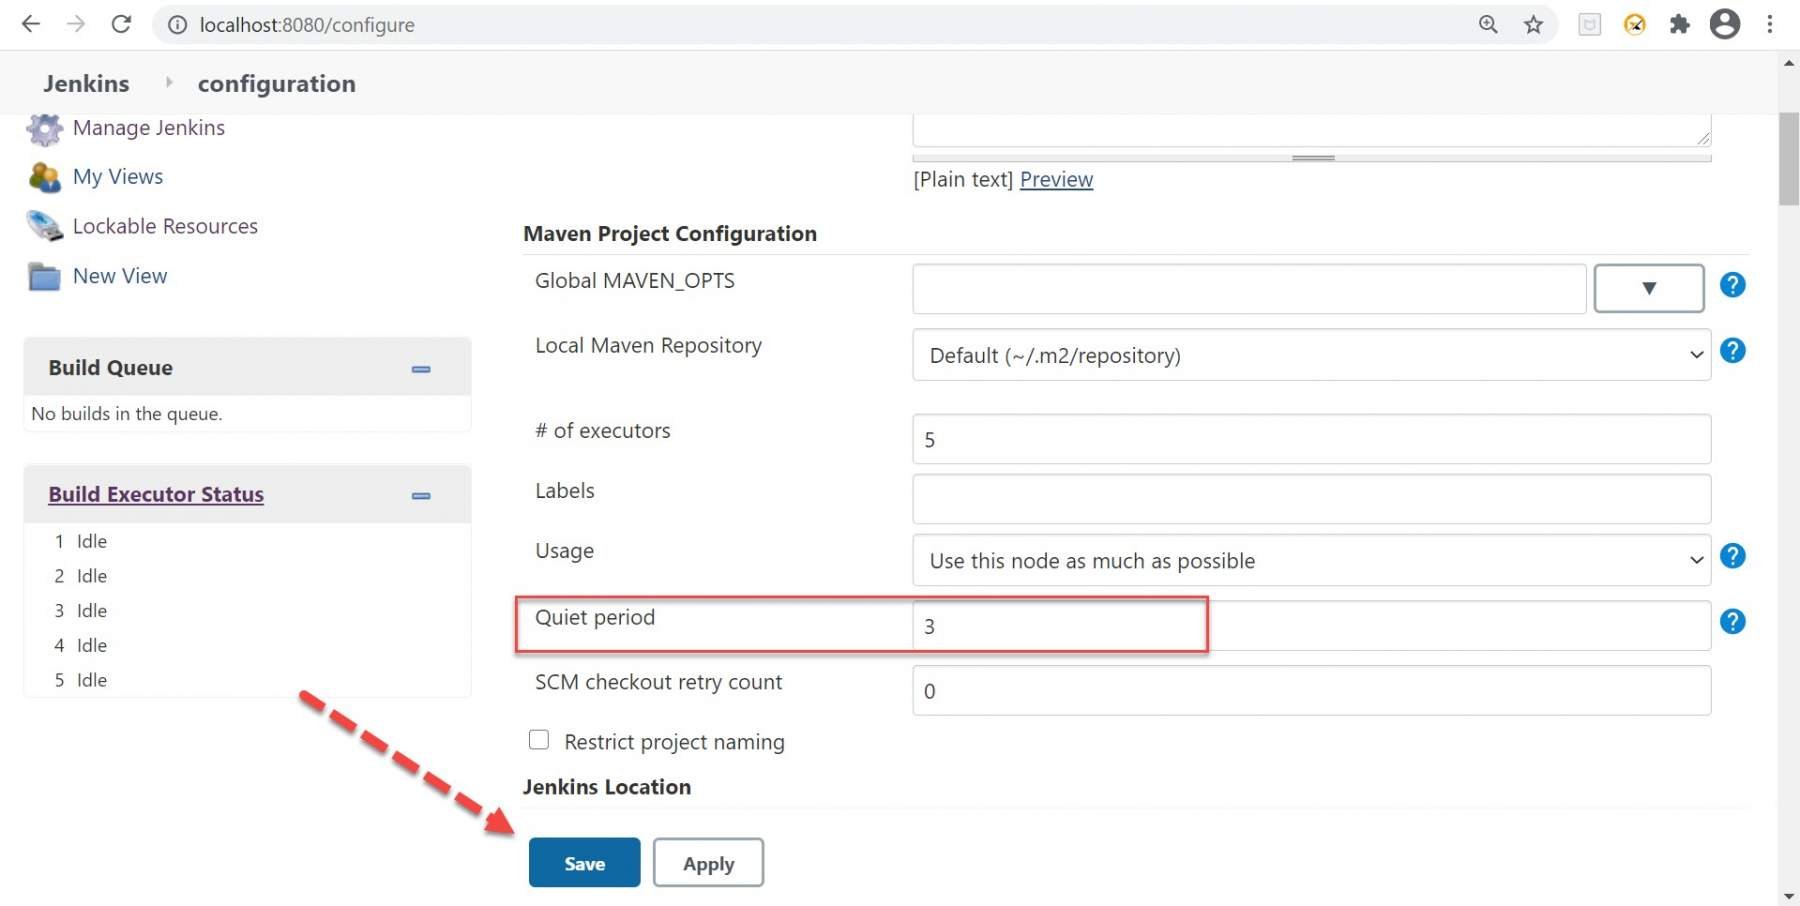
Step 1: Go to the Configure system page and set the time period that you want to set a Quiet period like in the below image. After putting time, click on the Save button.
Step 2: Now run any job by clicking on the Build Now link twice. For Eg in the below image, I ran the "Simple Java Program" job twice and you will see the pending message for the second build.
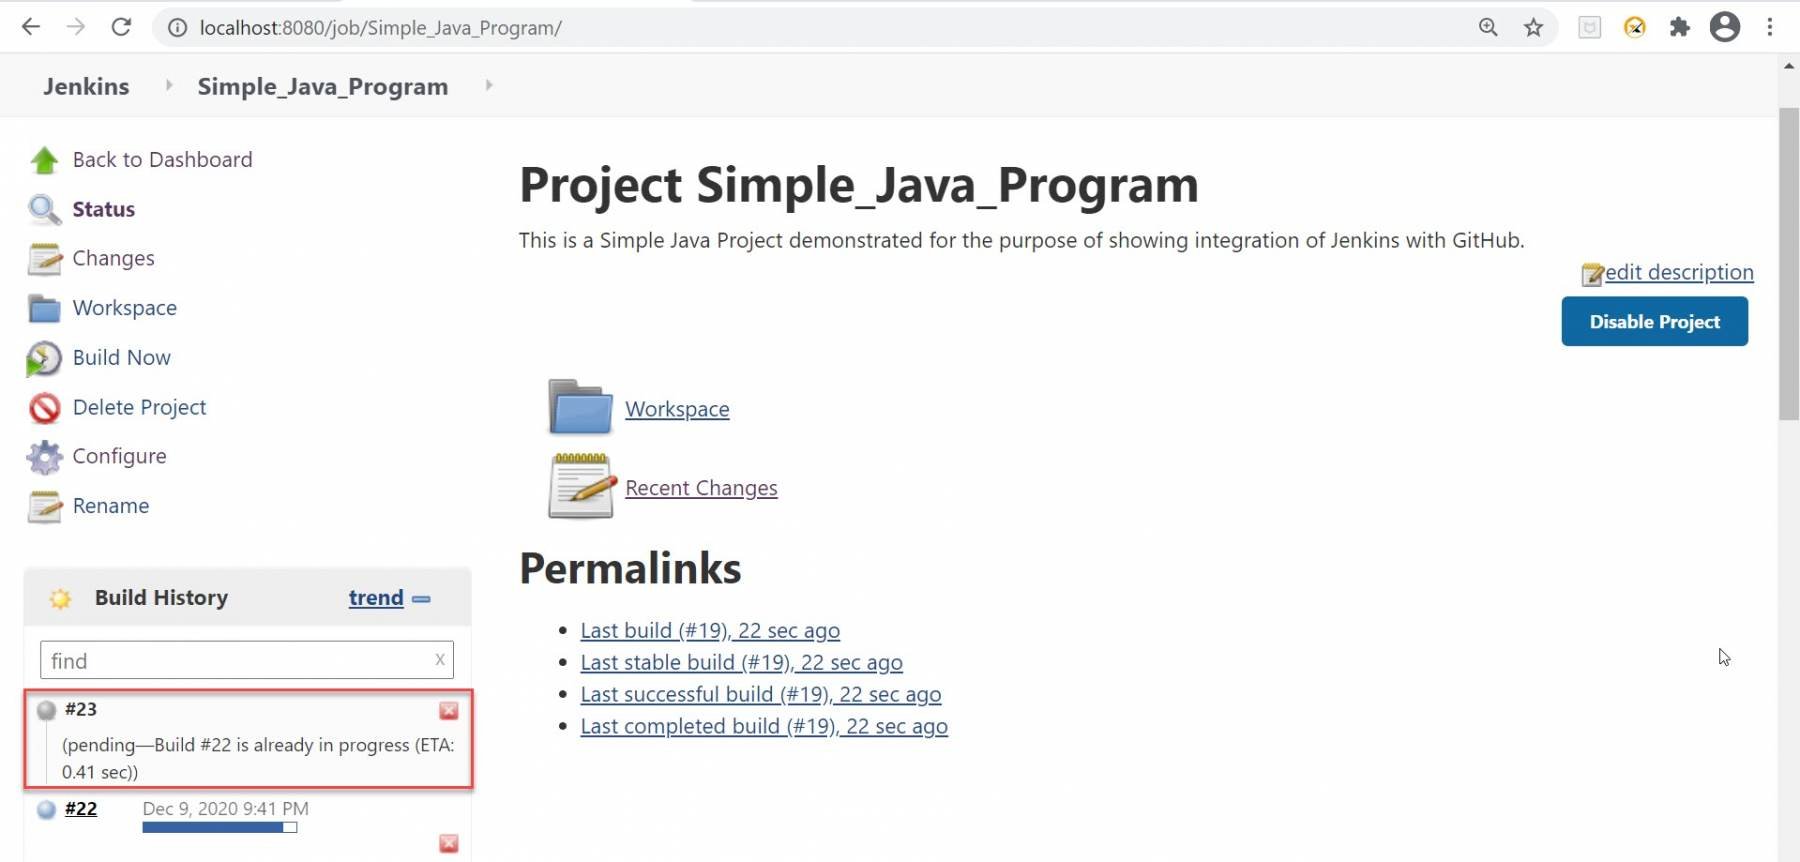
So it will wait the time (quiet period ) then after the build will be executed.
What is Jenkins URL?
This option, by default, depicts the HTTP address of Jenkins installation in the form of localhost i.e. http://localhost:8080/jenkins/. We can write DNS (Domain Name) of our machine or overwrite the localhost with the IP address of the machine. This value lets Jenkins know how to refer to itself, i.e. to display images or to create links in emails.

What are the Environment variables in Jenkins?
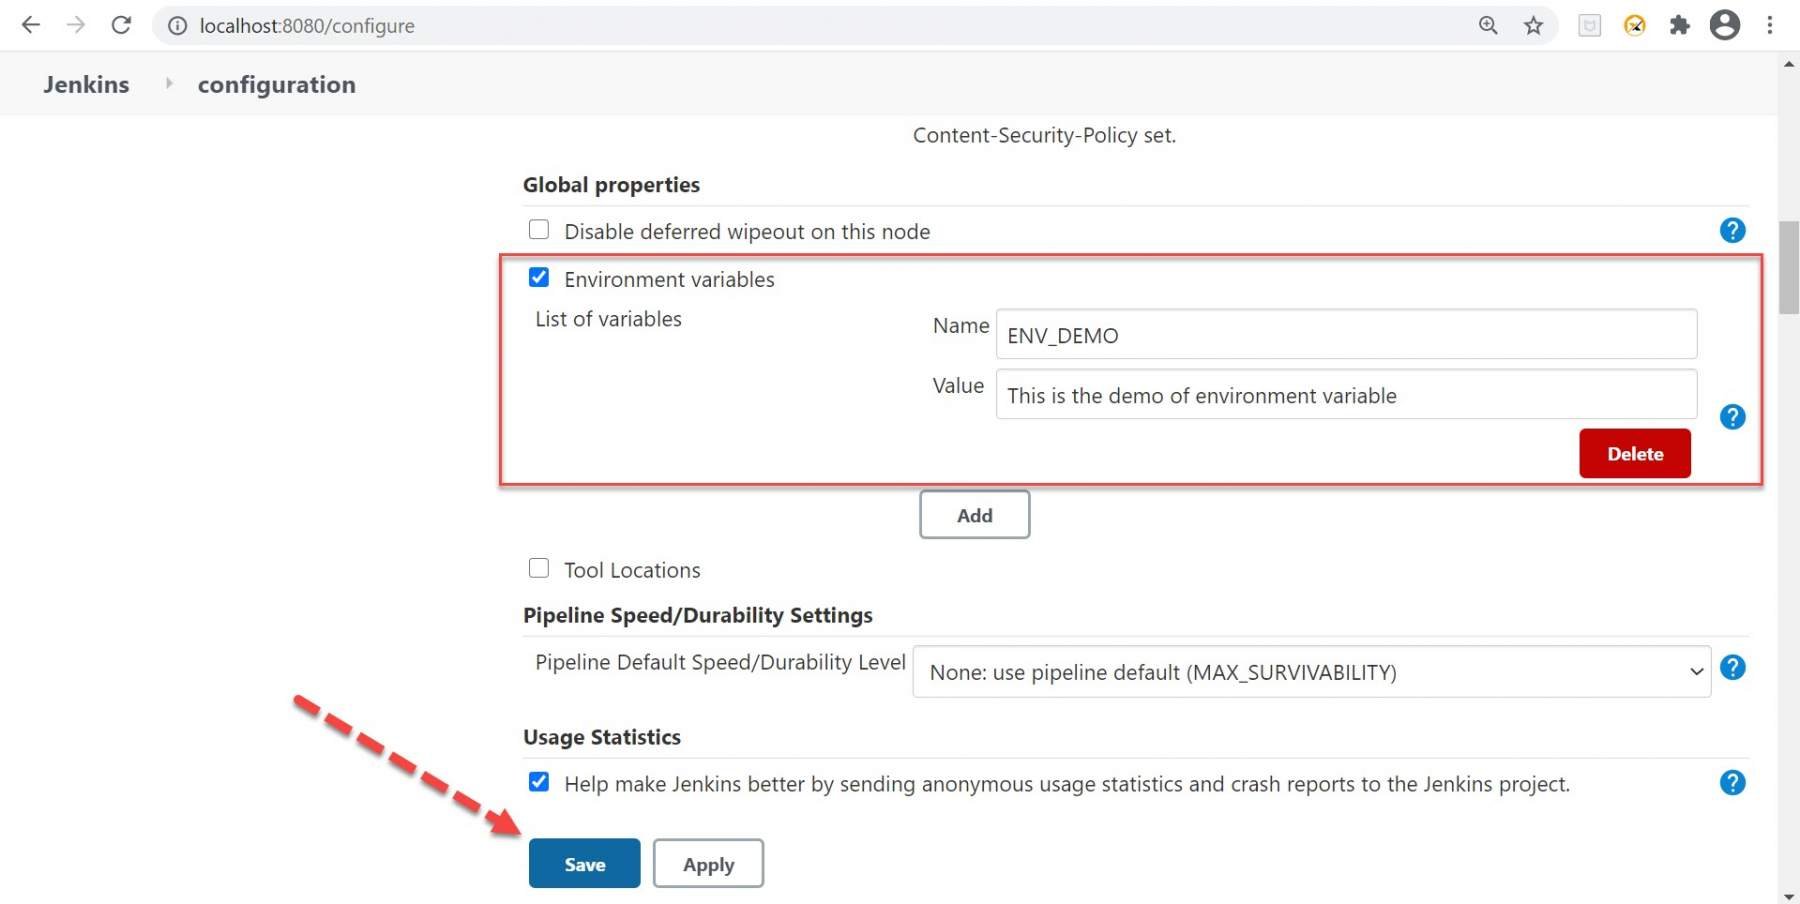
Environment variables are present in the form of key-value pairs in Jenkins. These custom environment variables apply to every build on every node. We can use them in Jenkins' configuration (as $key or ${key} ) and we will add them to the environment for processes launched from the build.
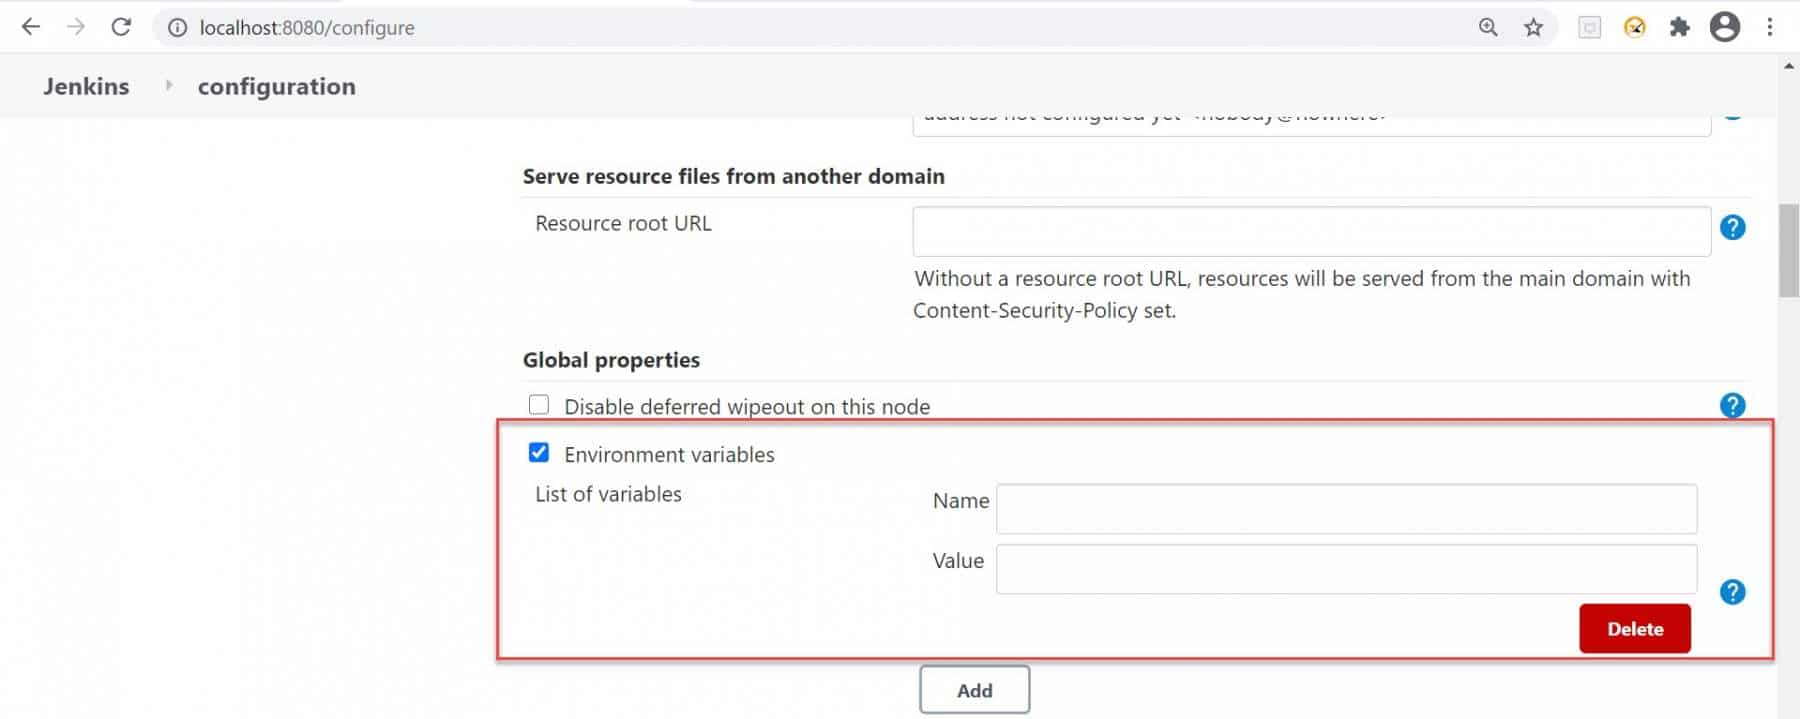
In the next sub-section, we will see how to configure and use environment variables in Jenkins.
How to configure Environment variables in Jenkins?
In this section, let's see how to configure as well as use Environment variables in Jenkins. Kindly follow the below steps to achieve it:
Step 1: Under the configuration page, specify the name and value of the Environment variable like in the below image. After putting, click on the Save button. Kindly note that if you want to add multiple environment variables then you need to click on the Add button and fill in the same name and value information.
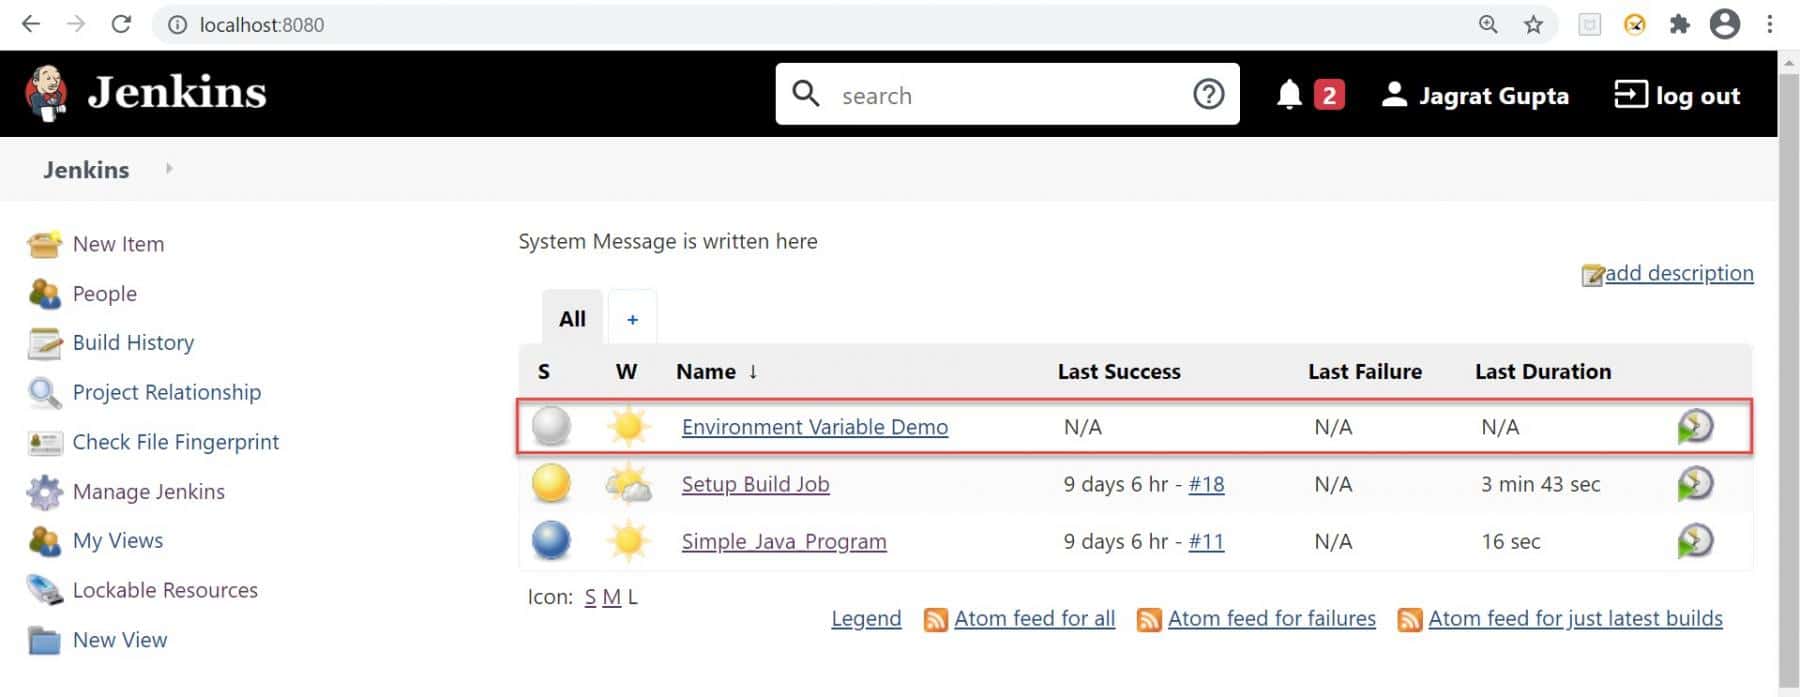
Step 2: Create a new job for the Environment variable demo.
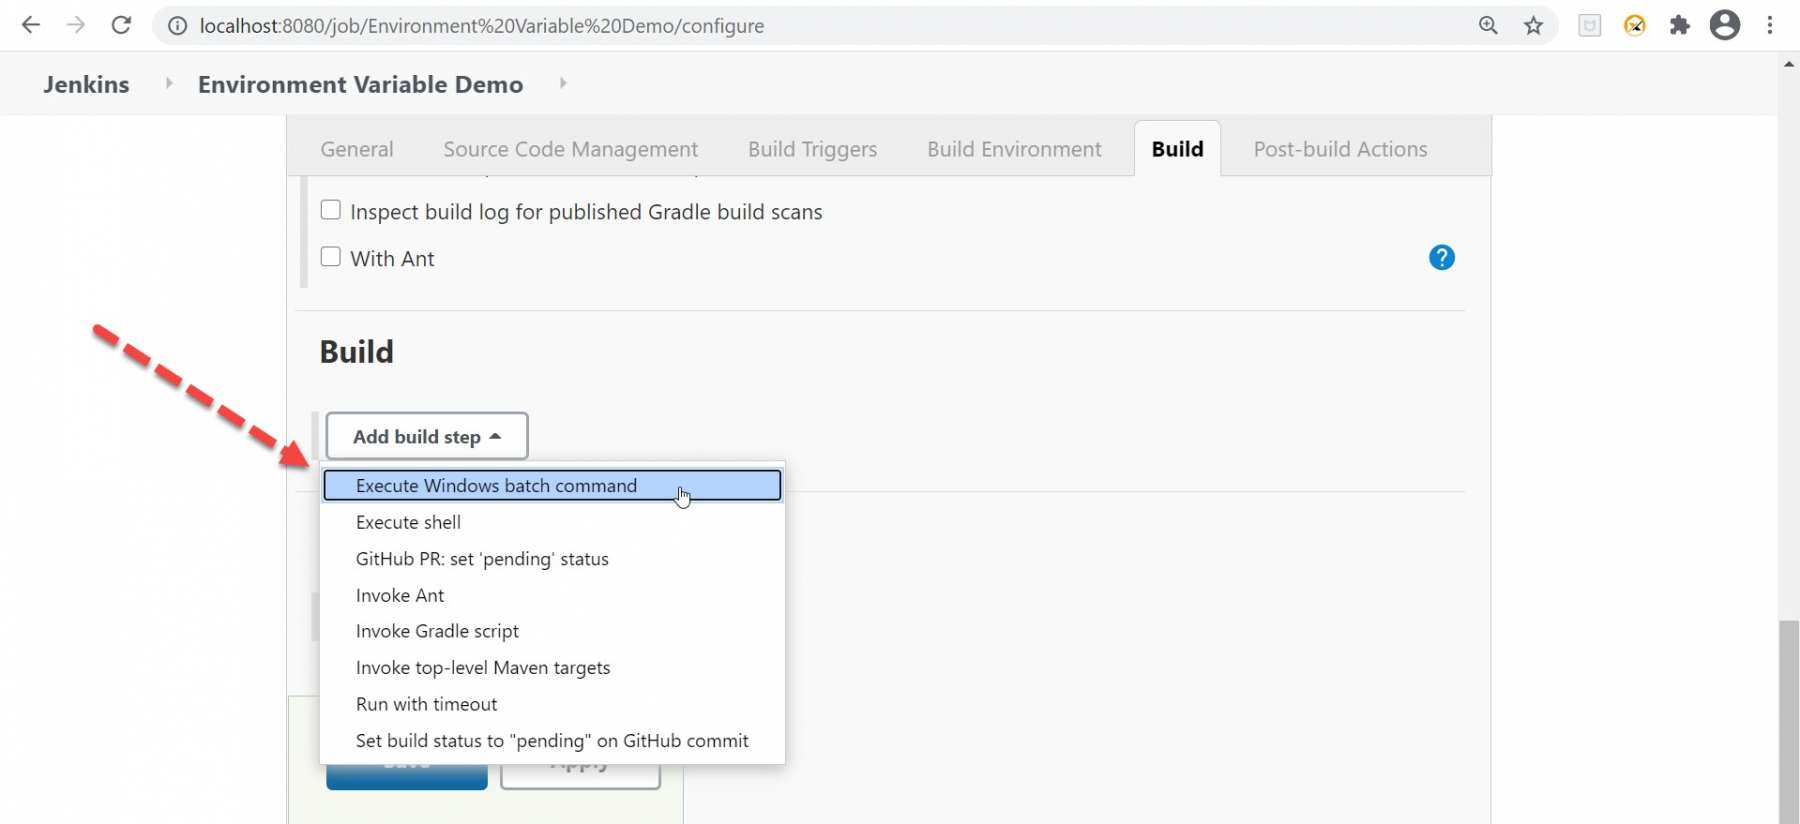
Step 3: Go to the configure section of this job and go to the build section. Under the Build section, click on the "Add build step" dropdown and select option "Execute Windows batch command".
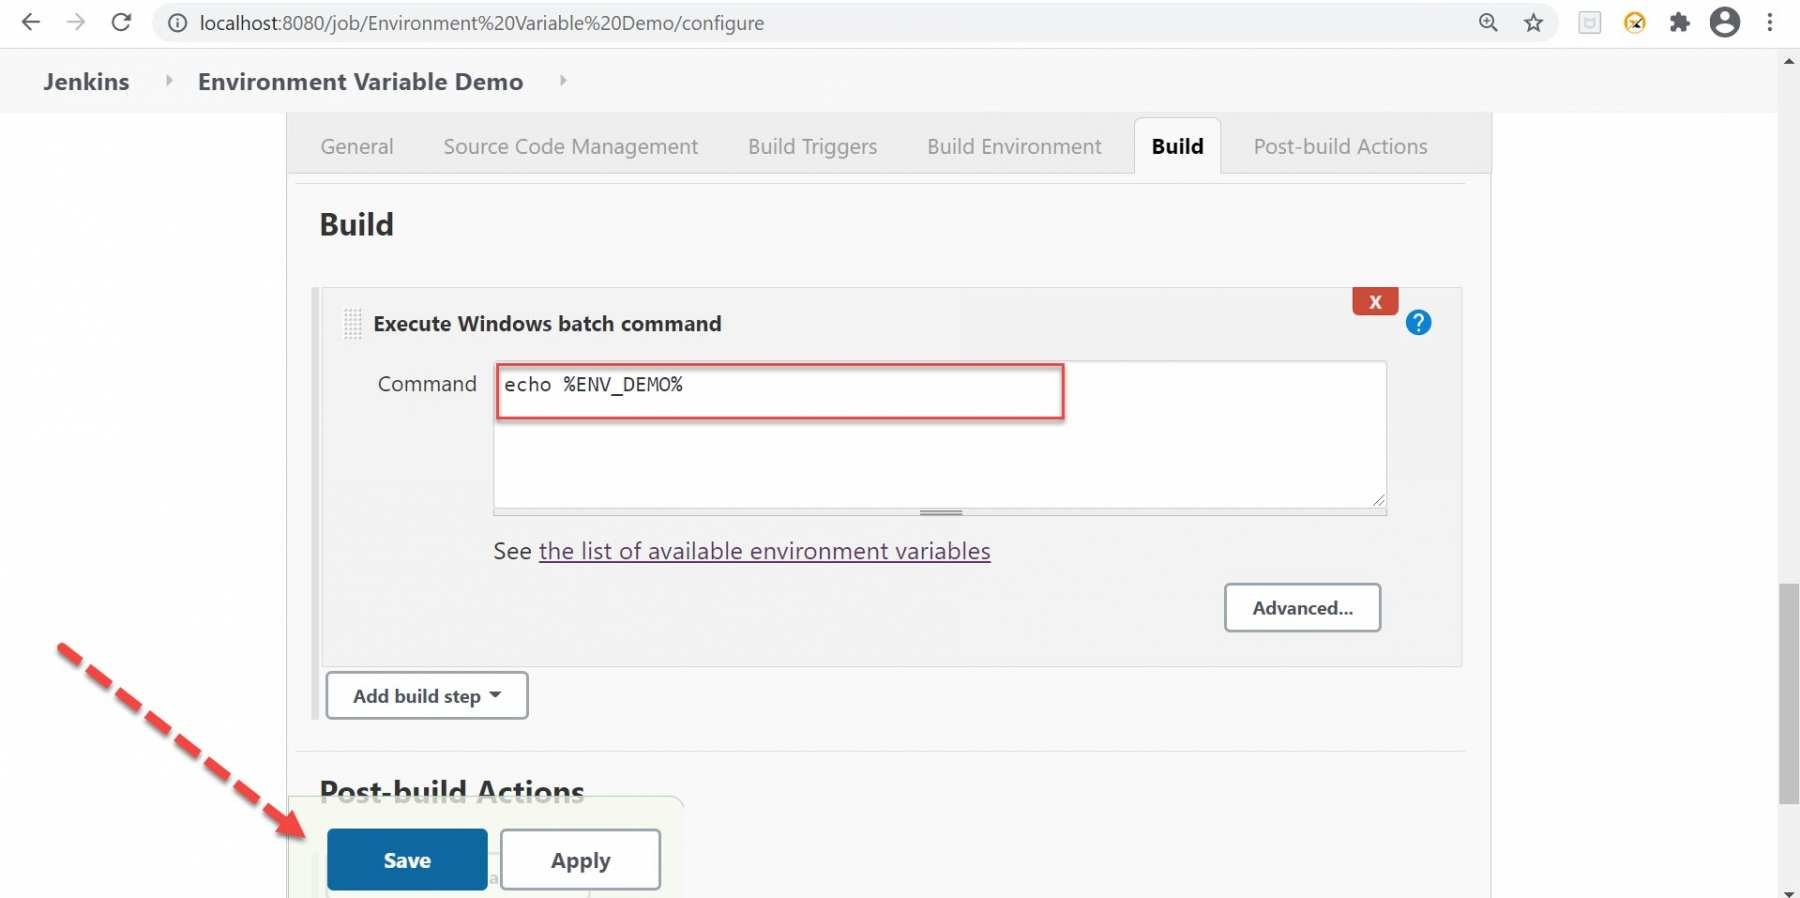
Step 4: Now, put the below command in the text area section and click on the Save button. echo %ENV_DEMO%
Here ENV_DEMO is the same variable name that we defined in the environment variable section.
Step 5: Now run the build by clicking the "Build Now" link and go to console output to see the result:
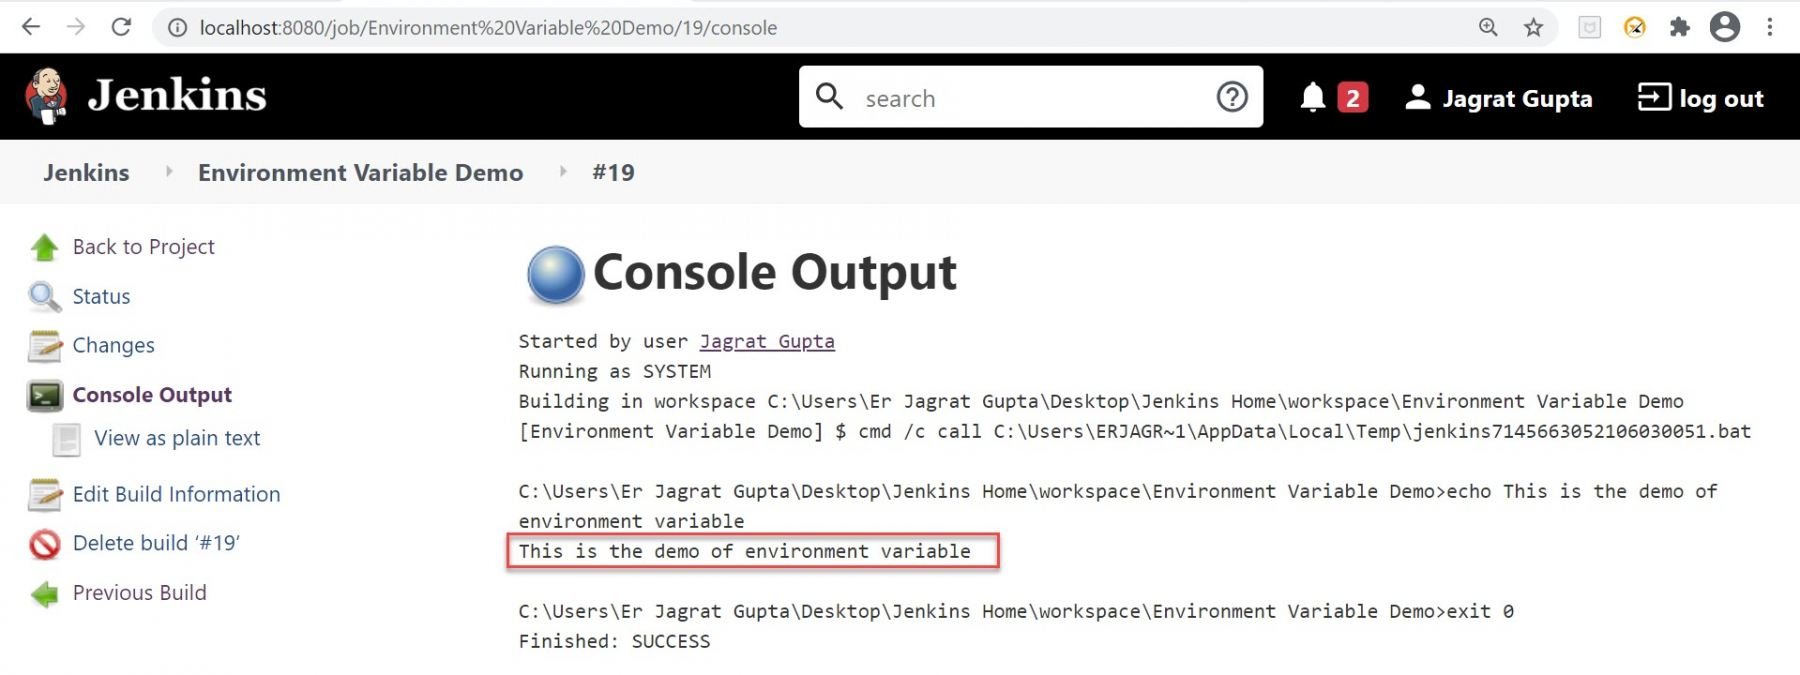
As we can see in the above image, the value that highlights in the red rectangle is the same value that we set in the environment variable section under the configure the system. So, in this way, we can configure and use the Environment variable.
What is Usage statistics?
In any open source project, tracking usage data is very difficult. To address this need, we use the Usage statistics option. When we enable this option, Jenkins periodically sends information like Jenkins version, information about agents, OS type and executors, installed plugins and versions and number of jobs, etc. All types of usage statistics are published at https://stats.jenkins.io/.
What is the Git Plugin option?
When we try to push our code from Git then we need to configure our username as well as email for authentication purposes. Jenkins gives this option under the Git Plugin section:
- Global Config user.name Value: if we will give username here then git command git config user. name "your username" will be called.
- Global Config user.email Value: if we will give email here then git command git config user.email "your email" will be called.

Here, Credential based authentication, we generally used as we use username and email to push our code into the repository. So, we can put these values as a part of global configurations.
What is Email Notification?
Email notification option configures SMTP settings for sending mail to specified recipients. This section has two fields that we need to configure:
- SMTP server: We need to specify the name of the SMTP mail server here. Jenkins uses JavaMail for sending out e-mails.
- Default user e-mail suffix: If our users' e-mail addresses can compute automatically by simply adding a suffix, then specify that suffix, otherwise leave it empty.

Now, the question is how to configure these email notification options. So we will elaborate on this section in the further article named "Notification". Conclusively, that's all for discussion regarding some important and most widely used configurations in Jenkins. Subsequently, in the next section, let's see some important takeaways.
Key Takeaways:
- Every tool gives the flexibility to use the tool's functionality according to the user's requirements. This flexibility comes into the form of "Configurations".
- *Additionally, the **Home directory *tells us the placement of our home directory Jenkins in the system. Jenkins stores all of its data in this directory on the file system.
- Moreover, a system message displays messages on the Jenkins dashboard page.
- #of executors tells us how many parallel jobs can be run at the Jenkins machine.
- The usage option depicts that how Jenkins schedules build on any node.
- Additionally, when the quiet period option is non-zero, newly triggered builds of this project will add to the queue. But Jenkins will wait for the specified period of time (in seconds) before actually starting the build.
- Moreover, Jenkins URL depicts the HTTP address of Jenkins installation in the form of localhost. This value lets Jenkins know how to refer to itself, ie. to display images or to create links in emails.
- Environment variables apply for every build on every node. We can use them in Jenkins' configuration (as $key or ${key}) and we will add them to the environment for processes launched from the build.
- The usage statistics option tracks the usage data in Jenkins.
- When we try to push our code from Git then we need to configure our username as well as email for authentication purposes. Jenkins gives this option under the Git Plugin section.
- Lastly, the Email notification option configures SMTP settings for sending mail to specified recipients.
