In the previous articles, we demonstrated so many functionalities in Jenkins, and one thing that is common among all articles is "Plugin installation" for specific functionality. So, one question that always comes to our mind that what is a plugin? And why is it required to implement any functionality in Jenkins? In this article, we will understand the core concept of Plugins. Also, we will see that how we can install plugins in different ways? So, let's start the journey of understanding how Jenkins Manage Plugins by covering the details in the following topics:
- What is a Plugin in Jenkins?
- Why are Plugins required?
- How to install a plugin in Jenkins?
- How to install a plugin manually in Jenkins?
- And, how to upgrade the plugin in Jenkins?
- How to uninstall the plugin in Jenkins?
What is a Plugin in Jenkins?
Jenkins plugin is a java-archive format package that follows a specific structure during the development. Every plugin contains all the relevant information like files, images, code, and other extra information. That's why we also refer to the plugin as "self-contained." All the Jenkins plugins have .hpi as file extensions.
All these plugins required in Jenkins can be found in the plugin repository and downloaded from here for a specific need, but the main question is still pending that why these plugins are required and the answer to this question, we will get in the next subsection.
Why are plugins required?
Every tool in this world tries to match some features. "Extensibility" is one of the essential features in this list. We can enhance the functionality of the tool with the help of extensibility apart from its core functionality. Plugins in Jenkins do the same work in this context according to user-specific needs.
Jenkins basically defines the set of interfaces that Jenkins community developers implement and extend by some custom code. So, community developers develop plugins according to the required functionality, and we can install that plugin to achieve that functionality in Jenkins. It is the basic fundamental concept of plugins in Jenkins. Now, in the next section, let's see that how to install a plugin in Jenkins.
How to Install a Plugin in Jenkins?
In the previous section, we understood the concept of a plugin and its requirement. In this section, we will see how to install a plugin in Jenkins to use the specific functionality in Jenkins according to our requirements. Please follow the below steps to install a plugin in Jenkins:
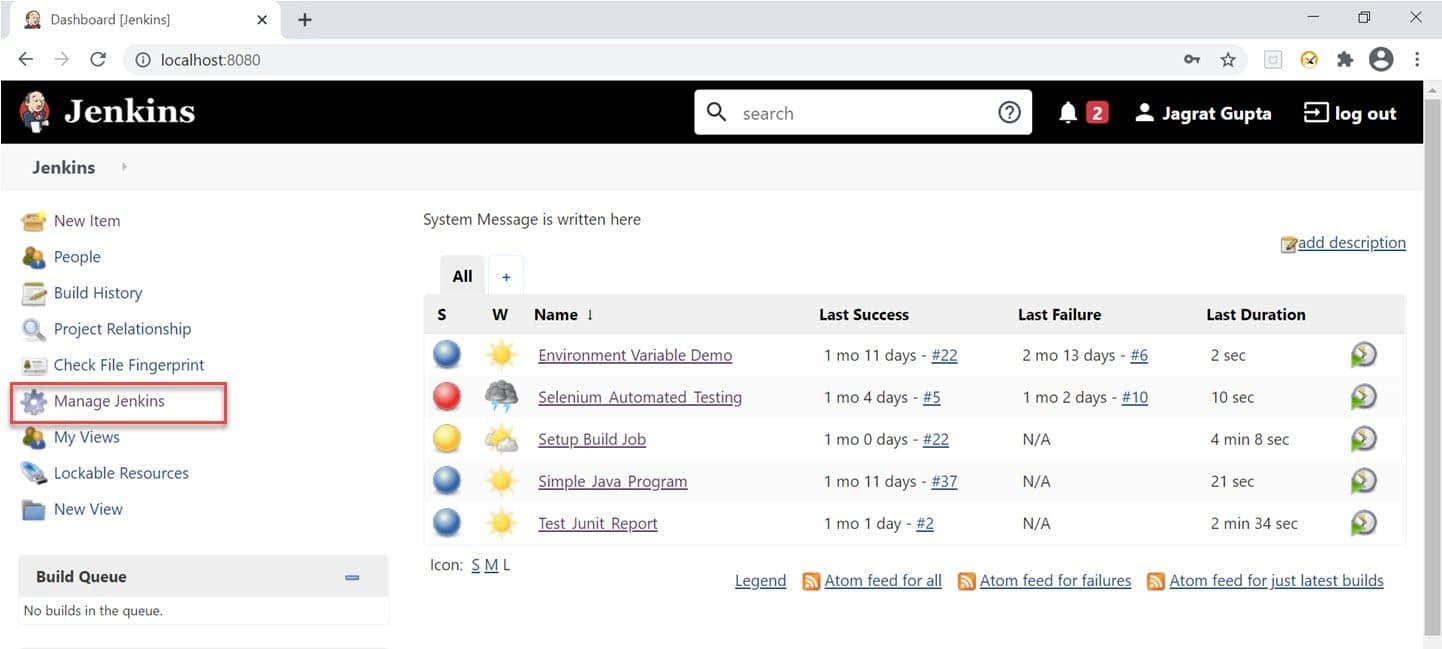
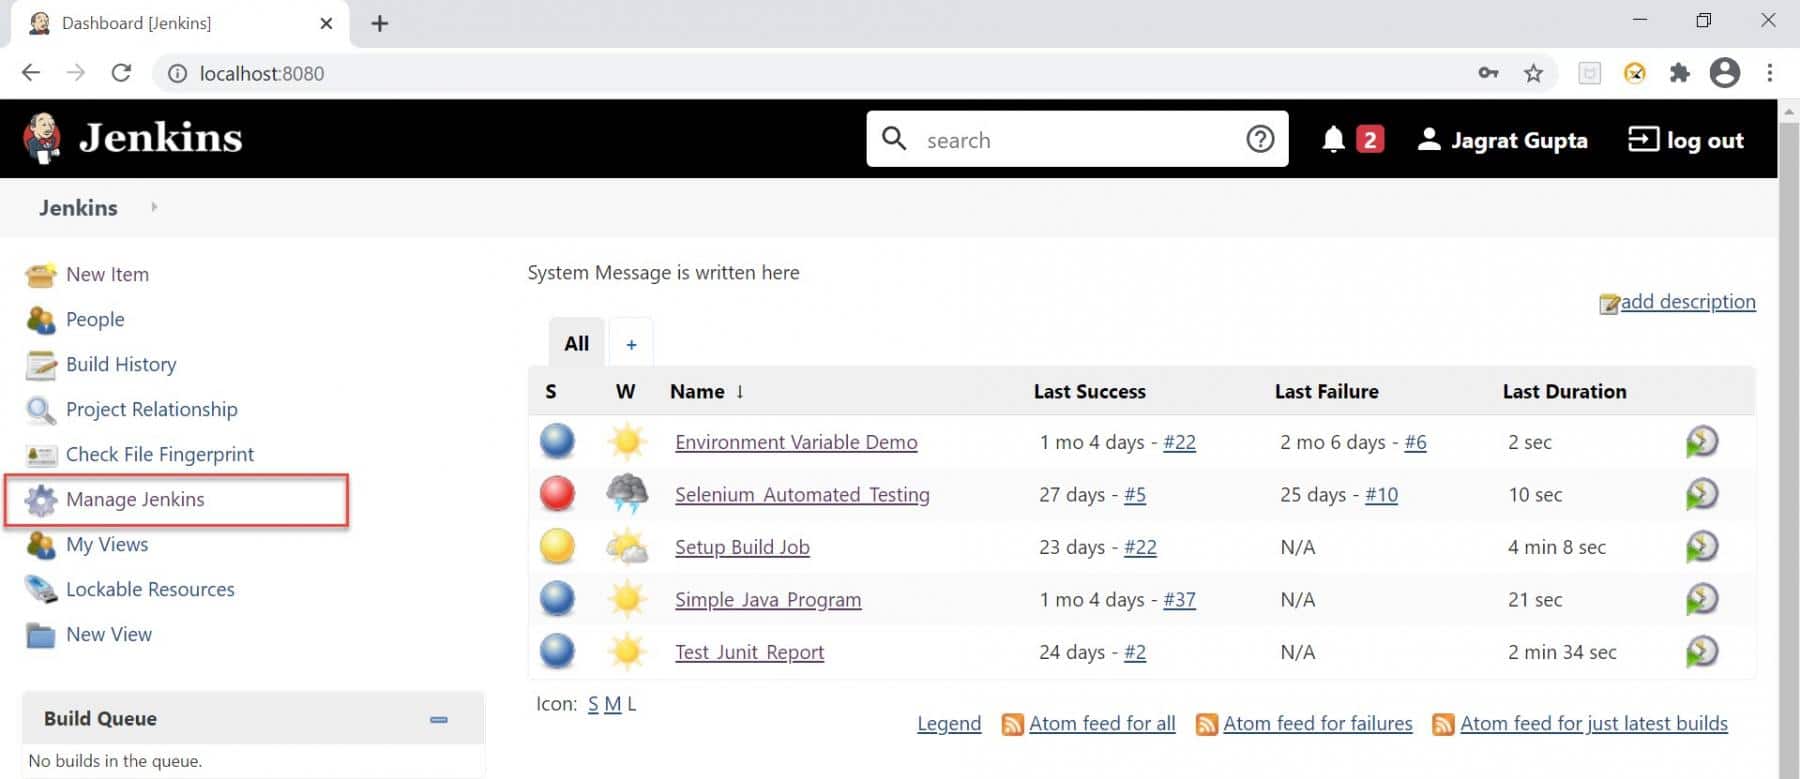
1st Step: Go to Jenkins dashboard and click on the "Manage Jenkins" link highlighted in the below image.
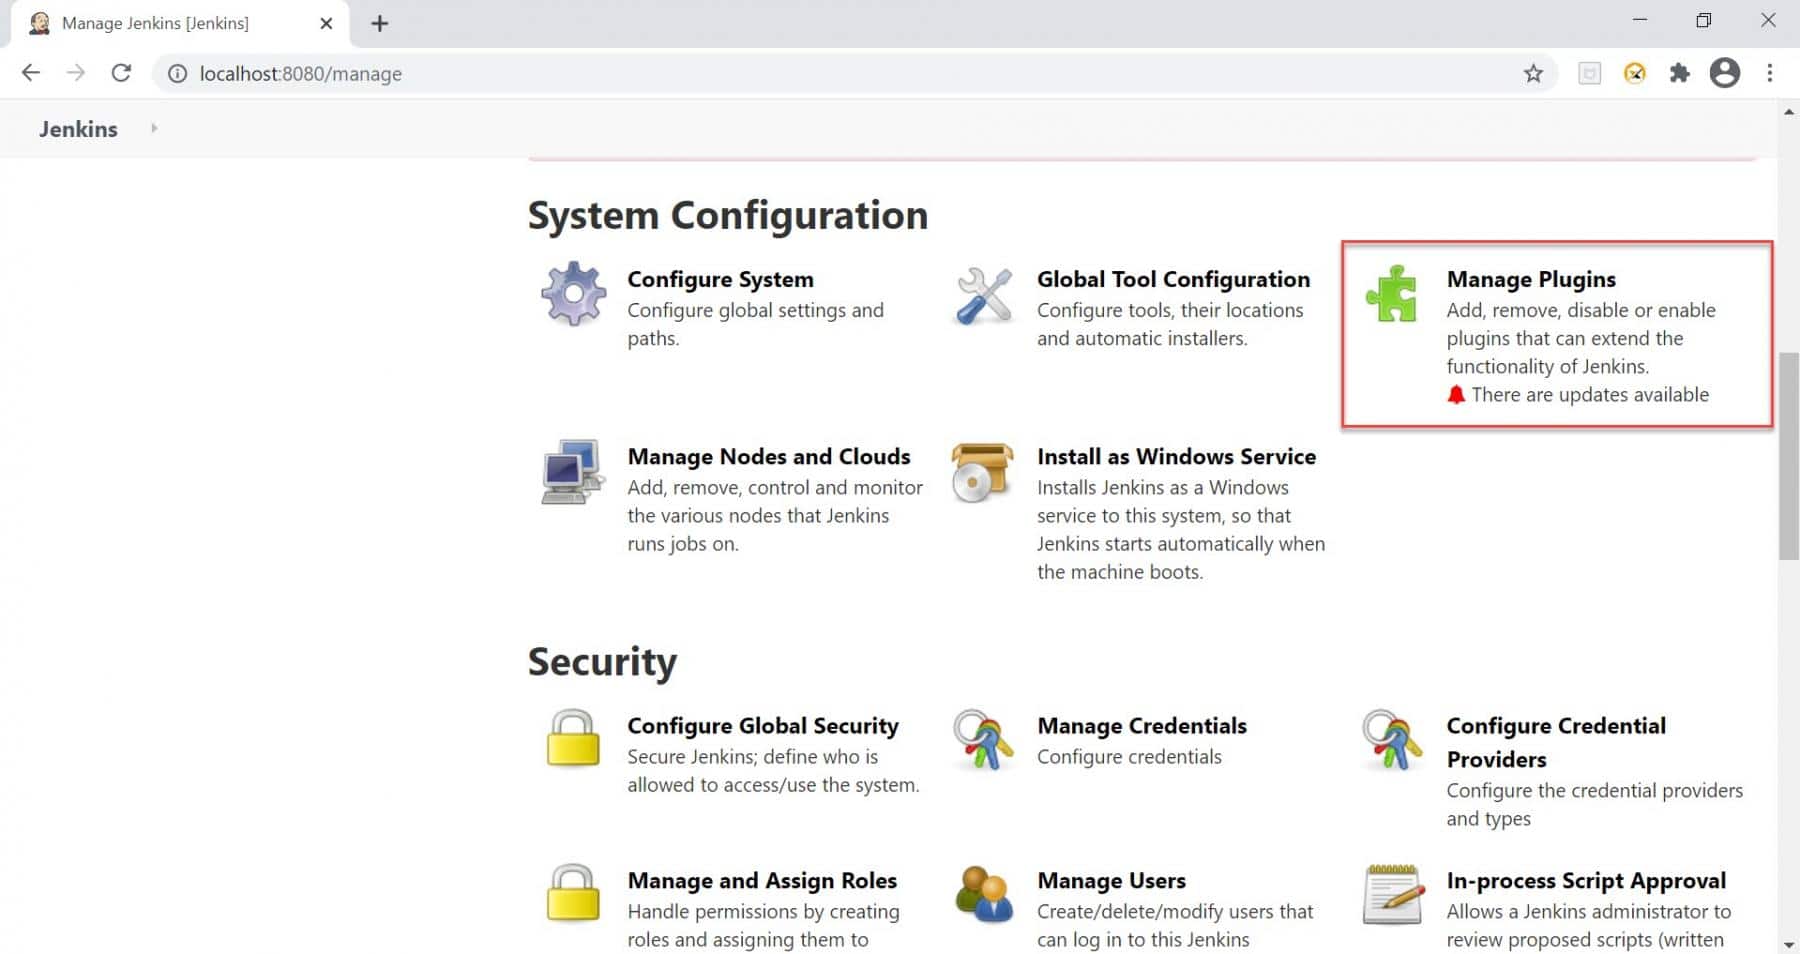
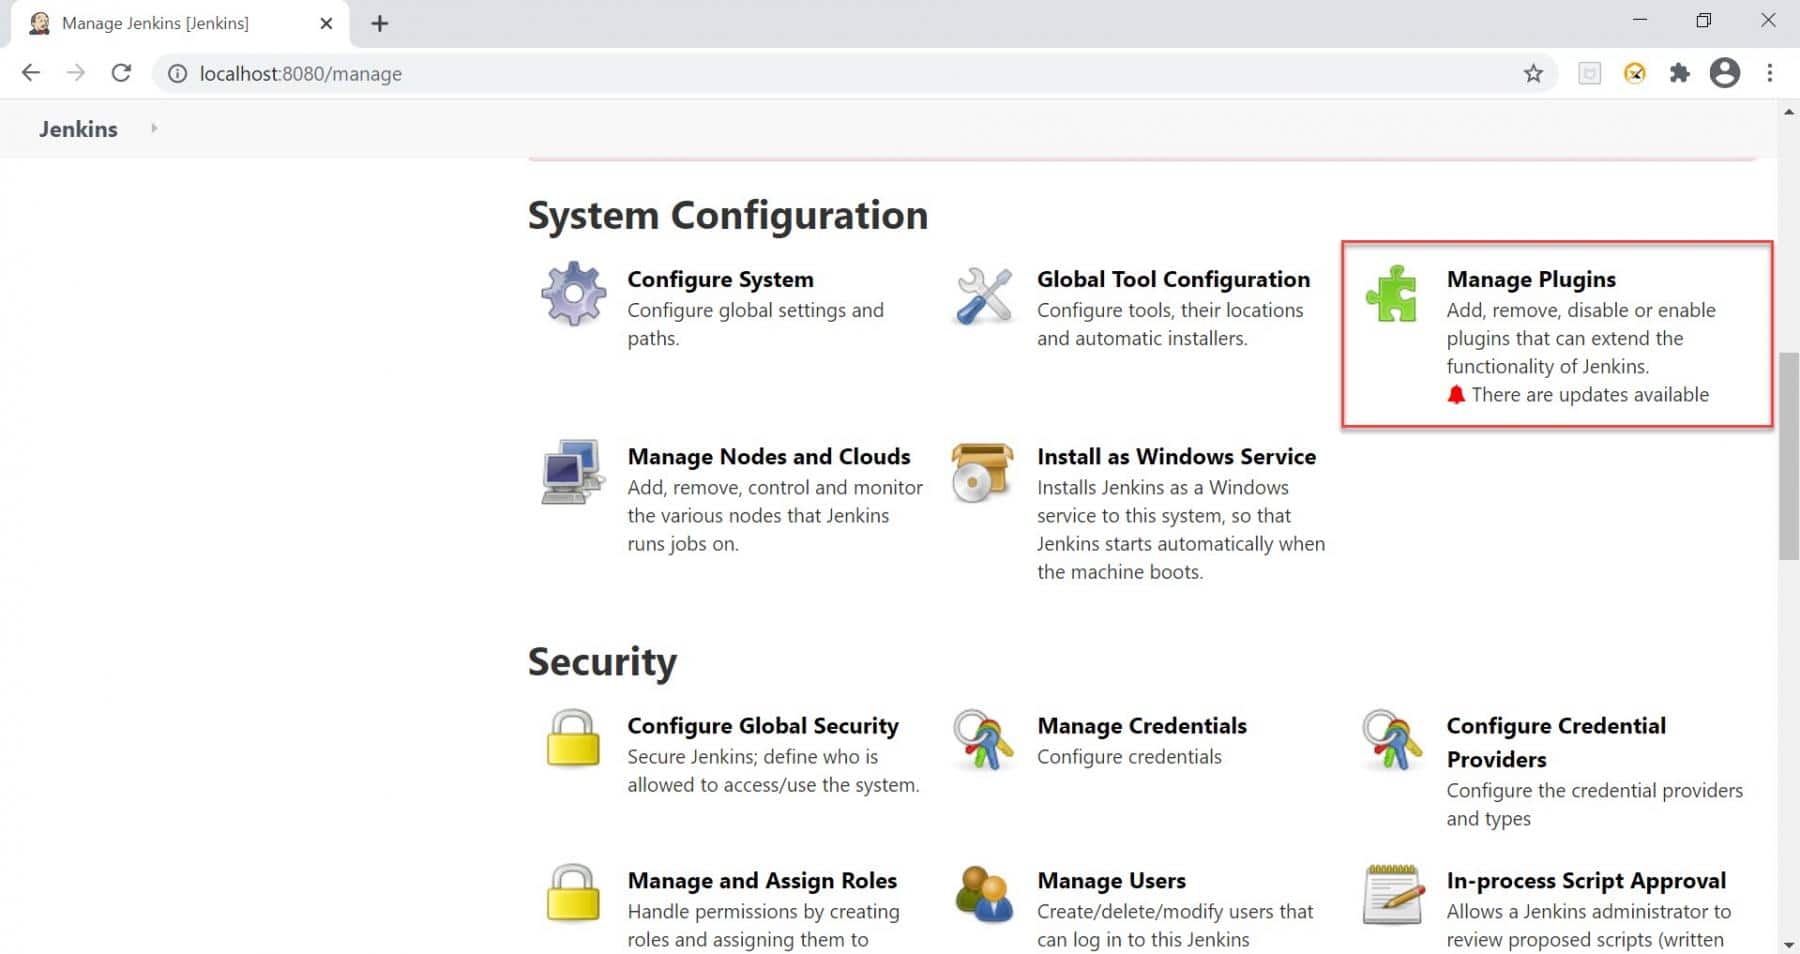
2nd Step: As soon as we click on the Manage Jenkins link, we will redirect towards the manage Jenkins page, and here we need to click on "Manage Plugins" under the System Configuration section.
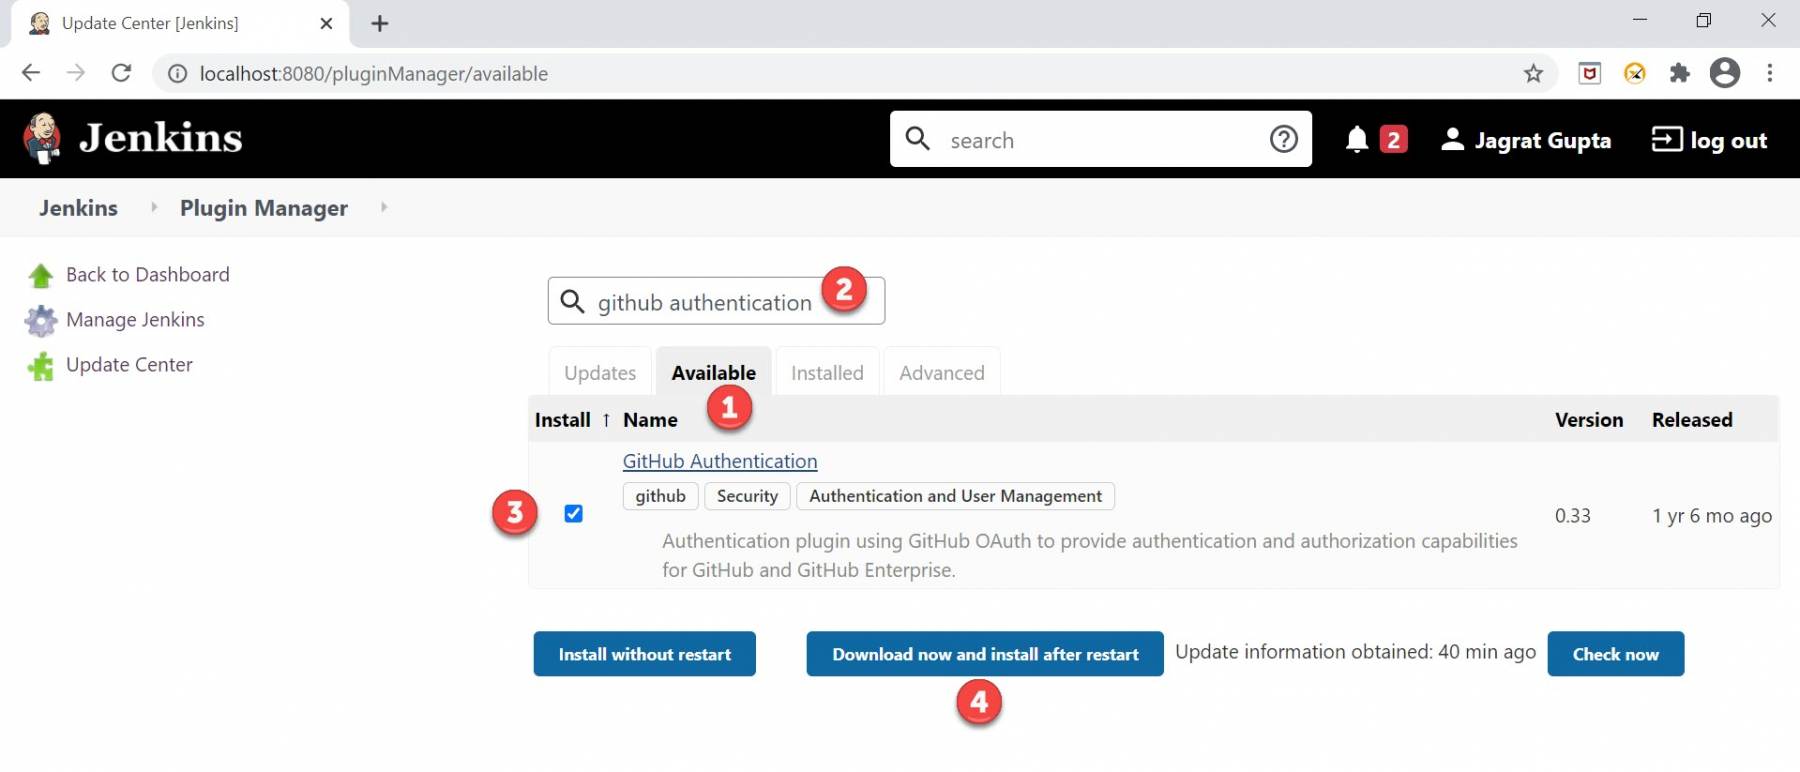
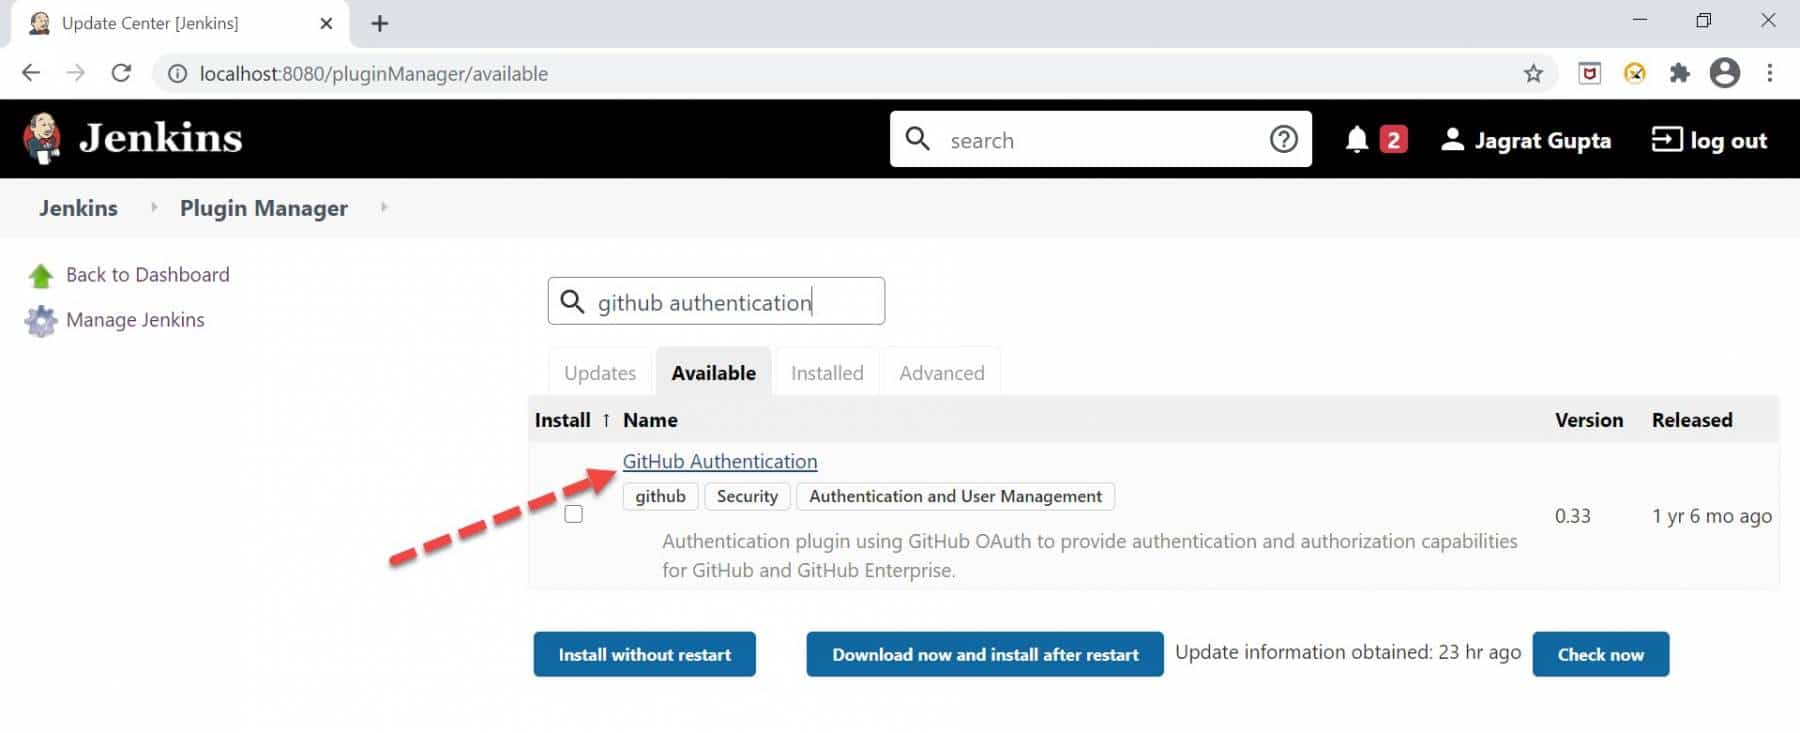
3rd Step: Now, we are on the page where plugins are available after clicking on the manage plugins option. Let us suppose we want to install the "GitHub Authentication" plugin in Jenkins. To do it, please follow the below steps:
- Click on the "Available" tab.
- Search the plugin you want to install in the search box as we searched "GitHub Authentication."
- Check the checkbox against the required plugin.
- After that, click on the "Download now and install after restart" button. We can also click on the "Install without restart" button, but we always recommend choosing to install after the restart to install the plugin effectively.
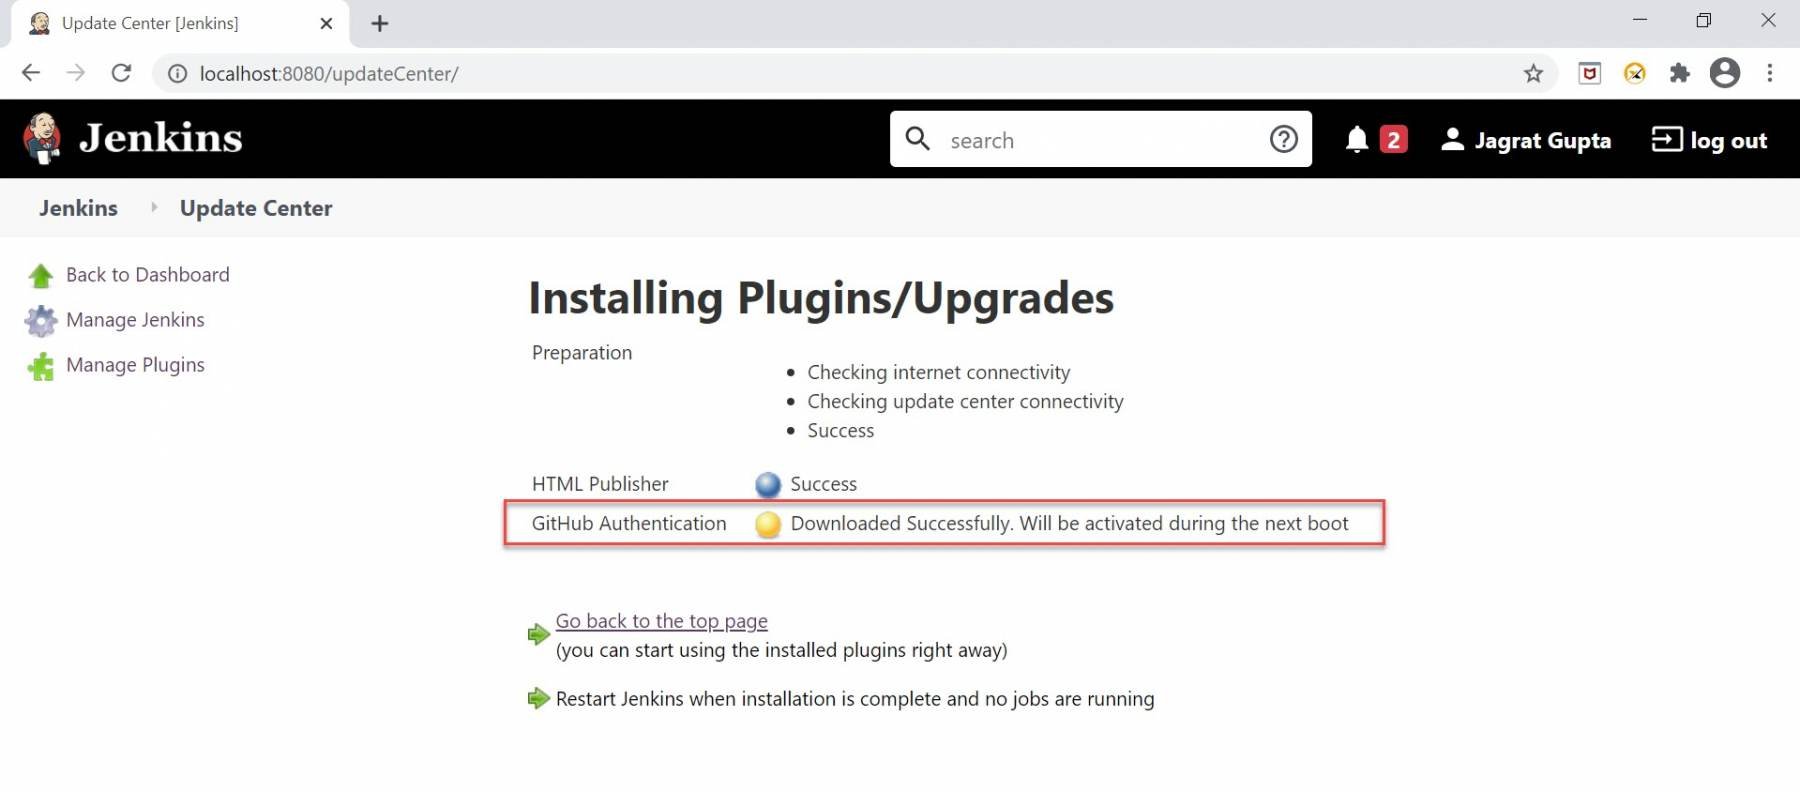
Step 4: As soon as the above steps will complete, we will move towards the Plugin installation progress page, and after successful installation of the plugin, we can see a successful message. Any dependent plugin will automatically start to install along with the required plugin during installation.
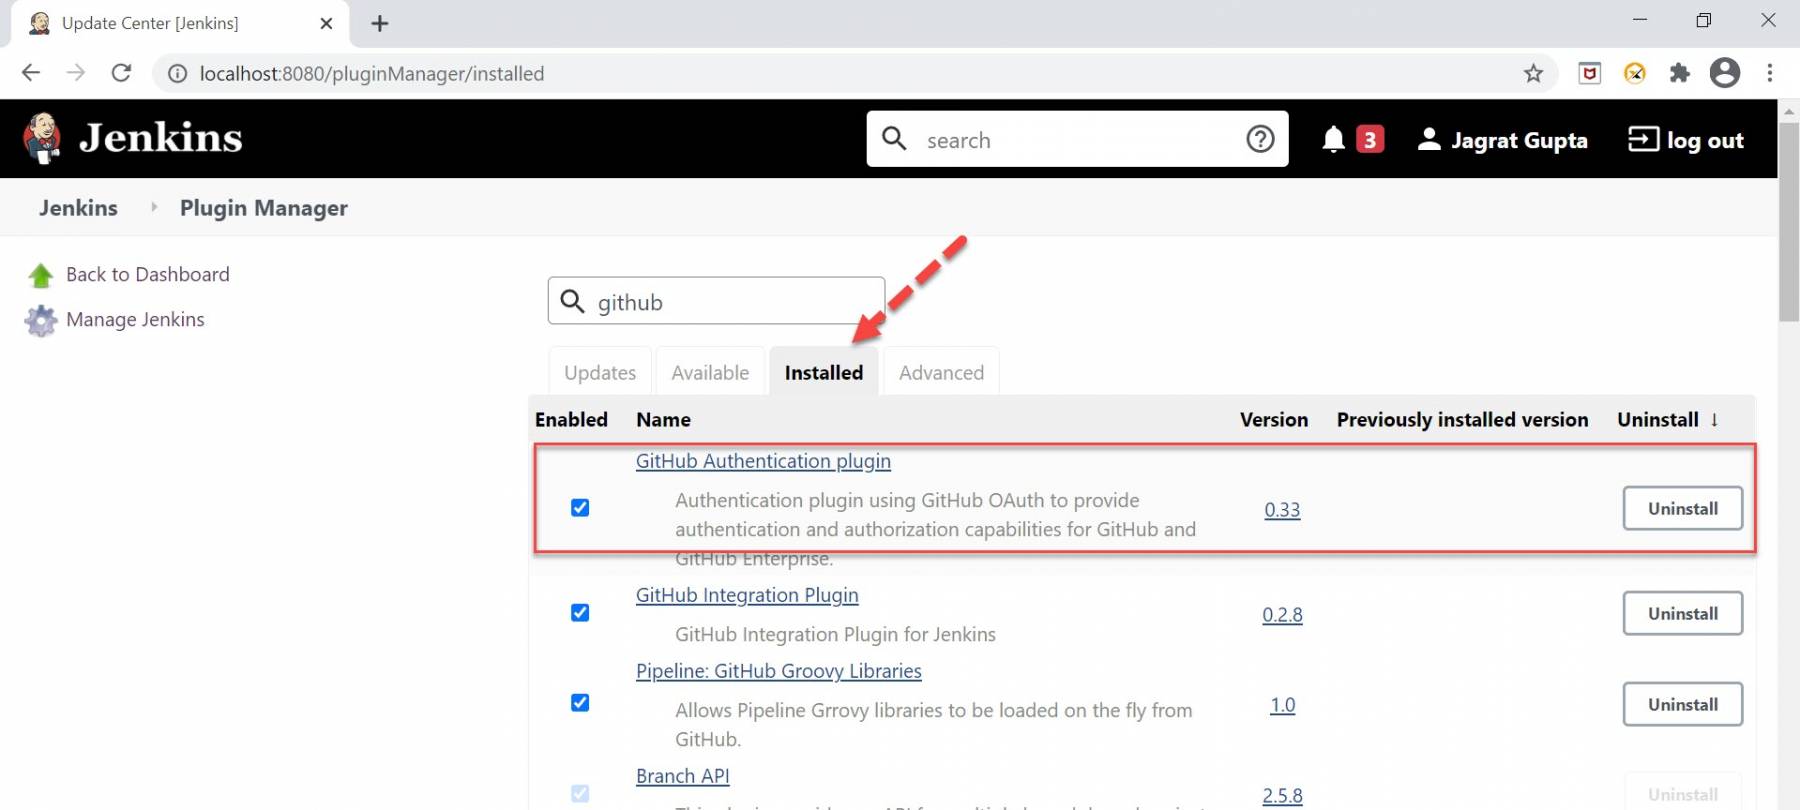
Step 5: Now restart Jenkins, and after a successful restart, we can verify that if the plugin installation were successful, it would show under the "Installed" tab.
So, in this way, we can install any plugin in Jenkins. Now in the next subsection, let's see how to install any plugin manually in Jenkins.
How to install the plugin manually in Jenkins?
We have already seen in the previous section how to install a plugin in Jenkins, but sometimes, we need to install some specific version of the plugin in Jenkins. In this case, we can not install the plugin through the steps mentioned in the previous section. Instead, we need to install the plugin manually in this case. So, let's understand the manual plugin installation process with the help of the below steps:
Step 1: Let us suppose we want to install the "HTML Publisher" plugin manually. So, firstly we need to go to the Plugins page of Jenkins and search for the plugin that we want to install.
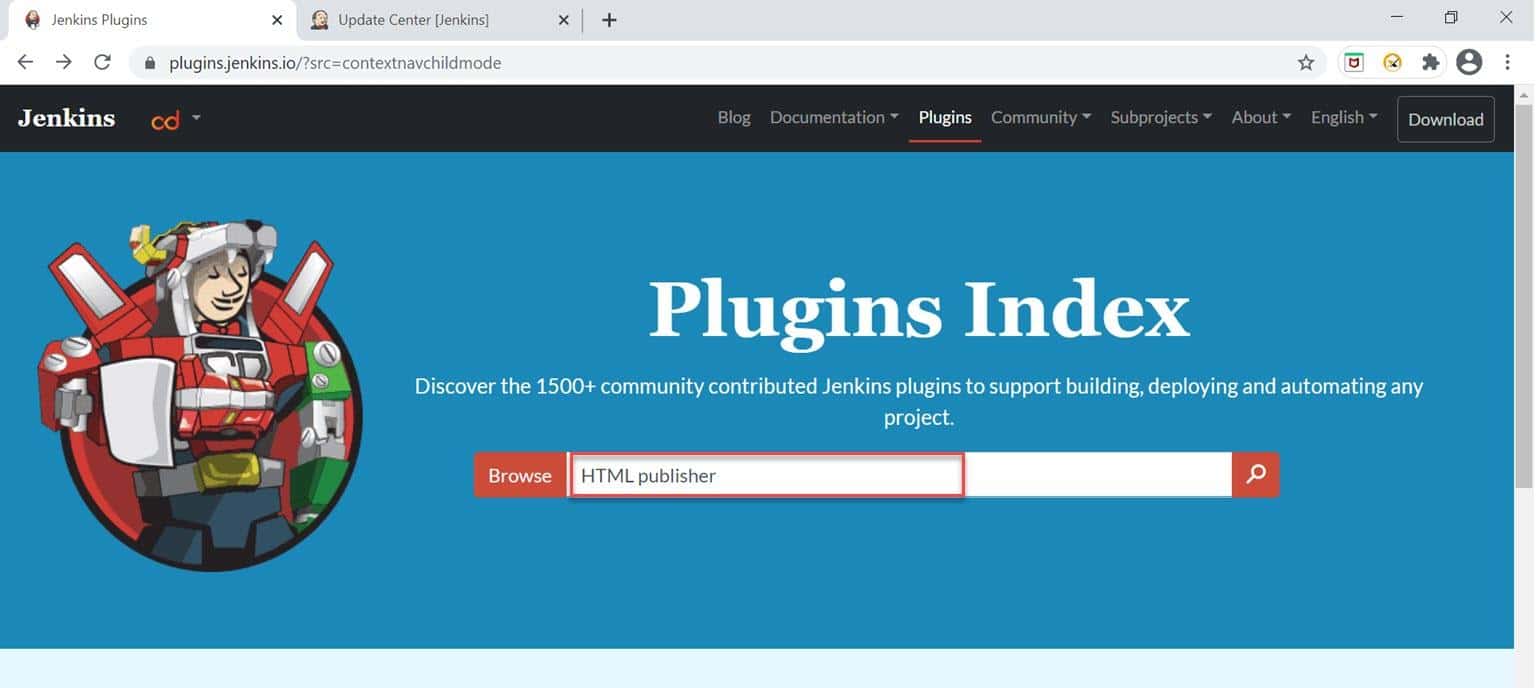
Step 2: As soon as we click, we will see the relevant plugin. Now click on the respected plugin.
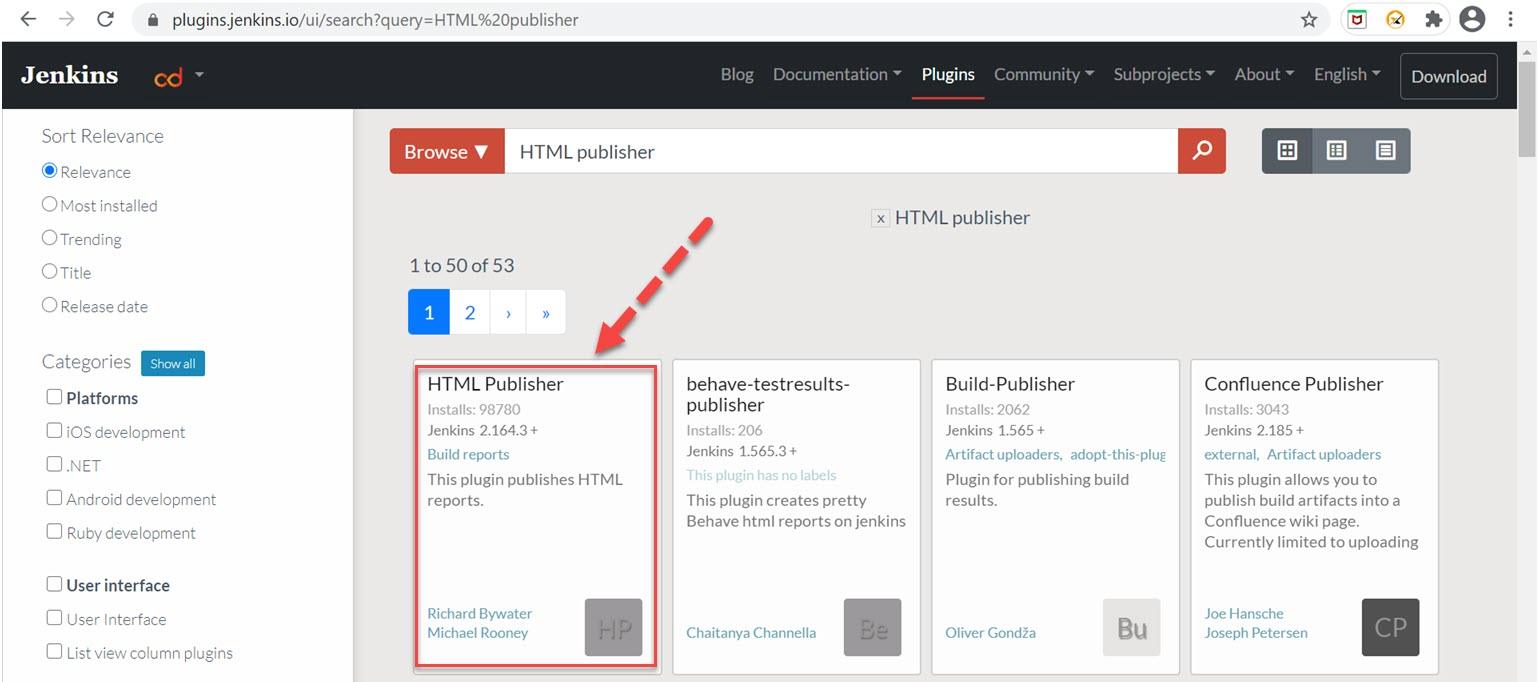
Step 3: After clicking on the respective plugin, we will move towards the plugin page. Here, as soon as we click on the "release" tab, we can see the plugin versions.
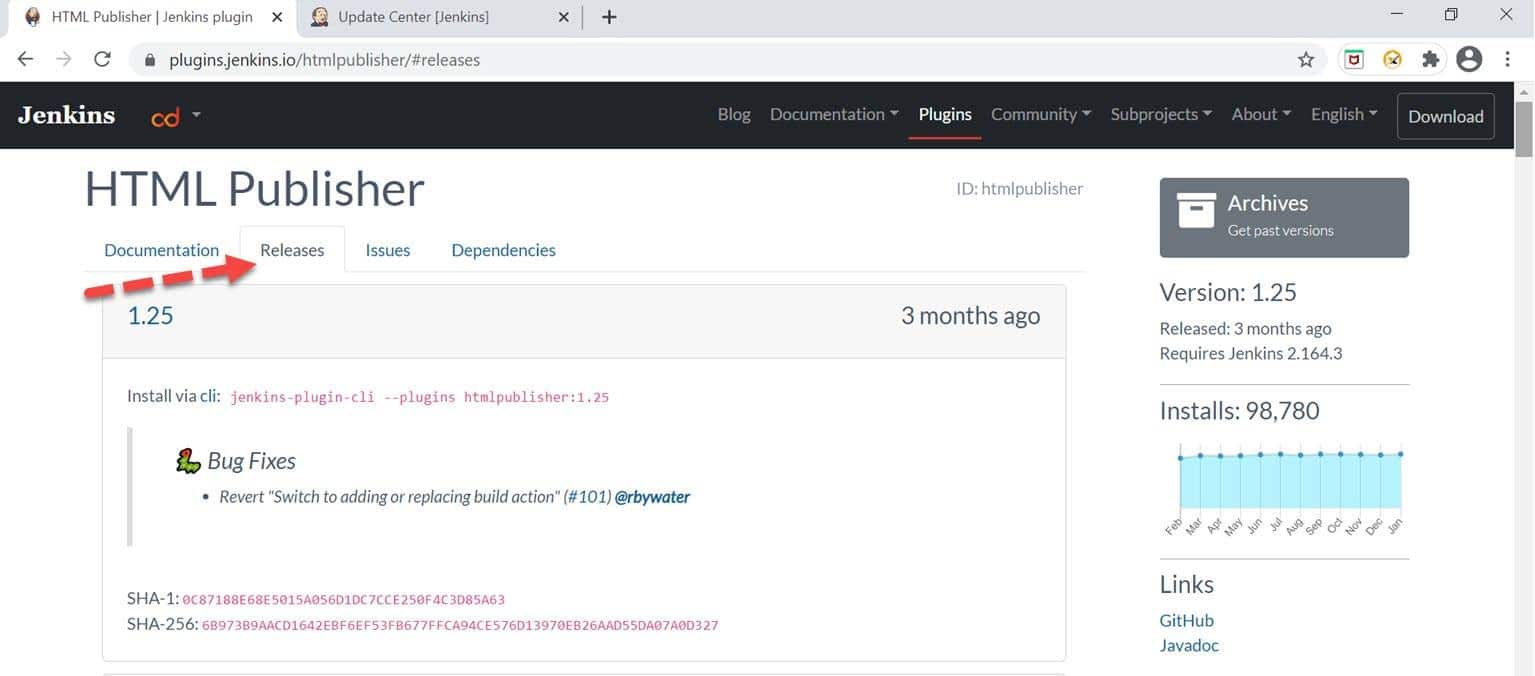
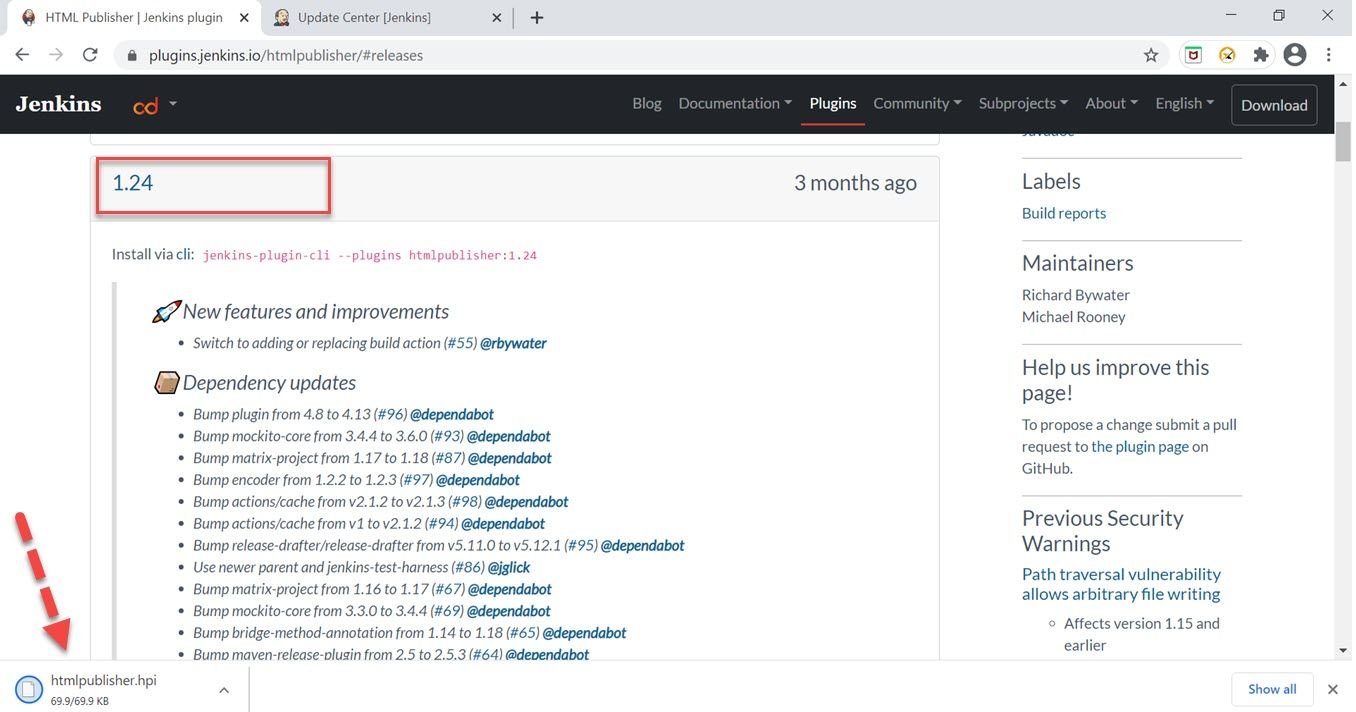
Step 4: Here, we can see that the latest version is 1.25 but let us suppose we want to install version 1.24, so we need to scroll down the page and go to that version and click on that link. After clicking, the hpi file will download.
Step 5: Now, in Jenkins, go to plugin manager and click on the "Advanced" tab.
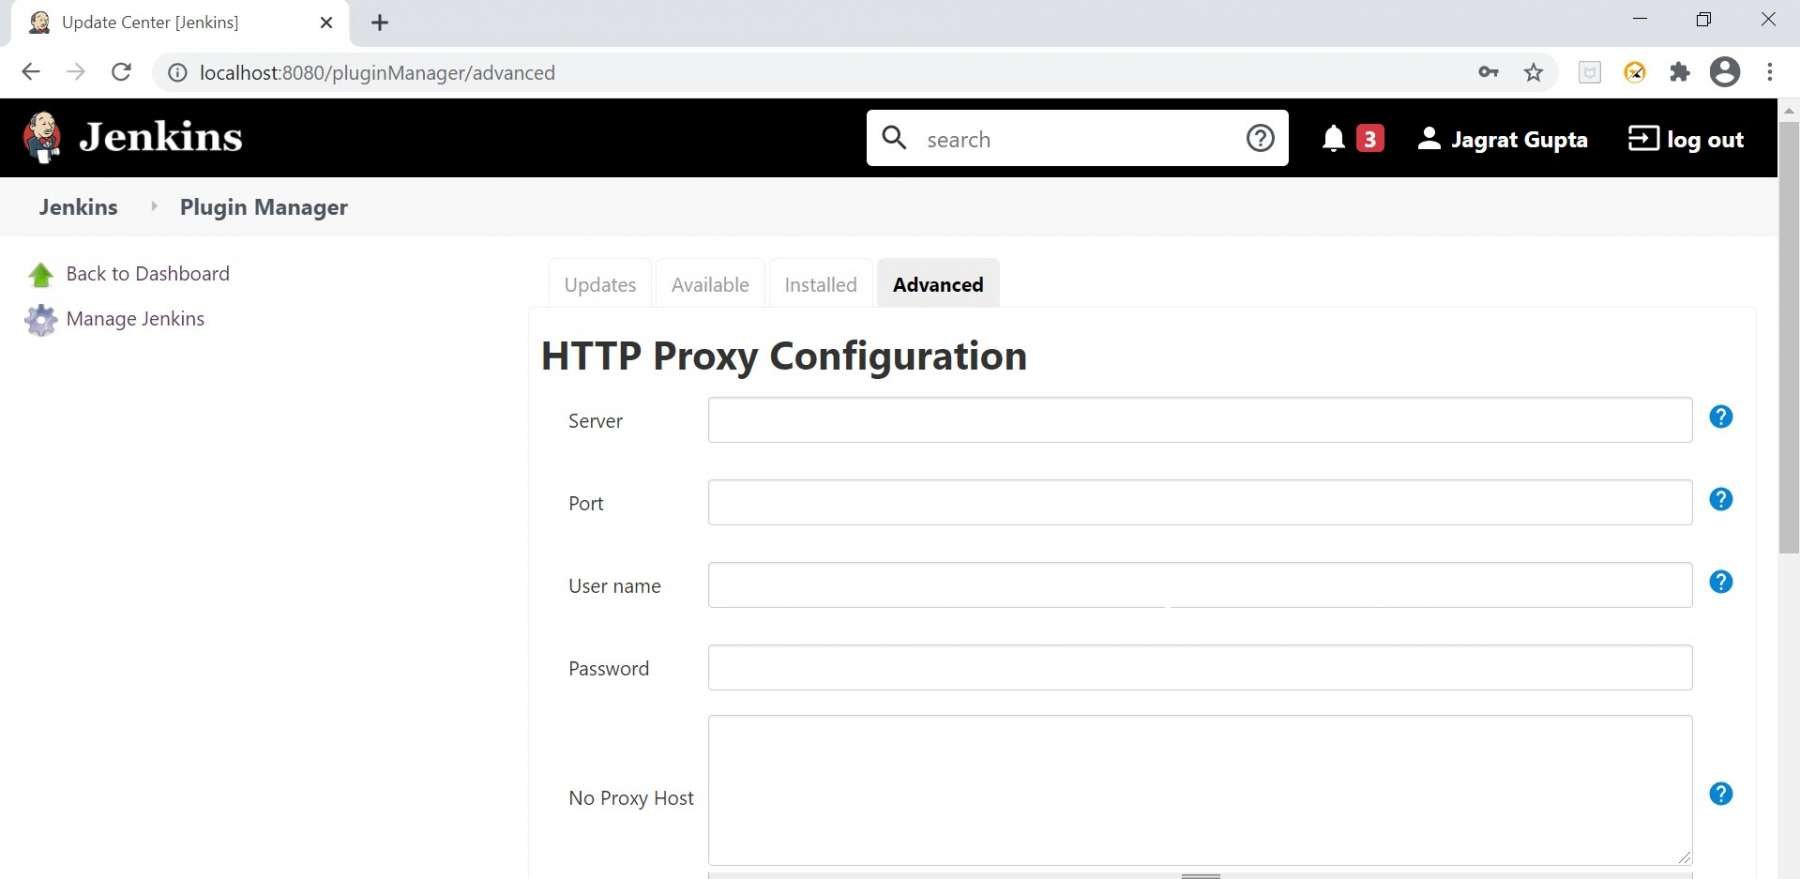
Step 6: Now, scroll down the page, and under the upload plugin section, we need to choose the file that we downloaded in the previous step. After that, click on the upload button.
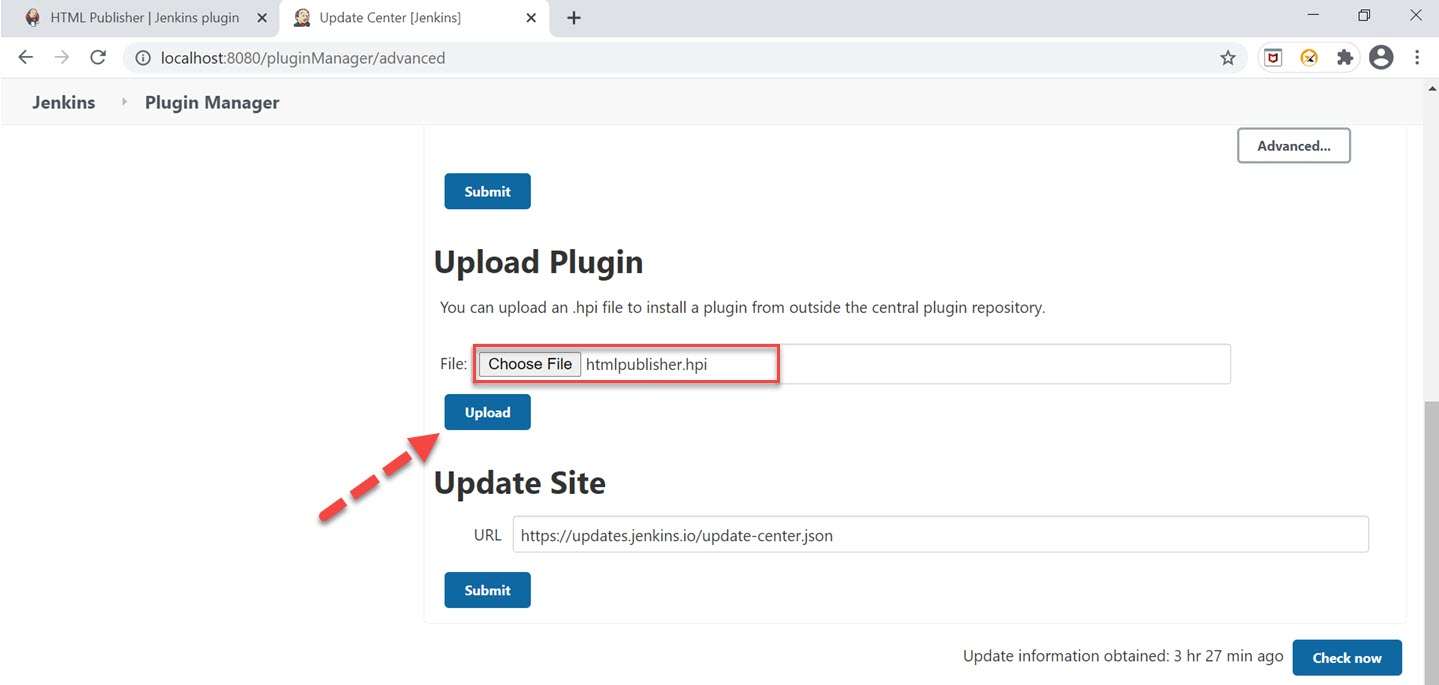
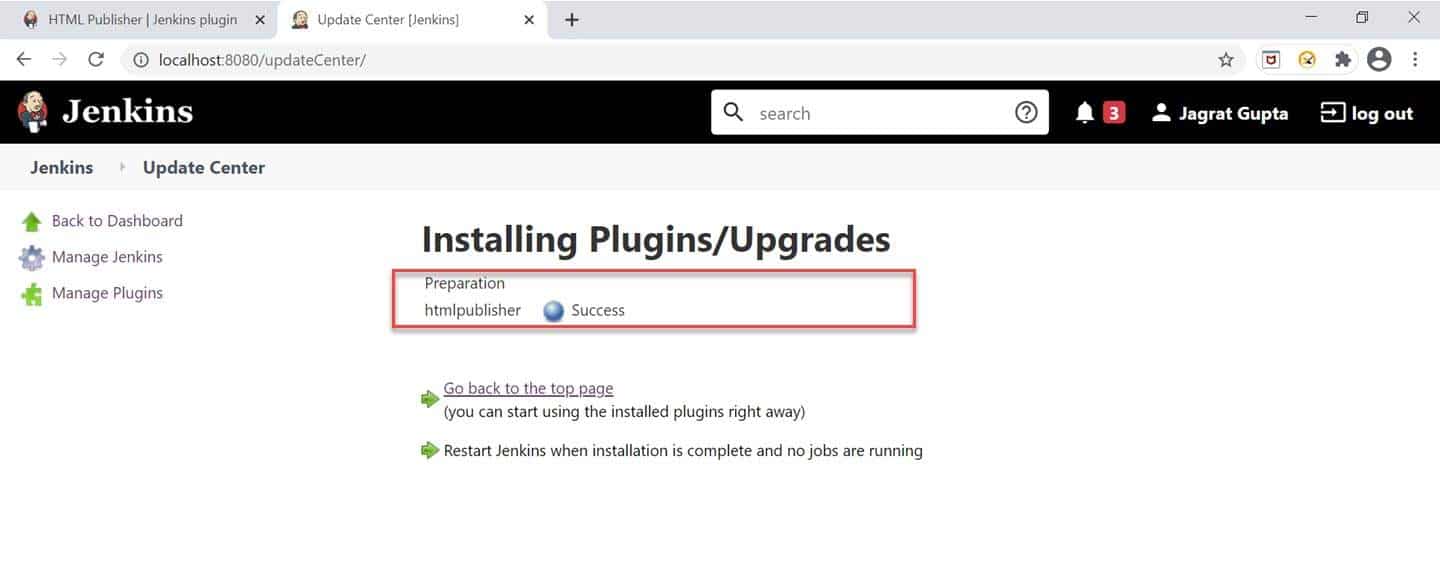
Step 7: As soon as we click on the upload button, we will move towards the Plugin installation progress page, and here we can see that the plugin installation started. We will see a success message after installation.
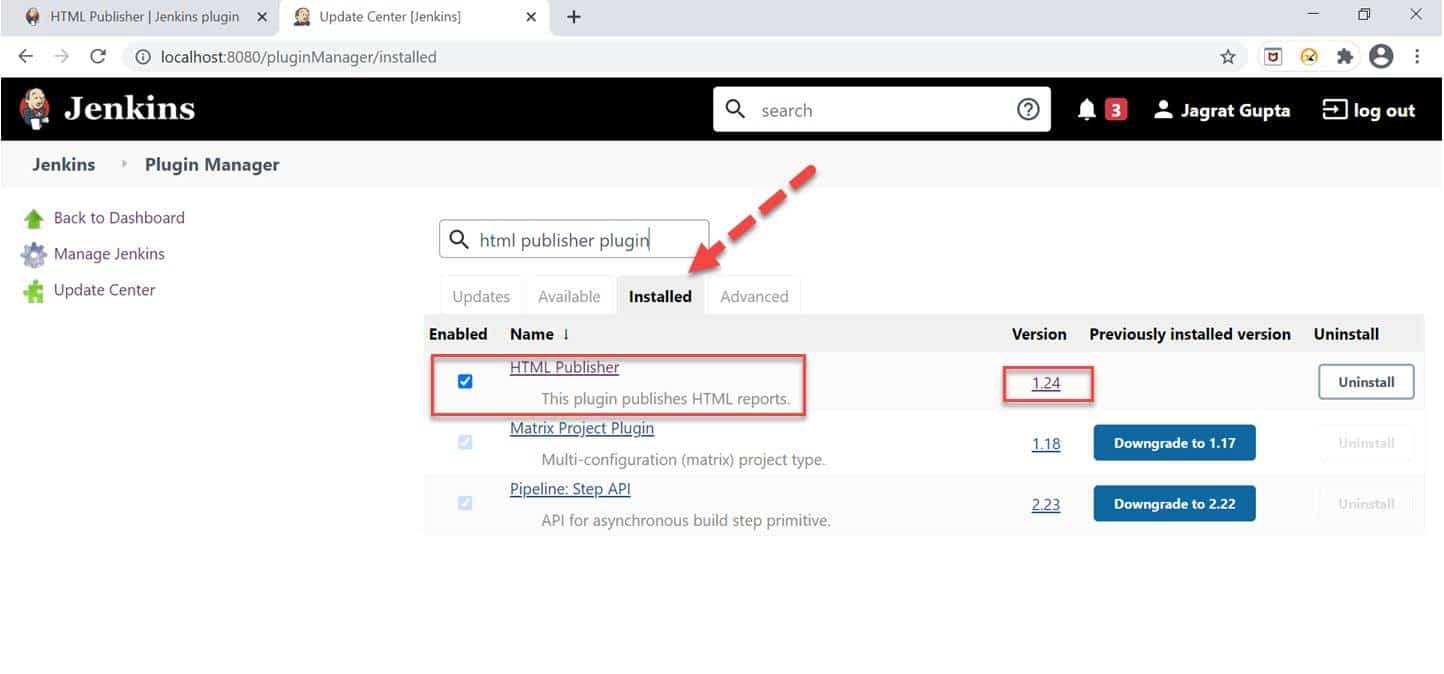
Step 8: Now, for validation, go to the plugin manager, and under the "installed" tab, we can see the HTML publisher plugin with the version that we installed.
So, in this way, we can install the plugin manually in Jenkins. In the next sub-section, we will see how to upgrade any plugin in Jenkins.
How to upgrade plugin in Jenkins?
We saw in the previous subsection that how to install a plugin manually in Jenkins, and at that moment, we installed the "HTML publisher plugin" with version 1.24. Still, as we saw previously that its latest version is 1.25, so the question is like how can we move to the latest version of any plugin. The answer is that we need to upgrade the plugin. So please follow the below steps to upgrade the plugin:
1st Step: Go to Jenkins dashboard and click on "Manage Jenkins".
2nd Step: As soon as we click on the manage Jenkins link, we will redirect towards the manage Jenkins page, and here we need to click on "Manage Plugins" under the System Configuration section.
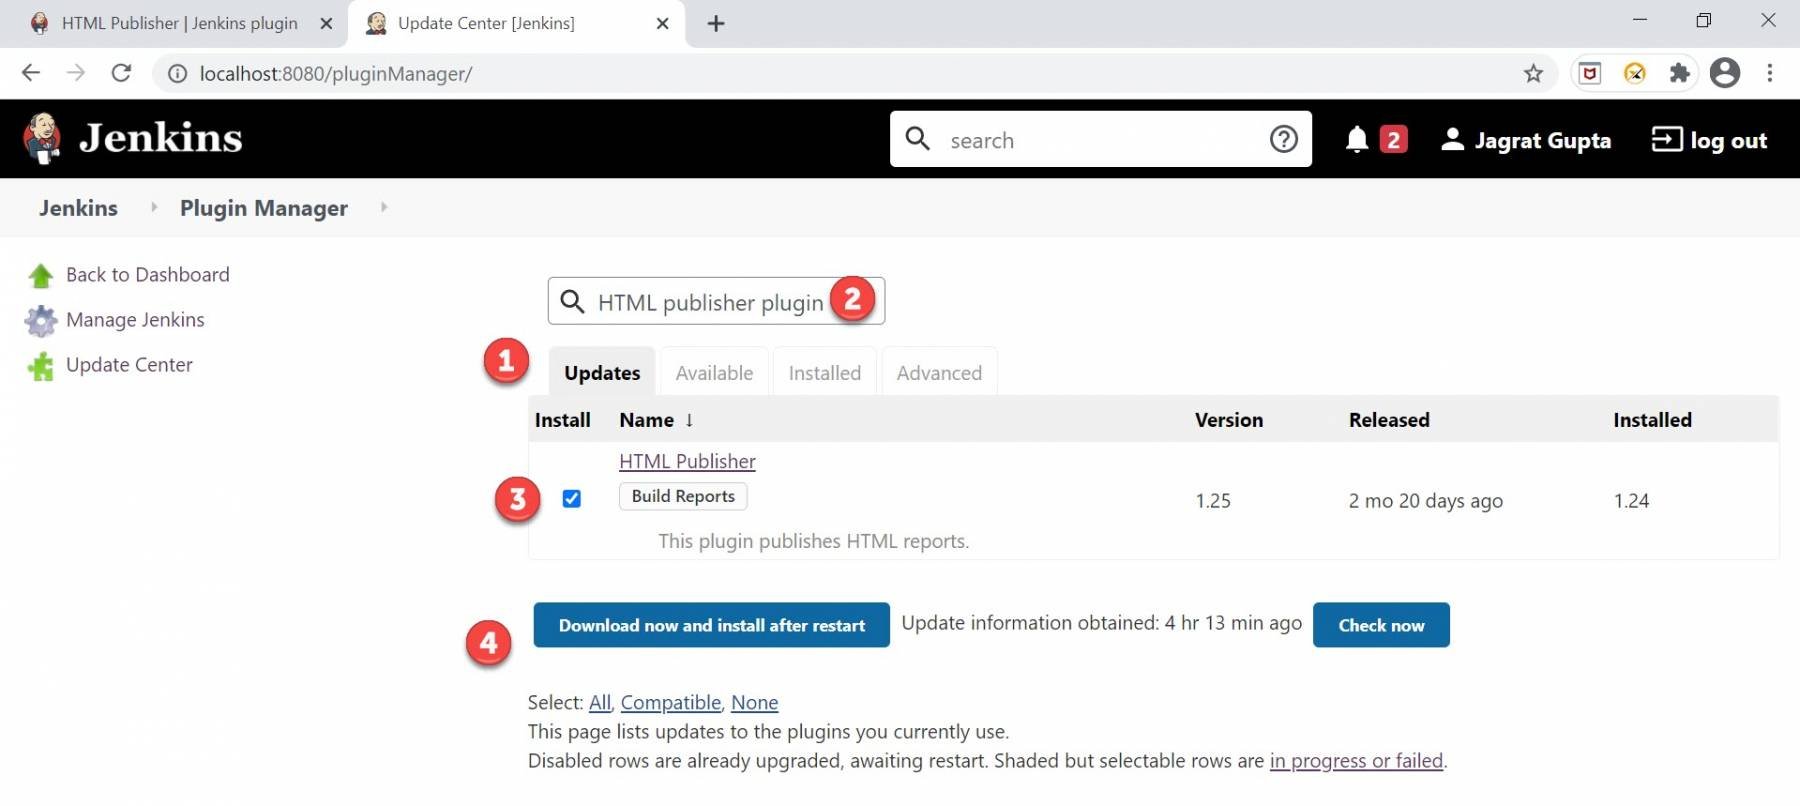
3rd Step: Now, we will move towards the plugin manager page. Please do the following steps to upgrade the plugin:
- Click on the "Updates" tab.
- Search the plugin that you want to upgrade in the search box as we searched "HTML publisher plugin." Here we can easily see the latest version as well as the currently installed version of the plugin.
- Check the checkbox against the required plugin.
- After that, click on the "Download now and install after restart" button.
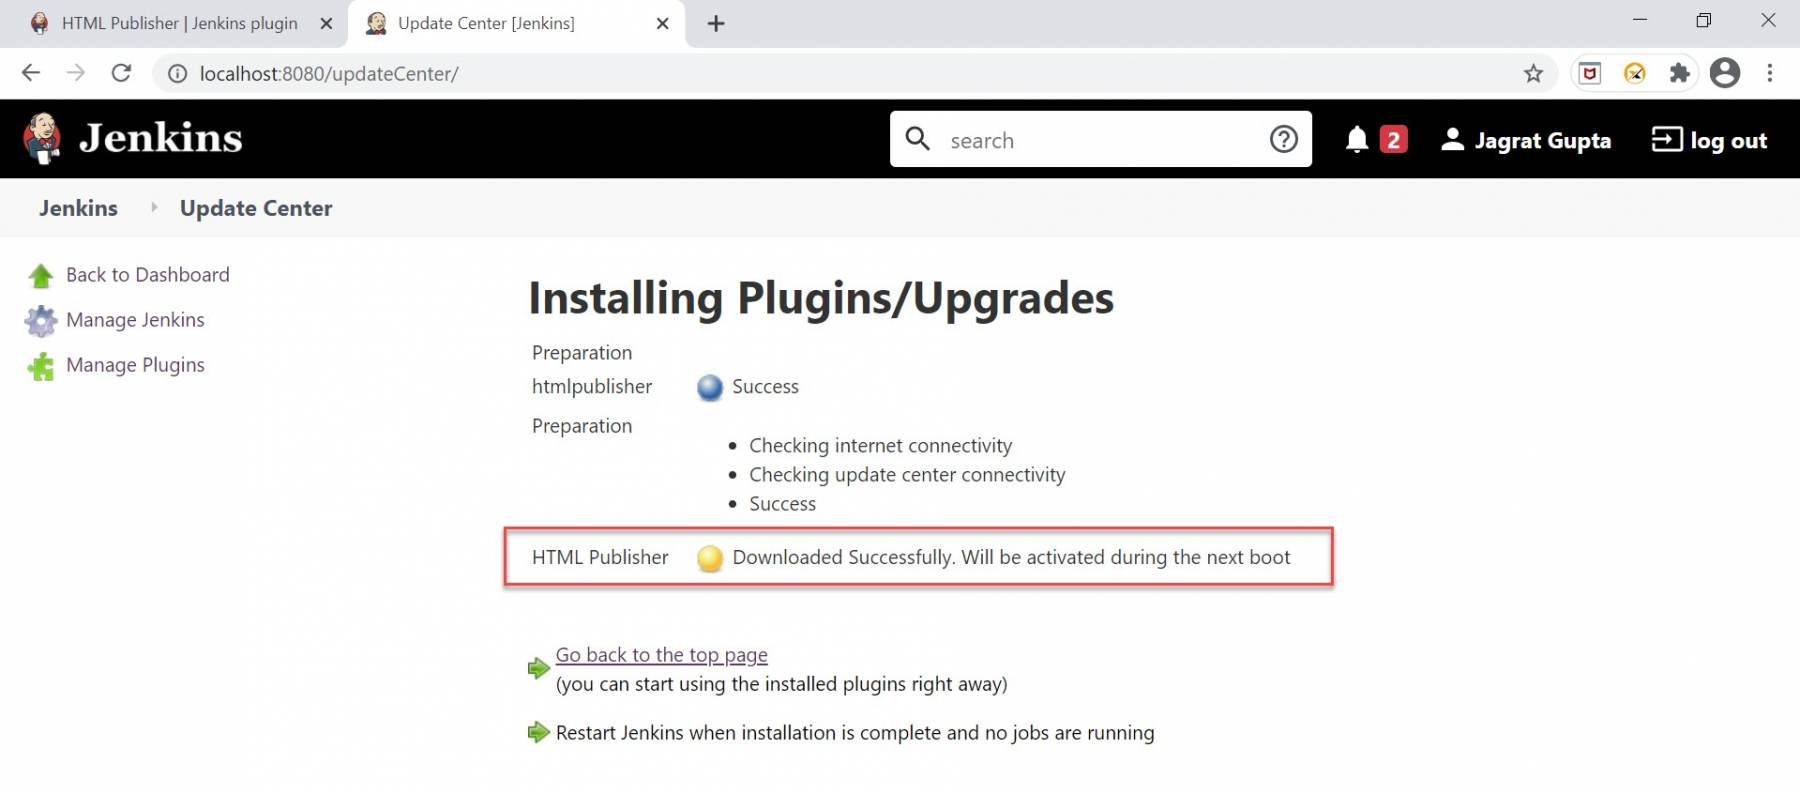
Step 4: As soon as we completed the above steps, the plugin installation progress page will come, and hereafter successful installation, we can see the successful message.
Step 5: Now we need to restart Jenkins and, after restarting, go to again plugin manager page and, under the installed tab, validate the version of the latest upgraded plugin.
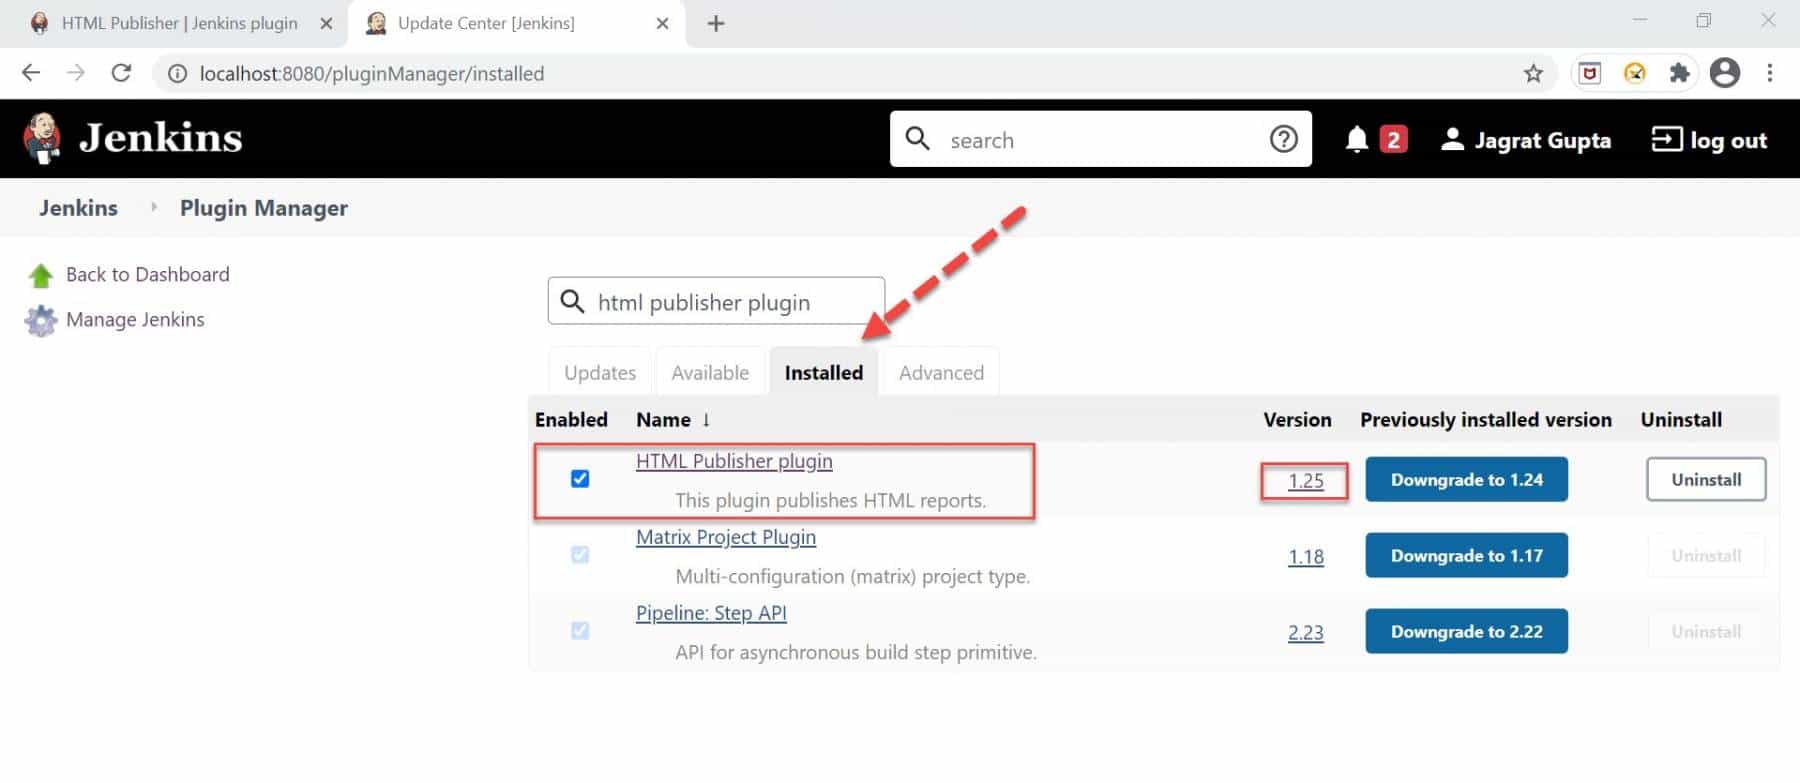
So, in this way, we can upgrade the plugin in Jenkins. In the next section, let's see how to uninstall any plugin in Jenkins.
How to uninstall Plugin in Jenkins?
In the previous section, we saw how to install any plugin in Jenkins and install any plugin in Jenkins manually. So, in this section, let's understand how to uninstall any plugin in Jenkins with the help of the below steps:
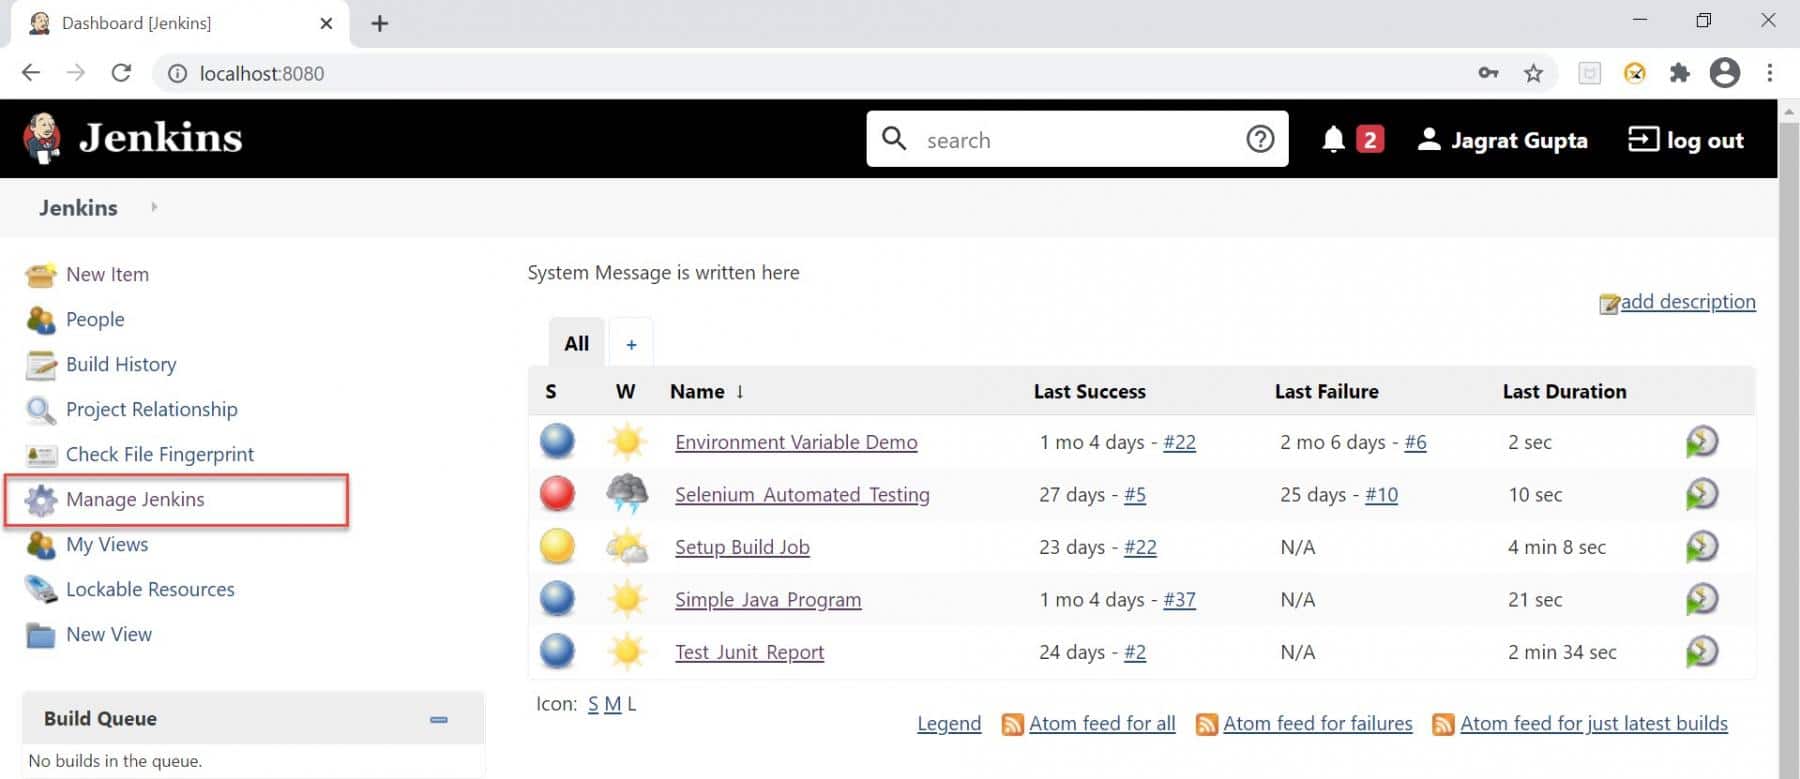
1st Step: Go to Jenkins dashboard after successful login and click on the "Manage Jenkins" option highlighted in the below image.
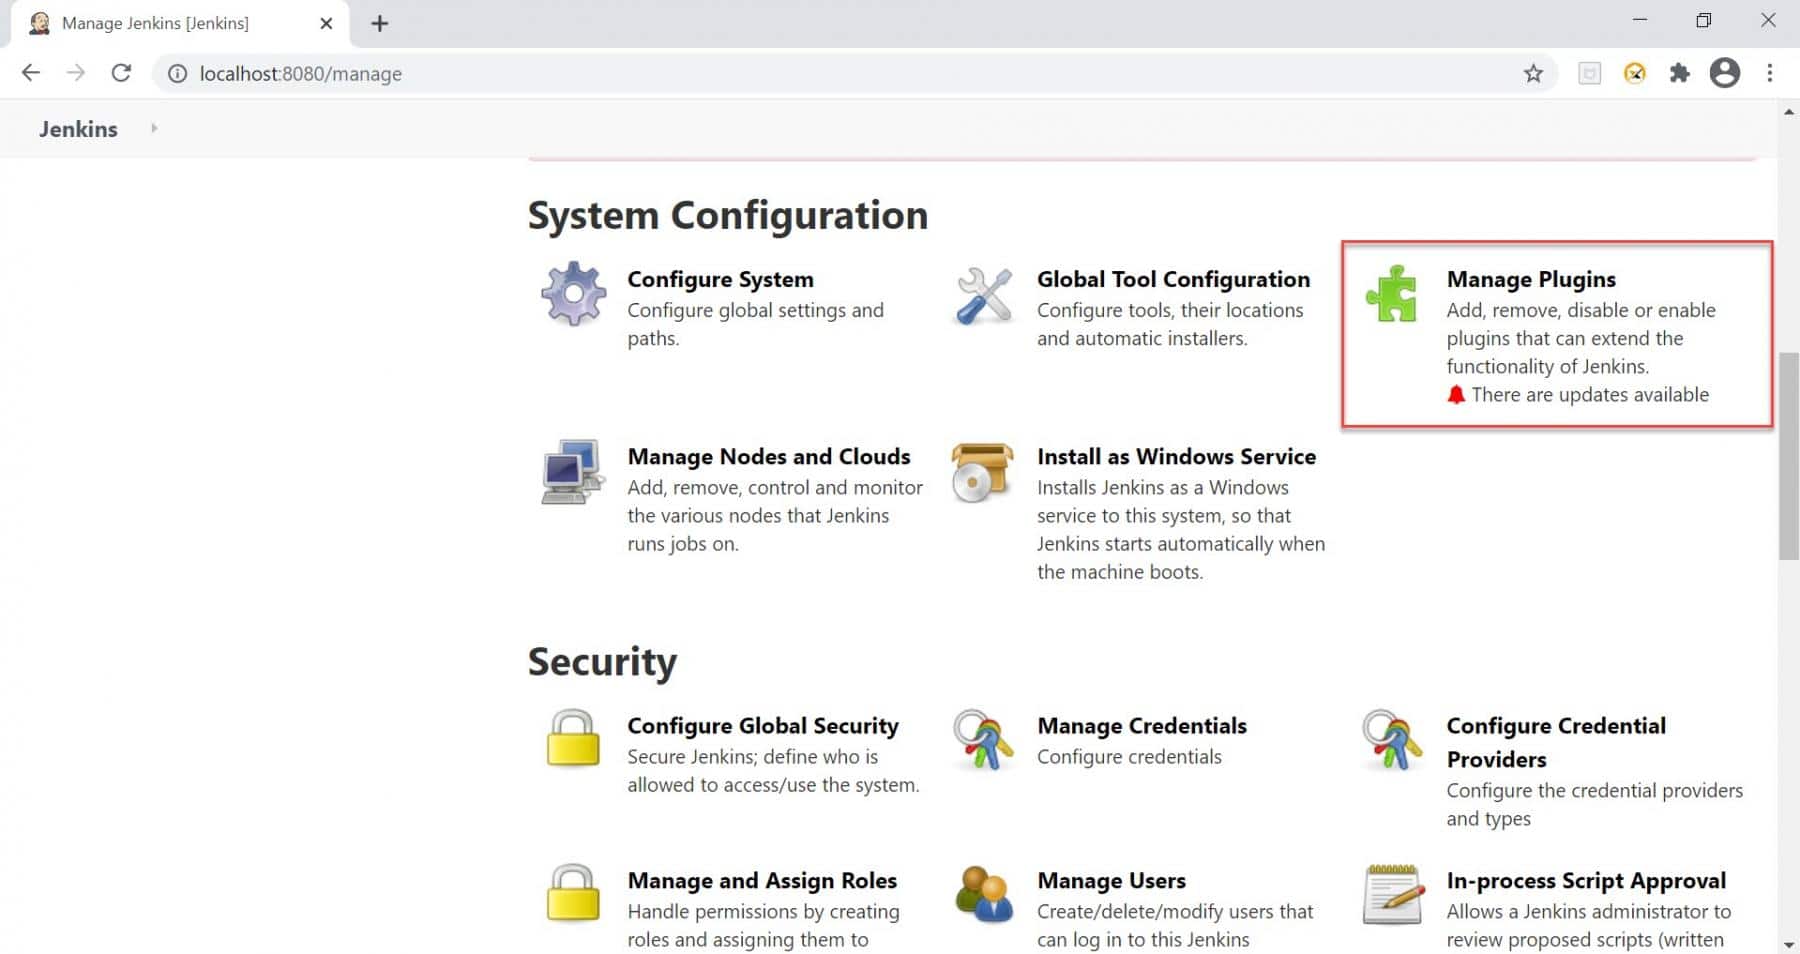
2nd Step: As soon as we click on the manage Jenkins link, we will redirect towards the manage Jenkins page, and here we need to click on "Manage Plugins" under the System Configuration section.
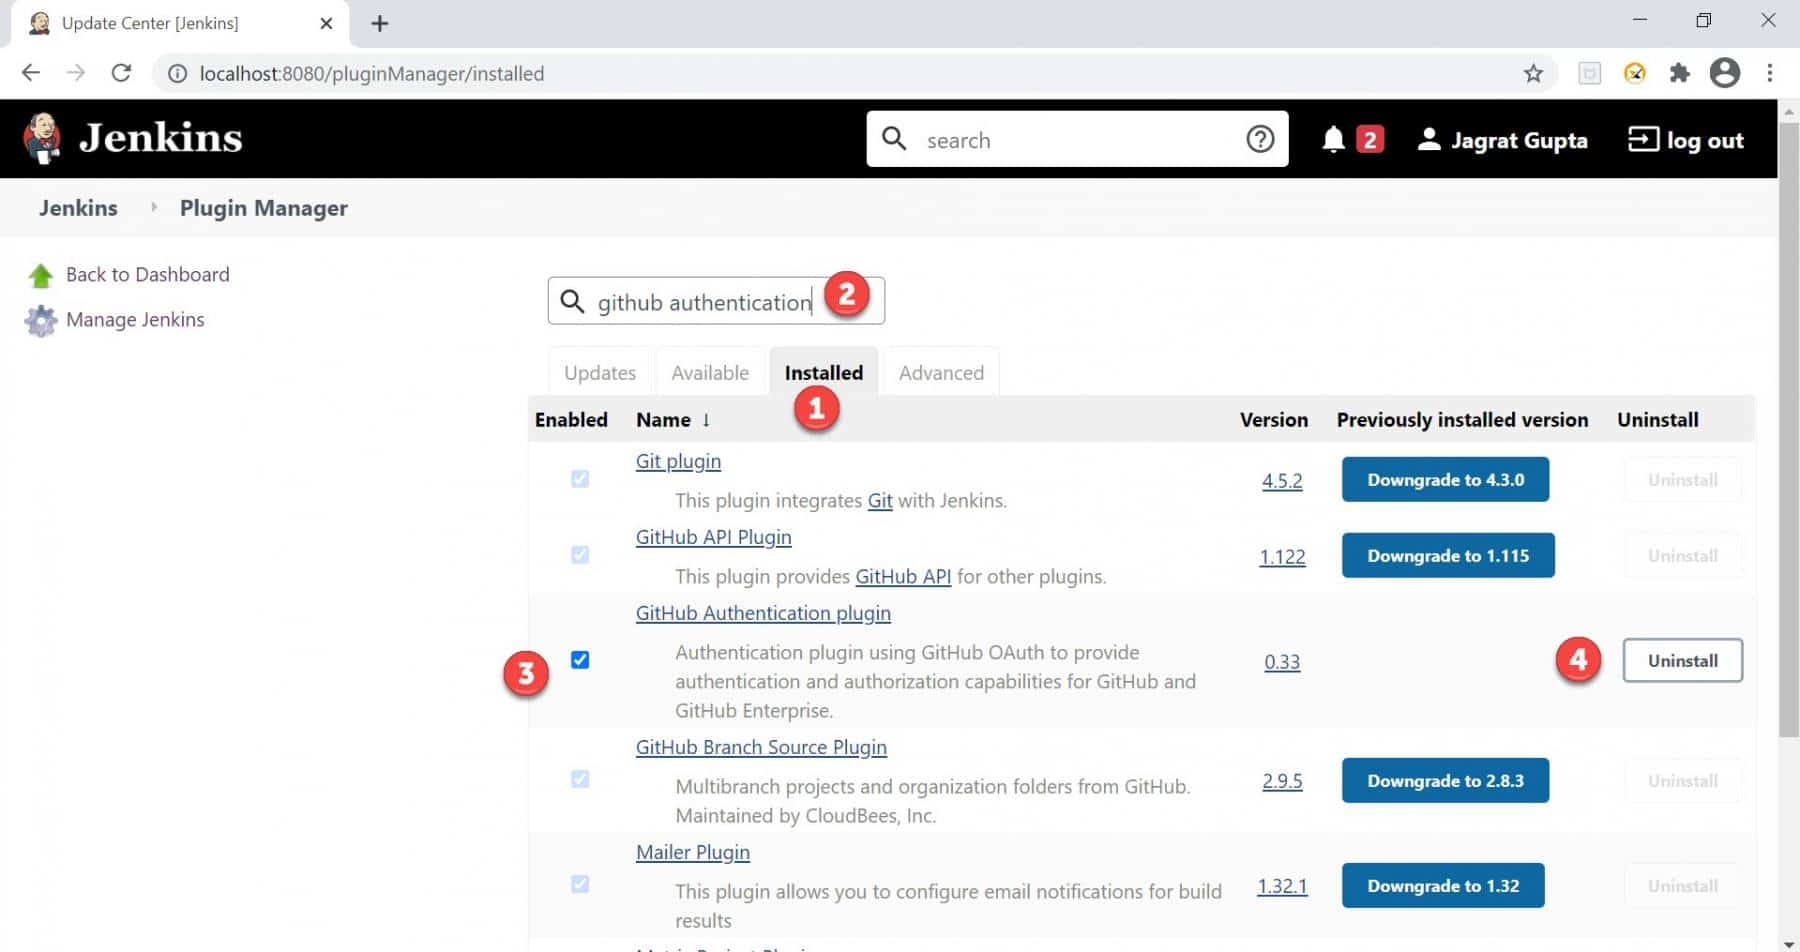
3rd Step: Now, for example, if we want to uninstall the "GitHub authentication" plugin that we installed in the previous steps the please follow the below steps:
- Click on the "installed" tab.
- Search the plugin that you want to uninstall in the search box as we searched the "GitHub authentication" plugin.
- Check the checkbox against the required plugin, if not checked.
- Click on the "Uninstall" button.
Step 4: As soon as we completed the above steps, the uninstallation confirmation page will come, and here we need to click on the "Yes" button.
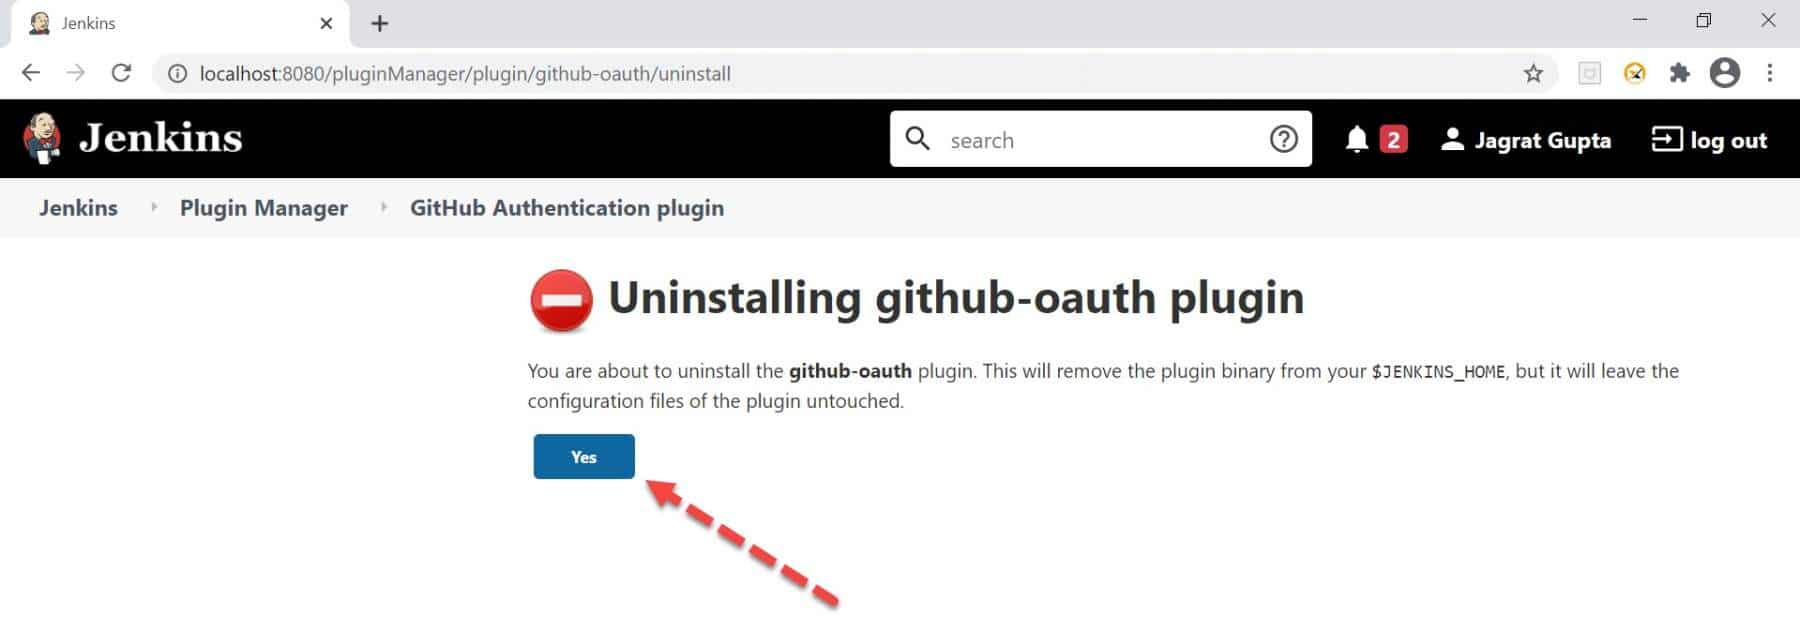
Once we click on the yes button, we will again redirect towards the plugin manager page.
Step 5: Now restart Jenkins and again go to the plugin manager page. Here we will find the plugin under the available tab again if plugin uninstallation is successful.
So, in this way, we can uninstall any plugin in Jenkins.
So, by using the ways mentioned above, we can install/uninstall and update plugins in Jenkins and utilize Jenkins's extended capabilities by using this Jenkins Manage Plugins functionalities.
Key Takeaways
- Jenkins plugin is a java-archive format package that basically follows a specific structure during the construction. Each plugin contains .hpi extension in Jenkins.
- Jenkins basically defines the set of interfaces that Jenkins community developers implement and extend by some custom code. So, community developers develop plugins according to the required functionality. Then, we can install that plugin to achieve that functionality in Jenkins.
- We can search any plugin under the Jenkins manage plugins option, and from there, we can install it.
- If we want to install the plugin manually or any specific version of the plugin, then we need to upload the plugin. Again, we should do it under the upload plugin section.
- We can also upgrade the plugin version in Jenkins.
- Moreover, we can uninstall the plugin in Jenkins in case of no requirement for that plugin.
