In our previous chapter, we accomplished the sharing of test data in Cucumber Steps using Scenario Context. Subsequently, in this cImplement Configuration Readerhapter, we shall read the configuration values from a property file and use them in our code with the help of Configuration Reader.
If you may have noticed, so far, we are passing the user_Idand the base_Url values as hardcoded ones. However, the problem with hardcoded values is that they are non-maintainable. In other words, the changes in configuration value amount to making changes in several places in the code. Therefore, it is not a clean code practice.
As a solution to this, we will go for property file implementation in Java. If you wish to understand this on a conceptual level, you could refer to the Read Configurations from Property File. Let us learn how to implement the configurations from the property file.
Implement Configuration Reader to Read Project Configurations
We will follow the below steps and implement Read Configurations:
- How to Read Configurations from Property File
- Write Hard-Coded Values in the Property File
- Create a Configuration Reader File
- Use ConfigFileReader object in the TestContext file
- Run the Cucumber Test
How to Read Configurations from Property File
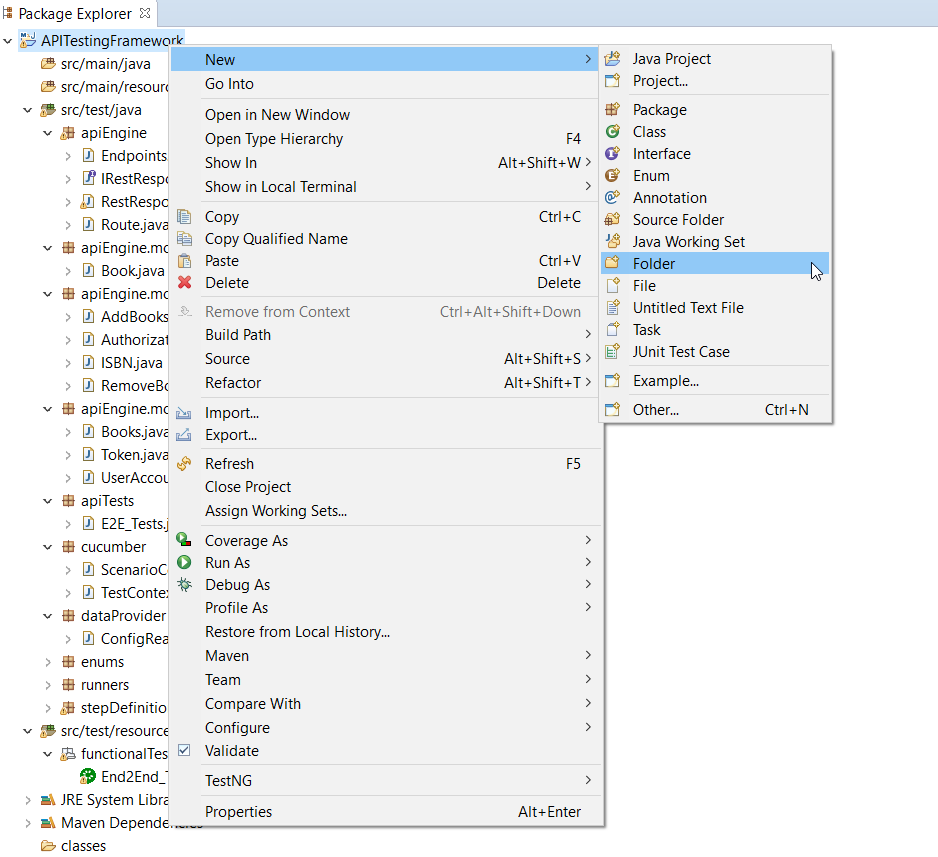
Firstly, right-click on the root Project and select New >> Folder. Additionally, name it as configs. Moreover, we will keep config files with in the same folder.
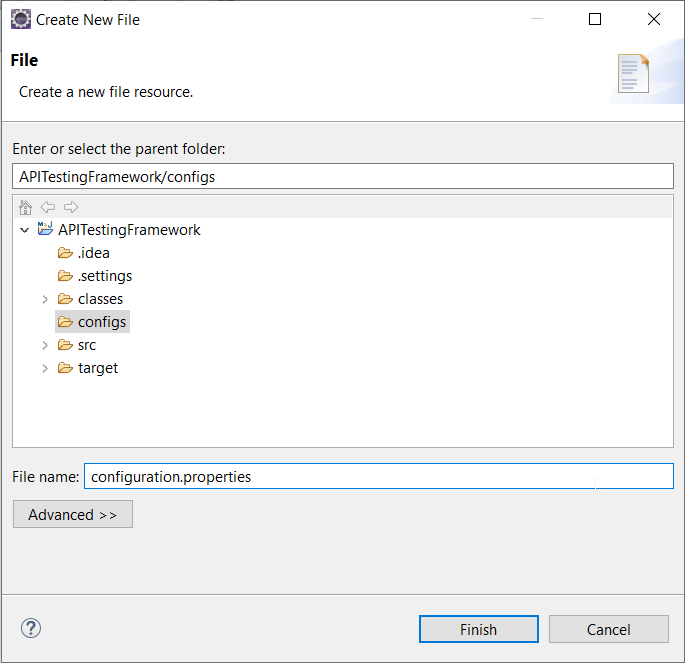
Secondly, right-click the above-created folder and select New >> File. Additionally, name it as configuration.properties. Here, the .properties is the file extension.
Step 2: Write Hard-Coded Values to Property File
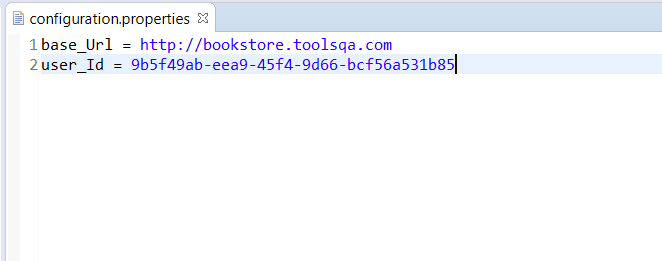
If we look at our TestContext.java class, we have been using two hardcoded values:
base_Url = http://bookstore.toolsqa.com
user_Id = 9b5f49ab-eea9-45f4-9d66-bcf56a531b85
In the configuration.properties file, we will move these values in key-pair format.
Step 3: Create a Config File Reader
Firstly, right-click on the src/test/java and select New >> Package. In addition to that, name it as dataProvider. Moreover, all the data-readers files will be kept here in this package.
Secondly, right-click on the above created package and select New >> Class. After that, name it as ConfigFileReader.
ConfigReader.java
package configs;

import java.io.BufferedReader;
import java.io.FileNotFoundException;
import java.io.FileReader;
import java.io.IOException;
import java.util.Properties;

public class ConfigReader {
	private Properties properties;
	private static ConfigReader configReader;

    private ConfigReader() {
		BufferedReader reader;
	    	String propertyFilePath = "configs//Configuration.properties";
	        try {
	            reader = new BufferedReader(new FileReader(propertyFilePath));
	            properties = new Properties();
	            try {
	                properties.load(reader);
	                reader.close();
	            } catch (IOException e) {
	                e.printStackTrace();
	            }
	        } catch (FileNotFoundException e) {
	            e.printStackTrace();
	            throw new RuntimeException("Configuration.properties not found at " + propertyFilePath);
	        }
	}

    public static ConfigReader getInstance( ) {
    	if(configReader == null) {
    		configReader = new ConfigReader();
    	}
        return configReader;
    }

    public String getBaseUrl() {
        String baseUrl = properties.getProperty("base_Url");
        if(baseUrl != null) return baseUrl;
        else throw new RuntimeException("base_Url not specified in the Configuration.properties file.");
    }

    public String getUserID() {
        String userId = properties.getProperty("user_Id");
        if(userId != null) return userId;
        else throw new RuntimeException("user_Id not specified in the Configuration.properties file.");
    }
}
Code Explanation:
How to Load Property File
BufferedReader reader = new BufferedReader(new FileReader(propertyFilePath));
Properties properties = new Properties();
properties.load(reader);
- propertyFilePath: It would be a String variable containing the information of the config file path.
- new FileReader(propertyFilePath): Creates a new FileReader containing file-name, to be read from.
- new BufferedReader(new FileReader(propertyFilePath)): Reads the text from a character-input stream. Moreover, it ensures efficient reading of the characters, arrays, and lines by buffering the characters.
- new Properties(): The Properties class represents a persistent set of properties. which can be saved to a stream or loaded from it. Additionally, the key and the corresponding value in the property list is a string.
- properties.load(reader): It reads a property list of key and element pairs from the input character stream in a simple line-oriented format.
If you have noticed the class ConfigReader.java, we have implemented it as a singleton class. The Singleton class’s purpose is to control object creation, limiting the number of objects to only one. Additionally, there is only one Singleton instance. Therefore, any instance fields of a Singleton would occur only once per class, similar to static fields.
Why do we need Singleton class implementation?
Singleton pattern ensures the creation of only one instance of a class in the JVM. Moreover, it enables a global point of access to the object. In our case, we have ConfigReader.java, which should be accessed globally. So it is better to make the ConfigReader.java class as a singleton.
How to implement a Singleton Pattern?
The common concepts among several approaches to implement a Singleton pattern are:
- Private constructor
- Static field containing only it's an instance
- A public static method returning an instance of the class
public class ConfigReader {
    // The Static member holds a single instance of the
    // ConfigReader class
    private static ConfigReader configReader;
    // ConfigReader prevents any other class from instantiating
    private ConfigReader() {
    }
    // Provides Global point of access
    public static ConfigReader getInstance() {
        if (configReader == null) {
            configReader = new ConfigReader();
        }
        return configReader;
    }
}
The ConfigReader.java class maintains a static reference to its instance. Additionally, it returns that reference from the static getInstance() method.
ConfigReader.java implements a private constructor so clients cannot instantiate ConfigReader instances.
ConfigFileReader Method
public String getBaseUrl() {
      String baseUrl = properties.getProperty("base_Url");
      if(baseUrl != null) return baseUrl;
      else throw new RuntimeException("base_Url not specified in the configuration.properties file.");
}
properties.getBaseUrl(): Properties object gives us a .getProperty method. Additionally, the input is Key of the property sent as a parameter while the Value of the matched key is the output from the .properties file.
Moreover, if the properties file doesn't have the specified key, it returns the null. Hence, we have to put the null check and, in case of null, throw an exception to stop the test with stack trace information.
For more details, you can visit the article on Singleton Pattern in Java.
Step 4: Use ConfigFileReader object in the TestContext file
After making the necessary changes for the BASE_URL and USER_ID inTextContext.java class:
private final String BASE_URL = "https://bookstore.toolsqa.com";
private EndPoints endPoints;

public TestContext() {
		endPoints = new EndPoints(BASE_URL);
		scenarioContext = new ScenarioContext();
		scenarioContext.setContext(Context.USER_ID, USER_ID);
	}
Consequently, the TextContext.java class transforms to:
package cucumber;

import apiEngine.EndPoints;
import configs.ConfigReader;
import enums.Context;

public class TestContext {

	private EndPoints endPoints = new EndPoints(ConfigReader.getInstance().getBaseUrl());
	private ScenarioContext scenarioContext;

	public TestContext() {
		scenarioContext = new ScenarioContext();
		scenarioContext.setContext(Context.USER_ID, ConfigReader.getInstance().getUserID());
	}

	public EndPoints getEndPoints() {
        return endPoints;
    }

	public ScenarioContext getScenarioContext() {
		return scenarioContext;
	}

}
Step 5: Run the Cucumber Test
Run the Tests as JUnit
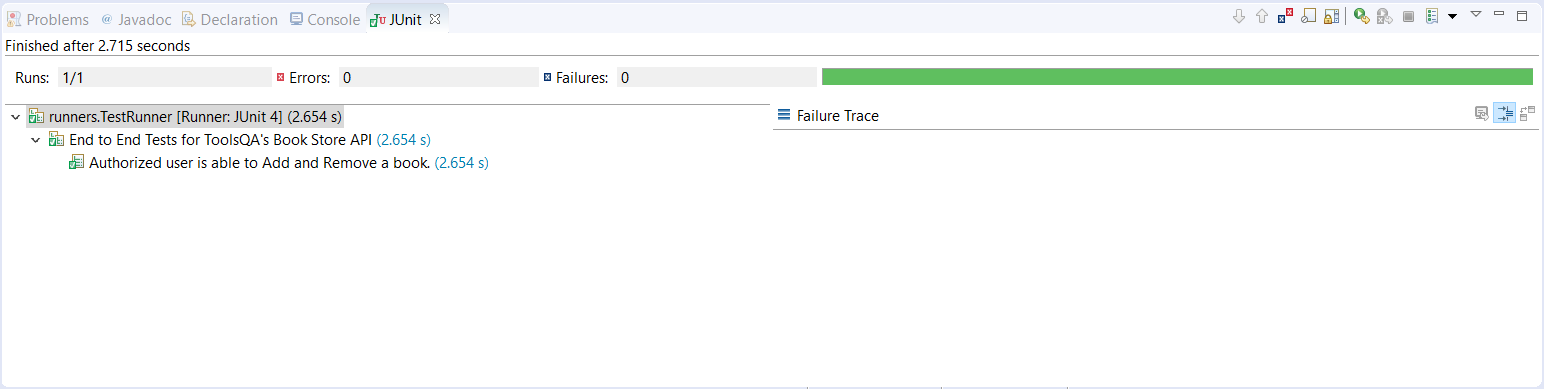
We are all set now to run the updated Cucumber test. Firstly, Right -Click on ***TestRunner *class and Click Run As >> JUnit Test. Cucumber runs the script in the same way as Selenium WebDriver. Finally, the result will display in the JUnit tab of the console.
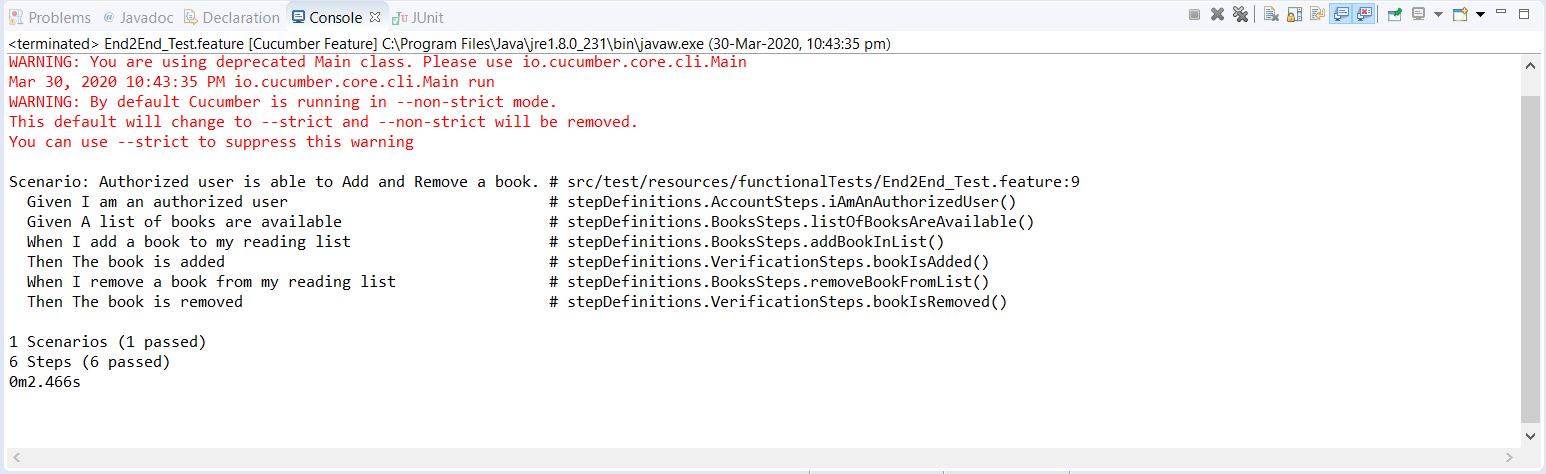
Run the Tests from Cucumber Feature
To run the tests as a Cucumber Feature, right-click on the End2End_Test.feature file. Select the Run As>>Cucumber Feature.
Moreover, please try to implement the above changes in your framework, as explained above. Subsequently, our updated project folder structure of the framework will look likewise:

The tests passed successfully with the changes we made to the Configuration Reader in our framework.