In the previous chapter, we implemented a Sharing Test Context between Cucumber Steps. Additionally, we made the changes to make the step definition file uncluttered and share the Test Context with all the Step Definition files. In continuation of the earlier chapter, we will now proceed to Share Data by using Scenario Context in Cucumber.
Scenario Context class holds the test data information explicitly. It helps you store values in a key-value pair between the steps. Moreover, it helps in organizing step definitions better rather than using private variables in step definition classes. We have implemented this before in our previous Cucumber tutorial on sharing data between steps in Cucumber using Scenario Context.
As a next step, we are going to implement the Scenario Context in cucumber for sharing data between our Step Definitions in our API Rest Assured Automation Framework.
Share Scenario Context in Cucumber
In the end-to-end tests, you're interested in verifying the response for the requests sent. Let’s say you wish to check the subsequent actions within the tests:
- Addition of Book
- Removal of Book
In that case, we want to store the book details in Scenario Context object while adding the book to the user account. Likewise, in our next verification step, we remove the book from the user account. Moreover, we retrieve from the ScenarioContext, book details of the added book, and validate its removal from the user account.
We will follow the identical steps as sharing Scenario Context with Cucumber Step Definitions to share the test data information state across steps:
- Firstly, create a Scenario Context class.
- Secondly, save the test information state within the Scenario Context.
- Thirdly, add a Verification Step file to Test for Responses.
- Fourthly, run the Cucumber Test.
Step 1: Create a Scenario Context class
It is a clean code practice to create enums for all the fixed set of values in the project.
-
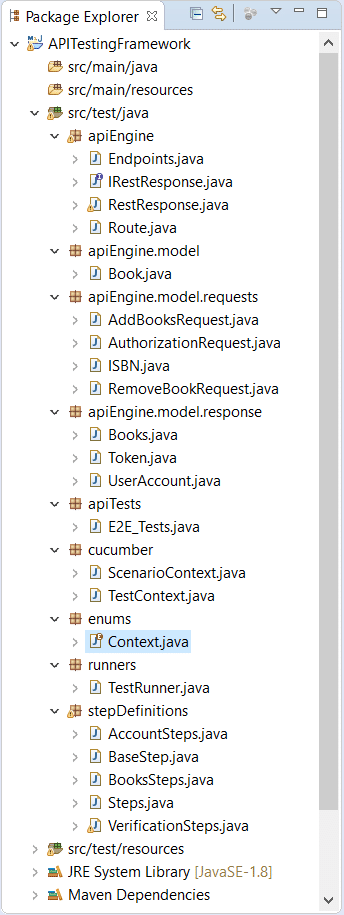
Firstly, Right-click on the src/test/java and select New >> Package. Moreover, name it as enums. We will keep all the project enums in this package.
-
Secondly, Right-click on the enums package and select New >> Enum. Name it as Context. Moreover, we will add our enum in it.
Context.java
package enums;

public enum Context {
    BOOK,
    USER_ID,
    USER_ACCOUNT_RESPONSE,
    BOOK_REMOVE_RESPONSE;
}
- After that, Right-click on the cucumber package and select New >> Class. Name it as ScenarioContext.
package cucumber;


import enums.Context;

import java.util.HashMap;
import java.util.Map;

public class ScenarioContext {

    private Map<String, Object> scenarioContext;

    public ScenarioContext(){
        scenarioContext = new HashMap<String, Object>();
    }

    public void setContext(Context key, Object value) {
        scenarioContext.put(key.toString(), value);
    }

    public Object getContext(Context key){
        return scenarioContext.get(key.toString());
    }

    public Boolean isContains(Context key){
        return scenarioContext.containsKey(key.toString());
    }
}
Code Explanation:
- scenarioContext: It's a HashMap object storing the information in the Key-Value pair. The key type is String. Moreover, theValue can be of any Object Type.
- setContext(): This method takes two parameters, key as Context and value as an object. Key is nothing but a Context enum.
- getContext(): This method takes a key as a parameter to returns the object matching the key.
- isContains(): This method checks in the complete Map if the respective key exists or not.
- Fourthly, include ScenarioContext in TextContext. It will ensure that ScenarioContext is shared across all the Cucumber Steps using the Pico-Container library. We added in our previous chapter. Moreover, add a getter method as getScenarioContext() to get the scenarioContext object.
TestContext.java
package cucumber;

import apiEngine.EndPoints;
import enums.Context;

public class TestContext {

	private final String BASE_URL = "https://bookstore.toolsqa.com";
	private final String USER_ID = "9b5f49ab-eea9-45f4-9d66-bcf56a531b85";

	private EndPoints endPoints;
	private ScenarioContext scenarioContext;

	public TestContext() {
		endPoints = new EndPoints(BASE_URL);
		scenarioContext = new ScenarioContext();
		scenarioContext.setContext(Context.USER_ID, USER_ID);
	}

	public EndPoints getEndPoints() {
        return endPoints;
    }

	public ScenarioContext getScenarioContext() {
		return scenarioContext;
	}

}
Also, the BaseSteps.java class updates as:
package stepDefinitions;

import apiEngine.EndPoints;
import cucumber.ScenarioContext;
import cucumber.TestContext;

public class BaseStep {

   private EndPoints endPoints;
   private ScenarioContext scenarioContext;

    public BaseStep(TestContext testContext) {
    	endPoints = testContext.getEndPoints();
    	scenarioContext = testContext.getScenarioContext();
    }

    public EndPoints getEndPoints() {
        return endPoints;
    }

    public ScenarioContext getScenarioContext() {
        return scenarioContext;
    }
}
Step 2: Save the test information state in the Scenario Context
In this step, we save the responses of our requests to ScenarioContext object. To begin with, we will add the book to the reading list of the user and save our response. Subsequently, the responses will then validate in our assertions as a part of the verification steps.
In the below steps of the BooksSteps.java class, we are saving responses to scenario context objects.
BooksSteps.java
package stepDefinitions;

import apiEngine.IRestResponse;
import apiEngine.model.Book;
import apiEngine.model.requests.AddBooksRequest;
import apiEngine.model.requests.ISBN;
import apiEngine.model.requests.RemoveBookRequest;
import apiEngine.model.responses.Books;
import apiEngine.model.responses.UserAccount;
import cucumber.TestContext;
import cucumber.api.java.en.Given;
import cucumber.api.java.en.When;
import enums.Context;
import io.restassured.response.Response;

public class BooksSteps extends BaseStep {

    public BooksSteps(TestContext testContext) {
    	super(testContext);
    }

    @Given("^A list of books are available$")
    public void listOfBooksAreAvailable() {
        IRestResponse<Books> booksResponse = getEndpoints().getBooks();
        Book book = booksResponse.getBody().books.get(0);
        getScenarioContext().setContext(Context.BOOK, book);
    }

    @When("^I add a book to my reading list$")
    public void addBookInList() {
    	Book book = (Book) getScenarioContext().getContext(Context.BOOK);
    	String userId = (String) getScenarioContext().getContext(Context.USER_ID);

        ISBN isbn = new ISBN(book.isbn);
        AddBooksRequest addBooksRequest = new AddBooksRequest(userId, isbn);

        IRestResponse<UserAccount> userAccountResponse = getEndpoints().addBook(addBooksRequest);
        getScenarioContext().setContext(Context.USER_ACCOUNT_RESPONSE, userAccountResponse);
    }

    @When("^I remove a book from my reading list$")
    public void removeBookFromList() {
    	Book book = (Book) getScenarioContext().getContext(Context.BOOK);
    	String userId = (String) getScenarioContext().getContext(Context.USER_ID);

        RemoveBookRequest removeBookRequest = new RemoveBookRequest(userId, book.isbn);

        Response response = getEndpoints().removeBook(removeBookRequest);
        getScenarioContext().setContext(Context.BOOK_REMOVE_RESPONSE, response);
    }
}
Step 3: Add a Verification Step file to Test for Responses
We will verify the responses saved in our ScenarioContext Objects as a part of this step. We will move all our verification steps to a new class created as VerificationSteps.java.
Create a New Class and name it as VerificationSteps, by right-clicking on the stepDefinitions. After that, select New >> Class.
VerificationSteps.java
package stepDefinitions;

import apiEngine.IRestResponse;
import apiEngine.model.Book;
import apiEngine.model.responses.UserAccount;
import cucumber.TestContext;
import cucumber.api.java.en.Then;
import enums.Context;
import io.restassured.response.Response;
import org.junit.Assert;

public class VerificationSteps extends BaseStep {

    public VerificationSteps(TestContext testContext) {
        super(testContext);
    }

    @Then("^The book is added$")
    public void bookIsAdded() {
    	Book book = (Book) getScenarioContext().getContext(Context.BOOK);
    	String userId = (String) getScenarioContext().getContext(Context.USER_ID);
        IRestResponse<UserAccount> userAccountResponse = (IRestResponse<UserAccount>) getScenarioContext().getContext(Context.USER_ACCOUNT_RESPONSE);

        Assert.assertTrue(userAccountResponse.isSuccessful());
        Assert.assertEquals(201, userAccountResponse.getStatusCode());

        Assert.assertEquals(userId, userAccountResponse.getBody().userID);
        Assert.assertEquals(book.isbn, userAccountResponse.getBody().books.get(0).isbn);
    }

    @Then("^The book is removed$")
    public void bookIsRemoved() {
    	String userId = (String) getScenarioContext().getContext(Context.USER_ID);
        Response response = (Response) getScenarioContext().getContext(Context.BOOK_REMOVE_RESPONSE);

        Assert.assertEquals(204, response.getStatusCode());

        IRestResponse<UserAccount> userAccountResponse = getEndPoints().getUserAccount(userId);
        Assert.assertEquals(200, userAccountResponse.getStatusCode());

        Assert.assertEquals(0, userAccountResponse.getBody().books.size());
    }
}
Explanation
- We just need to pass the Key to the getContext() method, which we can access like scenarioContext.getContext(Key Name). Additionally, it will retrieve the value returned by the response for Book.
- Since the method returns an object, we need to cast it to the right type. If it's cast it to a wrong type, the test will fail here. So, we must be sure of the object type we stored for the respective key.
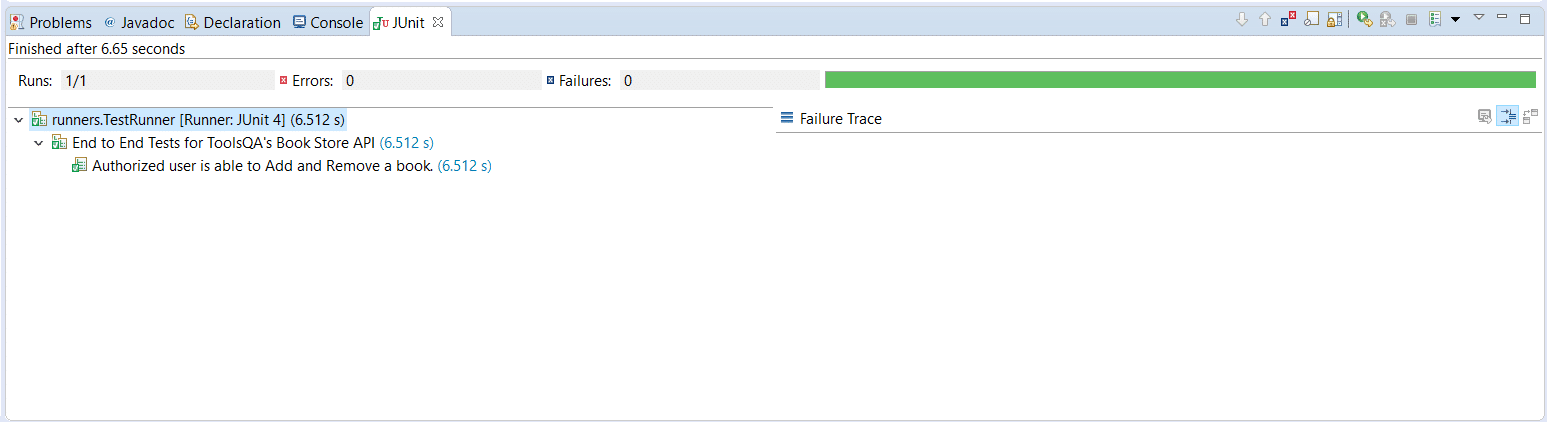
Step 4: Run the Cucumber Test
Run the Tests as JUnit
We are all set now to run the updated Cucumber test. Firstly, Right -Click on TestRunner class and Click Run As >> JUnit Test. Cucumber runs the script in the same way as Selenium WebDriver. Consequently, the result will display in the JUnit tab of the console.
Run the Tests from Cucumber Feature
To run the tests as a Cucumber Feature, right-click on the End2End_Test.feature file. Select the Run As>>Cucumber Feature.
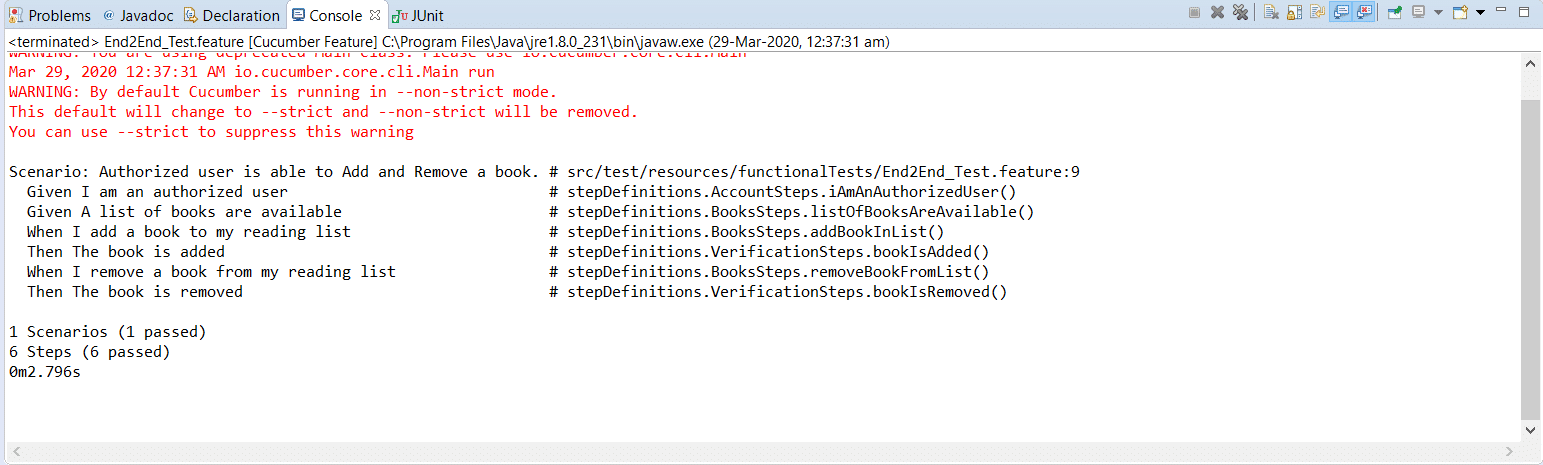
The tests passed successfully with the changes we made for sharing test data in Cucumber Steps using Scenario Context in our framework.
Our updated project folder structure of the framework will look likewise:
In the next chapter, we will add Config Reader class for BaseUrl and UserId. Please try to implement the above changes in your framework, as explained above.