Drag and drop is a fairly popular approach for modern websites to improve their overall UX. However, it could be very challenging to implement an automation test for drag and drop components. Subsequently, in this tutorial, we will show how to handle Drag and Drop in Katalon Studio in a web application.
This article assumes that you are familiar with the tool’s basic features. Moreover, to have a quick idea of how it works or to review the interface, please refer to Kickstart your automation testing using Katalon Studio.
There are different common implementation methods for the drag and drop feature, which needs to be addressed differently when testing, including:
- Using pure JavaScript to handle drag and drop with popular JavaScript frameworks like jQuery (http://jqueryui.com/droppable/#default).
- Using HTML5 Drag and Drop, which is detailed in w3schools’ HTML Drag and Drop tutorial.
We will be discussing the below topics in this article:
- Create Automation tests for JavaScript Drag and Drop
- How to handle drag and drop in Katalon Studio on the HTML5 element?
Create automation tests for JavaScript Drag and Drop
Testing the pure JavaScript implemented Drag and Drop function is straightforward with Katalon Studio as its built-in keyword dragAndDropObjectToObject. was designed to handle the JS action natively.
For this section, we will use the jQuery Droppable example page (http://jqueryui.com/droppable/#default) as the application under test (AUT).
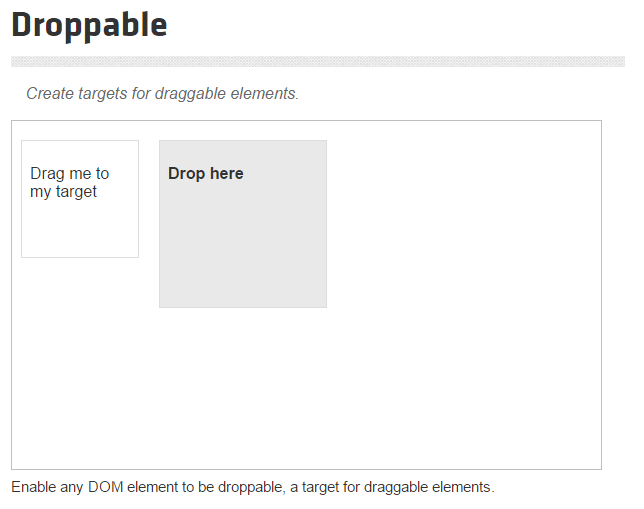
The example website provides a simple implementation of drag and drops with a draggable object containing the text “Drag me to my target” and a droppable object with the text “Drop here”.
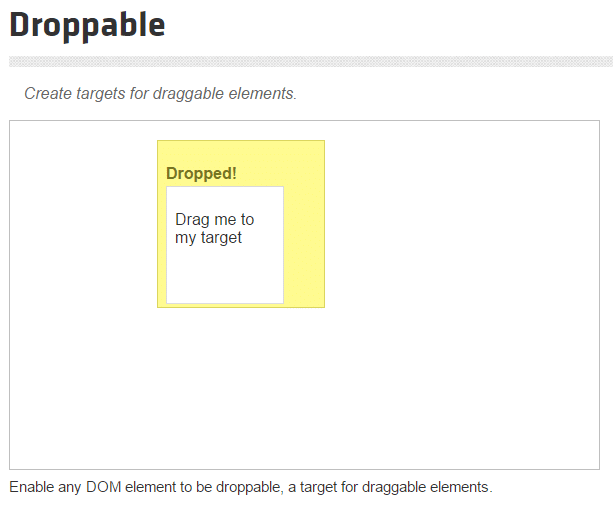
When the draggable object is dragged into the droppable object, the target object’s text will be changed to “Dropped!” like the image below:
We are going to test this behavior using Katalon Studio.
-
First, create a Katalon project with the name DragAndDrop.
-
Secondly, open the Object Spy dialog, start a spy object session and navigate to the AUT website at http://jqueryui.com/droppable/#default.
-
Third, use the object spy utility to capture both the droppable object and the draggable object mentioned above and import them into the project’s Object Repository. If you do it correctly, there will be 3 test objects as below:
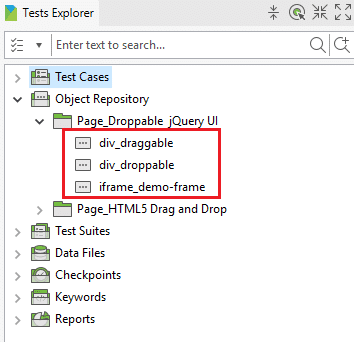
Each object's name is self-explanatory, except for the iframe_demo-frame object, which is the parent iframe of both draggable and droppable objects. Now let’s use those captured objects in a test script.
- Fourthly, create a test case named “jQuery Drag And Drop” open it, then change to Script mode and copy the following test scripts into it:
import static com.kms.katalon.core.testobject.ObjectRepository.findTestObject
import com.kms.katalon.core.webui.keyword.WebUiBuiltInKeywords as WebUI

'Open the selected browser and navigate to our AUT website.'
WebUI.openBrowser('https://jqueryui.com/droppable/#default')

'Use the dragAndDropObjectToObject keyword to perform the drag and drop action.'
WebUI.dragAndDropToObject(findTestObject('Page_Droppable  jQuery UI/div_draggable'), findTestObject('Page_Droppable  jQuery UI/div_droppable'))

'Get the text content of our droppable object.'
droppable_text = WebUI.getText(findTestObject('Page_Droppable  jQuery UI/div_droppable'))

'Verify if it is actually changed to "Dropped!" because of the drag and drop action.'
WebUI.verifyEqual(droppable_text, 'Dropped!')

'Clean up the testing environment by closing the browser.'
WebUI.closeBrowser()
- Finally, run the test case, and you will see that the executed test will pass effortlessly.
How to handle Drag & Drop in Katalon Studio on the HTML5 element?
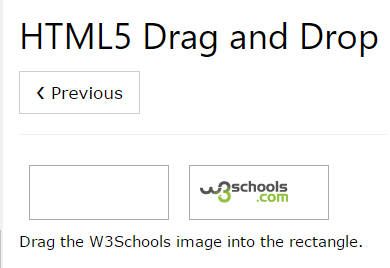
For this section, we will use the w3school HTML5 Drag and Drop page (https://goo.gl/sB59RF) as the application under test (AUT):
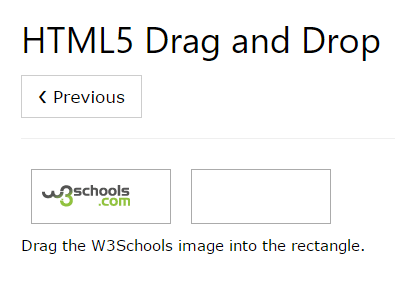
This web page contains a simple drag and drops implementation, which you drag the W3Schools.com image to change its container. After the W3Schools image is dragged and dropped to the right rectangle, it will look like the following image:
We will implement the drag and drop custom keyword for HTML Drag and Drop. After that, we verify the innerHTML of the right rectangle when the drag and drop completes.
Implementing an automation test for HTML5 Drag and Drop is a bit more complex than the JavaScript version. If you run the test case above to test this drag and drop feature, you will see that the draggable image does not move, although the test passes.
This happens because, as of the day of this article (May 22, 2017), Selenium still does not provide official support for testing HTML5 Drag and Drop. You can follow the related Selenium issue via https://github.com/seleniumhq/selenium-google-code-issue-archive/issues/3604.
Therefore, as Katalon Studio utilizes Selenium for the automation execution, implementing the automated test for HTML5 Drag and Drop requires a little bit of workaround:
- Capture the draggable and droppable objects into the project’s repository like above. If done correctly, we have 2 test objects as below:
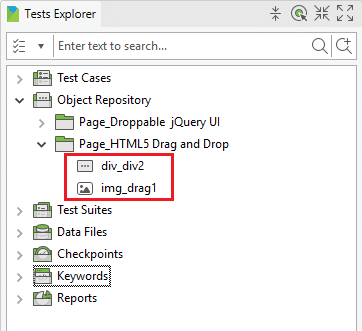
img_drag1 is the identifier of the draggle image object, while div_div2 identifies the destination rectangle element.
-
Create a package inside Keywords with the name dnd
-
Create a keyword class named DragAndDropHelper and open it. Copy the following scripts to create the custom keyword:
package html5.dnd

import org.openqa.selenium.JavascriptExecutor
import org.openqa.selenium.WebDriver
import org.openqa.selenium.WebElement

import com.kms.katalon.core.annotation.Keyword
import com.kms.katalon.core.testobject.TestObject
import com.kms.katalon.core.webui.driver.DriverFactory
import com.kms.katalon.core.webui.keyword.WebUiBuiltInKeywords

public class DragAndDropHelper {
	private static String getJsDndHelper() {
		return '''
		function simulateDragDrop(sourceNode, destinationNode) {
		    var EVENT_TYPES = {
		        DRAG_END: 'dragend',
		        DRAG_START: 'dragstart',
		        DROP: 'drop'
		    }

		    function createCustomEvent(type) {
		        var event = new CustomEvent("CustomEvent")
		        event.initCustomEvent(type, true, true, null)
		        event.dataTransfer = {
		            data: {
		            },
		            setData: function(type, val) {
		                this.data[type] = val
		            },
		            getData: function(type) {
		                return this.data[type]
		            }
		        }
		        return event
		    }

		    function dispatchEvent(node, type, event) {
		        if (node.dispatchEvent) {
		            return node.dispatchEvent(event)
		        }
		        if (node.fireEvent) {
		            return node.fireEvent("on" + type, event)
		        }
		    }

		    var event = createCustomEvent(EVENT_TYPES.DRAG_START)
		    dispatchEvent(sourceNode, EVENT_TYPES.DRAG_START, event)

		    var dropEvent = createCustomEvent(EVENT_TYPES.DROP)
		    dropEvent.dataTransfer = event.dataTransfer
		    dispatchEvent(destinationNode, EVENT_TYPES.DROP, dropEvent)

		    var dragEndEvent = createCustomEvent(EVENT_TYPES.DRAG_END)
		    dragEndEvent.dataTransfer = event.dataTransfer
		    dispatchEvent(sourceNode, EVENT_TYPES.DRAG_END, dragEndEvent)
		}
		''';
	}

	@Keyword
	def dragAndDrop(TestObject sourceObject, TestObject destinationObject) {
		WebElement sourceElement = WebUiBuiltInKeywords.findWebElement(sourceObject);
		WebElement destinationElement = WebUiBuiltInKeywords.findWebElement(destinationObject);
		WebDriver webDriver = DriverFactory.getWebDriver();
		((JavascriptExecutor) webDriver).executeScript(getJsDndHelper() + "simulateDragDrop(arguments[0], arguments[1])", sourceElement, destinationElement)
	}
}
This keyword uses Github's JavaScript function (https://gist.github.com/druska/624501b7209a74040175, thanks to user Druska) to mimic HTML5 native events to simulate drag and drop for HTML5.
- Use our newly created custom keyword. Create a test case with the name HTML5 Drag And Drop, open it, then changing to the Script mode and paste the following Groovy code:
import static com.kms.katalon.core.testobject.ObjectRepository.findTestObject

import com.kms.katalon.core.webui.keyword.WebUiBuiltInKeywords as WebUI

'Open the selected browser and navigate to our AUT website'
WebUI.openBrowser('https://www.w3schools.com/html/html5_draganddrop.asp')

'Use the previous custom keywords to perform the drag and drop action.'
CustomKeywords.'html5.dnd.DragAndDropHelper.dragAndDrop'(findTestObject('Page_HTML5 Drag and Drop/img_drag1'), findTestObject(
        'Page_HTML5 Drag and Drop/div_div2'))

'Verify that the drag and drop action is performed successfully by checking the innerHTML of the destination element for the draggable image.'
WebUI.verifyElementAttributeValue(findTestObject('Page_HTML5 Drag and Drop/div_div2'), 'innerHTML', '<img src=\"img_w3slogo.gif\" draggable=\"true\" ondragstart=\"drag(event)\" id=\"drag1\" alt=\"W3Schools\">',
    0)

'Close the browser to clean up the testing environment.'
WebUI.closeBrowser();
- Run the test case, and you will notice that the W3Schools image is dragged and dropped in the right rectangle successfully.
The sample project could be found here.