In this series of posts on testRigor features and implementing test cases using them, we have focused on simple elements up until now. If you remember, one of the features of testRigor is that it doesn't require element locators to find elements - and we can simply refer to any element how you see it on the screen as a human. In this article, we've decided to dig a little bit deeper and see if we can handle and test web tables in testRigor using the same principles, as this can be a challenge for many automation tools. Let's find out!
Table of contents
- What are web tables?
- Types of web tables
- Static web tables
- Dynamic web tables
- Types of web tables
- How to create a web table?
- How to test web tables using testRigor?
- How to delete a row in a web table using testRigor?
- How to modify a web table with testRigor?
- How to add a new in a web table using testRigor?
What are web tables?
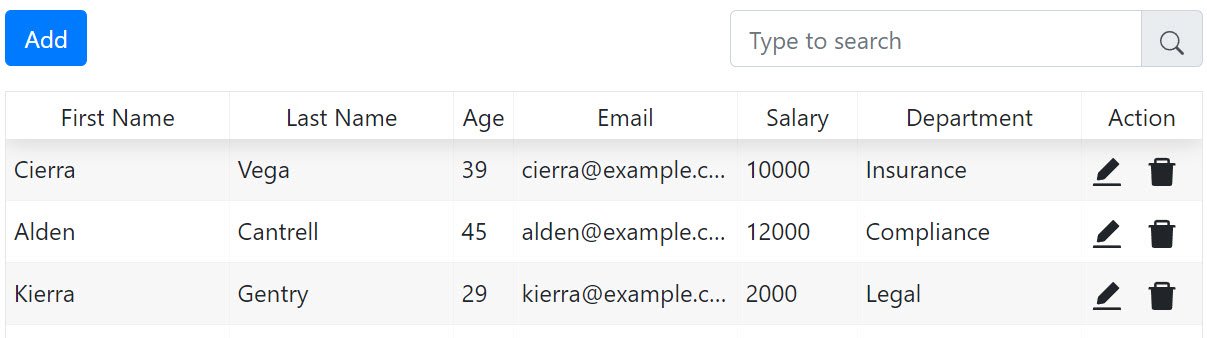
Tables are a form of data representation technique in which we have a matrix across rows and columns and present data into it. For example, this is a small table that represents data from a few employees working in different organizations and different countries:

Now imagine this data being represented without tables. The best method for this could be bullet representation such as:
- Maria Anders works at Google in Germany.
As you might already guess, the extra words used in the above sentence need to be repeated for each of the options which makes the user experience a bit annoying. Another option of writing everything in a paragraph could be even worse.
Tables also solve the problems of updating and deleting data, making it a simple process on the web application. Generally, when we feed a table some data, we call an API that fetches data records from the back end. Since it is going to be live data, whatever we update or delete, will be directly reflected on the table on the webpage without doing extra manual work. As a tester, if there is a web application you are working on, that displays such data through APIs or the backend, knowing how to test web tables is a must for you.
Types of web tables
There are two types of tables in the website world:
- Static web tables.
- Dynamic web tables.
Static web tables
Web tables that have static data (data that does not change over a period of time) are called static web tables. For instance, a table with historical events and their dates is never going to change because the dates will remain the same for certain events that have happened in the past.
Dynamic web tables
Web tables whose data keep on changing are called dynamic web tables. These are the most commonly used web tables as tables generally fetch data from the database that keep on changing based on various events.
Both of these tables follow the code structure described in the next section.
How to create a web table?
Web tables are created using the <table> tag of HTML and its sister tags to feed data into rows and columns. These tags represent the following meanings:
- table - the start of a web table.
- tbody - group the wrapped content underneath this tag.
- thead - group the header content underneath this tag.
- tr - represents a row in the table.
- td - represents the data of one cell of the table.
- th - represents the data of the heading cell in the table.
A sample table may be coded as follows:
<table>
	<tbody>
		<tr>
			  <th>Company</th>
			  <th>Contact</th>
			  <th>Country</th>
		 </tr>
		<tr>
			  <td>Google</td>
			  <td>Maria Anders</td>
			  <td>Germany</td>
		</tr>
		<tr>
			  <td>Meta</td>
			  <td>Francisco Chang</td>
			  <td>Mexico</td>
		</tr>
	</tbody>
</table>
The above code represents the top two rows of the table shared in the previous section. It is important to note here that learning how to test web tables using testRigor does not concern the types of tables and the code written to implement tables on a web page. The codeless nature of testRigor makes testing extremely easy and efficient that a beginner with no knowledge of programming can do it as well. However, it's always good to know how things work behind the scenes. Also, if you are someone who likes Selenium, you should know the code and type of tables to implement test cases and handle web tables using Selenium.
How to test web tables using testRigor?
Alright! Now that we are well aware of what web tables are and how we manage them on a web page, the next step is to apply a few test cases on it to ensure two things:
- The table data is consistent.
- The table functionalities work as expected.
Here, "functionalities" refer to the action buttons that a user will often encounter in a table. For instance, if a table represents my daily tasks of today, I should be able to delete them as I complete them. A "delete" action button helps me achieve that.
testRigor is an intelligent test automation tool that will be used in this demonstration to test the web tables. The best part of using testRigor is that we don't need to open the webpage code to find the locators, or code any script ourselves to perform actions on the web elements. We can test web tables by just writing plain English text as demonstrated in the subsequent sections.
To test web tables using testRigor, first, we need to have a table to run tests on. For this demonstration, we will be using the DemoQA website which already has a table on the Web Tables page:
Let's perform three actions on this table to understand the testing methods of testRigor.
How to delete a row in a web table using testRigor?
In this first example, we will delete the second row from the table using testRigor. For this, first, we need a test suite. If you are not aware of how to do that, please follow our simple guide on how to create a test suite in testRigor. In this example, we name our test suite "Web Table Implementation".
If we were using a scripting testing tool like Selenium, we would have to write multiple lines to first extract locators, then rows, and then identify the button and then press it. However, with testRigor, this can be achieved much easier as follows:
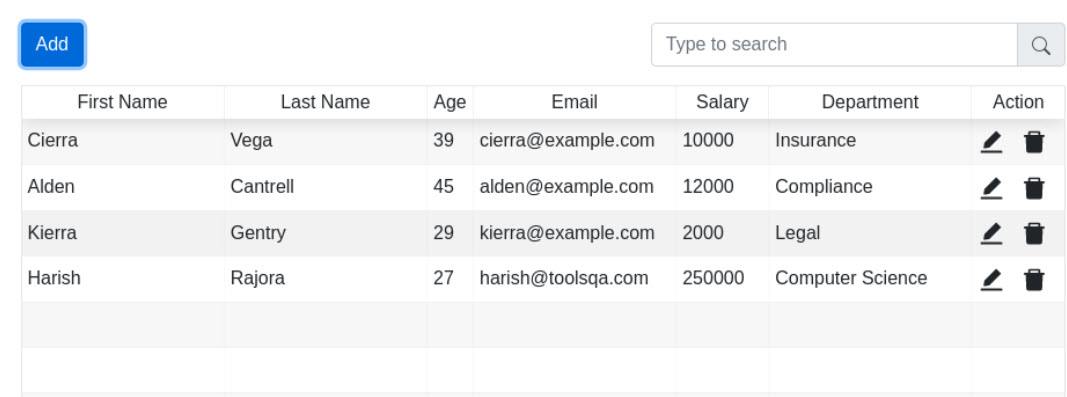
click on first table at row containing "Vega"
click on "Delete"
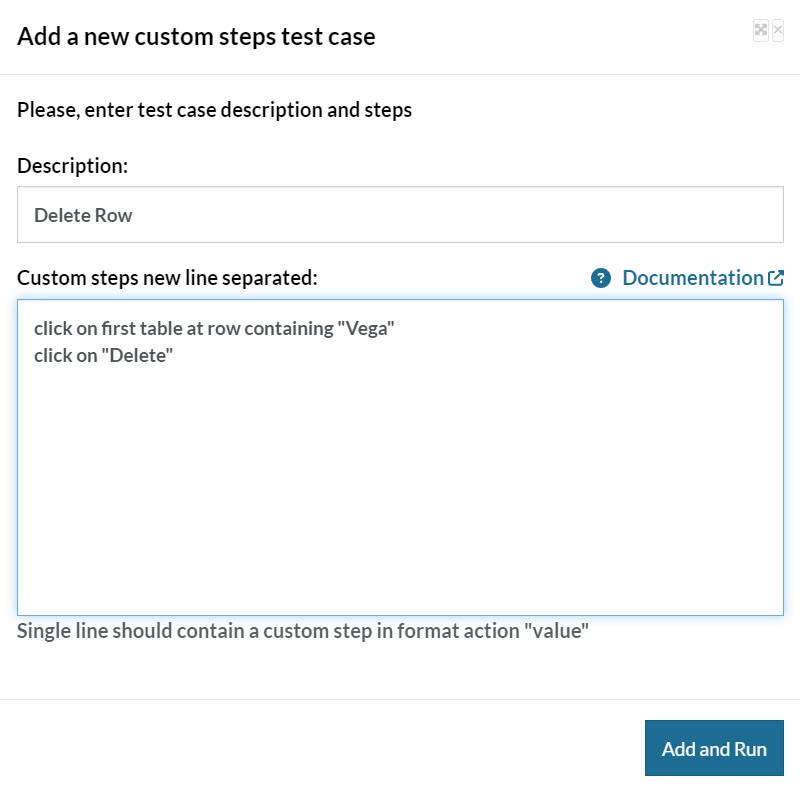
For the first line, we look toward selecting the row of the table that contains the word "Vega". Here, in the instruction set, we have to write "first table" to indicate that we are targeting a table that appears first on the web page. In this example we only have one table, but we recommend writing this keyword just in case. Otherwise, the tool may select the entire row expanding from the left to right viewport which is not desirable and can break the test cases.
The second instruction targets the "Delete" icon under the "Actions" tab. Since it has two icons, we can target the required action through labels of the icon that you may see when you hover over it. However, testRigor also has a smart icon recognition, and will typically automatically recognize any typical-looking icon (edit, delete, add, etc.)
![]()
Run the instruction set shown in the previous image to verify the functionality of row deletion in the web table using testRigor.
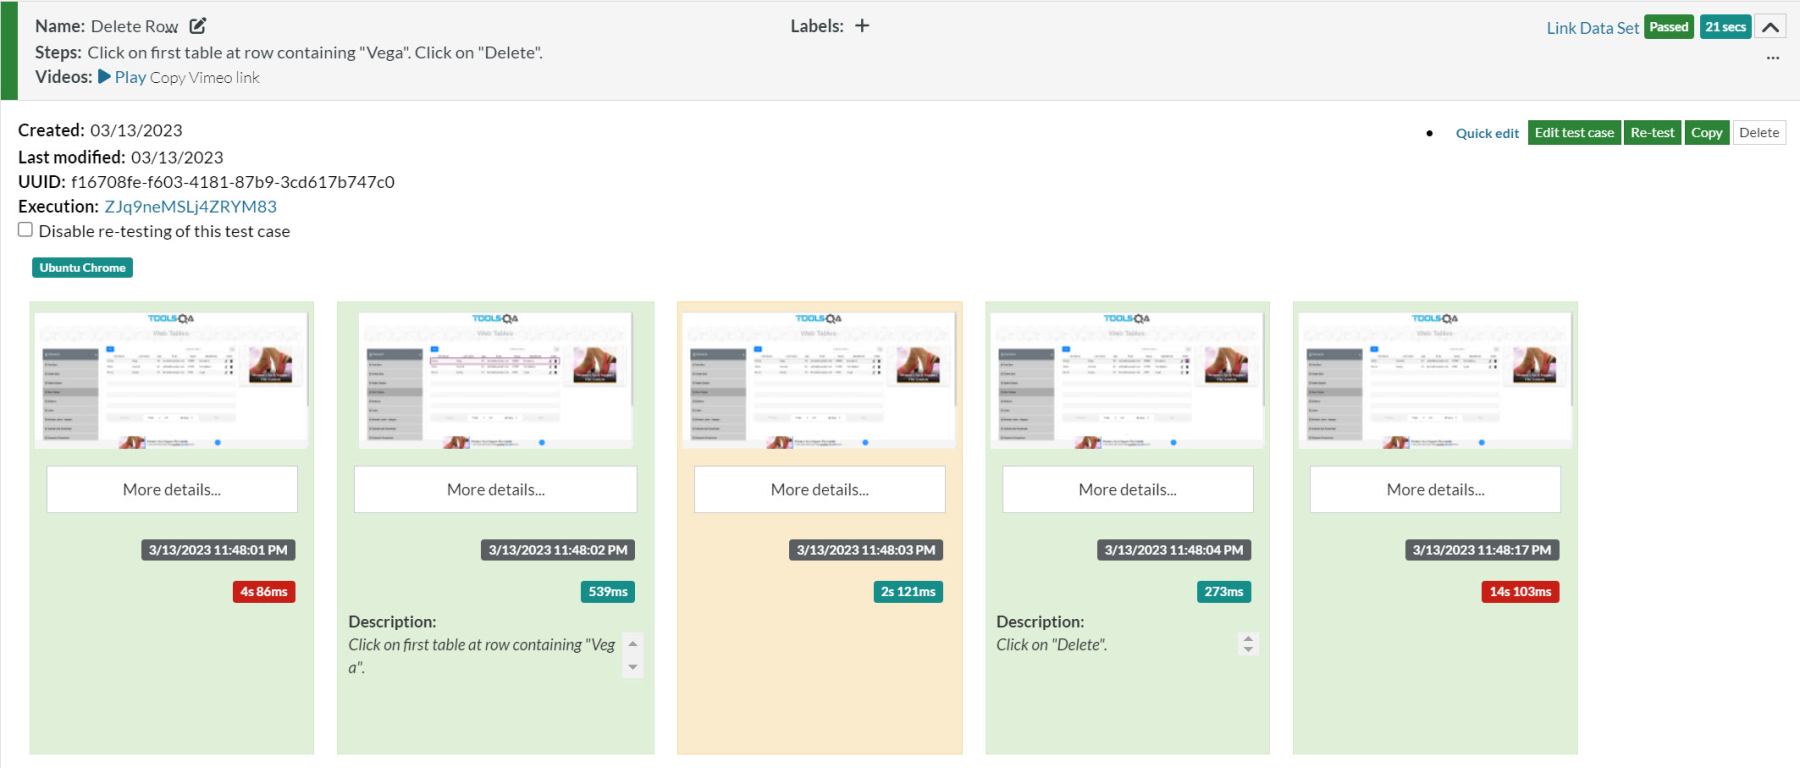
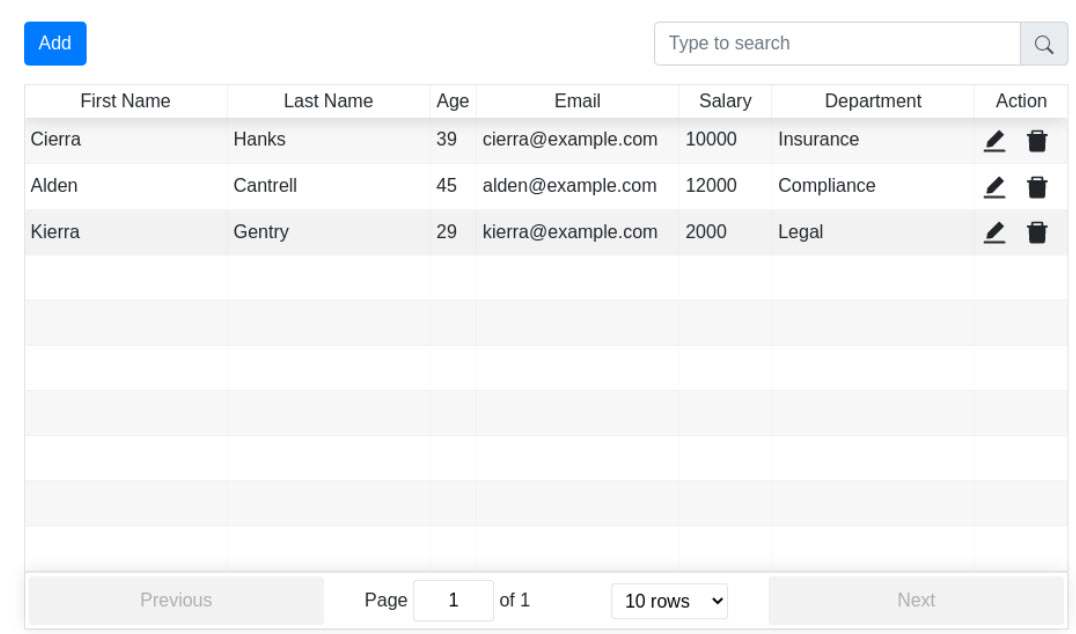
The test case passed successfully. To ensure, let's open the last screenshot and check whether one row is deleted or not.
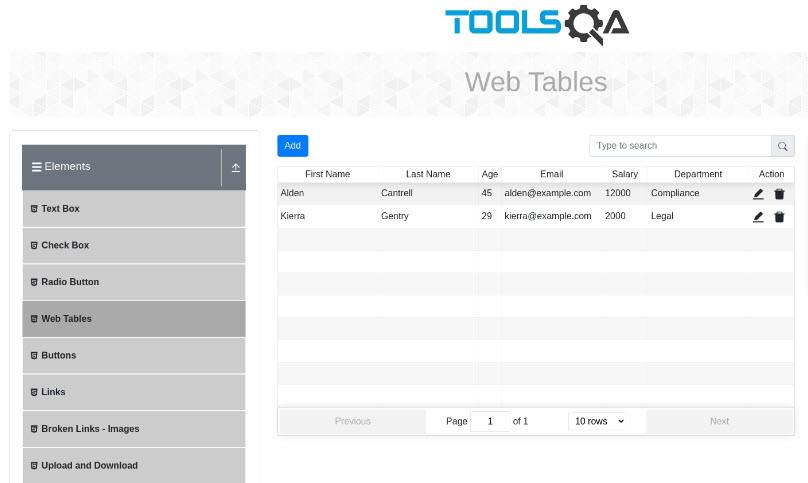
As we see, the row that contained the name "Vega" deletes successfully.
How to modify a web table to test with testRigor?
In this next example, we will try to edit the data inside the table. This is achieved by following these steps:
- Selecting the row whose data needs to be modified.
- Clicking the edit button on the right beside the "Delete" button.
- Enter the data in the field provided.
- Click "Submit" to save the data.
For reference, this is how the modal will look when the "Edit" icon is clicked for data modification:
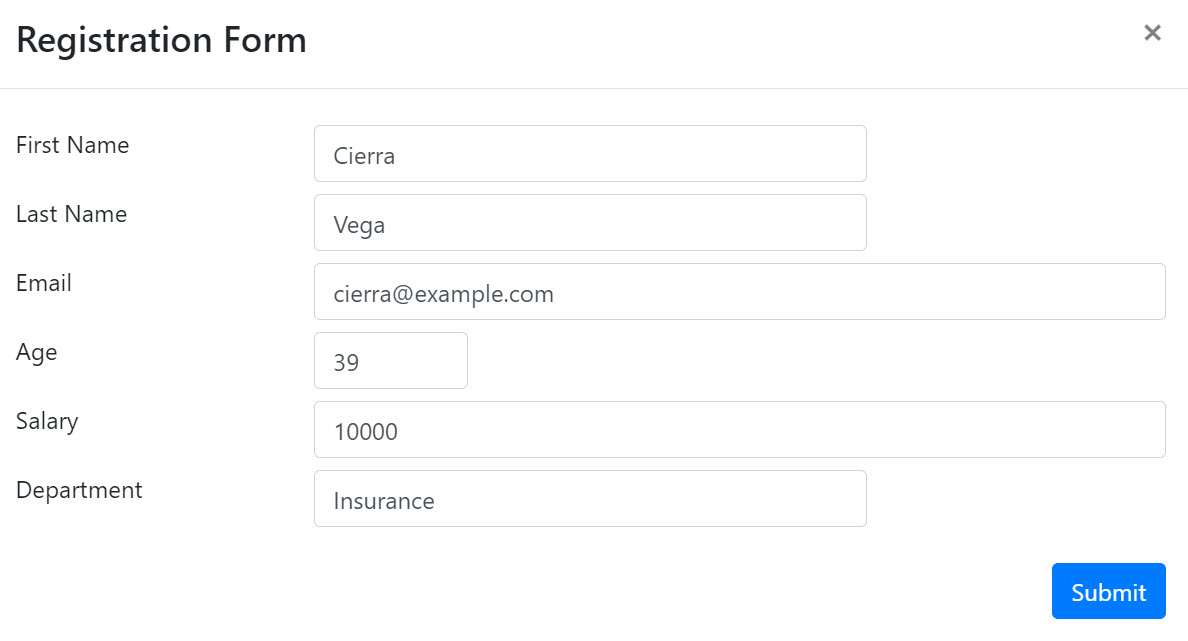
The instruction steps to modify the data of the table would be as follows:
click on first table at row containing "Vega"
click on "Edit"
enter "Hanks" in "Last Name"
click "Submit"
This will change the "Last Name" from "Cierra" to "Hanks". The following image shows the screenshot of these instruction steps on the platform:
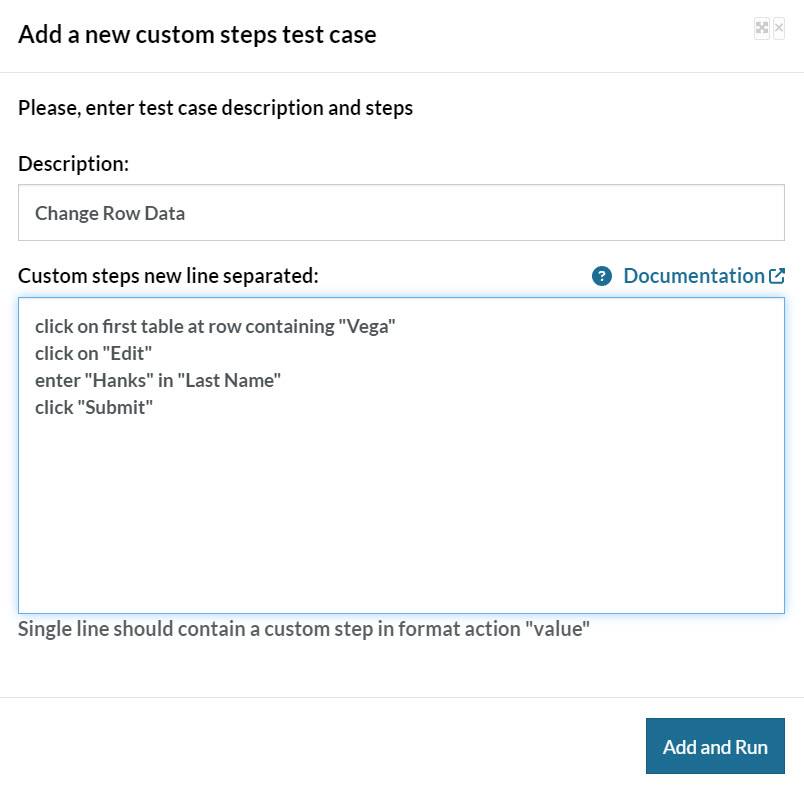
Select "Add and Run" to add this test case to the test suite and run automatically after addition.

The test case passed! If we click the last screenshot to view the status of our table, we can verify that the last name has changed to "Hanks"
testRigor provides us with the flexibility to write instruction steps in different ways. The above steps can also be written as:
click on first table at row containing "Vega"
click on "Edit" beside "Delete"
enter "Hanks" below "First Name"
click "Submit"
This will also result in the same outcome.
How to add a new row in a web table using testRigor?
In this last example, we will add a new row in the web table using the "Add" button located above the table. The modal that takes the input data for the new row will look as follows:
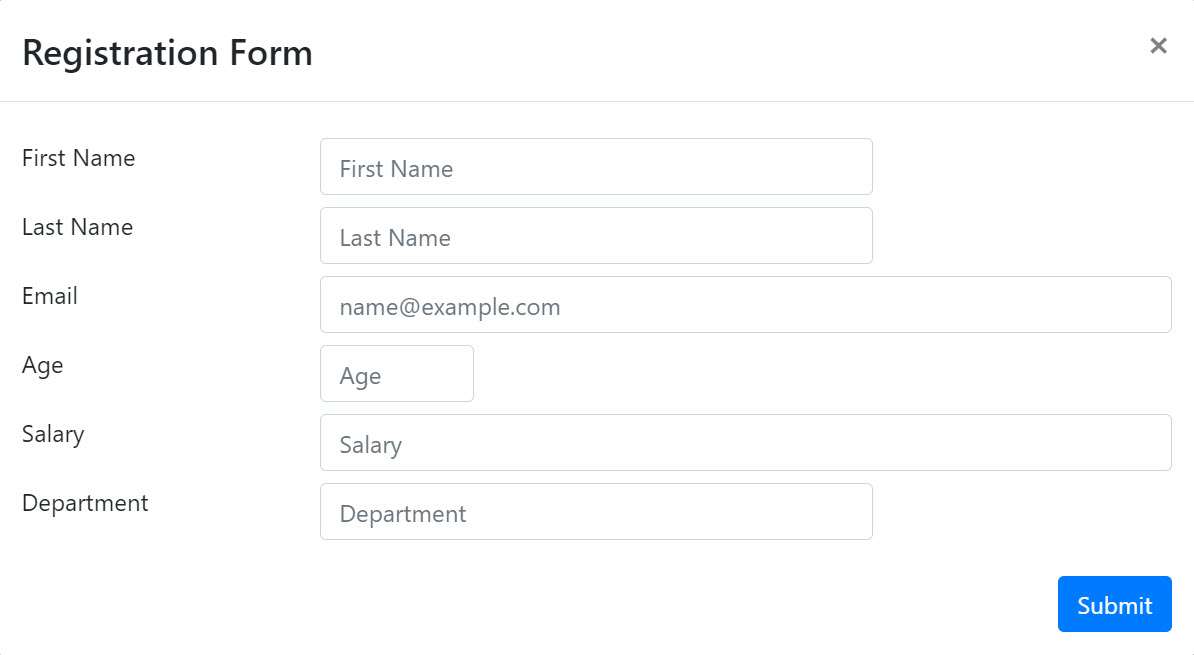
The instruction steps to execute the test case will look as follows:
click "Add" above first table
enter "Harish" in "First Name"
enter "Rajora" in "Last Name"
enter "[email protected]" below "Last Name"
enter "27" in "Age"
enter "250000" above "Department"
enter "Computer Science" in "Department"
click "Submit"
Notice that instead of directly executing the "enter <data> in <label>", we have used a combination of reference elements to locate the input field. testRigor identifies the location of the reference and then the input field based on that reference as follows:
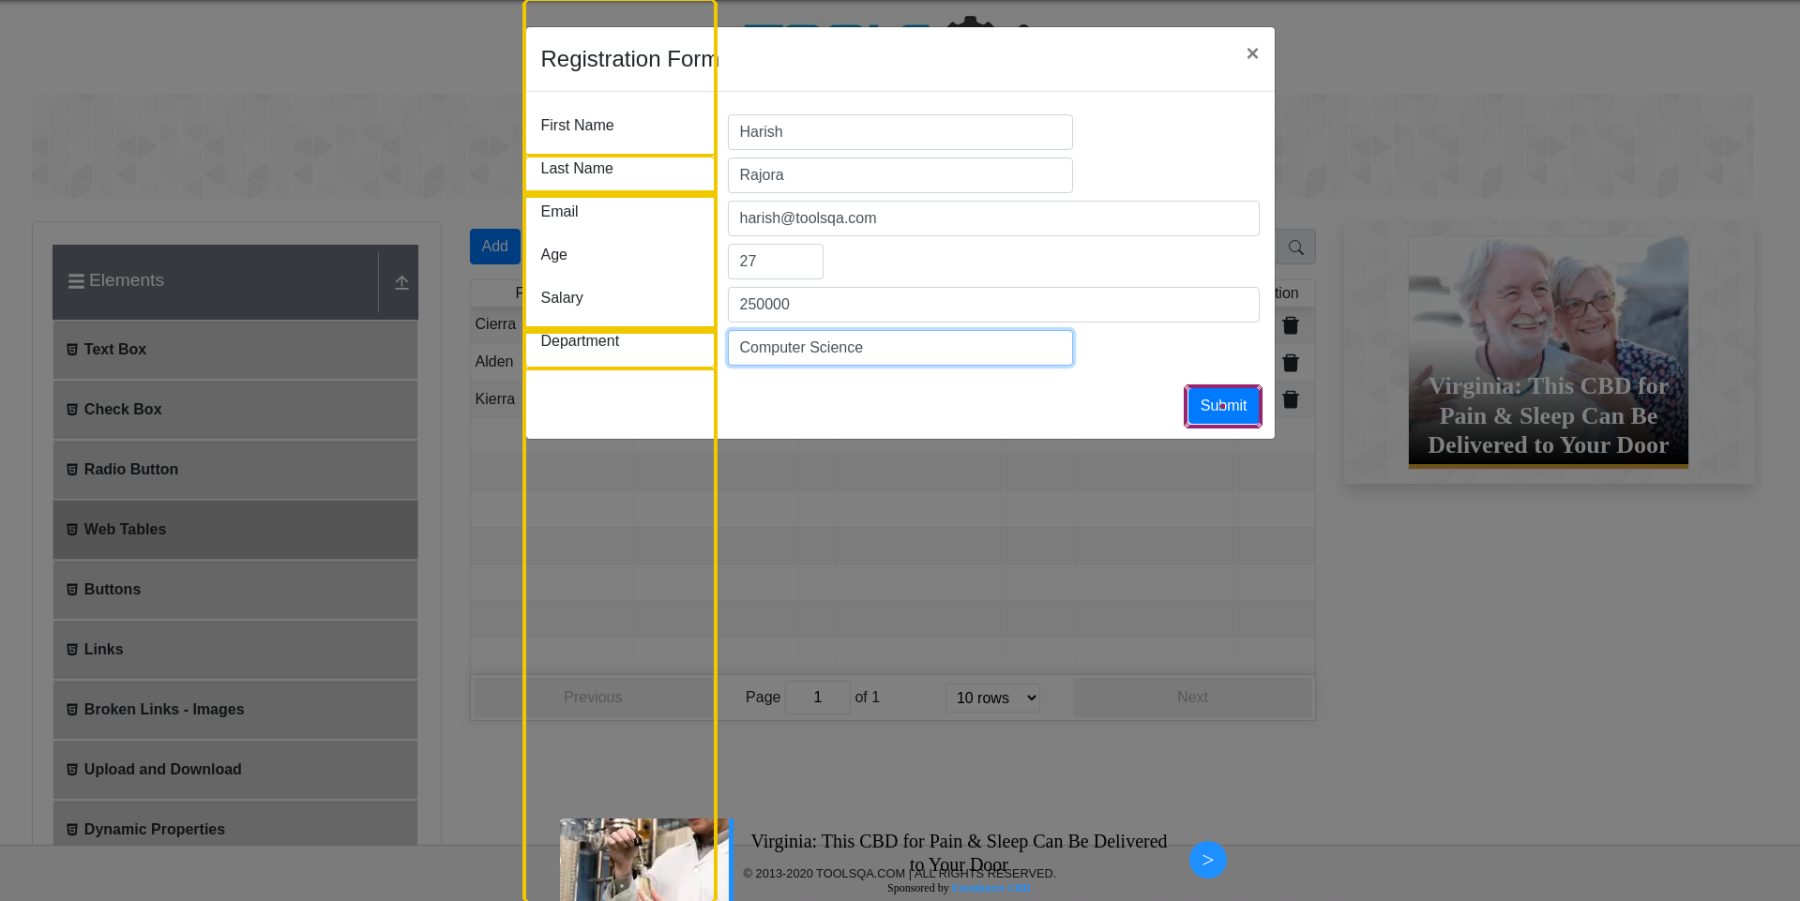
Execute the above instruction step and observe the results:

The test case has passed. If we open the last screenshot, we can verify that the new row adds successfully.
This brings us to the end of operations done on web tables using testRigor. As always, we recommend the testers to execute these test cases on various web tables using a variety of commands. As displayed in this post, one command can be written in different ways in testRigor. This makes it a highly flexible and customizable tool for testers. For any comments and queries, let us know through email on [email protected].
Conclusion
Web tables are an important part of data representation on a web page. They can deliver large amounts of data in a concise space reducing the bandwidth utilization and the readability for the user. Since they are related to data and its representation, testing them becomes a very important job to deliver correct information to the user. If the web table is developed to be used by the user directly, it requires testing the saving, editing, and deleting mechanisms including other web table functionalities provided by the developers.
This post tries to expand our testing horizon and make us aware of how to test web tables using testRigor easily and quickly. Since English is used as a medium of communication between the platform and the tester, I hope this tool was easy to learn and grasp and will help you test the web tables on a web application on the next project. There are more upcoming posts on testRigor and other cool testing platforms. Do subscribe to the newsletter and stay updated!