In the previous few posts dedicated to testRigor, we have reached a point where we can sign up for the platform and create a new test suite by filling in all the necessary information. Since test suites are a collection of test cases, we cannot run the suite unless we have at least one test case enclosed in it. Continuing in the same direction and using the same suite as before, in this post, we will look at the simplified explanation of creating a test case in testRigor and how to execute it successfully.
Table of contents
- How to create a test case in testRigor?
- How to run a test case in testRigor?
- Analyzing test case results in testRigor
- An alternative approach using different commands
How to create a test case in testRigor?
Before we start to create a test case in testRigor, it is important to brief yourself about creating test suites on the platform. If you are new to this concept, please refer to How to create test suites in testRigor guide for more information on it.
To create a test case in testRigor, select the option "Add Custom Test Case" from the test suite dashboard.

The test case panel will pop up.
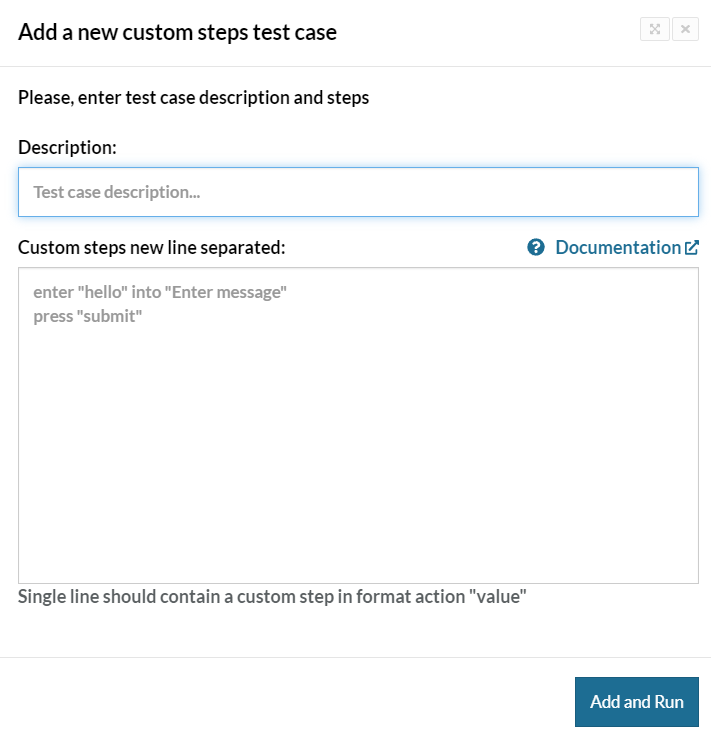
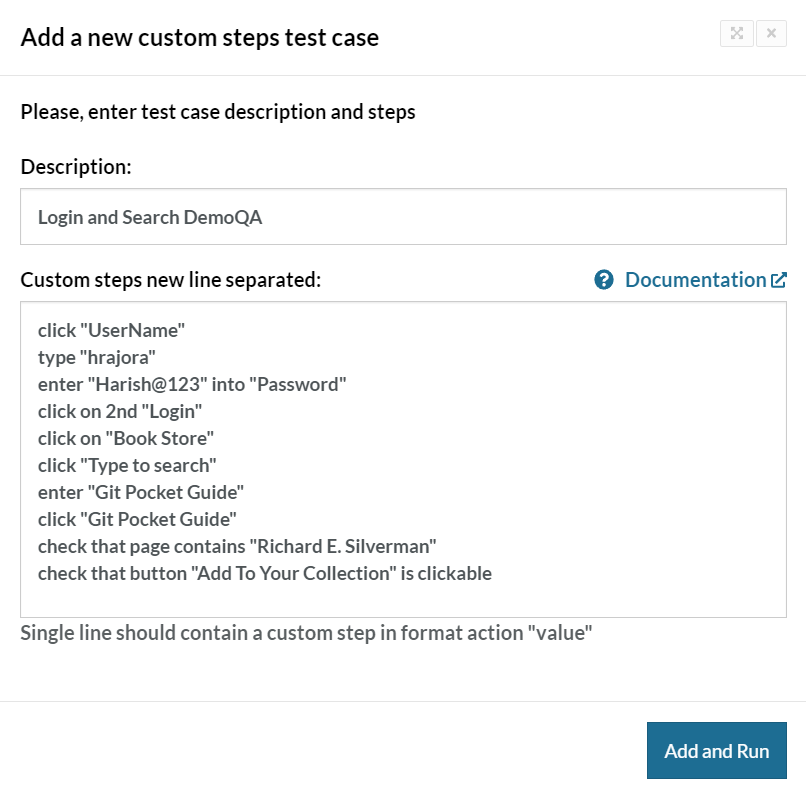
Here, we need to enter the description of the test case and the steps we want to execute. Since the description is what the test case is about, you can enter any meaningful (but your own choice of) words. In this post, we will be demonstrating the login scenario on the DemoQA website and then finding a book and searching for a string. I'll put the description as "Login and Search DemoQA".
Next, we step onto the "Custom Steps". Leaving the technical part aside for a second, as a tester or simply as a user, what are the steps that we take to log in to a website?
- First, we access the URL where we need to log in.
- Now we enter the username and password in the given fields (although fields may vary according to the web application).
- Next, we click the "Login" button and enter into the user panel.
- Now we click Book Store.
- Then, we move to the search bar and type the book we want to search for.
- Click on the book that comes as a result.
- Find the string on the page and whether a button is clickable or not.
The thing with testRigor is that it is an intelligent test automation system. If we can write a step-by-step script as a user in plain English as we did above, we have already completed 80% of the work in just a few minutes without any additional setup.
Once our steps are written we just need to make little modifications so that testRigor can understand what we are talking about. Let's see the transformation of the steps written above.
- Accessing a URL - This part is already done while filling in the details of the test suite. Please check out our post on test suites in testRigor to know more about it. We will be accessing the URL https://demoqa.com/login for these tests.
- Enter username - "enter hrajora into UserName"
- Enter password - "enter Harish@123 into Password"
- Click the Login button - "click on "Login""
- Click on "Book Store" - "click on "Book Store""
- Click on the search bar - "click "Type to search""
- Enter book name as Git Pocket Guide - "type "Git Pocket Guide""
- Click on the book - "click "Git Pocket Guide""
- Confirm whether string Richard E. Silverman exists or not - "check that page contains "Richard E. Silverman""
- Confirm whether the button "Add To Your Collection" is clickable or not - "check that button "Add To Your Collection" is clickable"
One other thing to note here, is that you can also simply say "Login" instead of steps 2-4 if you specify login credentials in the test suite settings. Need to create a new account each time test case runs? Easy. You can use commands such as "generate unique email", or even use RegEx for any specific format.
How to run a test case in testRigor?
Our test case panel would look like this once the details are filled.
 Press the Add and Run button in the bottom right corner to run your test cases. Once you do that, you will be back to the test suite dashboard with the test case shown as "In queue".

Besides the "In queue" label, press the down arrow button to expand the test case for further details. You will see something as follows:
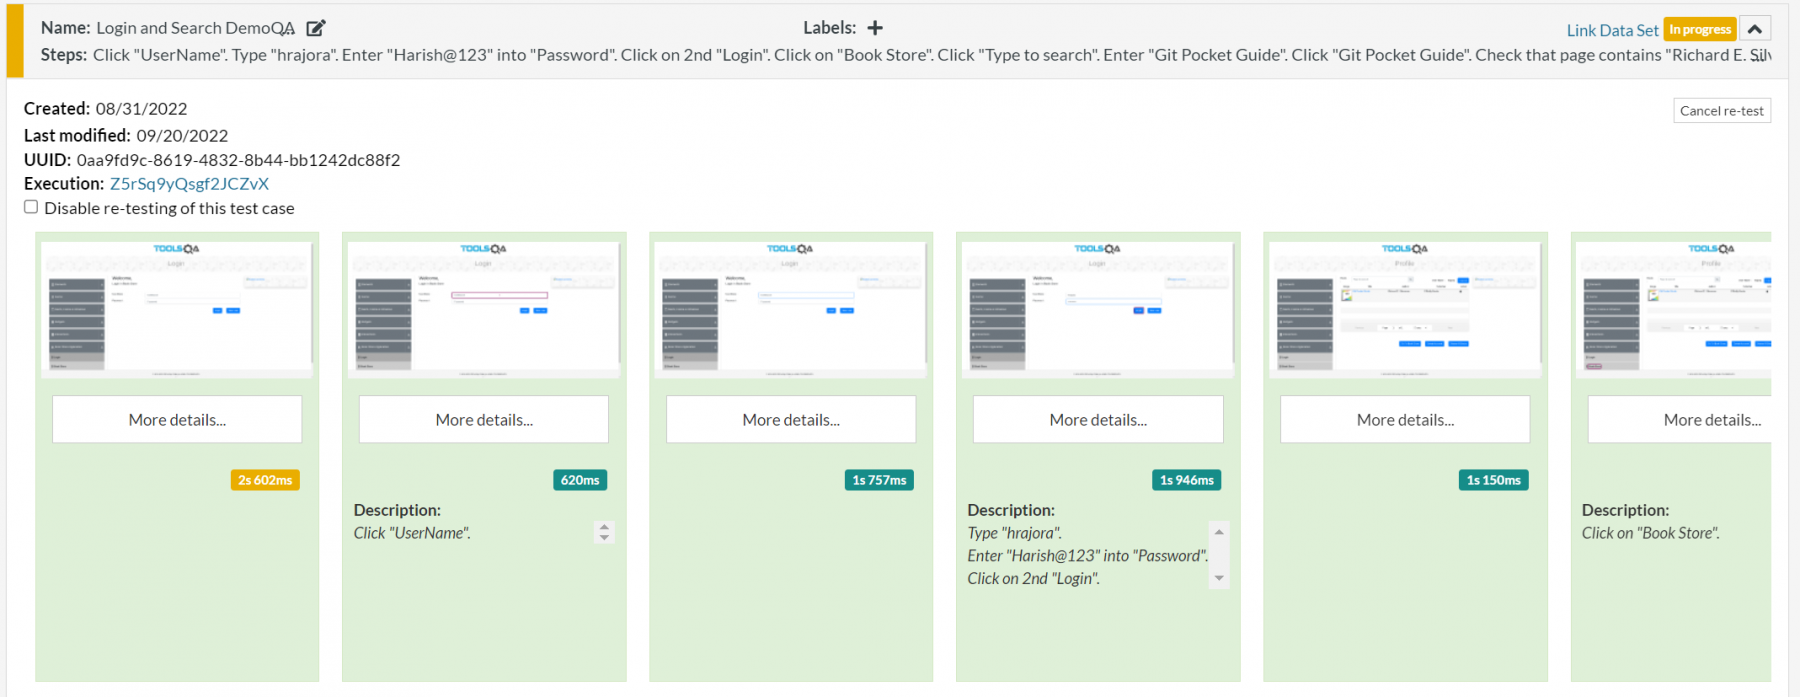
The images that we see below are the screenshots appearing for the test case in real time as it is executed (the test case execution is still in progress as seen in the image). The steps that were part of that screenshot are defined in the "Description". Since the first screenshot refers to just accessing the URL, it has no description. If I click on the fourth screenshot, I will be able to see the input fields filled with the values entered during test creation.

The tester can also press "More details..." which contains the individual execution time for that particular step. Let's examine the various components seen in the test results.
Analyzing test case results in testRigor
The test case contains a lot of components to consider. For simplicity, we've divided the panel into two divisions. The upper one (shown below) is the primary panel available without pressing the down arrow button. The detailed panel is visible after using the button.
The primary detail section looks as follows:

The numbered lines contain the following meanings to them:
- Name - This shows the name of the test referring to the one written during the test creation. The edit icon beside the name allows us to edit the name from this panel. With this, I have edited the name from "Login and Search DemoQA" to "Login DemoQA" just for demonstration.
- Steps: This defines the steps specified in the test execution.
- Videos: The videos of the test execution as it happened behind the scenes are available on the streaming and hosting website Vimeo. You can copy the link from here and share it with your teammates for analysis.
- Labels: The labels help define tests that are similar to each other under one category. Here, we have not put down any labels for now. You can press the "+" button and the label name will appear beside it.
- The fifth option contains three parts:
- Link Data Set: This option allows us to link any data set associated with the test suite. Currently, there is no data set linked.
- Passed: This option shows the current state of the test execution. Since our test passed, it shows "Passed" written on the label. It can take values of "In queue", "Failed" and "Passed".
- Time: Denotes the total time taken for the test execution.
- Quick actions: This option opens up three options to choose from namely "Edit test case", "Re-test" and "Delete". All these options are available as part of the detailed panel that comes after pressing the down arrow button shown in step 5. However, since you can access these options here without opening that panel, testRigor names it "Quick actions".
- Settings for some integrations will also appear here. For example, you can enable integration with your Jira project, which will allow you create a bug ticket in just a few clicks.
Click on the down arrow button to expand the detailed test case panel in testRigor:
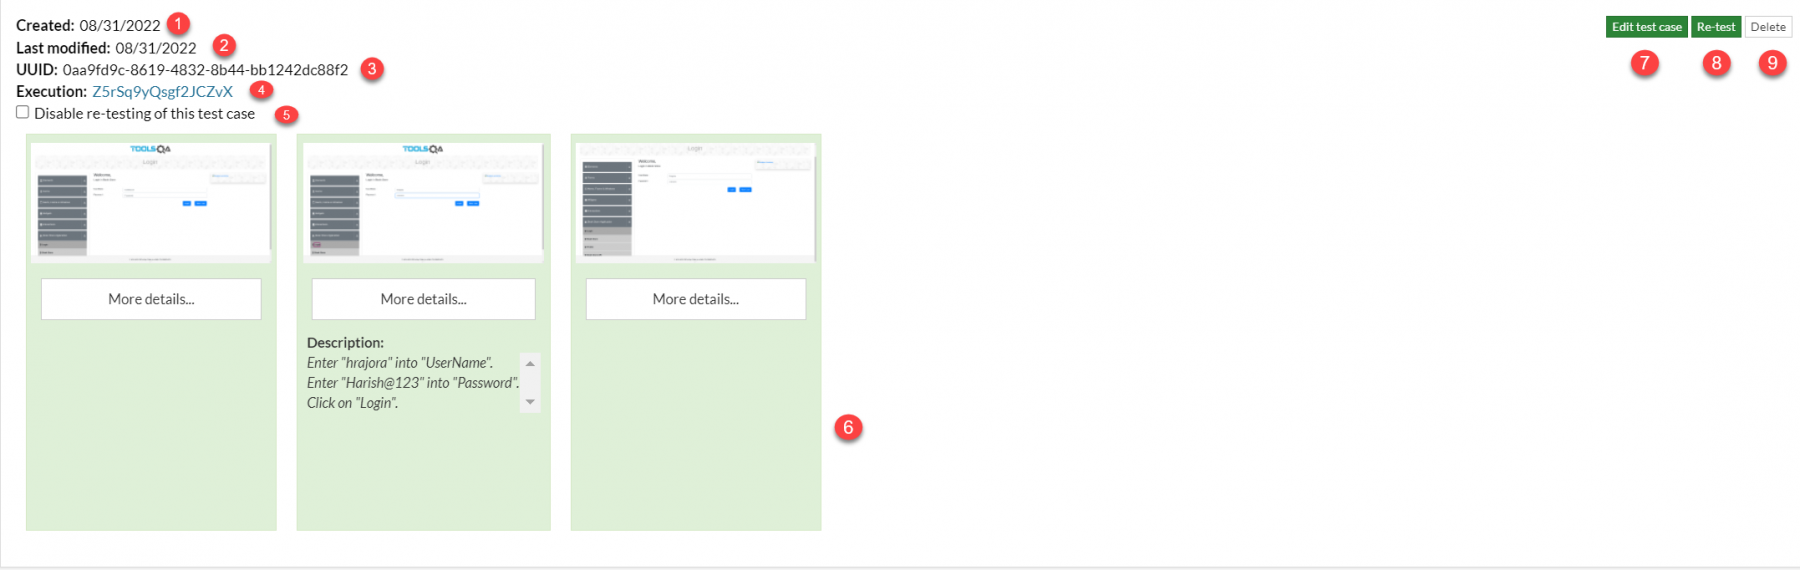
The numbered lines contain the following meanings to them:
- Created: The option defines the date when the test case was created.
- Last modified: The option defines the date when the test case was last modified.
- UUID: This is the universal ID of your test case. This is unique for each case across all the users to identify each test case uniquely by testRigor.
- Execution: The execution option shows the execution code of the test case as a link. Click the link to explore the execution on a single page:
- Disable re-test: Checking this box will disable the re-testing option for the test case. It freezes the test for no further changes.
- Screenshots: As explored earlier, the screenshots of the test cases are available referring to steps executed.
- Edit test case: This option opens up the same panel in which we entered the test case steps for the first time. Here, the user can edit the steps and other details related to the tests.
- Re-test: Once the changes are done, re-testing is required. This option helps in re-testing with new information. Also, recall that we analyzed a few settings in the test suite panel related to re-tests. Those settings will apply here. Please refer to the post for more info.
- Delete: This option will delete the test case from the suite.
All this information suffices our knowledge towards creating and analyzing a test case in testRigor.
An alternative approach using different commands
testRigor is an intelligent tool for test automation. Unlike strict programming languages, a tester gets the flexibility of choosing various options referring to the same element on the web page. For example, in the above section, we directly wrote:
enter "hrajora" into "UserName"
Whereas, I can also "click" on the input field and type "hrajora". Also, I can "copy-paste" the value "hrajora" directly. So, it depends on the tester which way they think is suitable. The list of commands that can help you get through can be found in the documentation section of testRigor. As for a small demonstration, let's edit our test case to the following steps:
click "UserName" type "hrajora" enter "Harish@123" into "Password" click on "Login"
Re-test with the above steps and the execution will be slightly different, but the result is exactly the same (as we would expect).
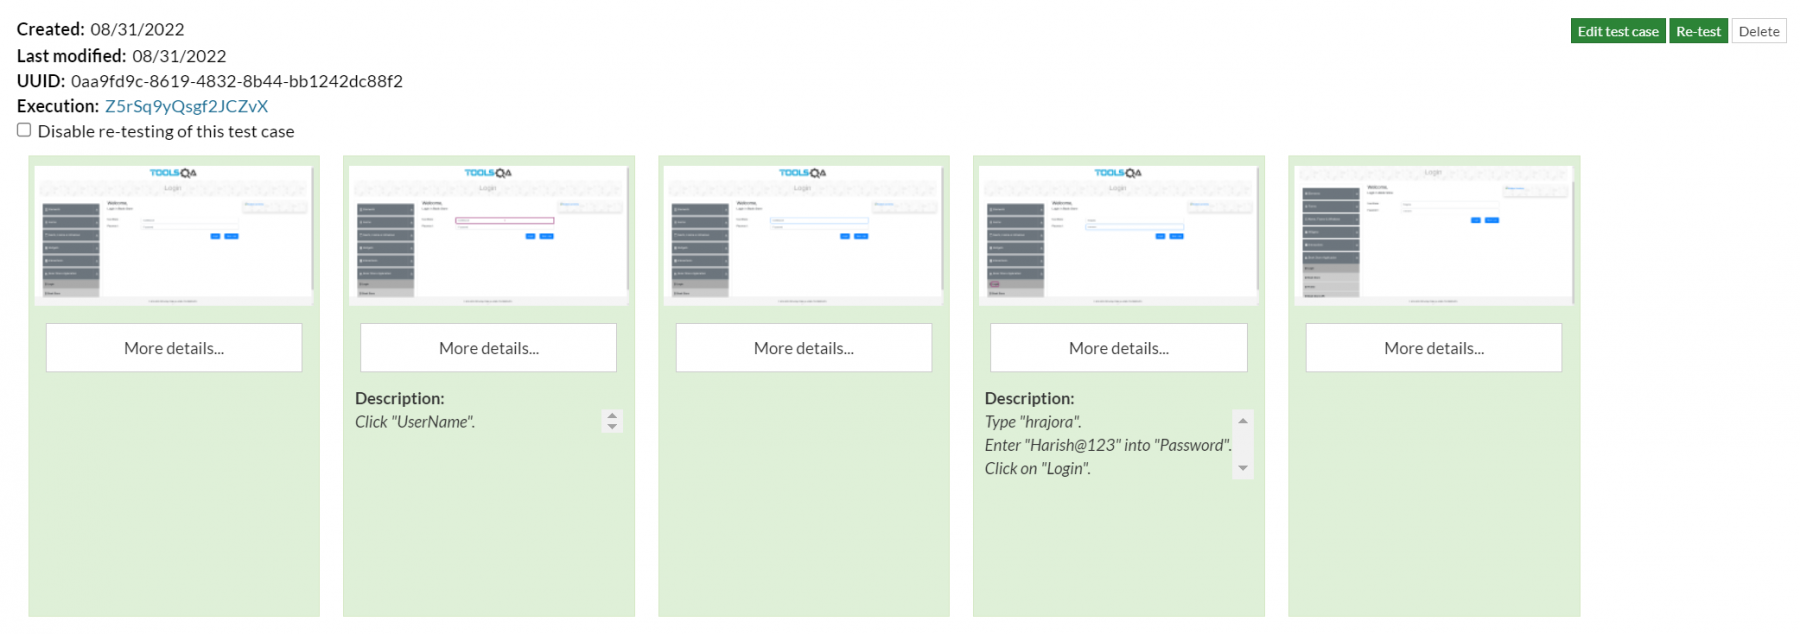
As you can observe, we have got additional two screenshots and in the second screenshot, a rectangular line is encircling the UserName field. This is because it clicked the field and then typed the name. You can play with these steps by referring to the documentation as per your wish.
What's next?
Executing the test case in testRigor is one of the most interesting things to witness. An intelligent tool reading English commands and executing tests within seconds is futuristic. However, as much as we enjoyed playing with a test case, testRigor has much more to offer in their bucket. In the next post, we will demonstrate how to add various validations to a test case and explore a few more interesting commands that facilitate the same process. Thank you for giving this post your valuable time.