Selenium WebDriver is the most used automation tool for the automation of web applications. Now, we know that these web applications are used by multiple users, and each one of those uses the applications as per their own data. So, considering the usage, it becomes the primary responsibility of the QAs also to test the web applications with varying data sets. Now the user journeys will be the same, but the data set will be different. Therefore, it makes more sense to execute the same test case with different data, instead of writing a separate test case for each user journey with each data set. This is where Microsoft Excel comes in handy, which is one of the favorite tools for storing test data. Excel in Selenium is one of the most used combinations for storing test data and then running the same test case against various data sets.
There are various libraries in JAVA which helps in reading/writing data from Excel files. But, Apache POI is one of the most used libraries, which provides various classes and methods to read/write data from various formats of Excel files (xls, xlsx etc). Subsequently, in this article, we will understand the details of Apache POI and how we can use the same to read/write data from Excel files, by covering the details under the following topics:
- What is Apache POI?
- How to manage Excel workbooks?
- How to manage Excel sheets?
- Also, how to manage Excel rows?
- How to manage Excel cells?
- How to read data from Excel in Selenium tests using Apache POI?
- Additionally, how to read a specific cell value?
- How to read the entire Excel sheet?
- How to write data in Excel in Selenium tests using Apache POI?
- Moreover, how to write to a new cell in an existing row?
- And, how to write to a new cell in a new row?
What is Apache POI?
Apache POI, where POI stands for (Poor Obfuscation Implementation) is an API that offers a collection of Java libraries that helps us to read, write, and manipulate different Microsoft files such as excel sheets, power-point, and word files.
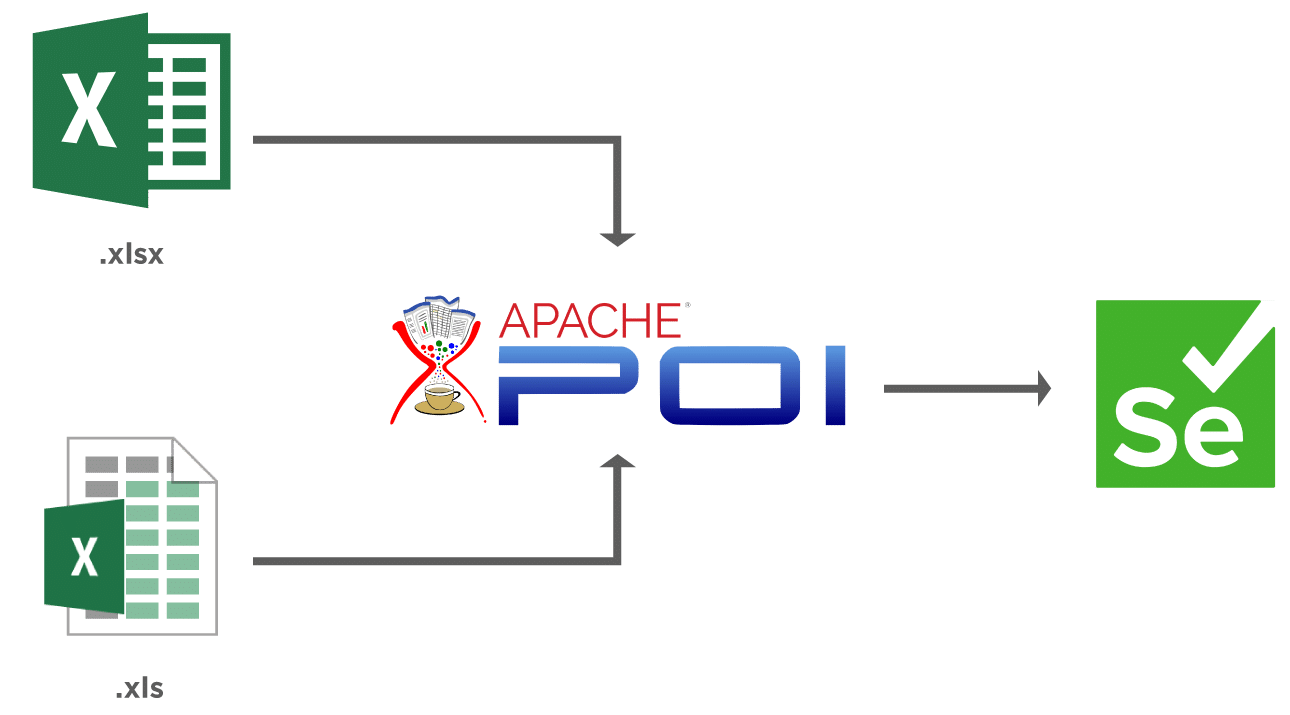
Apache POI uses certain terms to work with Microsoft Excel. Let's get familiar with these before we go into the details of the code.
| Term | Details |
|---|---|
| Workbook | A workbook represents a Microsoft Excel file. It can be used for creating and maintaining the spreadsheet. A workbook may contain many sheets. |
| Sheet | A sheet refers to a page in a Microsoft Excel file that contains the number of rows and columns. |
| Row | A row represents a collection of cells, which is used to represent a row in the spreadsheet. |
| Cell | A cell is indicated by a row and column combination. Data entered by a user is stored in a cell. Data can be of the type such as string, numeric value, or formula. |
Before we start, the first step is to download the jar files required to use the library. You can download the Apache POI library by referring to Steps to Download Apache POI.
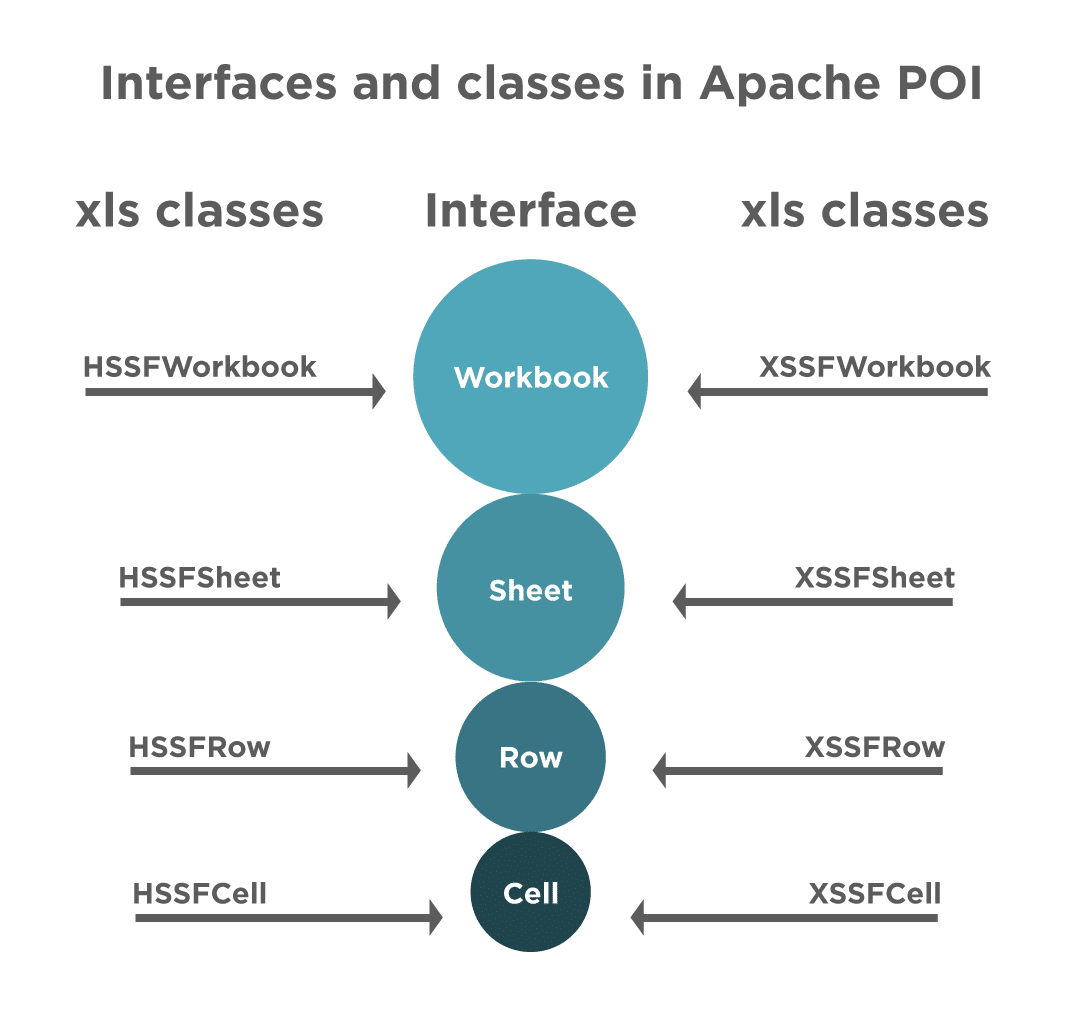
The below image clearly depicts the structure and how the classes and interfaces are aligned in Apache POI.
Let's now understand how we can access and manage various components in an Excel file using Apache POI ?
How to manage Excel workbooks pragmatically?
Apache POI provides various interfaces and classes that help us to work with Excel. It provides a "Workbook " interface to maintain Excel Workbooks. There are certain classes that implement this interface and we use these classes to create, modify, read, and write data in Excel files. The two mainly used classes for managing Excel Workbooks are:
- HSSFWorkbook- These class methods are used to read/write data to Microsoft Excel file in .xls format. It is compatible with MS-Office versions 97–2003.
- XSSFWorkbook- These class methods are used to read-write data to Microsoft Excel in .xls or .xlsx format. It is compatible with MS-Office versions 2007 or later.
How to manage Excel sheets programmatically?
There is another interface, "Sheet ", which we use to create a sheet in the Workbook. There are two classes that used to work with sheets, same as we have for Workbook Interface:
- HSSFSheet - This class is used to create a new sheet in the HSSFWorkbook, ie, the older format of Excel.
- XSSFSheet - This class is used to create a new sheet in the XSSFWorkbook., ie, the new format of Excel
How to manage Excel rows pragmatically?
The Row interface provides us with the ability to work with rows in the Excel sheet. Below two classes implement this interface:
- HSSFRow - This represents a row in the HSSFSheet.
- XSSFRow - This represents a row in the XSSFSheet.
How to manage Excel cells?
The Cell interface helps us in accessing the cells of a particular row. There are two classes that implement this interface and we can use for reading/writing data into the cell:
- HSSFCell - We use it to work with cells of HSSFRow.
- XSSFCell - We use it to work with cells of XSSFRow.
Now that we have gone through the details of the Apache POI library, let's try to use it to read and write into Excel Files using Selenium WebDriver.
How to read data from Excel in Selenium tests using Apache POI?
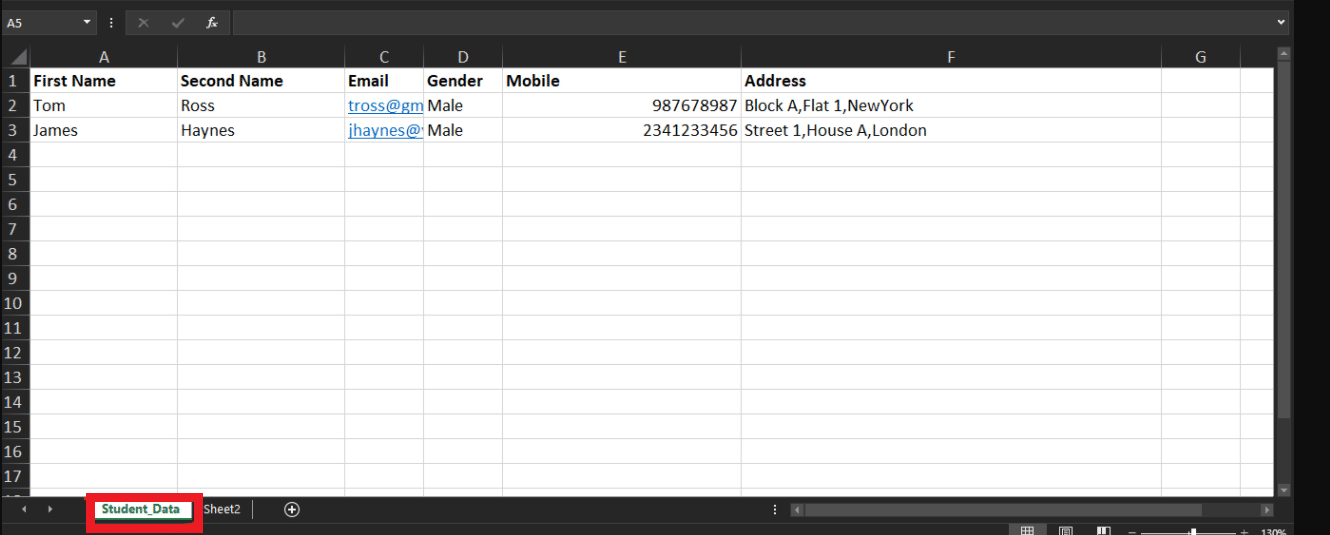
Suppose, for a Selenium test case, we need to read the student data from the Excel Sheet, having a sample data as shown below:
While reading the Excel file, Apache POI can read data in two ways:
- You want to read the value of a particular cell, for instance, you want to get the address of the student present in the second row.
- You can read the entire excel in one go. It is based upon the need for your test script and the data needed for test execution.
We will understand both the ways of reading the excel in Selenium, but before that, there are some common steps to follow:
- The first step is to obtain the Excel Workbook based upon its location on the computer. You can create an object of the workbook by referring to the FileInputStream object that points to the excel file. We can do it as shown below using the HSSFWorkbook Class. If you are using MS-Office versions 97–2003 or XSSFWorkbook Class if MS-Office versions 2007 or later. In the below line, we use HSSFWorkbook as an Excel version is 97-2003.
File file =    new File("E:\\TestData\\TestData.xls");
FileInputStream inputStream = new FileInputStream(file);
HSSFWorkbook wb=new HSSFWorkbook(inputStream);
- Once we create the Workbook, the next step is to create a Sheet in the Workbook. Additionally, we can do it as below using the name of the sheet in the getSheet (String sheetName) method. Here, "STUDENT_DATA" is the name of the sheet in the Excel Workbook.
HSSFSheet sheet=wb.getSheet("STUDENT_DATA");
You can also create a sheet based upon the index using the getSheetAt (int index) method as shown below -
HSSFSheet sheet1=wb.getSheetAt(1);
- After the sheet creation, we have to obtain the row of the sheet, which we can retrieve using the getRow (int rowIndex) method of the sheet object:
HSSFRow row1=sheet.getRow(1);
- Once you have got the row, you can get the cell of the row using the getCell (int index) method of the HSSFRow class:
sheet.getRow(1).getCell(1)
- After you obtain the cell that contains the data, you can read the data in different formats like String, Date, Number using the different methods which are based upon the format of the cell you specify in the excel sheet.
- String - getStringCellValue() [It can be used to read Name of the student from Excel ]
- Number - getNumericCellValue() [It can be used to read the mobile number of the student]
- Date - getDateCellValue() [It can be used to read the Date of Birth of the student]
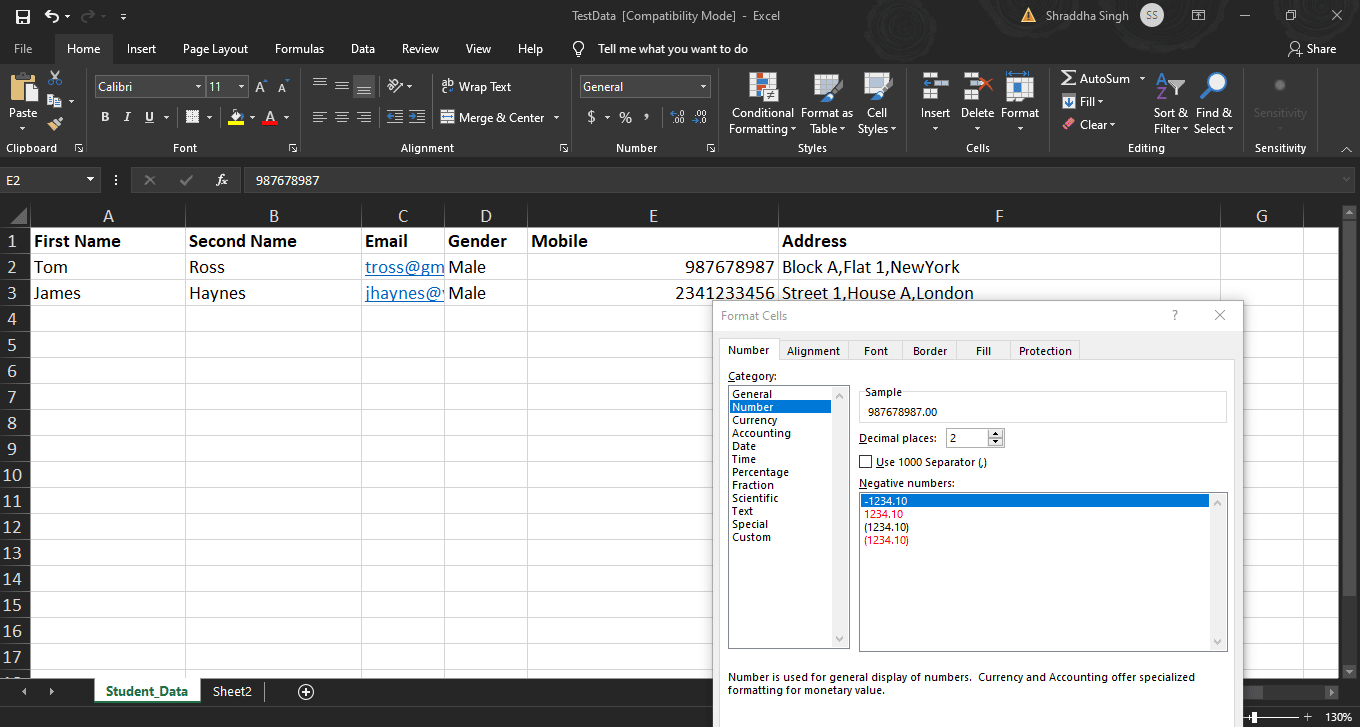
The image above shows the formats feasible for a cell value in Excel(General, Text, Number, Date, Time). For an easier approach, you can specify all values as Text (even numbers) and read them in the String variable.
How to read a specific cell value?
Now that we are familiar with the different classes and the method provided by the Apache POI library, let's try to combine them in a code snippet, where we try to read the Address of the student in the first row in our sample Excel. The Address is present in cell number 5 of the row.
Note: Index starts from zero for both the row and cell.

You can use the below code snippet to print the address as highlighted in the above image using the methods explained above -
import org.apache.poi.hssf.usermodel.HSSFCell;
import org.apache.poi.hssf.usermodel.HSSFRow;
import org.apache.poi.hssf.usermodel.HSSFSheet;
import org.apache.poi.hssf.usermodel.HSSFWorkbook;
import java.io.File;
import java.io.FileInputStream;
import java.io.IOException;

public class ApachePOI {
    public static  void main(String args[]) throws IOException {

        //Create an object of File class to open xlsx file
        File file =    new File("E:\\TestData\\TestData.xls");

        //Create an object of FileInputStream class to read excel file
        FileInputStream inputStream = new FileInputStream(file);

        //Creating workbook instance that refers to .xls file
        HSSFWorkbook wb=new HSSFWorkbook(inputStream);

        //Creating a Sheet object using the sheet Name
        HSSFSheet sheet=wb.getSheet("STUDENT_DATA");

        //Create a row object to retrieve row at index 1
        HSSFRow row2=sheet.getRow(1);

        //Create a cell object to retreive cell at index 5
        HSSFCell cell=row2.getCell(5);

        //Get the address in a variable
        String address= cell.getStringCellValue();

        //Printing the address
        System.out.println("Address is :"+ address);
    }
}
When we run the above program, we will get the output as follows:

The highlighted area shows the address of the first student that is printed using the code.
Now that we have understood how to read a particular cell value, we will now take a look at how to read the complete data from the Excel File.
How to read the entire Excel sheet?
To read the complete data from Excel, you can iterate over each cell of the row, present in the sheet. For iterating, you need the total number of rows and cells present in the sheet. Additionally, we can obtain the number of rows from the sheet, which is basically the total number of rows that have data present in the sheet by using the calculation -
RowCount = LastRowNumber -First Row Number
To get the last and first-row number, there are two methods in the sheet class:
- getLastRowNum()
- getFirstRowNum()
So, we can obtain the row count using the below code:
int rowCount=sheet.getLastRowNum()-sheet.getFirstRowNum();
Once you get the row, you can iterate over the cells present in the row by using the total number of cells, that we can calculate using getLastCellNum() method:
int cellcount=sheet.getRow(1).getLastCellNum();
Let's try to print the entire data present in the sheet using the below code:
import org.apache.poi.hssf.usermodel.HSSFSheet;
import org.apache.poi.hssf.usermodel.HSSFWorkbook;
import java.io.File;
import java.io.FileInputStream;
import java.io.IOException;

public class ApachePOI {
    public static  void main(String args[]) throws IOException {
        //Create an object of File class to open xlsx file
        File file =    new File("E:\\TestData\\TestData.xls");

        //Create an object of FileInputStream class to read excel file
        FileInputStream inputStream = new FileInputStream(file);

        //creating workbook instance that refers to .xls file
        HSSFWorkbook wb=new HSSFWorkbook(inputStream);

        //creating a Sheet object
        HSSFSheet sheet=wb.getSheet("STUDENT_DATA");

        //get all rows in the sheet
        int rowCount=sheet.getLastRowNum()-sheet.getFirstRowNum();

        //iterate over all the row to print the data present in each cell.
        for(int i=0;i<=rowCount;i++){

            //get cell count in a row
            int cellcount=sheet.getRow(i).getLastCellNum();

            //iterate over each cell to print its value
            System.out.println("Row"+ i+" data is :");

            for(int j=0;j<cellcount;j++){
                System.out.print(sheet.getRow(i).getCell(j).getStringCellValue() +",");
            }
            System.out.println();
        }
    }
}
The output of the code snippet is:

In the above image, you can see that the data present in the excel prints and also notice that Row 0 prints the Title. Moreover, you can avoid printing the title by starting the loop from value =1 instead of 0.
How to write data in Excel in Selenium tests using Apache POI?
Similar to reading, writing data in Excel files can be as important, as it can serve to save the test results back in the Excel sheets. Apache POI provides various set methods, which we can use to write the data in an Excel in Selenium tests itself. Consequently, let’s see how we can achieve the same:
How to write to a new cell in an existing row?
Suppose, we want to write the result of the test run using the given test data in the same row, in which we have the input data. Consider, we just have to put a "PASS/FAIL" in the last column of the row, we can achieve the same using Apache POI as shown below:
HSSFCell cell = sheet.getRow(1).createCell(6);
          if(confirmationMessage.isDisplayed()){
              cell.setCellValue("PASS");
          }else{
              cell.setCellValue("FAIL");
          }

//To write into Excel File
FileOutputStream outputStream = new FileOutputStream("E:\\TestData\\TestData.xls");
wb.write(outputStream);
Suppose consider a scenario that on page "https://demoqa.com/automation-practice-form", we have the fill the student registration form by reading the data from an Excel file and then append the result in the last cell of the row, if it was successful. Subsequently, we can achieve the same with the help of using data of Excel in Selenium using Apache POI library, as shown below:
import org.apache.poi.hssf.usermodel.HSSFCell;
import org.apache.poi.hssf.usermodel.HSSFSheet;
import org.apache.poi.hssf.usermodel.HSSFWorkbook;
import org.openqa.selenium.By;
import org.openqa.selenium.JavascriptExecutor;
import org.openqa.selenium.WebDriver;
import org.openqa.selenium.WebElement;
import org.openqa.selenium.chrome.ChromeDriver;
import java.io.File;
import java.io.FileInputStream;
import java.io.FileOutputStream;
import java.io.IOException;
import java.util.concurrent.TimeUnit;

public class WriteToExcel {
    public static  void main(String args[]) throws IOException {
        //set the ChromeDriver path
        System.setProperty("webdriver.chrome.driver","E:\\Projects\\chromedriver.exe");

        //Create an object of File class to open xls file
        File file =    new File("E:\\TestData\\TestData.xls");

        //Create an object of FileInputStream class to read excel file
        FileInputStream inputStream = new FileInputStream(file);

        //creating workbook instance that refers to .xls file
        HSSFWorkbook wb=new HSSFWorkbook(inputStream);

        //creating a Sheet object
        HSSFSheet sheet=wb.getSheet("STUDENT_DATA");

        //get all rows in the sheet
        int rowCount=sheet.getLastRowNum()-sheet.getFirstRowNum();

       //Creating an object of ChromeDriver
        WebDriver driver = new ChromeDriver();

        //Navigate to the URL
        driver.get("https://demoqa.com/automation-practice-form");


        //Identify the WebElements for the student registration form
        WebElement firstName=driver.findElement(By.id("firstName"));
        WebElement lastName=driver.findElement(By.id("lastName"));
        WebElement email=driver.findElement(By.id("userEmail"));
        WebElement genderMale= driver.findElement(By.id("gender-radio-1"));
        WebElement mobile=driver.findElement(By.id("userNumber"));
        WebElement address=driver.findElement(By.id("currentAddress"));
        WebElement submitBtn=driver.findElement(By.id("submit"));


        //iterate over all the rows in Excel and put data in the form.
        for(int i=1;i<=rowCount;i++) {
            //Enter the values read from Excel in firstname,lastname,mobile,email,address
            firstName.sendKeys(sheet.getRow(i).getCell(0).getStringCellValue());
            lastName.sendKeys(sheet.getRow(i).getCell(1).getStringCellValue());
            email.sendKeys(sheet.getRow(i).getCell(2).getStringCellValue());
            mobile.sendKeys(sheet.getRow(i).getCell(4).getStringCellValue());
            address.sendKeys(sheet.getRow(i).getCell(5).getStringCellValue());

            //Click on the gender radio button using javascript
            JavascriptExecutor js = (JavascriptExecutor) driver;
            js.executeScript("arguments[0].click();", genderMale);

            //Click on submit button
            submitBtn.click();

            //Verify the confirmation message
            WebElement confirmationMessage = driver.findElement(By.xpath("//div[text()='Thanks for submitting the form']"));

            //create a new cell in the row at index 6
            HSSFCell cell = sheet.getRow(i).createCell(6);

            //check if confirmation message is displayed
            if (confirmationMessage.isDisplayed()) {
                // if the message is displayed , write PASS in the excel sheet
                cell.setCellValue("PASS");

            } else {
                //if the message is not displayed , write FAIL in the excel sheet
                cell.setCellValue("FAIL");
            }

            // Write the data back in the Excel file
            FileOutputStream outputStream = new FileOutputStream("E:\\TestData\\TestData.xls");
            wb.write(outputStream);

            //close the confirmation popup
            WebElement closebtn = driver.findElement(By.id("closeLargeModal"));
            closebtn.click();

            //wait for page to come back to registration page after close button is clicked
            driver.manage().timeouts().implicitlyWait(2000, TimeUnit.SECONDS);
        }

        //Close the workbook
        wb.close();

        //Quit the driver
        driver.quit();
        }
}
We can see the output of the above code by opening the excel file that we use in the code (in our case "E:\TestData\TestData.xls" ) :

As seen in the image above, PASS is written into Excel File after the test execution against the student data which was registering at the given time.
Now suppose, if we need to write the data in a new row altogether, we can also achieve the same by using Apache POI. Subsequently, let’s see how to write data to a new cell in a new row?
How to write to a new cell in a new row?
The Apache POI sheet class provides methods to create new rows and then cells in these rows. Moreover, you can create a new row in an Excel sheet as follows:
HSSFRow row3=sheet.createRow(3);
After the row creates, we can create the cells and input the data in the excel sheet, as shown below-
row3.createCell(0).setCellValue("Diana");
row3.createCell(1).setCellValue("Jane");
row3.createCell(2).setCellValue("Female");
Subsequently, let’s write additional student data in the sheet by creating a new row in our sample Excel:
import org.apache.poi.hssf.usermodel.HSSFRow;
import org.apache.poi.hssf.usermodel.HSSFSheet;
import org.apache.poi.hssf.usermodel.HSSFWorkbook;
import java.io.File;
import java.io.FileInputStream;
import java.io.FileOutputStream;
import java.io.IOException;

public class WriteToExcel {
    public static  void main(String args[]) throws IOException {

    	//Create an object of File class to open xlsx file
        File file =    new File("E:\\TestData\\TestData.xls");

        //Create an object of FileInputStream class to read excel file
        FileInputStream inputStream = new FileInputStream(file);

        //creating workbook instance that refers to .xls file
        HSSFWorkbook wb=new HSSFWorkbook(inputStream);

        //creating a Sheet object using the sheet Name
        HSSFSheet sheet=wb.getSheet("STUDENT_DATA");

        //Create a row object to retrieve row at index 3
        HSSFRow row2=sheet.createRow(3);

        //create a cell object to enter value in it using cell Index
        row2.createCell(0).setCellValue("Diana");
        row2.createCell(1).setCellValue("Jane");
        row2.createCell(2).setCellValue("[email protected]");
        row2.createCell(3).setCellValue("Female");
        row2.createCell(4).setCellValue("8786858432");
        row2.createCell(5).setCellValue("Park Lane, Flat C1 , New Jersey");

        //write the data in excel using output stream
        FileOutputStream outputStream = new FileOutputStream("E:\\TestData\\TestData.xls");
        wb.write(outputStream);
        wb.close();

    }
}
Consequently, the output of the above code will appear in the Excel sheet which looks like -
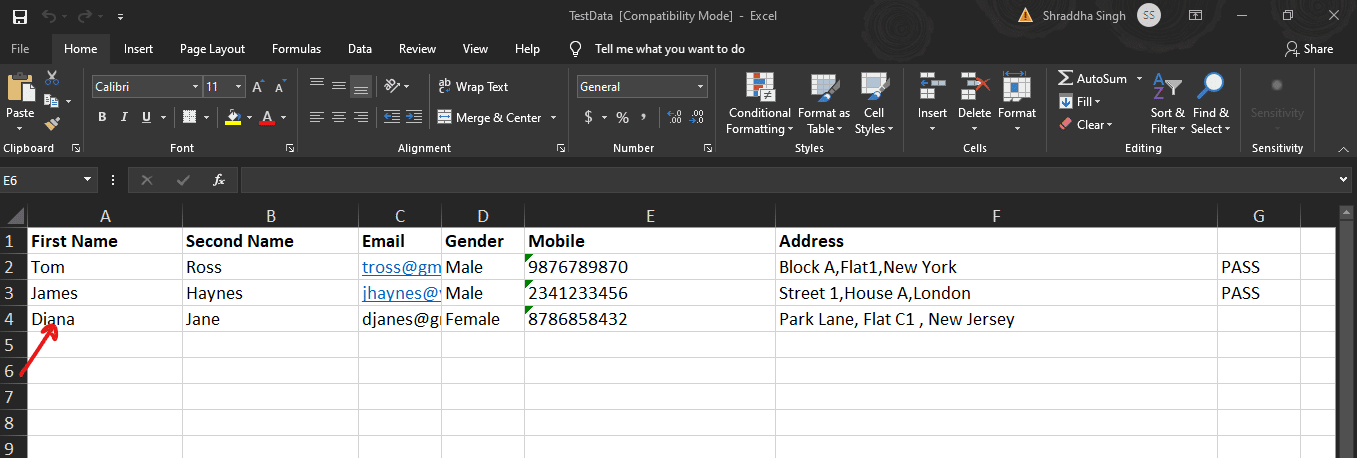
As seen in the above image, we add an additional row to the Excel Sheet having the same details as in the code.
