Once you are done with your basic test, next thing you need to do is to step up Action Keywords for your test steps and record them in to the Excel sheet. After that a separate class will be created for Action Keywords, so that they can be easily callable in the test with following the keyword driven methology.
Identify Action Keywords
- Create a ‘New Package’ and name it as ‘dataEngine’, by right click on the Project and select New > Package. We will be creating different packages for Utilities & Configuration files. It is always recommended to use this structure, as it is easy to understand, easy to use and easy to maintain.
- Create an ExcelSheet file and name it as ‘DataEngine‘, by right click on the above-created Package and select New > File.
Note: If in case you do not see any option to create a new Excel file from Eclipse IDE, you can simply go to the 'dataEngine' package directory locally on your computer and place a newly created Excel file there and then refresh your project folder in Eclipse.
-
Open the Excel and rename the 'Sheet 1' to 'Test Steps'.
-
Create the following columns in the 'Test Steps' sheet:
- TestCase ID : Test Case IDs will be stored in these columns, such as LogIn_001, Automation_001, etc.
- TestScenario ID : Test Scenario IDs will be stored in this, such as TS_01, TS_02, etc.
- Description : This will store a small description of the Test Step.
- Action_Keyword : This will be the keywords for the Actions.
-
Choose logical names for every action in the test. Action Keywords represent the required action on the object .
-
Open the Browser : Action Keyword for this action can be 'openBrowser' or 'startBrowser' or 'initiateBrowser'
-
Navigate to Website : Action Keyword for this action can be simple 'navigate' or 'openUrl'
Note: Choose Action Keywords very carefully, as it remains the same throughout the project.
Your ‘DataEngine‘ sheet will look like this:

Implement Action Keywords
- Create a ‘New Package’ and name it as ‘config’, by right click on the Project and select New > Package.
- Create a ‘New Class’ file and name it as ‘ActionKeywords‘, by right click on the above-created Package and select New > File.
- Now create 'Static' methods for each Action Keyword we have recorded in the Excel.
package config;

import java.util.concurrent.TimeUnit;

import org.openqa.selenium.By;
import org.openqa.selenium.WebDriver;
import org.openqa.selenium.firefox.FirefoxDriver;

public class ActionKeywords {

		public static WebDriver driver;

	public static void openBrowser(){
		driver=new FirefoxDriver();
		}

	public static void navigate(){
		driver.manage().timeouts().implicitlyWait(10, TimeUnit.SECONDS);
		driver.get("https://www.store.demoqa.com");
		}

	public static void click_MyAccount(){
		driver.findElement(By.xpath(".//*[@id='account']/a")).click();
		}

	public static void input_Username(){
		driver.findElement(By.id("log")).sendKeys("testuser_3");
		}

	public static void input_Password(){
		driver.findElement(By.id("pwd")).sendKeys("Test@123");
		}

	public static void click_Login(){
		driver.findElement(By.id("login")).click();
		}

	public static void waitFor() throws Exception{
		Thread.sleep(5000);
		}

	public static void click_Logout(){
		driver.findElement (By.xpath(".//*[@id='account_logout']/a")).click();
		}

	public static void closeBrowser(){
			driver.quit();
		}

	}
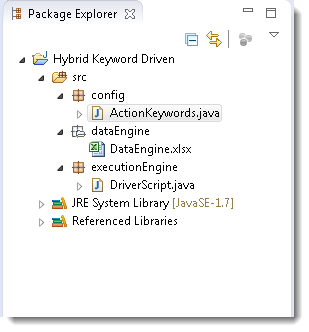
Now you project folder will look like this:
To run the 'driverScript' with above code, it is required to change the code of main driver script. Next chapter is all about setting up the Driver Script class with Data Engine excel.


