The next target is to test or run the feature file and in order to test the feature file, we need to write the implementation or step definition for each step in the feature file in java. When Cucumber executes a Step in a Scenario it will look for a matching Step Definition to execute.
What is Step Definition?
A Step Definition is a small piece of code with a pattern attached to it or in other words a Step Definition is a java method in a class with an annotation above it. An annotation followed by the pattern is used to link the Step Definition to all the matching Steps, and the code is what Cucumber will execute when it sees a Gherkin Step. Cucumber finds the Step Definition file with the help of the Glue code in Cucumber Options. We will cover different Cucumber Options in the next chapter.
Add a Step Definition file
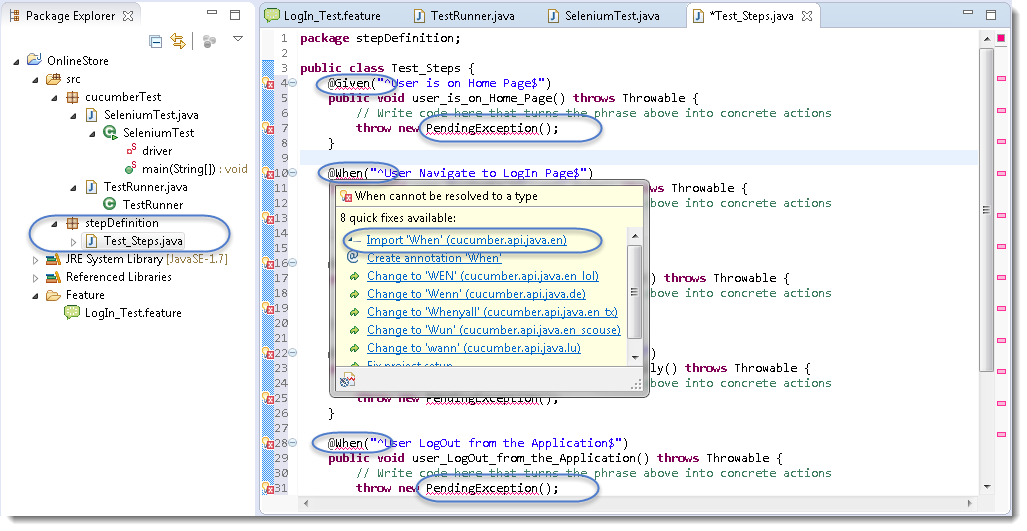
1) Create a new Class file in the ‘stepDefinition‘ package and name it as ‘Test_Steps‘, by right click on the Package and select New > Class. Do not check the option for ‘public static void main‘ and click on Finish button.
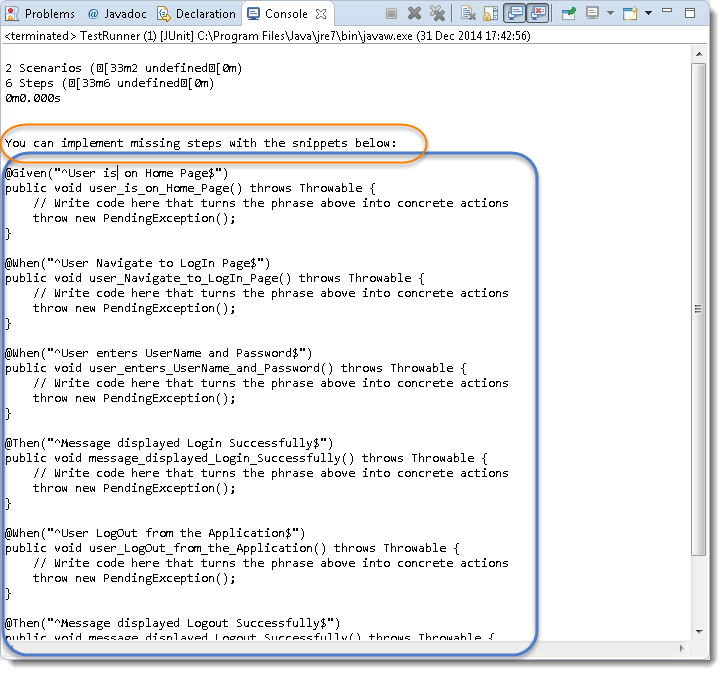
- Take a look at the message in the console window. This message was displayed, when we ran the Test_Runner class.

Note: Please go through the chapter of First Cucumber Selenium Test to understand the above message.
-
Notice, the eclipse console window says 'You can implement missing steps with the snippets below:'. It is very easy to implement all the steps, all you need to do is to copy the complete text marked in a blue box and paste it into the above created Test_Steps class.
-
As of now, the test will show many errors on '@' annotations. Mouse hover at the annotations and import the 'cucumber.api.java.en' for all the annotations.

Add Selenium Java code in the Step Definition methods
- Now take out the Selenium Java code of the following steps from the 'SeleniumTest' and paste it into the first method '@Given("^User is on Home Page$")'.
- Launch the Browser
- Navigate to Home Page
Method will look like this now:
@Given("^User is on Home Page$")
	public void user_is_on_Home_Page() throws Throwable {
		driver = new FirefoxDriver();
        driver.manage().timeouts().implicitlyWait(10, TimeUnit.SECONDS);
        driver.get("https://www.store.demoqa.com");
		}
- Take out the code take out the Selenium Java code of the following steps from the 'SeleniumTest' and paste it into the second method '@When("^User Navigate to LogIn Page$")'.
- Click on the LogIn link
Method will look like this now:
@When("^User Navigate to LogIn Page$")
	public void user_Navigate_to_LogIn_Page() throws Throwable {
		driver.findElement(By.xpath(".//*[@id='account']/a")).click();
		}
- Take out the code take out the Selenium Java code of the following steps from the 'SeleniumTest' and paste it into the second method '@When("^User enters UserName and Password$")'.
- Enter UserName and Password
- Click on Submit button
Method will look like this now:
@When("^User enters UserName and Password$")
	public void user_enters_UserName_and_Password() throws Throwable {
		driver.findElement(By.id("log")).sendKeys("testuser_1");
	    driver.findElement(By.id("pwd")).sendKeys("Test@123");
	    driver.findElement(By.id("login")).click();
		}
- Do the same steps for the rest of the methods as well and complete Test_Steps class will look like this:
Step Definition: Test_Steps Class
package stepDefinition;

import java.util.concurrent.TimeUnit;

import org.openqa.selenium.By;
import org.openqa.selenium.WebDriver;
import org.openqa.selenium.firefox.FirefoxDriver;

import cucumber.api.java.en.Given;
import cucumber.api.java.en.Then;
import cucumber.api.java.en.When;

public class Test_Steps {
	public static WebDriver driver;
	@Given("^User is on Home Page$")
	public void user_is_on_Home_Page() throws Throwable {
        driver = new FirefoxDriver();
        driver.manage().timeouts().implicitlyWait(10, TimeUnit.SECONDS);
        driver.get("https://www.store.demoqa.com");
		}

	@When("^User Navigate to LogIn Page$")
	public void user_Navigate_to_LogIn_Page() throws Throwable {
		driver.findElement(By.xpath(".//*[@id='account']/a")).click();
		}

	@When("^User enters UserName and Password$")
	public void user_enters_UserName_and_Password() throws Throwable {
		driver.findElement(By.id("log")).sendKeys("testuser_1");
	    driver.findElement(By.id("pwd")).sendKeys("Test@123");
	    driver.findElement(By.id("login")).click();
		}

	@Then("^Message displayed Login Successfully$")
	public void message_displayed_Login_Successfully() throws Throwable {
		System.out.println("Login Successfully");
	}

	@When("^User LogOut from the Application$")
	public void user_LogOut_from_the_Application() throws Throwable {
		driver.findElement (By.xpath(".//*[@id='account_logout']/a")).click();
	}

	@Then("^Message displayed Logout Successfully$")
	public void message_displayed_Logout_Successfully() throws Throwable {
        System.out.println("LogOut Successfully");
	}

}
Note: Make sure to create your own Username and Password for the test and do not attempt to login with wrong credentials, as you will be blocked for few hours then on demo website.
Run the Cucumber Test
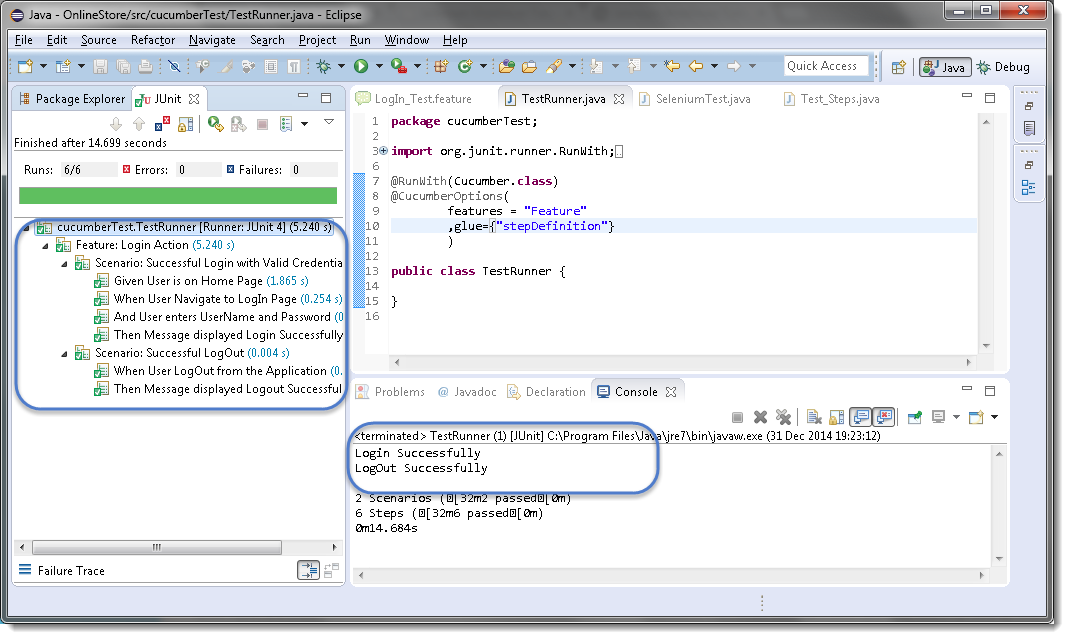
Now we are all set to run the first Cucumber test. Right Click on TestRunner class and Click Run As > JUnit Test. Cucumber will run the script the same way it runs in Selenium WebDriver and the result will be shown in the left hand side project explorer window in JUnit tab.

Cucumber starts it's execution by reading the feature file steps. As soon as Cucumber reaches the first step for e.g. Given the statement of Scenario, it looks for the same statement in the Step Definition file, the moment it finds the statement, it executes the piece of code written inside the function.


